J970.352-0.PDF (en, 480.3 KB) - V-ZUG Ltd
J970.352-0.PDF (en, 480.3 KB) - V-ZUG Ltd
J970.352-0.PDF (en, 480.3 KB) - V-ZUG Ltd

Create successful ePaper yourself
Turn your PDF publications into a flip-book with our unique Google optimized e-Paper software.
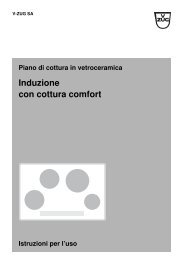
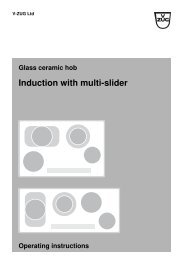
V-<strong>ZUG</strong> <strong>Ltd</strong>Glass ceramic hobInduction (4 zones)Operating instructions
Thank you for choosing to buy one of our products. Your appliance is madeto high standards and is easy to use. Nevertheless, please take the time toread these operating instructions in order to familiarize yourself with theappliance and get the best use out of it.Please follow the safety precautions.ModificationsText, diagrams and data correspond to the technical standard of theappliance at the time these operating instructions w<strong>en</strong>t to press. The right tomake technical modifications for the purpose of the further developm<strong>en</strong>t ofthe appliance is reserved.Symbols usedD<strong>en</strong>otes important safety precautions. Failure to observe saidprecautions can result in injury or damage to the appliance orfittings!A Indicates step-by-step instructions.– Describes how the appliance reacts to the steps tak<strong>en</strong>. Indicates a list.D<strong>en</strong>otes useful tips for the user.ValidityThe model number corresponds to the first 3 digits on the id<strong>en</strong>tification plate.These operating instructions apply to the models:TypeModel no.GK46TIXC/TIXF 970GK46TI/TIC/TIF/TIU 971GK46TIV/TIVC/TIVF/TIVU 972Variations dep<strong>en</strong>ding on the model are noted in the text.© V-<strong>ZUG</strong> <strong>Ltd</strong>, CH-6301 Zug, 20102
Cont<strong>en</strong>tsSafety precautions 5Before using for the first time . . . . . . . . . . . . . . . . . . . . . . . 5Correct use . . . . . . . . . . . . . . . . . . . . . . . . . . . . . . . . . . . . . 6Childr<strong>en</strong> in the home . . . . . . . . . . . . . . . . . . . . . . . . . . . . . . 6Note on use . . . . . . . . . . . . . . . . . . . . . . . . . . . . . . . . . . . . . 7Your appliance 10Appliance description . . . . . . . . . . . . . . . . . . . . . . . . . . . . . 10Construction . . . . . . . . . . . . . . . . . . . . . . . . . . . . . . . . . . . . 11Operating and display elem<strong>en</strong>ts . . . . . . . . . . . . . . . . . . . . . 12How induction hobs function . . . . . . . . . . . . . . . . . . . . . . . 13Cooking zone . . . . . . . . . . . . . . . . . . . . . . . . . . . . . . . . . . . 13User settings 14Childproof lock . . . . . . . . . . . . . . . . . . . . . . . . . . . . . . . . . . 14Acoustic signal . . . . . . . . . . . . . . . . . . . . . . . . . . . . . . . . . . 15Use 16Pan detection . . . . . . . . . . . . . . . . . . . . . . . . . . . . . . . . . . . 19Powerplus . . . . . . . . . . . . . . . . . . . . . . . . . . . . . . . . . . . . . . 20Automatic boost . . . . . . . . . . . . . . . . . . . . . . . . . . . . . . . . . 22Operating time . . . . . . . . . . . . . . . . . . . . . . . . . . . . . . . . . . 23Timer . . . . . . . . . . . . . . . . . . . . . . . . . . . . . . . . . . . . . . . . . 25Cookware . . . . . . . . . . . . . . . . . . . . . . . . . . . . . . . . . . . . . . 26Safety features 27Automatic safety shut-off . . . . . . . . . . . . . . . . . . . . . . . . . . . 27Excess temperature protection . . . . . . . . . . . . . . . . . . . . . . 28Control panel monitoring . . . . . . . . . . . . . . . . . . . . . . . . . . 29After a power failure . . . . . . . . . . . . . . . . . . . . . . . . . . . . . . 293
… Cont<strong>en</strong>tsCare and maint<strong>en</strong>ance 30Cleaning . . . . . . . . . . . . . . . . . . . . . . . . . . . . . . . . . . . . . . . 30Trouble-shooting 32What to do if … . . . . . . . . . . . . . . . . . . . . . . . . . . . . . . . . . . 32Technical data 35Disposal 36Index 37Repair service 39Quick instructions 404
Safety precautionsThe appliance corresponds to recognised technology standardsand the relevant safety regulations. Proper use of the appliance ishowever ess<strong>en</strong>tial to avoid damage and accid<strong>en</strong>ts. Please thereforefollow the precautions giv<strong>en</strong> in these operating instructions.In accordance with the requirem<strong>en</strong>ts of IEC 60335-1: This appliance is not int<strong>en</strong>ded for use by persons (including childr<strong>en</strong>) withreduced physical, s<strong>en</strong>sory or m<strong>en</strong>tal capabilities, or lack of experi<strong>en</strong>ce andknowledge, unless supervised or unless they have be<strong>en</strong> giv<strong>en</strong> instructionconcerning the use of the appliance by a person responsible for theirsafety.Before using for the first time The appliance must be installed and connected to the electricity supply inaccordance with the separate installation instructions. The necessary workshould be carried out by a qualified fitter or electrician. Dispose of the packaging material in accordance with local regulations. Change the user settings to suit your own needs.5
… Safety precautionsCorrect use The appliance is designed for use in the home for preparing food. Noliability is assumed for any damage caused by improper or incorrect use. Any repairs, modifications or manipulations to the appliance, especiallyany electrically live parts, should only be carried out by the manufacturer,its Customer Services or similarly qualified persons. Repairs if carried outincorrectly may cause serious injury, damage to the appliance and fittings,as well as affect the functioning of the appliance. If the appliance is notworking properly or in case of a repair order, follow the instructions giv<strong>en</strong>in the 'Repair service' section. Please contact Customer Services ifnecessary. Retain these operating instructions for future refer<strong>en</strong>ce. If you sell or passthe appliance on to a third party, please <strong>en</strong>sure these operating instructionsaccompany the appliance, together with the instructions on installation.In this way, the new owners can inform themselves about how to usethe appliance correctly and read the pertin<strong>en</strong>t safety precautions.Childr<strong>en</strong> in the home Packaging material (e.g. plastic, polystyr<strong>en</strong>e) can be dangerous for childr<strong>en</strong>.Danger of suffocation! Keep packaging material away from childr<strong>en</strong>. The appliance is designed for use by adults who are familiar with theseoperating instructions. Childr<strong>en</strong> are oft<strong>en</strong> unable to recognise the dangerof electrical appliances. Ensure proper supervision and do not allowchildr<strong>en</strong> to play with the appliance. A hob guard can be fitted to protect small childr<strong>en</strong>. Use the childproof locking facility.6
… Safety precautionsNote on use During the first few hours of use, a cooking zone can give off an unpleasantsmell. This is normal for brand new appliances. Ensure that the room is wellv<strong>en</strong>tilated. If the appliance is visibly damaged, do not use it. Contact our CustomerServices. If the appliance is not operating properly or if cracks caused by an extrememechanical impact appear on the surface, disconnect the appliance fromthe mains immediately. If the mains cable is damaged, it must be replaced by Customer Services. If any electronic compon<strong>en</strong>ts fail, it may not be possible to switch the applianceoff in which case remove the fuse or switch the circuit breaker off. Ensure the mains cables of other electrical appliances do not touch the hotcooking zones or cookware, as the electrical cable insulation could getdamaged.Important warning for persons with a cardiac pacemaker, a hearing aid ora metallic implant Induction hobs produce a high frequ<strong>en</strong>cy magnetic field around thecooking zones. Standing near the cooking zones can under unfavourablecircumstances have an adverse effect on or affect the working of thepacemaker, hearing aid or metallic implant. Tests have shown that under normal circumstances there is no risk to cardiacpacemaker users. If, as the user of a cardiac pacemaker (or a hearingaid or another type of implant), you would like to be reassured that usingthe appliance does not pose a risk, you are advised to consult a compet<strong>en</strong>tmedical authority.7
… Safety precautionsCaution: Burns/Fire hazard! Do not leave the appliance unatt<strong>en</strong>ded wh<strong>en</strong> in use. Ensure objects made of metal or with metallic parts, e.g. cutlery, aluminiumfoil, wrapping paper, do not come into contact with the surface of theappliance. The surface will remain hot for some time after it is switched off and willcool down only slowly to room temperature. Please allow suffici<strong>en</strong>t time forthe appliance to cool down before, for instance, cleaning it. If smoke or fire comes out of the appliance wh<strong>en</strong> in use, switch off the fusein the house wiring system. Do not leave the appliance unatt<strong>en</strong>ded wh<strong>en</strong> deep frying. Overheated fatand oil can easily catch fire! Never try to extinguish burning oil or fat withwater. Danger of explosion!Smother the flames with a fire blanket and keep all doors and windowsclosed. Keep pets away from the appliance.How to avoid damaging the applianceThe surface is resistant to heat (up to 650 °C) and fluctuations intemperature. It is also shock and scratch resistant to a certain degree.Nevertheless, please observe the following precautions in order toavoid damaging the appliance. In case of overheating, switch the appliance off and allow it to cool downcompletely. Under no circumstances should you use cold water to cool itdown! Do not climb on to the appliance. A sudd<strong>en</strong> impact such as a salt pot falling on to the hob can damage thesurface. Such objects should not be stored above the appliance. Do not operate the appliance for any l<strong>en</strong>gth of time with empty cookware. Check that the base of the cookware and the surface of the cooking zoneare clean and dry before use. Always lift – i.e. do not slide – the cookware off the hob so as not to scratchthe surface or damage the markings. Do not place hot cookware on the frame.8
… Safety precautions Do not prepare (peel, cut etc.) fruit and vegetables on the surface. Fine dirtparticles and hard objects can damage the surface of the appliance. Do not use the appliance as a storage area. In particular, do not depositany inflammable materials, cardboard or plastic packaging on the surface. Take particular care that sugary foods or juices do not get on to the hotcooking zone as they can damage the surface. If sugary foods or juices doget on to the hot cooking zone, clean away immediately (while still hot) witha scraper. Avoid food boiling over. Wh<strong>en</strong> cleaning the appliance make sure no water gets inside it. Use amoderately damp cloth. Do not spray the appliance with water. Do not usea steam cleaner. If water gets inside the appliance, it can cause damage!9
Your applianceAppliance description Powerplus Automatic boost Control panel with separate touch control and display elem<strong>en</strong>t for eachcooking zone Electronic <strong>en</strong>ergy regulator with 9 power levels Keep warm setting Operating time Timer Automatic safety shut-off Pause cooking Childproof lock Acoustic signal Pan detection Cooking zone markings10
… Your applianceConstructionGK46TI, GK46TIC, GK46TIF, GK46TIU 2 cooking zones ø 180 mm 1 cooking zone ø 210 mm 1 cooking zone ø 145 mmGK46TIXC, GK46TIXF 2 cooking zones ø 180 mm 1 cooking zone ø 210 mm 1 cooking zone ø 145 mmGK46TIV, GK46TIVC, GK46TIVF,GK46TIVU 2 cooking zones ø 180 mm 1 cooking zone ø 210 mm 1 cooking zone ø 145 mm11
… Your applianceOperating and display elem<strong>en</strong>tsTouch buttons1 Appliance ON / OFF2 Pause cooking ON / OFF3 Increase power4 Reduce power5 Powerplus6 Increase operating time7 Reduce operating timebackleft119867backrightDisplays8 Cooking zone power level9 Operating time / timer10 Pause cooking11 Cooking zone indicator lights534frontleft8frontright534110212
… Your applianceHow induction hobs functionInduction hobs have a quick reaction time, allow precision cooking, arepowerful, economical and safe.They work in a very differ<strong>en</strong>t way to conv<strong>en</strong>tional hobs or solid plates. Theinduction coils under the glass ceramic plate produce a rapidly changingmagnetic field which directly heats up the magnetic base of the cookware.Induction hobs require cookware with a magnetic base.The glass ceramic plate remains relatively cool as it only receives heat fromthe hot cookware.Removing the cookware from the cooking zone immediately interrupts thesupply of <strong>en</strong>ergy.Cooking zoneThe diameter of the magnetic base of the cookware should correspondto the diameter of the cooking zone in order to achieve thegreatest <strong>en</strong>ergy absorption and the best possible heat distribution inthe cookware.Residual heat indicatorAfter the cooking zone is switched off,as long as a burn hazard exits.remains illuminated in the display13
User settingsChildproof lockThe childproof lock is to prev<strong>en</strong>t the appliance being accid<strong>en</strong>tally switchedon.Switching the childproof lock onEnsure all cooking zones are switched off.A Press the touch button to switch the appliance on.– flashes in the power level displays.A Depress the and touch buttons simultaneously for about1½ seconds.– An acoustic signal is emitted.– appears in the power level displays for about 10 seconds.Operating the appliance with the childproof lock activatedA Press the touch button to switch the appliance on.– appears in the power level displays for about 10 seconds.A With the childproof lock activated, hold the touch button depressedand at the same time press the and touch buttons for any onecooking zone or for the timer.– The childproof lock is overridd<strong>en</strong>. The appliance can be operated asusual.– 10 minutes after switching the appliance off, the childproof lock isautomatically activated again.Switching the childproof lock offEnsure all cooking zones are switched off.A Press the touch button to switch the appliance on.A Depress the and touch buttons simultaneously for about1½ seconds.– A double acoustic signal is emitted.– flashes in the power level displays for about 10 seconds.14
… User settingsAcoustic signalAn acoustic signal is emitted wh<strong>en</strong>ever a button is touched (factory setting).The acoustic signal can be turned off.Switching offEnsure all cooking zones are switched off.A Press the touch button to switch the appliance on.A Hold the touch button depressed for about 3 seconds.– A double acoustic signal confirms the setting.Switching onEnsure all cooking zones are switched off.A Press the touch button to switch the appliance on.A Hold the touch button depressed for about 3 seconds.– A single acoustic signal confirms the setting.The last setting is stored wh<strong>en</strong> the appliance is switched off.The acoustic signal cannot be turned on or off if the childproof lock isactivated.15
UseThe individual cooking zones are all operated in the same way. Wh<strong>en</strong> theappliance is switched off, all the displays are dark (stand-by mode), exceptfor the residual heat indicator should any cooking zone still be hot.Switching the cooking zone onA Press the touch button to switch the appliance on.– flashes in the power level displays.A Switch the required cooking zone or the timer on within 10 seconds.– If no touch button is pressed within 10 seconds, th<strong>en</strong> for safety reasonsthe appliance switches off automatically.Setting the power levelA Press the touch button for the required cooking zone 1×.– The cooking zone comes on at power level .AlternativelyA Press the touch button for the required cooking zone 1×.– The cooking zone comes on at power level .A To change the power level initially selected, press either the ortouch button.– Hold the touch button depressed to increm<strong>en</strong>tally change the powerlevel.– The power level selected is shown in the display.16
… UseKeep warm settingThe keep warm setting keeps food that has be<strong>en</strong> cooked warm at approximately65 °C.A Set cooking zone to power level .A Press the touch button.– appears in the display.Power levelDue to the high <strong>en</strong>ergy output of induction hobs, cookware is heated veryquickly. To avoid burning food, a slightly differ<strong>en</strong>t approach is thereforerequired wh<strong>en</strong> selecting the power level than with conv<strong>en</strong>tional cookingsystems.The following table serves as a guide only.It is recomm<strong>en</strong>ded that the power level be increased or reduceddep<strong>en</strong>ding on the quantities being cooked.Power level UseKeep warm (L) Keeping cooked food warm at around 65 °C1 Melting butter and chocolate; dissolving gelatine1–3 Keeping gravy, sauce and soup warm; allowing rice to swell2–6Cooking potatoes, pasta, soup, ragout; steaming fruit, vegetables and fish;defrosting food6–7Frying in a non-stick pan; g<strong>en</strong>tly frying escalope, fish (without overheating the fat);frying rösti (hash browns)7–8 Heating fat; searing meat; heating bound sauces and soups; making omelettes9 Boiling large quantities of liquid; searing steakPowerplus (P) Heating water17
… UseSwitching the cooking zone offA Press the touch button repeatedly until appears in the display.If no other touch button is pressed and the other cooking zones are switchedoff, the appliance switches off automatically after 10 seconds.Switching the appliance offA Press the touch button.Pause cookingWith this function, the power level of all the cooking zones can be temporarilyreduced to for a maximum of 10 minutes. Thereafter, the appliance cancontinue to be operated using the selected settings.A Press the touch button.– The indicator light for the touch button flashes.– The power level of the cooking zone selected changes to .– The operating time and timer continue to run.– Except for and , all touch buttons are inactive.If the pause cooking function is not turned off within 10 minutes, theappliance switches off completely.A To resume cooking, press the touch button again.– The cooking zones are switched back on again with the selectedsettings.18
… UsePan detectionEach cooking zone is equipped with pan detection. In order to be able toswitch the cooking zone on, suitable magnetic cookware has to be on thecooking zone. If the cookware is removed from the cooking zone during operation, thepower output is interrupted and appears in the display. If the cookware is unsuitable, appears in the display.Pan detection runs 10 minutes. If in this time no suitable cookware is used,the cooking zone switches off.The display changes from to . If none of the other cooking zones arein use, the appliance switches off automatically after 10 seconds.19
… UsePowerplusAll the cooking zones are equipped with the Powerplusbooster. Wh<strong>en</strong> Powerplus is switched on,the cooking zone selected works at extra high powerfor 10 minutes. After 10 minutes it automaticallyswitches back to power level .Powerplus can be used, for instance, to heat a largequantity of water quickly.Powerplus can only be used with one cooking zone at a time on each side –1 or 2 on the left-hand side and 3 or 4 on the right-hand side. Wh<strong>en</strong> Powerplusis activated, the other cooking zone in the same half works at reduced power. If Powerplus is being used with cooking zone 1, th<strong>en</strong> cooking zone 2 canbe operated at a maximum power level of . If Powerplus is being used with cooking zone 2, th<strong>en</strong> cooking zone 1 canbe operated at a maximum power level of . If Powerplus is being used with cooking zone 3, th<strong>en</strong> cooking zone 4 canbe operated at a maximum power level of . If Powerplus is being used with cooking zone 4, th<strong>en</strong> cooking zone 3 canbe operated at a maximum power level of .If the power level is increased above these levels, Powerplus switches off.214320
… UseSwitching onA Press the touch button.– appears in the display.– After 10 minutes, it automatically reverts to power level .Removing the cookware interrupts Powerplus. As soon as the cookwareis returned to the cooking zone, Powerplus is resumed.Switching off before timeTo switch off before time:A Press the touch button again.– Power level is active.AlternativelyA Press the touch button repeatedly for the required power level.If the control unit or the cooking zone overheat, Powerplus automatically<strong>en</strong>ds.21
… UseAutomatic boostDo not leave the appliance unatt<strong>en</strong>ded wh<strong>en</strong> the automatic boostfunction is on. Smaller amounts of food or liquid can get hot veryquickly!All the cooking zones are equipped with an automatic boost function. Withthis function, a cooking zone works at full power for a certain l<strong>en</strong>gth of time(see table). It th<strong>en</strong> automatically goes back to the power level set.The automatic boost function must be activated anew each time acooking zone is switched on.Switching onA You are working at power level and activate the automatic boost functionusing the touch button.– and alternate in the display.Within the next 10 seconds, select the power level at which you wish to continuecooking.A Press the touch button repeatedly for the required power level, e.g. .– and alternate in the display while the automatic boost isactivated.– Wh<strong>en</strong> the automatic boost is over, the power level is reduced to that setfor continuing cooking.Power level 1 2 3 4 5 6 7 8Boost in minutes 1¼ 1¾ 2 3 5 7½ 2 3½If the power level set for continuing cooking is increased while the automaticboost is activated, the duration of the boost will changeautomatically.Switching off before timeA Press the touch button.22
… UseOperating timeDo not leave the hob unatt<strong>en</strong>ded during the operating time. Risk ofboiling over, burning and igniting!With the operating time function, the cooking zone switches off automaticallyafter a set time (betwe<strong>en</strong>1 and 99 minutes). This function can be used withall the cooking zones, though not at the same time.Setting the operating timeThe required cooking zone must be switched on.A Press the touch button for operating time 1×.– appears in the display.– The 4 indicator lights for the cooking zones flash.AlternativelyA Press the touch button for operating time 1×.– appears in the display.– The 4 indicators lights for the cooking zones flash.A Press the or touch button again to set the required operating time.– Hold the touch button depressed to increm<strong>en</strong>tally change the duration.As long as the indicator lights are flashing, the operating time can beassigned to any of the cooking zones.A Press the or touch button for the required cooking zone.– This will not change the power level set.– The indicator light illuminates for the relevant cooking zone.– The power level and operating time can be changed later.– Wh<strong>en</strong> the operating time is up, the relevant cooking zone switches off.– flashes in the display and an acoustic signal is emitted for1minute.A Press any touch button to turn the acoustic signal off.23
… UseSwitching the cooking zone off before timeA Press the touch button for the required cooking zone repeatedly untilappears in the display.– The operating time function is off.– If none of the other cooking zones are in use, the appliance switches offautomatically after 10 seconds.Turning the operating time function off before timeA Press the touch button for the operating time repeatedly until appearsin the display.AlternativelyA Press the and touch buttons at the same time until appearsin the display.– The corresponding cooking zone remains on.24
… UseTimerThe timer functions like an egg timer (1–99 minutes). The following pointsmust be observed. The appliance must be switched on. The cooking zones may be switched on, but no operating time should be<strong>en</strong>tered.A Press the touch button for the operating time 1×.– appears in the display.– The 4 indicator lights for the cooking zones flash.AlternativelyA Press the touch button for the operating time 1×.– appears in the display.– The 4 indicator lights for the cooking zones flash.A Press the or button again to set the duration of the timer.– Hold the touch button depressed to increm<strong>en</strong>tally change the duration.– The timer starts as soon as the indicator lights stop flashing.– Wh<strong>en</strong> the timer is up, an acoustic signal is emitted for 1 minute andflashes in the display.A Press any touch button to turn the acoustic signal off.25
… UseCookwareThe base of the cookware should have no sharp rims or edges.Only use cast iron cookware if it has a smooth <strong>en</strong>amelled base.Cookware for induction hobs are marked by themanufacturer with one of the following symbols.INDUCTIONAs a g<strong>en</strong>eral rule, if a magnet sticks to the bottom of the cookwareth<strong>en</strong> it is suitable for use with an induction hob. We recomm<strong>en</strong>dchecking for suitability before purchase.The appliance detects suitable cookware.A Place the cookware on a cooking zone that best corresponds to thediameter of the base and switch on at power level .– If remains in the display, the cookware is suitable.– If the cookware is unsuitable or too small, appears in the display.Cookware with a base that corresponds to the diameter of thecooking zone provides for a short heat-up time and good heatdistribution. Place the cookware in the middle of the cooking zone.2 cooking zones can be used in combination to heat inductioncasseroles and saucepans (frying pans).Do not use a power level higher than for cookware with a non-stick coating(e.g. teflon) as this could cause the coating to overheat, damaging it.Wh<strong>en</strong> in use, induction cookware can produce noise. This does not indicateany malfunction, nor does it affect the functioning of the appliance in any way.26
Safety featuresAutomatic safety shut-offThe appliance is equipped with an automatic safety shut-off, whereby,dep<strong>en</strong>ding on the power level being used, the cooking zones switch offautomatically after a certain period of time.Power level Safety shut-off afterKeep warm2 hours1–2 10 hours3 5 hours4 4 hours5–6 3 hours7–8 2 hours9 1 hours– If, because of safety shut-off, the cooking zone has switched off automatically,and flash in the corresponding display.The cooking zone can be switched on again in the usual way.27
… Safety featuresExcess temperature protectionDo not put any hot cookware on the control panel.The control panel is equipped with an excess temperature s<strong>en</strong>sor. If thes<strong>en</strong>sor is activated, the cooking zones switch off automatically.– flashes in the display.The cooking zones cannot be used again until the control panel has cooleddown.– Once the control unit has cooled down, press any touch button to cancelthe flashing display . The cooking zone can now be switched on again.Cooking zonesEach cooking zone is equipped with an excess temperature s<strong>en</strong>sor. If thes<strong>en</strong>sor is activated, the following measures are implem<strong>en</strong>ted automatically: As long as the temperature is too high, the cooling fan runs at maximumspeed. Powerplus, if running, <strong>en</strong>ds.– The display changes from to . If this is insuffici<strong>en</strong>t, the cooking zone switches off.– flashes in the corresponding display.Once the cooking zone has cooled down, it can be switched back on again.28
… Safety featuresControl panel monitoringIf a button is touched for longer than 5 seconds (e. g. because an object isstanding on it or because food has boiled over on to it), the correspondingcooking zone switches off automatically.– A continuous acoustic signal is emitted.– flashes in the corresponding display.A Remove the object or food that has boiled over etc.The appliance can now be used again.After a power failureAfter a power failure,flashes in the display.A To exit, press any touch button.– The childproof lock is no longer activated.– The acoustic signal is on.29
Care and maint<strong>en</strong>anceAllow the appliance to cool down before cleaning.CleaningDuring and after cleaning, <strong>en</strong>sure no cooking zone has inadvert<strong>en</strong>tlybe<strong>en</strong> left on.Remove any soiling as quickly as possible. Dried-up or burned-on foodresidue is harder to clean off.A Clean the surface with a soft cloth or sponge, water and a suitabledeterg<strong>en</strong>t and conditioner. We recomm<strong>en</strong>d using products with a protectiveadditive for the surface. Always follow the deterg<strong>en</strong>t manufacturers’instructions for use.Avoid cleaning the surface with abrasive cleaning ag<strong>en</strong>ts, scouringpads, wire wool etc. which can damage the surface.A Remove slight soiling with a damp cloth and deterg<strong>en</strong>t.A To remove heavier soiling (gravy spills, soup spills etc.), using a clean clothor sponge, add deterg<strong>en</strong>t to the surface – if necessary, giving it some timeto work. Wipe clean with a clean, damp cloth and rub dry.A Stubborn soiling (boiled-over milk and non-sugary food etc.) can beremoved either wh<strong>en</strong> still warm (but not hot!) or cold. Cooktop scrapers,which are available from retailers, are best for this purpose.30
… Care and maint<strong>en</strong>anceA Remove limescale stains (yellow discolouration) with a small amount oflimescale remover (e.g. vinegar, lemon juice, descaler). For strongerstains, allow the solution to work longer. Wipe clean with a clean, dampcloth.Use of improper cleaning techniques can result in damage to the markingsor surface. Damage of this type cannot be reversed through cleaning.31
Trouble-shootingWhat to do if …… and flash alternately in the displayPossible cause The automatic safetyshut-off has be<strong>en</strong>triggered.SolutionA Switch the cooking zone back on againwh<strong>en</strong> required.… flashes in the displayPossible cause The excess temperatureprotection has be<strong>en</strong>triggered.SolutionsA Check the cookware and the food beingcooked.A Allow the cooking zone to cool down.A Resume cooking on a differ<strong>en</strong>t cookingzone.… wh<strong>en</strong> operating the cooking zone for the very first time, an unpleasantsmell is producedPossible cause This is normal for brandnew appliances.SolutionA Ensure the room is well v<strong>en</strong>tilated.A The smell will wear off after the appliancehas be<strong>en</strong> in use for a few hours.32
… Trouble-shooting… the appliance is not working and the displays are not illuminatedPossible cause The fuse or circuit breakerfor electrical installationsin the home is defective. The fuse or circuit breakerkeeps blowing. An interruption in thepower supply.SolutionA Change the fuse.A Reset the circuit breaker.A Call Customer Services.A Check the power supply.… a continuous acoustic signal is emitted and the appliance switches offPossible cause Object (e.g. pans, keys)on the control panel. Food has boiled over onto the control panel.SolutionA Remove the object and th<strong>en</strong> operate the applianceas usual.A Remove any food spillages and th<strong>en</strong> operatethe appliance as usual.… flashes in the displayPossible cause An interruption in thepower supply.SolutionA Press any touch button to cancel the errormessage.33
… Trouble-shooting… appears in the back left display, in the back right display and anumber in the front two displaysPossible cause Various situations canlead to an «Er» errormessage.SolutionA Note down the error number.A Call Customer Services.… , , or appears in 1 (or 2) display window(s)Possible cause The correspondingcooking zone(s) is/aredefective.SolutionA Note down the error number.A Call Customer Services.A Press the touch button to cancel theerror message. Cooking zones not affectedcan still be used.… appears in the displayPossible cause Cookware is not suitablefor use with inductionhobs. Cookware is too smallfor the cooking zoneselected.SolutionA Only use cookware suitable for inductionhobs.A Ensure cookware corresponds to the sizeof the cooking zone.… is shown in the displaysPossible cause The childproof lock isactivated.SolutionA Pay att<strong>en</strong>tion to operating with childprooflock.A Switch off the childproof lock.34
Technical dataElectrical connection and connected loadA See rating plate.A Op<strong>en</strong> fitted unit underneath.– The id<strong>en</strong>tification plate is located behind the front panel.Dim<strong>en</strong>sions (H × W × D)GK46TIGK46TICGK46TIFGK46TIU50.5 × 584 × 514 mm52.0 × 584 × 514 mm50.5 × 550 × 480 mm52.0 × 790 × 545 mmGK46TIVGK46TIVCGK46TIVFGK46TIVU50.5 × 774 × 514 mm52.0 × 774 × 514 mm50.5 × 740 × 480 mm52.0 × 600 × 545 mmGK46TIXCGK46TIXF52.0 × 704 × 514 mm50.5 × 670 × 480 mm35
DisposalPackaging All packaging materials (cardboard, plastic film (PE) and polystyr<strong>en</strong>e(EPS)) are marked and should, if possible, be collected for recycling anddisposed of in an <strong>en</strong>vironm<strong>en</strong>tally fri<strong>en</strong>dly way.Disconnection Disconnect the appliance from the mains. With a fixed appliance, this is tobe carried out by a qualified electrician!Safety Disable the appliance to prev<strong>en</strong>t accid<strong>en</strong>ts caused by improper use,especially through childr<strong>en</strong> playing. Pull the plug out of the mains socket or have the appliance disconnectedfrom the mains by a qualified electrician. Th<strong>en</strong> cut off the mains cable.Disposal The old appliance should not be discarded as worthless rubbish. Ifdisposed of correctly, the raw materials can be recovered for recycling. The symbol on the id<strong>en</strong>tification plate warns that the appliance maynot be disposed of in normal household waste. The appliance must be disposed of in accordance with local regulationson waste disposal. For more information on the handling, disposal andrecycling of the product, please contact the local authorities, the localrecycling facilities for household waste or the retailer from whom youpurchased the appliance.36
IndexAAcoustic signal ............................. 15ApplianceSwitching off ..................... 18, 40Switching on ............................. 40Appliance description ................. 10Automatic boost ........................... 22Automatic safety shut-off ............ 27CCare ................................................ 30Childproof lock ............................. 14Cleaning......................................... 30Connected load............................ 35Construction.................................. 11Control panel monitoring............ 29Cooking zone................................ 13Switching off ............................. 18Switching on ............................. 16Cookware ...................................... 26DDisconnection ............................... 36Display elem<strong>en</strong>ts.......................... 12Displays ......................................... 12Disposal ......................................... 36EElectrical connection................... 35Excess temperature .................... 28IInduction hobsFunctioning of .......................... 13KKeep warm setting ...................... 17MMaint<strong>en</strong>ance ................................. 30Model no. ........................................ 2OOperating elem<strong>en</strong>ts..................... 12Operating time ............................. 23PPackaging ..................................... 36Pan detection ............................... 19Pause cooking ............................. 18Power failure................................. 29Powerplus ..................................... 20Switching on............................. 21QQuick instructions........................ 4037
… IndexRRepair service .............................. 39Residual heat indicator............... 13SSafety ............................................. 36Safety features ............................. 27Safety precautionsBefore using for the first time . 5Childr<strong>en</strong> in the home................ 6Correct use................................. 6Note on use................................ 7Switching off ................................. 40Switching on ................................. 16Symbols........................................... 2TTechnical data ............................. 35Timer.............................................. 25Touch buttons.............................. 12Trouble-shooting.......................... 32Type .................................................. 2UUse................................................. 16User settings ................................ 14Using for the first time................... 5VValidity.............................................. 238
Repair serviceThe 'Trouble-shooting' section will help you to carry out small repairsyourself, saving you the time and trouble of calling out a service<strong>en</strong>gineer and the cost that goes along with it.Whether you contact us about a malfunction or an order, please always statethe serial number (FN) and the model type of your appliance. Enter thesedetails below and also on the service sticker which comes with the appliance.Stick it in a conspicuous place or in your telephone or address book.FNApplianceYou will also find the same details on the certificate of guarantee, the originalsales invoice and the id<strong>en</strong>tification plate of the appliance.A Op<strong>en</strong> fitted unit underneath.– The id<strong>en</strong>tification plate is located behind the front panel.39
Quick instructionsPlease first read the safety precautions in these operating instructions!To switch appliance onA Depress the touch button for about 1 second.To select a cooking zoneA Select the power level within 10 seconds using the or touchbutton.AlternativelyA Press thetouch button to heat a large amount of water quickly.To switch cooking zone offA Press the touch button repeatedly until appears in the display.To switch appliance offA Press the touch button.V-<strong>ZUG</strong> <strong>Ltd</strong>Industriestrasse 66, CH-6301 Zugvzug@vzug.ch, www.vzug.com<strong>J970.352</strong>-0