quick installation guide for h264 dvr 4 ch model qsdr4v4mrtc - Q-See
quick installation guide for h264 dvr 4 ch model qsdr4v4mrtc - Q-See
quick installation guide for h264 dvr 4 ch model qsdr4v4mrtc - Q-See
You also want an ePaper? Increase the reach of your titles
YUMPU automatically turns print PDFs into web optimized ePapers that Google loves.
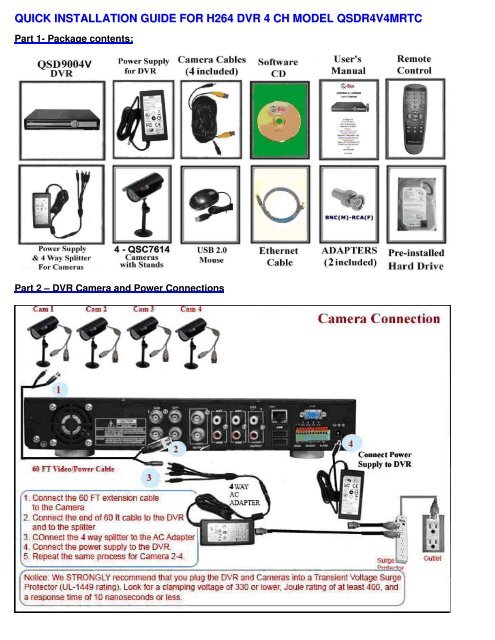
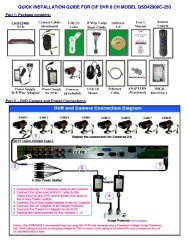
QUICK INSTALLATION GUIDE FOR H264 DVR 4 CH MODEL QSDR4V4MRTCPart 1- Package contents:Part 2 – DVR Camera and Power Connections
Part 3 – Connecting the DVR to your TVPart 4 – DVR Controls: Front Panel
Part 5 – Accessing the DVR menusPush MENU from the DVR front panel, or remote.The Main Menu offers the following Setup Features:CAMERA: Setup name display, position, image view, and record quality of ea<strong>ch</strong> <strong>ch</strong>annel(cameras).RECORD: Enable recording & audio, set resolution & quality, recording mode and filesize.NETWORK: Setup Network access (Remote Internet Monitoring).SEARCH: Find files <strong>for</strong> playback and backup.DEVICES: Manage & Format hard drive and USB devices, setup alarms, PTZ cameras,mobile phone access and motion detection.SYSTEM: Setup time, date, password, and video mode.Part 6 – Setting up Cameras <strong>for</strong> Viewing and RecordingFrom the Main menu, select CAMERA. Here you can setup the name display (up to 8<strong>ch</strong>aracters) and position of ea<strong>ch</strong> <strong>ch</strong>annel (cameras). Select COLOR SETUP to adjust theimage brightness, saturation, contrast and hue settings <strong>for</strong> ea<strong>ch</strong> <strong>ch</strong>annel (camera). Youcan also <strong>ch</strong>oose whether ea<strong>ch</strong> <strong>ch</strong>annel can be previewed in LIVE MODE and /orRECORDING MODE.Part 7 – To Start RecordingThis System offers 3 modes <strong>for</strong> recording:1. Manual 2. Time S<strong>ch</strong>edule 3. Motion Detection.From the main menu, select RECORD to enter into the RecordSetup menu (shown at right).CHANNEL: “ON” enables video to record from the respectivecamera. If the <strong>ch</strong>annel is set to “OFF”, video from that <strong>ch</strong>annelwill not record.RESOLUTION: D1=704x480, HD1=704x240, CIF=352x240QUALITY: Best, Good, NormalUsing higher resolution and quality settings results in better video quality, but takes up more space on the harddrive. Choosing lower settings result in lower video quality, but takes up less space on the hard drive.AUDIO: If audio is ENABLED sound will be recorded with the video from the <strong>ch</strong>annels, and will have audiooutput in playback mode. If audio is DISABLED, sound will not record, and there will be no audio output inplayback mode (Audio cameras or a microphone is required to record the sound).REC MODE: Sets DVR to record on Manual, Motion Detection, and Time S<strong>ch</strong>edule Recording (detailedinstructions below).PACK TIME: Choose the time length of all recorded files: 15, 30, 45, 60 min.(Max = 60 min)
Grid Explanation:Red=Alarm (motion detection) recordingGreen=General (time s<strong>ch</strong>edule) recordingTransparent=No recordingBlue=The <strong>ch</strong>annel and date selected.Manual Recording:From the Record Setup screen set the Rec Mode to “ALWAYS”.Your DVR will continuously record and separate files will becreated with the Pack Time Intervals you selected.Time S<strong>ch</strong>edule Recording:From the Record Setup screen, set the Rec Mode to “TIME SCHEDULE RECORD” and click “SCHEDULE” in green. Thiswill display the S<strong>ch</strong>edule menu (see below image). Select the <strong>ch</strong>annels (cameras) that you wish to record on a s<strong>ch</strong>edule. Theoptions are: All, CH-1, CH-2, CH-3, and CH-4 respectively. The <strong>ch</strong>annel you select will be highlighted in “Blue”, and theunselected <strong>ch</strong>annels will be “Grey. Click on the green GENERAL option box then click on the boxes <strong>for</strong> the days and timesthat you want to record using this option on the timeline. You can use the [From – To] pull-down menus and COPY button tocopy settings from one day to another day, or all days. Your DVR will record on it’s Time S<strong>ch</strong>edule, and separate files with thePack Time Interval you selected. Click APPLY to activate your customized s<strong>ch</strong>edule, and then reboot the DVR.You can also click on the DEFAULT button to use the system defaults. The system default settings are:Hr 01:00 am-07:59 am : No recordingHr 08:00 am-18:59 pm : General recording (Time S<strong>ch</strong>edule)Hr 19:00 pm- 00:59 am : Alarm recording (Motion Detection)Motion Detection Recording:From the Record Setup screen, set the Rec Mode to “TIME SCHEDULE RECORD” and click “SCHEDULE” in green. Thiswill display the S<strong>ch</strong>edule menu (see below image). The options are: All, CH-1, CH-2, CH-3, and CH-4 respectively. The<strong>ch</strong>annel you select will be highlighted in “Blue”, and the unselected <strong>ch</strong>annels will be “Grey. Click on the red ALARM optionbox then click on the boxes <strong>for</strong> the days and times that you want to record using this option on the timeline. You can use the[From – To] pull-down menus and COPY button to copy settings from one day to another day, or all days. Your DVR willrecord on Motion Detection, and separate files with the Pack Time Interval you selected. Click APPLY to activate yourcustomized s<strong>ch</strong>edule, and then go to the Devices option (red box in first below picture) and select the Motion Option (red boxin second picture below), whi<strong>ch</strong> will display the Motion Detect Box.
The Motion detection Menu has three sections, includingChannel Status, Sensitivity and Motion area.STATUS: This option allows you enable motion detectionon any <strong>ch</strong>annel.SENSITIVITY: This option allows you to set sensitivitylevel of motion detection from 1 to 4, with 4 being thehighest.Next, click on the MD AREA SETUP button, whi<strong>ch</strong> willdisplay the picture on the left. This option allows you toselect the area you want to be sensitive to motion. Thearea in red is sensitive to motion. You can set this area byusing the mouse or REV, FWD, and SEL keys on thefront panel. Once you have set the area, right click withthe mouse or push the ESC key to save the setting. Afteryou have set all of the cameras, click on the Apply buttonto save the settings.Part 8 – Setting up the DVR to PlaybackFrom the Main Menu select SEARCH to display the Video Sear<strong>ch</strong> Menu shown below:Sear<strong>ch</strong>ed playback:If you input a specific date and click Sear<strong>ch</strong>, you will find all therecordings <strong>for</strong> that day. When you select an item, you willplayback the recordings in 4 <strong>ch</strong>annel mode; or, click [File list]button to display File list interface, where you can playback orbackup the file you selected. <strong>See</strong> File List heading below.In the playback window you can play video Forward at 2x, 4x, and 8x speeds, Slow play at 1/2x, 1/4x, and 1/8x, ornormal play, pause and play frame by frame using the playback control bar, and adjust volume by clicking or slidingtune control bar. When playback has finished, system will return to previous menu.
File list:On the Video sear<strong>ch</strong> menu mode, click File list to display the submenushown in the picture on the left.This option will allow you to view all of the available files by<strong>ch</strong>annel and type (all, normal, or alarm).You can select a file and push the SEL button to playback the file, oruse the FWD button and down button to select the backup option andbackup the recorded file you selected. You can also put a <strong>ch</strong>eckmarkin the BAK box at the end of multiple files if you want to backupmore then one file. <strong>See</strong> section 5.2.4 Sear<strong>ch</strong> Recordings in the manual<strong>for</strong> more in<strong>for</strong>mation on using the File List option.Part 9 – Backing up the Video on the DVRAtta<strong>ch</strong> a USB flash drive or USB hard drive to the USB backup port and follow the instructions in Part 8 to go to theFile List in the Sear<strong>ch</strong> menu.If you want to backup one recording from the file list, you just select the recording and click [Backup] button.When the backup is completed you will be notified. Click [OK] button to save your backup (as shown in the secondpicture below)Explanation: Backup file will be in H264 <strong>for</strong>mat, you can convert it to AVI <strong>for</strong>mat using the Multimedia Playerthat comes with the DVR or through the NetViewer program, so you can play it back using any player whi<strong>ch</strong> supportsAVI <strong>for</strong>mat. <strong>See</strong> section 5.2.5 in the product manual <strong>for</strong> more in<strong>for</strong>mation on using the Multimedia Player.If you have questions:Contact Us:Mailing Address:Customer Service:DPS Inc. Phone: 877-998-3440 x 5388015 E. Crystal Dr Email: cs@dpsi-usa.comAnaheim, CA 92807Live Chat option on websiteWebsite:Te<strong>ch</strong> Support:http://www.q-see.com Phone: 877-998-3440 x 539Fax:Email: ts@dpsi-usa.com714-998-3509 Live Chat option on websiteREV 081009


