Basic information on the SURGICAL PROCEDURE - Straumann
Basic information on the SURGICAL PROCEDURE - Straumann
Basic information on the SURGICAL PROCEDURE - Straumann

You also want an ePaper? Increase the reach of your titles
YUMPU automatically turns print PDFs into web optimized ePapers that Google loves.
Preparati<strong>on</strong> of <strong>the</strong> implant bed for Tapered Effect implants<br />
<strong>the</strong> cylindrical apical part of <strong>the</strong> tapered effect implants corresp<strong>on</strong>ds in shape and<br />
size to <strong>the</strong> standard and standard Plus implants. apart from two special features, <strong>the</strong><br />
surgical procedure for standard and standard Plus implants is identical with that of<br />
<strong>the</strong> tapered effect implants: <strong>the</strong> implant bed is first drilled with round burrs, pilot and<br />
twist drills to <strong>the</strong> desired apical endosteal width and depth (see page 33 “Preparati<strong>on</strong><br />
of <strong>the</strong> implant bed for standard and standard Plus implants“). Because of <strong>the</strong> special<br />
thread of <strong>the</strong> tapered effect implants, however, ano<strong>the</strong>r tap is used in c<strong>on</strong>trast to <strong>the</strong><br />
standard procedure. instead, <strong>the</strong> cor<strong>on</strong>al part of <strong>the</strong> drill hole is shaped to c<strong>on</strong>form to<br />
<strong>the</strong> shape of <strong>the</strong> c<strong>on</strong>ical part of <strong>the</strong> implant with <strong>the</strong> corresp<strong>on</strong>ding tapered effect<br />
profile drill. in order to avoid any resorpti<strong>on</strong> due to pressure <strong>on</strong> <strong>the</strong> b<strong>on</strong>e, in <strong>the</strong> cor<strong>on</strong>al<br />
regi<strong>on</strong> <strong>the</strong> tapered effect implant should not fill <strong>the</strong> alveolus completely. it should<br />
ra<strong>the</strong>r be ensured that <strong>the</strong> orofacial b<strong>on</strong>e wall around <strong>the</strong> implant is at least 1 mm<br />
thick. in human and animal studies, successful osseointegrati<strong>on</strong> was observed with<br />
gaps of 1–1.5 mm (hDD = horiz<strong>on</strong>tal defect dimensi<strong>on</strong>) between implants with a<br />
rough surface (such as <strong>the</strong> sLactive/sLa ® ) and <strong>the</strong> b<strong>on</strong>e. 1<br />
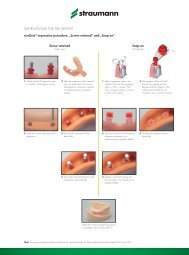
Initial situati<strong>on</strong> in extracti<strong>on</strong> sockets<br />
a prec<strong>on</strong>diti<strong>on</strong> for immediate or early implantati<strong>on</strong> in extracti<strong>on</strong> sockets is a gentle<br />
extracti<strong>on</strong> technique that preserves <strong>the</strong> b<strong>on</strong>e walls. <strong>the</strong> tooth or root to be removed<br />
should be extracted without damaging <strong>the</strong> buccal b<strong>on</strong>e wall. if removal of <strong>the</strong> roots is<br />
not possible without raising a mucoperiosteal flap, in aes<strong>the</strong>tically important regi<strong>on</strong>s,<br />
shortening <strong>the</strong> root to b<strong>on</strong>e level is recommended to enable <strong>the</strong> soft tissue to heal over<br />
<strong>the</strong> shortened root. after a healing period of 6 to 8 weeks, it can be exposed with an<br />
ideal incisi<strong>on</strong>. <strong>the</strong> root is removed under good visi<strong>on</strong> and with easy access and an<br />
implant can be inserted in optimum positi<strong>on</strong> and axial alignment at <strong>the</strong> same time.<br />
extracti<strong>on</strong> alveoli often dem<strong>on</strong>strate peri-implant b<strong>on</strong>e defects. in <strong>the</strong>se cases,<br />
an augmentati<strong>on</strong> procedure 2 is indicated. this should ensure that after healing <strong>the</strong><br />
orofacial b<strong>on</strong>e wall around <strong>the</strong> implant is at least 1 mm thick.<br />
Depending <strong>on</strong> <strong>the</strong> selected implant diameter, <strong>the</strong> implant bed is prepared with <strong>the</strong><br />
twist and spiral drills. after each drilling acti<strong>on</strong>, <strong>the</strong> endosteal inserti<strong>on</strong> depth is<br />
checked with <strong>the</strong> depth gauge corresp<strong>on</strong>ding to <strong>the</strong> drill diameter (see Preparati<strong>on</strong><br />
of <strong>the</strong> implant bed for standard and standard Plus implants, page 33).<br />
Informati<strong>on</strong><br />
In some situati<strong>on</strong>s use of a tap is also recommended for <strong>the</strong> TE implant.<br />
Please see page 30 for details.<br />
Situati<strong>on</strong> after extracti<strong>on</strong> of <strong>the</strong> natural tooth<br />
and opening of <strong>the</strong> gingiva.<br />
1 Wils<strong>on</strong>, Schenk, Buser, Cochran, JOMI<br />
1998, Cornelini et al.,<br />
Int. J Oral Maxillofac. Imp. 2000,<br />
Paolant<strong>on</strong>ia et al., J Perio 2001<br />
2 This technique should be employed <strong>on</strong>ly<br />
by dentists who have<br />
adequate experience in <strong>the</strong> use of<br />
augmentati<strong>on</strong> procedures.