Create successful ePaper yourself
Turn your PDF publications into a flip-book with our unique Google optimized e-Paper software.
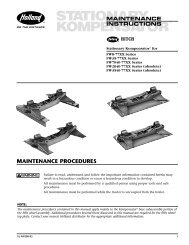
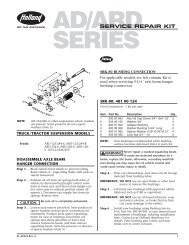
MAINTENANCE OF FW1560-CFIFTH WHEELSThe following procedures must be performed asnecessary to maintain proper operation.1. Lubricate all moving parts with No. 2 diesel oil orsuitable lubricant.2. Lube fittings (38) in shaft (37) and lube fittings (41) inshaft (44) weekly with grease.3. Check for proper operation of fifth wheel with aTF-TLN-5001 kingpin lock tester. Check locking andunlocking actions.4. Replace all cracked, missing or damaged parts usingonly <strong>Holland</strong> parts.REBUILDING OF FW1560-CFIFTH WHEELSRemove the fifh wheel head and proceed as follows:1. Remove pin (7), spring (8) and secondary lock (6).2. Remove cam (19) and air cylinder (23).3. Remove yoke shank (14), spring (13) and yoke (12).4. Remove lock pins (3), spring (5) and locks (4).To reassemble the fifth wheel:1. Lubricate lock pin holes with NeverSeez DO NOT SUB-STITUTE. Install locks (4), making sure they are properlyoriented (the “TOP” marked on each lock shouldface the fifth wheel casting), followed by pins (3),spring (5) and cotter pins (2).2. Install yoke (12), spring (13) and yoke shank (14) sothat the indentation in yoke shank (14) is alignedwith hole in yoke (12). When yoke (12) is installed,the yoke tips must be flush with ends of the locks (4)or extend beyond (See FIGURE 1).FIGURE 13. Install handle (9) with washer (11), with spring (10)on cam (19).4. Install washer (20) between cam (19) and yoke (12).5. Install second washer (20) on bolt (22) and installroller (21) on bolt (22). Install bolt (22) through camopening (19) through a second washer (20), then intoyoke (12), making sure that the bolt will go into therecess in yoke shank (14). Tighten on cam (19) untilbolt bottoms out, making sure there is a little up anddown play on the cam and that washers (20) are freeto spin.6. Install washers (16), one between casting and cam(19) and second washer (16), on bolt (18) and roller(17). Install into casting through cam (19) andtighten with self-locking nut (15). Do not overtighten.Install secondary lock (6), spring (8) and pin (7).7. Install air cylinder (23) as shown in exploded viewwith screw (24) and self-locking nut (15), leavingsome free movement.8. Install fifth wheel head (1) on base with shaft (43).Slide on collars (42) to fifth wheel plate (1) and installbolts (44) and nuts (42).NOTE:Check operation of fifth wheel with a TF-TLN-5001lock adjustment tool for proper locking andunlocking action.XA-60-S UNIVERSAL ASSEMBLYDisassembly of XA-60-S assembly:1. To remove rocker arm (35), remove set screws (34),remove 2 bolts (40) and remove rocker pin (36).2. To remove rocker bed (32), remove all bolts (30)and (39) and remove weld where rocker bed (32) iswelded to mounting plate (29).Reassembly of XA-60-S assembly:1. Place rocker bed (32) on mounting plate (29).2. Install bolts (30) lock washers (45) and nuts (31) onfour corners. Install 8 bolts (39), lock washers (45)and nuts (38). Do not install the two center bolts (39),lock washers (45) and nuts (38) yet. Skip weld rockerbed (32) to the mounting plate (29) using a minimumof 28 linear inches of .25˝ fillet weld.IMPORTANT: When welding, use a procedure thatassures a sound, good quality weld,which protects the operator and others.Overwelding may cause distortionand damage, while underweldingmay not develop sufficient strength.A low hydrogen process and AWSE70XX filler metal are recomended.Take precautions to insure that thetractor electrical system is not damagedby the welding.3. Install four rubber cushions (33).4. Place rocker arm (35) in rocker bed (32) and insertrocker pin (36). Install two bolts (39) with threads upin front and rear rocker pin. Install lock washers (45)and nuts (38) on bolts (39).5. Align recess in rocker pin (36) and install set screw(34). Tighten set screw (34) securely.6. Install lube fittings (37) in rocker pin (36 ).2<strong>XL</strong>-<strong>FW147</strong>-<strong>02</strong>
GENERAL INFORMATION1. All fifth wheel maintenance, adjustment andrebuilding must be performed by a qualified personusing proper tools and safe procedures. For moreinformation, refer to <strong>Holland</strong> Publication <strong>XL</strong>-FW303“Fifth Wheel Maintenance Procedures.”2. Do not modify or add to the product.3. Use only genuine <strong>Holland</strong> parts.4. Wear safety goggles during installation, removal andrebuilding.5. Never strike any part of the item with asteel hammer.6. Do not weld on this product without writtenpermission from the factory.7. Observe standard precautions when lifting.8. Refer to <strong>Holland</strong> Publication FW 340 for descriptionand instructions for <strong>Holland</strong> TF-TLN-5001 LockAdjustment Tool.9. Do not deviate from these instructions. Any changesor deviations will void all warranties, expressed orimplied, unless written consent is first obtained fromthe factory.10. Check to see that all parts included in the kit areenclosed in the box.IMPORTANT: When welding, use a procedure thatassures a sound, good quality weld,which protects the operator and others.Overwelding may cause distortionand damage, while underweldingmay not develop sufficient strength.A low hydrogen process and AWSE70XX filler metal are recomended.NOTE:If cylinder support (25) or lever bracket (26) isdamaged, replace as shown below.ITEM 26 XA-1532LEVER BRACKET2.5063.50 REF 12.31312.67ITEM 25 XA-1512CYLINDER SUPPORT3.81±1296.77±3.053.5088.90.256.12155.454.88123.95NOTE:Dimensions shown are for locating lugswhen rebuilding from XA-1501-01952,or XA-1501-CA1-1 to XA-1501-CA1..251.5038.10 REFThese products are covered by <strong>Holland</strong>’s Commercial Products Warranty.<strong>Holland</strong> reserves the right, without giving prior notice, to change specificationsand dimensions as designs are altered or improved.Copyright © October 20<strong>02</strong> • The <strong>Holland</strong> <strong>Group</strong>, <strong>Inc</strong>.<strong>Holland</strong> USA, <strong>Inc</strong>. Facilities:Denmark, SC Muskegon, MIDumas, AR Warrenton, MO<strong>Holland</strong>, MI Whitehouse Station, NJMilpitas, CA Wylie, TX<strong>Holland</strong> International, <strong>Inc</strong>.<strong>Holland</strong>, MIPhone: 616-396-6501Fax: 616-396-1511<strong>Holland</strong> Hitch of Canada, Ltd.Woodstock, Ontario • CanadaPhone: 519-537-3494Fax: 800-565-7753<strong>Holland</strong> Equipment, Ltd.Norwich, Ontario • CanadaPhone: 519-863-3414Fax: 519-863-2398<strong>Holland</strong> Hitch Western, Ltd.Surrey, British Columbia • CanadaPhone: 604-574-7491Fax: 604-574-<strong>02</strong>44Ph: 888-396-6501 Fax: 800-356-39294 <strong>XL</strong>-<strong>FW147</strong>-<strong>02</strong>