

Standard Valves with Bellows Seal - Flowserve Corporation
Standard Valves with Bellows Seal - Flowserve Corporation
Standard Valves with Bellows Seal - Flowserve Corporation

Create successful ePaper yourself
Turn your PDF publications into a flip-book with our unique Google optimized e-Paper software.
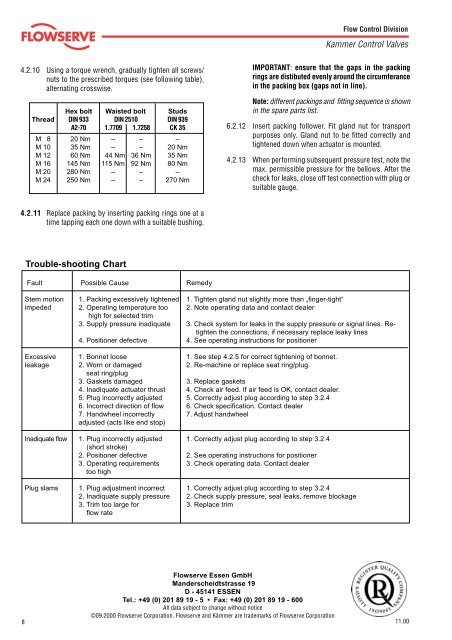
Flow Control DivisionKammer Control <strong>Valves</strong>4.2.10 Using a torque wrench, gradually tighten all screws/nuts to the prescribed torques (see following table),alternating crosswise.Hex bolt Waisted bolt StudsThread DIN 933 DIN 2510 DIN 939A2-70 1.7709 1.7258 CK 35M 8 20 Nm – – –M 10 35 Nm – – 20 NmM 12 60 Nm 44 Nm 36 Nm 35 NmM 16 145 Nm 115 Nm 92 Nm 80 NmM 20 280 Nm – – –M 24 250 Nm – – 270 NmIMPORTANT: ensure that the gaps in the packingrings are distibuted evenly around the circumferancein the packing box (gaps not in line).Note: different packings and fitting sequence is shownin the spare parts list.6.2.12 Insert packing follower. Fit gland nut for transportpurposes only. Gland nut to be fitted correctly andtightened down when actuator is mounted.4.2.13 When performing subsequent pressure test, note themax. permissible pressure for the bellows. After thecheck for leaks, close off test connection <strong>with</strong> plug orsuitable gauge.4.2.11 Replace packing by inserting packing rings one at atime tapping each one down <strong>with</strong> a suitable bushing.Trouble-shooting ChartFault Possible Cause RemedyStem motion 1. Packing excessively tightened 1. Tighten gland nut slightly more than „finger-tight“impeded 2. Operating temperature too 2. Note operating data and contact dealerhigh for selected trim3. Supply pressure inadiquate 3. Check system for leaks in the supply pressure or signal lines. Retightenthe connections, if necessary replace leaky lines4. Positioner defective 4. See operating instructions for positionerExcessive 1. Bonnet loose 1. See step 4.2.5 for correct tightening of bonnet.leakage 2. Worn or damaged 2. Re-machine or replace seat ring/plug.seat ring/plug3. Gaskets damaged 3. Replace gaskets4. Inadiquate actuator thrust 4. Check air feed. If air feed is OK, contact dealer.5. Plug incorrectly adjusted 5. Correctly adjust plug according to step 3.2.46. Incorrect direction of flow 6. Check specification. Contact dealer7. Handwheel incorrectly 7. Adjust handwheeladjusted (acts like end stop)Inadiquate flow 1. Plug incorrectly adjusted 1. Correctly adjust plug according to step 3.2.4(short stroke)2. Positioner defective 2. See operating instructions for positioner3. Operating requirements 3. Check operating data. Contact dealertoo highPlug slams 1. Plug adjustment incorrect 1. Correctly adjust plug according to step 3.2.42. Inadiquate supply pressure 2. Check supply pressure, seal leaks, remove blockage3. Trim too large for 3. Replace trimflow rate8<strong>Flowserve</strong> Essen GmbHManderscheidtstrasse 19D - 45141 ESSENTel.: +49 (0) 201 89 19 - 5 • Fax: +49 (0) 201 89 19 - 600All data subject to change <strong>with</strong>out notice©09.2000 <strong>Flowserve</strong> <strong>Corporation</strong>. <strong>Flowserve</strong> and Kämmer are trademarks of <strong>Flowserve</strong> <strong>Corporation</strong>11.00


