Gutter Installation Instructions - Intex Millwork Solutions
Gutter Installation Instructions - Intex Millwork Solutions
Gutter Installation Instructions - Intex Millwork Solutions

Create successful ePaper yourself
Turn your PDF publications into a flip-book with our unique Google optimized e-Paper software.
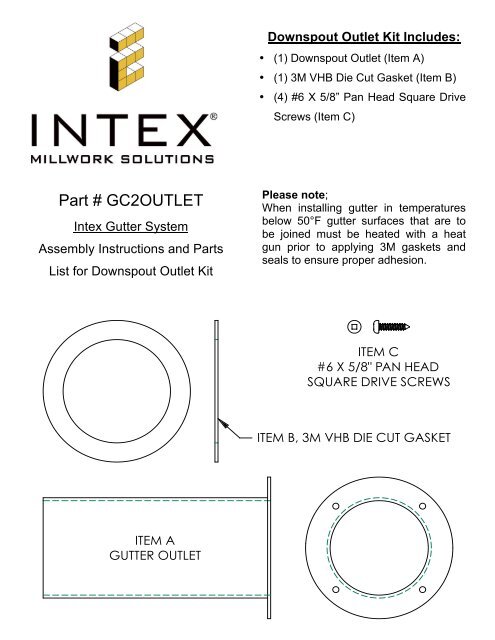
Downspout Outlet Kit Includes:• (1) Downspout Outlet (Item A)• (1) 3M VHB Die Cut Gasket (Item B)• (4) #6 X 5/8” Pan Head Square DriveScrews (Item C)Part # GC2OUTLET<strong>Intex</strong> <strong>Gutter</strong> SystemAssembly <strong>Instructions</strong> and PartsList for Downspout Outlet KitPlease note;When installing gutter in temperaturesbelow 50°F gutter surfaces that are tobe joined must be heated with a heatgun prior to applying 3M gaskets andseals to ensure proper adhesion.
1. Drill Clearance Hole – In order to install theDownspout Outlet you must drill a 2-1/8” diameterclearance hole through the <strong>Gutter</strong> per the abovesketch. The location of the hole is critical. This willprevent you from drilling into the Cortex screws usedto mount the End Cap. <strong>Intex</strong> recommends using aHole Saw or Forstner Bit for this application.2. Apply Gasket – Remove one backer from the DieCut Gasket Item B. With the now exposed edge ofthe Gasket facing up, feed the <strong>Gutter</strong> Outlet Item A,down through the Gasket as shown in the figure tothe left. The underside of Outlet’s rim should beclean and free of debris. Apply the Gasket to the rimof the Outlet by pressing firmly around the entirecircumference.3. Form the Downspout Outlet Flange – Form theDownspout Outlet flange to the base of the gutter bytapping it into place with a hammer .Once the flangehas been shaped to fit the gutter, remove theDownspout Outlet from the gutter and remove thesecond backer from the Die Cut Gasket Item B.4. Install the Downspout Outlet Feed the DownspoutOutlet Item A, with the applied gasket down throughthe 2-1/8” diameter hole in the <strong>Gutter</strong>. Insure theinside surface of the <strong>Gutter</strong> is clean a free of debris.Before the gasket makes contact with the gutterinsure that the shape of the outlet’s pre-formed rimwill align with the profile of the <strong>Gutter</strong> as created instep 3 above. This shape is symmetrical and ifinstalled backwards may leak. Once in place, pressdown firmly on the rim of the Outlet and secure inplace with the four #6 X 5/8” Pan Head Square DriveScrews Item C as shown in the figure to the left.