2009 TSX Engine Block Heater - Bernardi Acura Parts & Accessories
2009 TSX Engine Block Heater - Bernardi Acura Parts & Accessories
2009 TSX Engine Block Heater - Bernardi Acura Parts & Accessories

You also want an ePaper? Increase the reach of your titles
YUMPU automatically turns print PDFs into web optimized ePapers that Google loves.
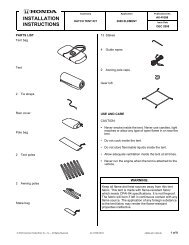
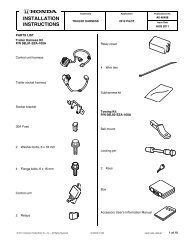
AccessoryApplicationPublications No.INSTALLATIONINSTRUCTIONSENGINE BLOCK HEATER (L4)P/N 08T44-TA0-100<strong>2009</strong> <strong>TSX</strong>BII 39057-39656Issue DateMAY 2008PARTS LIST<strong>Engine</strong> block heaterAluminum washer<strong>Heater</strong> harnessProtective cap12 Black wire ties(3 Not used)TOOLS AND SUPPLIES REQUIREDPhillips screwdriverFlat-tip screwdriverRatchet10 mm, 12 mm, and 24 mm Sockets10 mm Hex SocketTorque wrenchDiagonal cuttersHeavy glovesDrain panTape measureWhite markerHonda All Season Antifreeze/Coolant Type 2Honda Coolant ConcentrateFender coverBlanketPlastic Trim Tool (T/N SILTRIMTL10)4” ExtensionNOTE: Using an extension longer than 4” will give you anincorrect torque reading.5 Wire ties with clip5 White wire ties(Not used)Coolant concentration label© 2008 American Honda Motor Co., Inc. – All Rights Reserved.BII 39057-39565 (0804)08T44-TL2-2000-91 1 of 8
7. Release the eight tabs, and pull the front bumpertoward you. Release the eight tabs from the otherside the same way.9. Remove the strut tower bar (six nuts and release thebrake booster vacuum hose).FRONTBUMPERNUTSSTRUT TOWER BAR5 TABSNUTS3 TABSPull.730303AT8. Remove the front bumper (unplug the two fog lightconnectors).• Have an assistant help you when removing andinstalling the front bumper.• Place the front bumper on a blanket to preventdamage.10. Disconnect the VSA modulator control unit, andrelease the vehicle clip from the bracket.FRONTBRAKE BOOSTERVACUUM HOSE791702AH2 FOG LIGHTCONNECTORSVSA MODULATOR-CONTROL UNITPush.FRONTBUMPER700901ATCLIPBRACKETCONNECTOR791704CH© 2008 American Honda Motor Co., Inc. – All Rights Reserved.BII 39057-39656 (0804)3 of 8
11. Remove the heat shield (two bolts).13. Disconnect the VTEC solenoid connector and VTECoil pressure switch connector.HEAT SHIELDVTEC OILPRESSURESWITCHCONNECTORVTEC SOLENOIDCONNECTOR2 BOLTSFRONTFRONT791303AR12. Using a tape measure, install a wire tie with clip tothe heater harness at each of the measurementsshown. Using a white marker, measure and mark theheater harness at the measurement point.791705AH14. Release the harness holder from the VTEC bracket(two hooks).ENGINE BLOCKHEATER SIDE160 mm (6.3 in.)240 mm (9.4 in.)470 mm(18.5 in.)620 mm(24.4 in.)HARNESSHOLDERVTECBRACKETAWIRE TIESWITH CLIPBWIRE TIESWITH CLIPWHITE MARKERCWIRE TIEWITH CLIPDGE800 mm (31.4 in.)F990 mm(38.9 in.)WHITEMARKERHOOKHOOKFRONT470 mm(18.5 in.)PLUG SIDEHARNESSHOLDER7N0501AH792901AH4 of 8 BII 39057-39656 (0804)© 2008 American Honda Motor Co., Inc. – All Rights Reserved.
15. Using a 10 mm hex socket, remove the drain plugfrom the engine block. Remaining coolant will drainfrom the engine block when the plug is removed.Retain the plug; it will be used if the engine blockheater is later removed.17. Plug the connector end of the heater harness intothe engine block heater. Route the heater harnessas shown, and secure the two wire ties with clip(points A and B) to the vehicle bracket.BRACKETHARNESSHEATERHARNESSFRONTWIRE TIEWITH CLIP(point B)FRONTDRAIN PLUG(Retain.)Use a 10 mm hex.7N0502AH16. Install the engine block heater with the aluminumwasher into the engine block using a 24 mm socketwith a 100 mm 4” extension. Torque the engine blockheater to 60 N·m (44 lb-ft). Using an extension longerthan 100 mm (4”) will give you a incorrect torque.HEATER HARNESSCONNECTORENGINEBLOCKHEATERWIRE TIE WITH CLIP(point A)7N0504AH18. Route the heater harness as shown, and secure thewire tie with clip (point C) to the vehicle frame.VEHICLEFRAMEFRONTHEATERHARNESSFRONTWIRE TIEWITH CLIP(point C)ENGINE BLOCK HEATER60 N·m (44 lb-ft)Use a 24 mm socket.ALUMINUMWASHER7N0503AHRIGHTHEADLIGHTFRONT791706CH© 2008 American Honda Motor Co., Inc. – All Rights Reserved.BII 39057-39656 (0804)5 of 8
19. Route the heater harness as shown, and secure thewire tie with clip (point D) to the vehicle frame.21. Release the engine reservoir (one hook).Use thishole.THREADEDHOLE (not used.)FRONTCOOLANTRESERVOIRRIGHTHEADLIGHTVEHICLEFRAMEFRONTHEATERHARNESSRIGHTHEADLIGHTWIRE TIEWITH CLIP(point D)FRONT20. Route the heater harness as shown, and secure it tothe bracket with two black wire ties (points E and F).22. Route the heater harness as shown, and secure it tothe vehicle harness with three black wire ties.FRONTHOOKHEADLIGHTBLACK WIRE TIEBRACKETHEATERHARNESSVEHICLEHARNESSHEATERHARNESSRIGHTHEADLIGHTBLACK WIRE TIE(point F)BLACKWIRE TIE(point E)FRONT791708BH3 BLACKWIRE TIESVEHICLECLIP791711AH6 of 8 BII 39057-39656 (0804)© 2008 American Honda Motor Co., Inc. – All Rights Reserved.
23. Route the heater harness as shown, and secure thewire tie with clip (points G) to the vehicle frame.25. Secure the heater harness to the front bumper grillewith four black wire ties.FRONTBUMPERHEATERHARNESSVEHICLEFRAME24. Bring the front bumper close to the vehicle. Routethe heater harness to the front bumper grille asshown, and install the front bumper in the originalposition.• Have an assistant help you when removing andinstalling the front bumper.• Reconnect the fog light connectors.WIRE TIE WITH CLIP(point G)791712CH• Install the clips securely so that they are notraised.BLACKWIRE TIES26. Attach the protective cap to the front bumper grille,and plug the connector of the heater harness into theprotective cap.HEATER HARNESSCONNECTORFRONTBUMPERGRILLEHEATERHARNESSPROTECTIVECAP791714AHFRONTBUMPERGRILLEFRONTBUMPERFRONTBUMPER791715BHFRONTBUMPERGRILLEHEATERHARNESS791713AH© 2008 American Honda Motor Co., Inc. – All Rights Reserved.BII 39057-39656 (0804)7 of 8
27. Reinstall all removed parts and connectors exceptfor the radiator cap.28. Check that the heater harness is routed properly andall connectors are plugged in.29. Reconnect the negative cable to the battery.30. Reinstall the radiator drain plug.31. Pour 1.6 lit. of the 100% concentration coolantthrough the radiator filler port.32. Pour the 50% concentration coolant up to the top ofthe radiator filler port.33. Check the cooling system for proper bleeding, andcheck the coolant level according to the instructionsdescribed in the Service Manual.34. Install the coolant concentration label to the radiatoras shown.35. Reinstall the radiator cap.RADIATOR CAPCOOLANTCONCENTRATIONLABELRADIATOR791716AH36. Put the drain plug (removed in step 15) in the glovebox.37. Enter the anti-theft codes for the audio system andthe navigation system (if equipped).38. Reset the clock (without navigation).8 of 8 BII 39057-39656 (0804)© 2008 American Honda Motor Co., Inc. – All Rights Reserved.