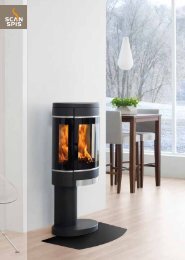
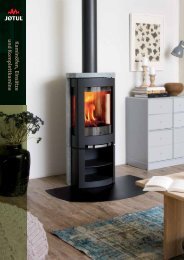
Manual - Jøtul stoves and fireplaces
Manual - Jøtul stoves and fireplaces
Manual - Jøtul stoves and fireplaces

You also want an ePaper? Increase the reach of your titles
YUMPU automatically turns print PDFs into web optimized ePapers that Google loves.
138914 Rev. Q 8/28/12MaintenanceThis appliance <strong>and</strong> its venting system should beinspected before use <strong>and</strong> at least annually by a qualifiedservice technician.WARNING!THE IGNITION SYSTEM OF THIS APPLIANCECARRIES LIVE VOLTAGE. ALWAYS TURN “OFF “THE MAIN GAS SUPPLY AND DISCONNECT THEPOWER SOURCE BEFORE PERFORMING ANYMAINTENANCE PROCEDURE.TURN “OFF “ THE MAIN GAS SUPPLY AND DIS-CONNECT THE POWER SUPPLY TO THE APPLI-ANCE BEFORE REPLACING BATTERIES.Annual CleaningVent SystemThe entire vent system should be inspected <strong>and</strong>cleaned every year. If the intake <strong>and</strong> exhaust ventingis disassembled for any reason, it should be reassembled<strong>and</strong> sealed according to the vent manufacturer’sinstructions provided at the initial installation.Burner <strong>and</strong> Log SetPeriodically inspect the firebox <strong>and</strong> valve compartmentto BE CERTAIN THAT THE FLOW OF COMBUSTIONAND VENTILATION AIR IS UNOBSTRUCTED.The firebox should be vacuumed at least annuallyto remove any surface build up. Use a soft brushattachment <strong>and</strong> h<strong>and</strong>le the logs carefully as they arefragile.FOR REPLACEMENT, USE ONLY JØTUL CERAMICGLASS PANEL KIT 156817. DO NOT USE ANYOTHER TYPE OF GLASS WITH THIS APPLIANCE.Glass Panel or Gasket Replacement1. Use the 4 mm hex key to remove the four socketscrews that attach the Glass Frame to the firebox.Remove the lower screws first <strong>and</strong> be sure toadequately support the frame against the fireboxwhile you remove the upper screws.2. Lay the assembly upside down on a flat surface,protecting the frame from scratches using a blanketor towel.3. The glass panel is held in place by four retainertabs. Use a screwdriver to carefully pry these up offthe edge of the glass retaining walls. If the tabsbreak off, use the Tinnerman clips supplied withthe replacement glass kit to secure the glass panelwithin the frame.4. Remove the old gasket material.5. Beginning at the midpoint of the upper edge, applythe new gasket around the glass panel, with theadhesive side inside <strong>and</strong> the thicker portion on theoutside. DO NOT STRETCH THE GASKET MATERIAL.Trim off any excess, leaving a 1/2” overlap as shownin fig. 60.6. Lay the glass panel within the glass frame <strong>and</strong> pressthe tabs back down or press the clips in place asshown in fig. 61.Figure 60.Gasket application,PN 129124Glass CareClean the glass as necessary. Wipe the surface witha clean, dampened, soft cloth. Follow with a dry, softtowel. Take care not to scratch the glass surface.WARNING: DO NOT USE ABRASIVE CLEANERSON THE GLASS. NEVER CLEAN THE GLASS WHENIT IS HOT.Gasket InspectionIt is important that the glass gasket be inspected atleast annually. Examine the ribbon gasket for signs ofdeterioration <strong>and</strong> make sure the gasket has a positiveseal. Replace the gasket if necessary.StarFire Glass EmbersNOTE: Glass embers may discolor over time, dependingupon frequency of use. Clean the embers by washing inwarm, soapy water, <strong>and</strong> dry thoroughly before reinstallation<strong>and</strong> use. After washing, discard any permanentlyhazed pieces, or replace embers annually. Colored glassembers, not supplied by Jøtul, maybe used, but must beat least 1/2” <strong>and</strong> similar in size <strong>and</strong> shape.30