Manual - Jøtul stoves and fireplaces
Manual - Jøtul stoves and fireplaces
Manual - Jøtul stoves and fireplaces

You also want an ePaper? Increase the reach of your titles
YUMPU automatically turns print PDFs into web optimized ePapers that Google loves.
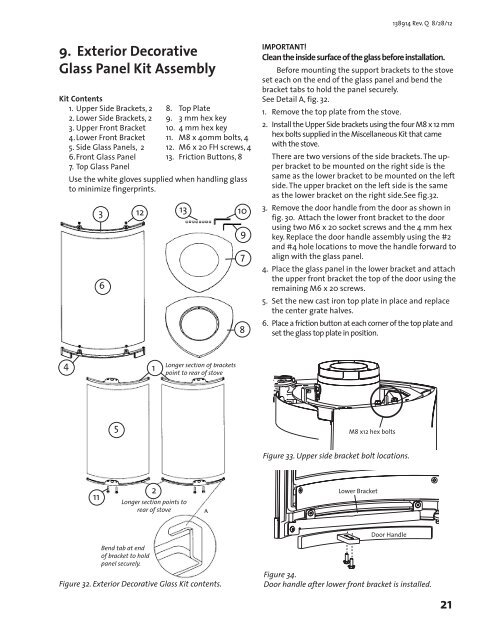
138914 Rev. Q 8/28/129. Exterior DecorativeGlass Panel Kit AssemblyKit Contents1. Upper Side Brackets, 22. Lower Side Brackets, 23. Upper Front Bracket4. Lower Front Bracket5. Side Glass Panels, 26. Front Glass Panel7. Top Glass Panel8. Top Plate9. 3 mm hex key10. 4 mm hex key11. M8 x 40mm bolts, 412. M6 x 20 FH screws, 413. Friction Buttons, 8Use the white gloves supplied when h<strong>and</strong>ling glassto minimize fingerprints.3 12 13 106978IMPORTANT!Clean the inside surface of the glass before installation.Before mounting the support brackets to the <strong>stoves</strong>et each on the end of the glass panel <strong>and</strong> bend thebracket tabs to hold the panel securely.See Detail A, fig. 32.1. Remove the top plate from the stove.2. Install the Upper Side brackets using the four M8 x 12 mmhex bolts supplied in the Miscellaneous Kit that camewith the stove.There are two versions of the side brackets. The upperbracket to be mounted on the right side is thesame as the lower bracket to be mounted on the leftside. The upper bracket on the left side is the sameas the lower bracket on the right side.See fig.32.3. Remove the door h<strong>and</strong>le from the door as shown infig. 30. Attach the lower front bracket to the doorusing two M6 x 20 socket screws <strong>and</strong> the 4 mm hexkey. Replace the door h<strong>and</strong>le assembly using the #2<strong>and</strong> #4 hole locations to move the h<strong>and</strong>le forward toalign with the glass panel.4. Place the glass panel in the lower bracket <strong>and</strong> attachthe upper front bracket the top of the door using theremaining M6 x 20 screws.5. Set the new cast iron top plate in place <strong>and</strong> replacethe center grate halves.6. Place a friction button at each corner of the top plate <strong>and</strong>set the glass top plate in position.41Longer section of bracketspoint to rear of stove5M8 x12 hex boltsFigure 33. Upper side bracket bolt locations.112Longer section points torear of stoveLower BracketDoor H<strong>and</strong>leBend tab at endof bracket to holdpanel securely.Figure 32. Exterior Decorative Glass Kit contents.Figure 34.Door h<strong>and</strong>le after lower front bracket is installed.21