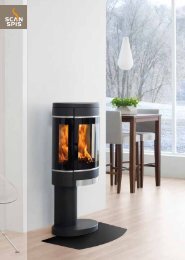
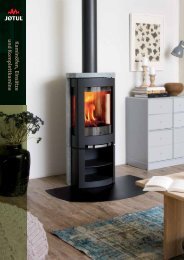
Manual - Jøtul stoves and fireplaces
Manual - Jøtul stoves and fireplaces
Manual - Jøtul stoves and fireplaces

Create successful ePaper yourself
Turn your PDF publications into a flip-book with our unique Google optimized e-Paper software.
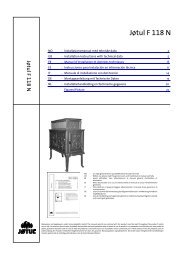
138914 Rev. Q 8/28/12Vent Restriction AdjustmentsThe Jøtul GF 370 DV features adjustment controls forboth intake air <strong>and</strong> exhaust to accommodate a varietyof conditions that result from variables inherent in thevent configuration <strong>and</strong> environment. Both controlscan be accessed from outside the firebox to allow theburner to be “dialed-in” under operation. See figures 14<strong>and</strong> 16.Use the Vent Termination Diagram, fig. 17, todetermine which zone your vent termination fallswithin <strong>and</strong> make the appropriate exhaust <strong>and</strong> airintake setting adjustments. Use these settings asgeneral guidelines to start from. The final settingswill ultimately be determined by the individualcharacteristics of your particular installation.There are no hard <strong>and</strong> fast rules.Exhaust Vent RestrictionExhaust restriction prevents overly strong draftthat can interfere with pilot function, cause poorcombustion or a weak flame picture. The shutter isset in the fully open position at the factory. The finalposition of the restriction shutter is determined bywhere the vent termination falls within the ventwindow diagram.For example, if the vent rise is 20 feet <strong>and</strong>includes one elbow in a horizontal run of 5 feet, theappropriate exhaust setting will be Full Restriction.Pivot PlateTop PlateExhaust Restrictor Adjustment1. Remove the Trim Rings from the Top Plate.2. Loosen the locking screw <strong>and</strong> turn the restrictorpivot plate to the appropriate indicator point asspecified in the vent window diagram, figure 17.After the burner has been operating for 15 minutes,make any further adjustment in 1/8” incrementsuntil the desired flame picture is achieved. Do notexceed the fully closed setting as shown in fig. 15.Operate the burner for 10-15 minutes between additionaladjustments.3. Tighten the locking screw <strong>and</strong> replace the TrimRings.Intake Air AdjustmentAn Intake Air shutter plate allows further burneradjustment for taller vent runs. It is located under thefirebox floor <strong>and</strong> is set fully open at the factory. Seefig. 16.The shutter has an adjustment range of 1 inch.To change the setting, loosen the wingnut <strong>and</strong> slidethe gasketed shutter stem backward to the half orfully closed positions, depending on which vent zoneis appropriate. Retighten the wingnut before lightingthe burner to seal the gasket. Allow the flame patternto settle in for 10- 15 minutes between each settingchange.Zone DVent terminations within Zone D are susceptibleto draft conditions that may interfere with theintermittent Pilot Ignition functionality. In suchcases, we recommend that the stove be operatedonly in Continuous Pilot Ignition mode.Figure 14. The Exhaust Restrictor is located within thevent adaptor collar.NoRestrictionHalfRestrictionFullRestrictionIntakeAir ShutterDO NOT EXCEED THIS SETTING.OVER-RESTRICTION MAY CAUSE SOOTING.Figure 15. Exhaust Restrictor settingsFigure 16. Air intake shutter location.12