Adobe InDesign CS3 Read Me
Adobe InDesign CS3 Read Me
Adobe InDesign CS3 Read Me
Create successful ePaper yourself
Turn your PDF publications into a flip-book with our unique Google optimized e-Paper software.
<strong>Adobe</strong> ®<br />
<strong>InDesign</strong> ® CS 3 <strong>Read</strong> <strong>Me</strong><br />
Welcome to <strong>Adobe</strong>® <strong>InDesign</strong> <strong>CS3</strong>. This document contains late-breaking product information, updates, and troubleshooting tips not<br />
covered in the product documentation.<br />
Minimum system requirements<br />
Install your software<br />
Uninstall your software<br />
Purchase from a trial<br />
Electronic licensing<br />
Registration information<br />
Font installation<br />
Known issues<br />
Customer care<br />
Other resources<br />
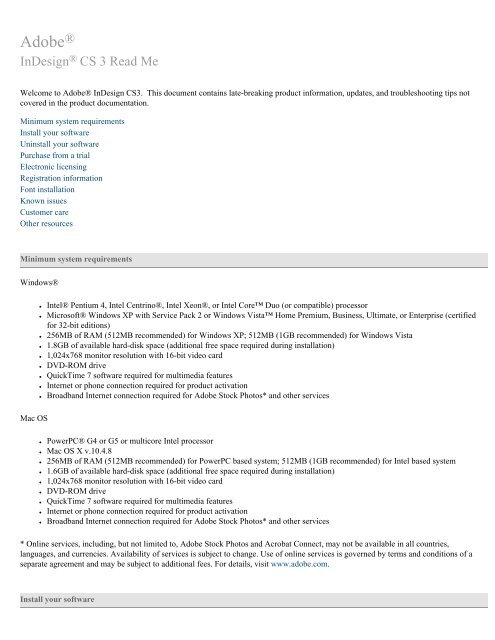
Minimum system requirements<br />
Windows®<br />
Mac OS<br />
● Intel® Pentium 4, Intel Centrino®, Intel Xeon®, or Intel Core Duo (or compatible) processor<br />
● Microsoft® Windows XP with Service Pack 2 or Windows Vista Home Premium, Business, Ultimate, or Enterprise (certified<br />
for 32-bit editions)<br />
● 256MB of RAM (512MB recommended) for Windows XP; 512MB (1GB recommended) for Windows Vista<br />
● 1.8GB of available hard-disk space (additional free space required during installation)<br />
● 1,024x768 monitor resolution with 16-bit video card<br />
● DVD-ROM drive<br />
● QuickTime 7 software required for multimedia features<br />
● Internet or phone connection required for product activation<br />
● Broadband Internet connection required for <strong>Adobe</strong> Stock Photos* and other services<br />
● PowerPC® G4 or G5 or multicore Intel processor<br />
● Mac OS X v.10.4.8<br />
● 256MB of RAM (512MB recommended) for PowerPC based system; 512MB (1GB recommended) for Intel based system<br />
● 1.6GB of available hard-disk space (additional free space required during installation)<br />
● 1,024x768 monitor resolution with 16-bit video card<br />
● DVD-ROM drive<br />
● QuickTime 7 software required for multimedia features<br />
● Internet or phone connection required for product activation<br />
● Broadband Internet connection required for <strong>Adobe</strong> Stock Photos* and other services<br />
* Online services, including, but not limited to, <strong>Adobe</strong> Stock Photos and Acrobat Connect, may not be available in all countries,<br />
languages, and currencies. Availability of services is subject to change. Use of online services is governed by terms and conditions of a<br />
separate agreement and may be subject to additional fees. For details, visit www.adobe.com.<br />
Install your software
1. Before you install, close all applications currently running on your system—including other <strong>Adobe</strong> applications, Microsoft Office<br />
applications, and browser windows.<br />
2. Do one of the following:<br />
❍ Insert the DVD in your drive, and follow the on-screen instructions. (If the installer does not launch automatically, doubleclick<br />
Setup.exe (Windows) or Setup (Mac OS) at the root level of your disk to start the installation process.)<br />
❍ If you downloaded the software from the web, open the folder and double-click Setup.exe (Windows) or Setup (Mac OS),<br />
and then follow the on-screen instructions.<br />
Note: By default, templates, sample files, and fonts are installed with <strong>Adobe</strong> <strong>InDesign</strong> <strong>CS3</strong>. You’ll find additional fonts,<br />
sample files, stock photo and clip art content, as well as back-up copies of the installed fonts, in the Goodies folder of the<br />
installation DVD. Technical information, such as a PDF of the application Help, the <strong>Adobe</strong> <strong>InDesign</strong> <strong>CS3</strong> Scripting<br />
Guide, documentation regarding installed fonts, and the Tagged Text.pdf can be found in the Documentation folder of the<br />
installation DVD, depending on whether you’re licensing a standalone version of <strong>InDesign</strong> or <strong>Adobe</strong> Creative Suite 3.<br />
After installing the software, we encourage you to browse the <strong>InDesign</strong> application folder on your hard drive, as well as<br />
the installation DVD to see the available content.<br />
In order for the document icons to display correctly in <strong>InDesign</strong> on a 64-bit Windows platform, please do the following:<br />
On Windows XP<br />
After installation, navigate to the Program Files (x86)\Common Files\<strong>Adobe</strong>\Shell folder and double click the Register64BitIcons.bat file<br />
to update the document icons.<br />
Windows Vista<br />
Open a command shell with Administrator Privileges by right clicking the cmd.exe application and choosing to Run As Administrator.<br />
Navigate to the Program Files (x86)\Common\<strong>Adobe</strong>\Shell folder. Type the name of the .bat file, " Register64BitIcons.bat" (without<br />
quotations) and press Enter.<br />
Uninstall your software<br />
1. Before you uninstall, close all applications currently running on your system—including other <strong>Adobe</strong> applications, Microsoft<br />
Office applications, and browser windows.<br />
2. Do one of the following:<br />
❍ In Windows, open the Windows Control Panel and double-click Add or Remove Programs. Select the product that you<br />
want to uninstall, click Change/Remove, and then follow the on-screen instructions.<br />
❍ In Mac OS, double-click the product installer in Applications\Utilities\<strong>Adobe</strong> Installers. Authenticate as an administrator,<br />
then select Uninstall Components and follow the on-screen instructions.<br />
Note: Before uninstalling you will need to deactivate <strong>InDesign</strong> <strong>CS3</strong> by choosing Help > Deactivate and following the on screen<br />
instructions.<br />
Purchase from a trial<br />
• Choose Activate from the Help menu and follow the on-screen instructions.<br />
Note: If you decide to purchase a different product than you installed for the trial, you may need to uninstall and reinstall the software.<br />
For example, if you download and install a trial of <strong>Adobe</strong>® Creative® Suite 3 Design Premium, but you decide to purchase only <strong>Adobe</strong>®<br />
<strong>InDesign</strong>®, you will need to uninstall the trial version of the Suite before installing the standalone version of <strong>InDesign</strong> that you purchased.<br />
For more detailed information, visit www.adobe.com/go/tbinfo<br />
Volume licensing customers cannot purchase from a trial directly. After evaluating a Creative Suite 3 product, you must uninstall the trial<br />
and install the product using the volume licensing media and serial number. Refer to the Uninstall your software section of this document<br />
for instructions. Please contact your reseller or the authorized <strong>Adobe</strong> licensing center to place an order for a volume license. To find a<br />
reseller in your area, go to http://partners.adobe.com/resellerfinder/na/reseller.jsp.
Electronic licensing<br />
<strong>Adobe</strong> software may include electronic license (e-license) management technology to ensure compliance with the Product License<br />
Agreement. When present, this technology prompts you to verify the license of your product within 30 days after you start it for the first<br />
time. If prompted, verification is mandatory.<br />
The on-screen prompt may ask you to activate the software. This verification process does not collect, transmit, or use any personally<br />
identifiable information. To learn more, visit the <strong>Adobe</strong> web site at www.adobe.com/activation.<br />
Activate software:<br />
1. If the Activation dialog box is not already open, choose Help > Activate.<br />
2. Follow the on-screen instructions.<br />
Note: If you want to install the product on a different computer, you must first deactivate the software on your computer. To<br />
deactivate, choose Help > Deactivate.<br />
Registration information<br />
When you install your software, be sure to register to get up-to-date product information, training, newsletters and invitations to <strong>Adobe</strong><br />
events and seminars. You will also receive a complimentary benefit such as the Hypatia Sans font and great discounts on training.<br />
Font installation<br />
There are additional fonts on the installation disk. For information on installing these fonts, see http://www.adobe.com/go/<br />
learn_fontinstall_en.<br />
OpenType® fonts<br />
Several OpenType fonts are included with <strong>InDesign</strong> <strong>CS3</strong>. These fonts are installed by <strong>InDesign</strong> for your convenience. The following font<br />
families are installed:<br />
● <strong>Adobe</strong>® Caslon<br />
● <strong>Adobe</strong>® Garamond®<br />
● Arno<br />
● Bell Gothic<br />
● Bickham Script®<br />
● Birch®<br />
● Blackoak®<br />
● BrushScript<br />
● Chaparral®<br />
● Charlemagne®<br />
● Cooper Black<br />
● Eccentric<br />
● Garamond Premier Pro<br />
● Giddyup®<br />
● Hobo<br />
● Kozuka Gothic®<br />
● Kozuka Mincho®<br />
● Letter Gothic<br />
● Lithos®<br />
● <strong>Me</strong>squite®<br />
● Minion®<br />
● Myriad®<br />
● Nueva®<br />
● OCR-A<br />
● Orator
● Poplar®<br />
● Prestige Elite<br />
● Rosewood®<br />
● Stencil<br />
● Tekton®<br />
● Trajan®<br />
These fonts are installed in the following locations:<br />
• Mac OS X: [startup drive]/Library/Fonts/<br />
• Windows: [startup drive]\Windows\Fonts\<br />
These fonts and accompanying documentation are included in the Documentation folder on the <strong>InDesign</strong> <strong>CS3</strong> product DVD, or in the<br />
packaged download file (if you downloaded <strong>InDesign</strong> <strong>CS3</strong> from <strong>Adobe</strong> Store).<br />
Known issues<br />
This section contains information that can help you determine the cause of problems that may occur when you run <strong>InDesign</strong> <strong>CS3</strong>. For<br />
general product usage and additional troubleshooting information, visit the <strong>Adobe</strong> Product Support Knowledgebase or choose Online<br />
Support from <strong>InDesign</strong>’s Help menu.<br />
In addition to the below known issues, the online Release Notes contain additional late-breaking information and known issues about<br />
<strong>InDesign</strong> <strong>CS3</strong>. The online <strong>InDesign</strong> Scripting <strong>Read</strong><strong>Me</strong> also contains known scripting issues.<br />
Exporting documents for use in <strong>InDesign</strong> CS2 (Save Back)<br />
Save Backwards allows <strong>InDesign</strong> CS2 users to open <strong>InDesign</strong> <strong>CS3</strong> documents that have been exported to the <strong>InDesign</strong> Interchange (.inx)<br />
format. To open these .inx files in <strong>InDesign</strong> CS2, you also need to first install the <strong>Adobe</strong> <strong>InDesign</strong> CS2 4.0.5 update. You can obtain this<br />
update by choosing Help > Updates, and then following the prompts in the <strong>Adobe</strong> Update Manager. Alternatively, the update can be<br />
downloaded from the <strong>Adobe</strong> Web site. Visit http://www.adobe.com/go/downloads/ then click the link for the <strong>InDesign</strong> Updates.<br />
Be aware that content created using functionality that is specific to <strong>InDesign</strong> <strong>CS3</strong> might be modified or omitted when you open the file in<br />
<strong>InDesign</strong> CS2. For example, variables and gradient feathers (new features in <strong>InDesign</strong> <strong>CS3</strong>) drop out.<br />
To export an <strong>InDesign</strong> Interchange file from <strong>InDesign</strong> <strong>CS3</strong>, please do the following:<br />
1. Open or create a file in <strong>InDesign</strong> <strong>CS3</strong>.<br />
2. Choose File > Export.<br />
2. In the Export dialog box, select <strong>InDesign</strong> Interchange from the File Type menu (on Windows) or Formats menu (on Mac OS).<br />
3. Click Save.<br />
Note: To open an <strong>InDesign</strong> <strong>CS3</strong> document in <strong>InDesign</strong> CS, you will need to export an <strong>InDesign</strong> Interchange file from <strong>InDesign</strong> <strong>CS3</strong>, open<br />
the file in <strong>InDesign</strong> CS2 and then export an <strong>InDesign</strong> Interchange file from <strong>InDesign</strong> CS2.<br />
For more information about what features are supported in this workflow, please search for Save Backwards technical documents in the<br />
support database on our Web site.<br />
Post-processing <strong>InDesign</strong> documents<br />
Users of <strong>Adobe</strong>-certified RIPs that use the CPSI version 3016.103 (Fuji CelebraNT) may encounter failures (e.g., PostScript errors or no<br />
output) when printing on-host separations of spot colors from rasters and Illustrator patterns and gradient meshes. The workaround is to<br />
print in-RIP separations. [1156330, 1152178, 1140985]<br />
Text, Tables, and Fonts<br />
After opening an <strong>InDesign</strong> CS2 or InCopy CS2 document in <strong>InDesign</strong> C3 or InCopy <strong>CS3</strong>, text with optical kerning applied may shift<br />
slightly in <strong>CS3</strong>. This issue occurs because <strong>InDesign</strong> <strong>CS3</strong> has more accurate optical kerning values than CS2. Note that line breaks may<br />
also change, but only if you recompose. [1137236]
Paragraph Numbering has been extensively revised in <strong>InDesign</strong> <strong>CS3</strong>. Some paragraph numbers in <strong>InDesign</strong> CS2 may change when the<br />
document is converted to <strong>InDesign</strong> <strong>CS3</strong>. If an anchored frame contains numbered paragraphs and the parent frame also contains numbered<br />
paragraphs both before and after the anchored frame, the subsequent paragraphs in the parent frame may be renumbered. [1467322]<br />
No missing font warning appears when placing a snippet file with missing fonts in <strong>InDesign</strong> <strong>CS3</strong>. Note that if you want <strong>InDesign</strong> to<br />
highlight any missing fonts when placing files, select the “Substituted Fonts” option under the Highlight section of Composition<br />
Preferences (this is enabled by default). You can also use the Type > Find Font dialog to search for and replace any missing fonts. The<br />
Missing/Modified Links alert also does not appear when placing either a snippet or a library asset with broken link(s) into <strong>InDesign</strong> <strong>CS3</strong>.<br />
As a workaround, open the Links palette and then relink any missing or modified files. [1161965, 1160819]<br />
A different bullet character, with the same glyph ID but representing a different glyph, is applied to text when opening an <strong>InDesign</strong> CS2<br />
document in <strong>InDesign</strong> <strong>CS3</strong>. [1477415]<br />
Dictionary<br />
Conflicting hyphenation exception entries for a word in the user or document dictionaries may cause a capitalized word to hyphenate<br />
incorrectly, if Case Sensitivity was selected for one of the entries. Note that two different hyphenations of the same word are not<br />
supported. [1166107, 1183307]<br />
Anchored Objects<br />
Anchored objects that are anchored relative to the page margin or the page edge do not display at the correct location if the text frame they<br />
are in is rotated or skewed. [1053012]<br />
Exporting to RTF<br />
Page breaks in <strong>InDesign</strong> or InCopy stories are exported to RTF as paragraph characters instead of page breaks. As a workaround, manually<br />
add new page breaks or apply page breaks using the keep options feature into the exported RTF file where required. [1151019]<br />
Working with multiple language versions<br />
Multiple <strong>InDesign</strong> language versions (for example, <strong>InDesign</strong> <strong>CS3</strong> US English and <strong>InDesign</strong> <strong>CS3</strong> Japanese) can not be used on the same<br />
Windows or Macintosh operating system. [0532777]<br />
Note: The following bugs are for <strong>InDesign</strong> <strong>CS3</strong> Japanese, Chinese Simplified, Chinese Traditional, and/or Korean only:<br />
Print<br />
OpenType and CID vertical full-width glyphs are downloaded when printing with the Download option off. [1156427]<br />
Text, Tables, & Fonts<br />
When the text’s leading size is changed, the text in the second paragraph does not align to the frame grid if the text has Gyodori applied.<br />
[1070861]<br />
Converted documents that use a SING glyphlet with the Bulleted & Numbered Lists feature will display as the not defined character<br />
(notdef) in <strong>InDesign</strong> <strong>CS3</strong>. As a workaround, use the Bulleted & Numbered Lists feature to replace the not defined character. Additionally,<br />
in <strong>InDesign</strong> <strong>CS3</strong>, SING glyphlets cannot be added to the custom bullet list. [1358986]<br />
Text that contains the horizontal bar character (u2015) that has been scaled in <strong>InDesign</strong> CS2 recomposes when opened in <strong>InDesign</strong> <strong>CS3</strong>;<br />
<strong>InDesign</strong> CS2 was treating the horizontal bar character incorrectly as a Roman character. This has been fixed in <strong>InDesign</strong> <strong>CS3</strong>, but<br />
converted documents may experience changes in composition. As a workaround for converted documents, find these characters and<br />
change the scaling applied from horizontal to vertical.[1346055]<br />
The Tate-chu-yoko attribute is not applied to half-width numbered text in a vertical text frame or frame grid, created with the Bulleted &<br />
Numbered Lists feature. As a result, the composition of numbers in vertical text in an <strong>InDesign</strong> CS2 document will change when the<br />
document is opened in <strong>InDesign</strong> <strong>CS3</strong>. [1332827,1441452]<br />
<strong>Adobe</strong> SING Glyphet Manager (ASGM) Known Issues<br />
When attempting to run ASGM on Windows Vista, you will receive a warning dialog from Windows asking you to confirm before<br />
running the program. This is caused by Vista’s new User Account Control feature, which will ask users to confirm Workaround: This is<br />
expected behavior in Vista. The only workaround is to disable Vista’s User Account Control, however that action is not recommended for<br />
security reasons. [1487279]
When attempting to use ASGM on a Mac or Windows machine where you do not have administrative privileges, the program will not run,<br />
or will run incorrectly. ASGM needs administrative privileges in order to save and edit glyphlets on the machine. Workaround: You must<br />
have administrative access to run ASGM. [1310037]<br />
When using the ‘Add Glyphlets By Folder’ option, the Mac OS shows a Search box in that window. Using that window to search for your<br />
folder will prevent you from adding that folder when you click it and select Choose. Workaround: Do not use the search ability to find<br />
your glyphlets and folders. Navigate to them instead. [1407171]<br />
On a Mac, when you click different glyphlets from the Add Files screen very quickly, you can potentially select multiple glyphlets by<br />
accident. Workaround: Be aware that clicking on glyphlets quickly can result in this behavior. [1347006]<br />
Using the keyboard shortcuts to select multiple glyphlets can sometimes fail, especially when performing multiple selections together at<br />
once. Workaround: Perform one selection or use mouse movement to select multiple glyphlets. [1309671]<br />
When looking at the information of a glyphlet in <strong>Me</strong>tadata1, 4 byte Unicode code point appears<br />
correctly, but there is no rasterized glyph next to it. Workaround: There is no workaround. Be aware that the rasterized glyph will not<br />
appear in these cases. [1403247]<br />
Customer care<br />
Customer Service<br />
<strong>Adobe</strong> Customer Service provides assistance with product information, sales, registration, and other non-technical issues. To find out how<br />
to contact <strong>Adobe</strong> Customer Service, please visit <strong>Adobe</strong>.com’s main page for your region or country and click on ‘Contact’.<br />
Support Plan Options and Technical Resources<br />
If you require technical assistance for your product, including information on free and paid support options and troubleshooting resources,<br />
more information is available at http://www.adobe.com/go/support/. For outside of North America http://www.adobe.com/go/intlsupport/.<br />
Free troubleshooting resources include <strong>Adobe</strong>’s support knowledgebase, <strong>Adobe</strong> user-to-user forums and more.”<br />
Other resources<br />
Documentation<br />
Order printed documentation at www.adobe.com/go/buy_books.<br />
Online Resources<br />
<strong>InDesign</strong> Product Home<br />
<strong>InDesign</strong> Design Center<br />
<strong>InDesign</strong> Developer Center<br />
<strong>InDesign</strong> Exchange<br />
<strong>InDesign</strong> Partners<br />
<strong>InDesign</strong> Plug-ins<br />
<strong>InDesign</strong> User Group<br />
<strong>Adobe</strong> Certification Program<br />
© 2007 <strong>Adobe</strong> Systems Incorporated. All rights reserved.


