

setting up remote access for q-see dvr
setting up remote access for q-see dvr
setting up remote access for q-see dvr

Create successful ePaper yourself
Turn your PDF publications into a flip-book with our unique Google optimized e-Paper software.
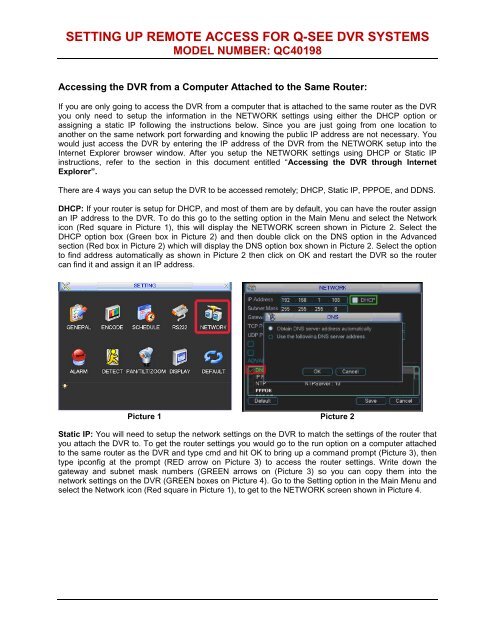
SETTING UP REMOTE ACCESS FOR Q-SEE DVR SYSTEMSMODEL NUMBER: QC40198Accessing the DVR from a Computer Attached to the Same Router:If you are only going to <strong>access</strong> the DVR from a computer that is attached to the same router as the DVRyou only need to set<strong>up</strong> the in<strong>for</strong>mation in the NETWORK <strong>setting</strong>s using either the DHCP option orassigning a static IP following the instructions below. Since you are just going from one location toanother on the same network port <strong>for</strong>warding and knowing the public IP address are not necessary. Youwould just <strong>access</strong> the DVR by entering the IP address of the DVR from the NETWORK set<strong>up</strong> into theInternet Explorer browser window. After you set<strong>up</strong> the NETWORK <strong>setting</strong>s using DHCP or Static IPinstructions, refer to the section in this document entitled “Accessing the DVR through InternetExplorer”.There are 4 ways you can set<strong>up</strong> the DVR to be <strong>access</strong>ed <strong>remote</strong>ly; DHCP, Static IP, PPPOE, and DDNS.DHCP: If your router is set<strong>up</strong> <strong>for</strong> DHCP, and most of them are by default, you can have the router assignan IP address to the DVR. To do this go to the <strong>setting</strong> option in the Main Menu and select the Networkicon (Red square in Picture 1), this will display the NETWORK screen shown in Picture 2. Select theDHCP option box (Green box in Picture 2) and then double click on the DNS option in the Advancedsection (Red box in Picture 2) which will display the DNS option box shown in Picture 2. Select the optionto find address automatically as shown in Picture 2 then click on OK and restart the DVR so the routercan find it and assign it an IP address.Picture 1 Picture 2Static IP: You will need to set<strong>up</strong> the network <strong>setting</strong>s on the DVR to match the <strong>setting</strong>s of the router thatyou attach the DVR to. To get the router <strong>setting</strong>s you would go to the run option on a computer attachedto the same router as the DVR and type cmd and hit OK to bring <strong>up</strong> a command prompt (Picture 3), thentype ipconfig at the prompt (RED arrow on Picture 3) to <strong>access</strong> the router <strong>setting</strong>s. Write down thegateway and subnet mask numbers (GREEN arrows on (Picture 3) so you can copy them into thenetwork <strong>setting</strong>s on the DVR (GREEN boxes on Picture 4). Go to the Setting option in the Main Menu andselect the Network icon (Red square in Picture 1), to get to the NETWORK screen shown in Picture 4.
SETTING UP REMOTE ACCESS FOR Q-SEE DVR SYSTEMSMODEL NUMBER: QC40198Picture 11TO ACCESS THE DVR THROUGH INTERNET EXPLORER:Once you have set<strong>up</strong> the network <strong>setting</strong>s on the DVR to match the <strong>setting</strong>s of your router and <strong>for</strong>wardedthe ports needed by the DVR (<strong>for</strong> <strong>remote</strong> <strong>access</strong> over the internet), you need to modify your browsercontrols. You need to allow Pop-<strong>up</strong>s. To do so go to the Internet Explorer tool bar and select the "tools"option (RED box in Picture 12), then select the "Pop <strong>up</strong> Blocker" option and select "Turn Off Pop-<strong>up</strong>Blocker” (BLUE arrows in Picture 12). You will also need to enable Active X controls. To do so go to theInternet Explorer tool bar and select the "tools" option, then "Internet Options"(GREEN arrow in Picture12), In the windows that opens (Picture 13) Go to "Security" (RED box in Picture 13), then click the"Custom Level" button (GREEN box in Picture 13), then click on OK (BLUE arrow in Picture 13). This willopen the page shown in Picture 14. On this page scroll down to the ActiveX Controls and Plug Ins andmake sure they are all set to either prompt (RED arrows) or enabled (BLUE arrows).Picture 124 | P age
SETTING UP REMOTE ACCESS FOR Q-SEE DVR SYSTEMSMODEL NUMBER: QC40198Picture 13 Picture 14To connect to the DVR from the <strong>remote</strong> computer you would then open an Internet Explorer browserwindow and enter the internet IP of your router that you got by going to www.myipaddress.com.Notice: If you cannot use HTTP port 80 because it is being used by another program, or it isbeing blocked by your service provider, you can use another port in the same range such as83, 85, 89, etc. If you do so then you need to <strong>for</strong>ward the IP address of the router to the otherport, change the port in the DVR NETWORK <strong>setting</strong>s and you need to add the port numberafter the IP address. For example, if you set the HTTP port as 83, you need to enter the IPaddress as 192.168.0.25:83.User name and password here are the same as that used on the DVR. The default user nameis admin and password is also admin.5 | P age
SETTING UP REMOTE ACCESS FOR Q-SEE DVR SYSTEMSMODEL NUMBER: QC40198If you get a error message that says the program cannot load because the publisher is unknown or theprogram is unsigned, go to internet explorer, tools, internet options (refer to Picture 9), then go to the“Advanced” tab (RED box in Picture 12), this will open the window in Picture 13, scroll down to “Security”,and select the options to “Allow software to run or install even if the signature is invalid”, and “Allow ActiveContent to Run Files on My Computer” (RED box in Picture 13).Picture 15 Picture 16Remote Viewing WindowWhen you connect you will <strong>see</strong> the <strong>remote</strong> viewing window shown below:Picture 17After you log in, you can <strong>see</strong> the main window. See Picture 19The main window is divided into the following sections:• Section 1: There are five function buttons: Configuration (Manual Chapter 7.3), Search (ManualChapter 7.4), Alarm (Manual Chapter 7.5), About (Manual Chapter 7.6), Log out (ManualChapter 7.7).6 | P age
SETTING UP REMOTE ACCESS FOR Q-SEE DVR SYSTEMSMODEL NUMBER: QC40198• Section 2: Here are channel number and three function buttons: Start dialog, Local play, andRefresh.• Section 3: Here you have PTZ controls (Manual Chapter 7.2.2), Color (Manual Chapter 7.2.3)button and you can also select picture path and record path (Manual Chapter 7.2.4).• Section 4: Real-time monitoring windows. Please note current preview window is surrounded bya green rectangular border.• Section 5: Here you can view window switch buttons. You can also select video prioritybetween fluency or real-time. System monitor window switch s<strong>up</strong>ports full screen/1-window/4-window/6-window/8-window/9-window/13-window/16-window/20-window/25-window/36-window. Picture 15Picture 18Picture 19For in<strong>for</strong>mation on the features of, and how to use the <strong>remote</strong> viewing program refer to Chapter 7Web Operation, 7.2 Login starting on page 77 of the Users Manual.Notice: If you still have problems connecting <strong>remote</strong>ly: Anti-virus programs could alsoblock the ActiveX control, if you still have a problem try closing them. Other plug-ins could also block it.Close firewalls in Windows and in the router if applicable.If you have a router plugged into another router, <strong>for</strong> example, if you have the DVR attached toa router which is attached to DSL or Cable router, you may need to <strong>for</strong>ward port 80 (orwhatever port you are using) and port 37777 on the DSL or Cable router to the IP address ofthe router that the DVR is attached to, so that router can then <strong>for</strong>ward the ports to the DVR.Please refer to the PORT FORWARDING section above on how to get instructions on how to<strong>for</strong>ward the port on the other router.7 | P age
SETTING UP REMOTE ACCESS FOR Q-SEE DVR SYSTEMSMODEL NUMBER: QC40198Questions or Comments?Contact Us:Mailing Address:Customer Service:DPS Inc. Phone: 877-998-3440 x 5388015 E. Crystal Dr. Email: cs@dpsi-usa.comAnaheim, CA 92807Live Chat from ourWebsite:Tech S<strong>up</strong>port:http://www.q-<strong>see</strong>.com Phone: 877-998-3440 x 539Fax:Email: ts@dpsi-usa.com714-998-3509 Live Chat from ourREV 0329108 | P age


