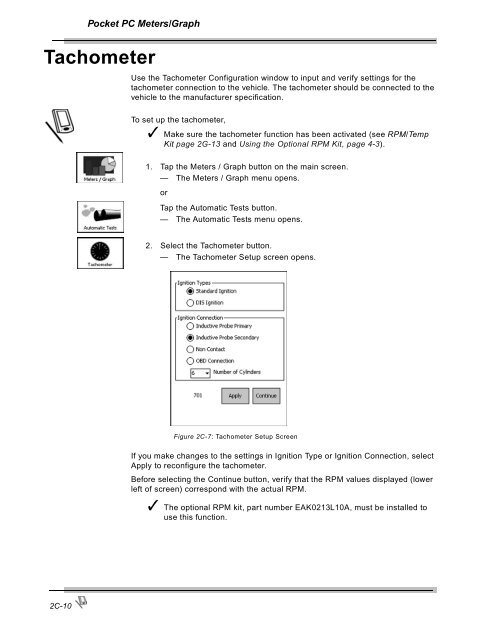
- Page 3 and 4: Table of ContentsUsing this Manual
- Page 5 and 6: Table of ContentsManual Meters/Stri
- Page 7: Using this ManualThis manual contai
- Page 10 and 11: Using this ManualSoftware License A
- Page 12 and 13: Safety InformationIMPORTANT SAFETY
- Page 14: Safety InformationFGA SAFETY MESSAG
- Page 17 and 18: Introduction and Equipment Overview
- Page 19 and 20: Introduction and Equipment Overview
- Page 21 and 22: Using FGA with thePocket PC2The Fle
- Page 23 and 24: Pocket PCSoftware Overview2AThe poc
- Page 25 and 26: Pocket PC Software OverviewBattery
- Page 27 and 28: Pocket PC Software OverviewSoftware
- Page 29 and 30: 2BPocket PCSoftware InstallationThe
- Page 31 and 32: Pocket PC Software Installation3. F
- Page 33 and 34: Pocket PCMeters/Graph2CThis chapter
- Page 35 and 36: Pocket PC Meters/GraphStrip ChartTo
- Page 37 and 38: Pocket PC Meters/GraphBar GraphTo b
- Page 39 and 40: Pocket PC Meters/GraphConfiguration
- Page 41: Pocket PC Meters/GraphResultsThe po
- Page 45 and 46: Pocket PC Automatic TestsHigh RPM T
- Page 47 and 48: Pocket PC Automatic TestsTest Compl
- Page 49 and 50: Pocket PC Automatic TestsCatalyst T
- Page 51 and 52: Pocket PC Automatic Tests5. When pr
- Page 53 and 54: Pocket PC Automatic TestsIf the res
- Page 55 and 56: Pocket PCCustomer/Vehicle2EFGA is d
- Page 57 and 58: Pocket PC Customer/Vehicle✓ To di
- Page 59 and 60: Pocket PC Customer/Vehicle2. Choose
- Page 61 and 62: 2FPocket PC ResultsTest ResultsThe
- Page 63 and 64: Pocket PC ResultsChange StandardsCu
- Page 65 and 66: Pocket PCMaintenance2GThis section
- Page 67 and 68: Pocket PC Maintenance6. Press OK to
- Page 69 and 70: Pocket PC MaintenanceIf the reading
- Page 71 and 72: Pocket PC Maintenance✓ Always mak
- Page 73 and 74: Pocket PC Maintenance3. Remove the
- Page 75 and 76: Pocket PC MaintenanceSetupThis sect
- Page 77 and 78: Pocket PC MaintenanceRPM/Temp Kit
- Page 79 and 80: Pocket PC MaintenanceTSI / Idle Set
- Page 81 and 82: Pocket PC MaintenanceStandardsThe S
- Page 83 and 84: Pocket PC MaintenanceFigure 2G-23:
- Page 85 and 86: Pocket PC MaintenanceBoard Diagnost
- Page 87 and 88: Pocket PC MaintenanceTo perform the
- Page 89 and 90: Pocket PC Maintenance7. Press the S
- Page 91 and 92: Pocket PC MaintenanceFigure 2G-34:
- Page 93 and 94:
Pocket PC MaintenanceLow Out FlowTh
- Page 95 and 96:
Pocket PCOther Functions2HAboutThis
- Page 97 and 98:
3Using FGA with the PCThe Flexible
- Page 99 and 100:
3APC Software OverviewThe PC versio
- Page 101 and 102:
PC Software OverviewCommands 1-10Co
- Page 103 and 104:
PC Software OverviewCommandsFigure
- Page 105 and 106:
3BPC SoftwareInstallationThe Flexib
- Page 107 and 108:
PC Software Installation5. If this
- Page 109 and 110:
3CPC Meters/Strip ChartThis chapter
- Page 111 and 112:
PC Meters/GraphGas Bench MenuThe Ga
- Page 113 and 114:
PC Meters/GraphStrip ChartTo view t
- Page 115 and 116:
PC Meters/GraphStrip Chart Display
- Page 117 and 118:
PC Meters/GraphWhen you select the
- Page 119 and 120:
PC Meters/GraphTachometerUse the Ta
- Page 121 and 122:
PC Automatic Tests3DTSI TestThis se
- Page 123 and 124:
PC Automatic TestsTachometer Config
- Page 125 and 126:
PC Automatic TestsIdle RPM TestFGA
- Page 127 and 128:
PC Automatic TestsTSI Results16. Th
- Page 129 and 130:
3EPC Customer/VehicleFGA is designe
- Page 131 and 132:
PC Customer/VehicleInformation bar
- Page 133 and 134:
PC Customer/VehicleWhen the desired
- Page 135 and 136:
3FPC ResultsThe Test Results window
- Page 137 and 138:
3GPC MaintenanceGas CalibrationThis
- Page 139 and 140:
PC Maintenance5. Attach the calibra
- Page 141 and 142:
PC MaintenanceNew NO x SensorNew NO
- Page 143 and 144:
PC MaintenanceShop InformationThe S
- Page 145 and 146:
PC MaintenanceThe Setup window cont
- Page 147 and 148:
PC MaintenanceTSI Test SetupThe TSI
- Page 149 and 150:
PC MaintenanceZero Purge Time(s)—
- Page 151 and 152:
PC MaintenanceDiagnosticsService ut
- Page 153 and 154:
PC Other Functions3HThis chapter co
- Page 155 and 156:
4General MaintenanceThis chapter ad
- Page 157 and 158:
General MaintenanceOptionsPart Numb
- Page 159 and 160:
General Maintenance3. Select the Ig
- Page 161 and 162:
General MaintenanceWhen using the O
- Page 163 and 164:
General Maintenance—Push the gray
- Page 165 and 166:
General MaintenanceWhen FGA softwar
- Page 167 and 168:
5InterpretationThe section includes
- Page 169 and 170:
Interpretation• Minimal NO is pro
- Page 171 and 172:
Interpretation2. Repair the vehicle
- Page 173 and 174:
Interpretation:The following is a c
- Page 175 and 176:
AAppendix A:OBD II ConnectionsThe l
- Page 177 and 178:
LIMITED WARRANTYTERMS AND CONDITION


