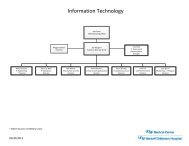
UCSFwpa User Guide for Windows XP with Windows Wireless
UCSFwpa User Guide for Windows XP with Windows Wireless
UCSFwpa User Guide for Windows XP with Windows Wireless

You also want an ePaper? Increase the reach of your titles
YUMPU automatically turns print PDFs into web optimized ePapers that Google loves.
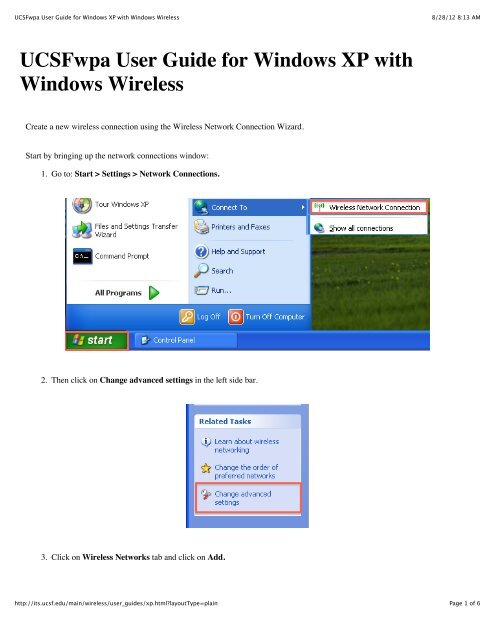
<strong>UCSFwpa</strong> <strong>User</strong> <strong>Guide</strong> <strong>for</strong> <strong>Windows</strong> <strong>XP</strong> <strong>with</strong> <strong>Windows</strong> <strong>Wireless</strong>8/28/12 8:13 AM<strong>UCSFwpa</strong> <strong>User</strong> <strong>Guide</strong> <strong>for</strong> <strong>Windows</strong> <strong>XP</strong> <strong>with</strong><strong>Windows</strong> <strong>Wireless</strong>Create a new wireless connection using the <strong>Wireless</strong> Network Connection Wizard.Start by bringing up the network connections window:1. Go to: Start > Settings > Network Connections.2. Then click on Change advanced settings in the left side bar.3. Click on <strong>Wireless</strong> Networks tab and click on Add.http://its.ucsf.edu/main/wireless/user_guides/xp.html?layoutType=plainPage 1 of 6
<strong>UCSFwpa</strong> <strong>User</strong> <strong>Guide</strong> <strong>for</strong> <strong>Windows</strong> <strong>XP</strong> <strong>with</strong> <strong>Windows</strong> <strong>Wireless</strong>8/28/12 8:13 AM4. In the Association tab, fill it out <strong>with</strong> the following in<strong>for</strong>mation:Enter <strong>UCSFwpa</strong> in the Network name (SSID) field;Select WPA2 from the Network Authentication pull-down menu;Select AES from the Data encryption pull-down menu.http://its.ucsf.edu/main/wireless/user_guides/xp.html?layoutType=plainPage 2 of 6
<strong>UCSFwpa</strong> <strong>User</strong> <strong>Guide</strong> <strong>for</strong> <strong>Windows</strong> <strong>XP</strong> <strong>with</strong> <strong>Windows</strong> <strong>Wireless</strong>8/28/12 8:13 AM6. From the Protected EAP Properties window:Verify that Validate server certificate is selected;If checked, uncheck the Do not prompt user to authorize new servers or trusted certification authorities box;Verify that Enable Fast Reconnect is selected;Click the Configure button to view the EAP MSCHAP v2 Properties screen.http://its.ucsf.edu/main/wireless/user_guides/xp.html?layoutType=plainPage 4 of 6
<strong>UCSFwpa</strong> <strong>User</strong> <strong>Guide</strong> <strong>for</strong> <strong>Windows</strong> <strong>XP</strong> <strong>with</strong> <strong>Windows</strong> <strong>Wireless</strong>8/28/12 8:13 AM7. Clear the checkmark in the "Automatically use my <strong>Windows</strong> logon name and password (and domain if any).";8. Click the OK button to return to the <strong>Wireless</strong> network properties screen;9. Click the OK button to save the <strong>UCSFwpa</strong> configuration.The wireless network will immediately attempt to connect. A balloon will appear from the Task Bar area <strong>with</strong> the instructionshttp://its.ucsf.edu/main/wireless/user_guides/xp.html?layoutType=plainPage 5 of 6
<strong>UCSFwpa</strong> <strong>User</strong> <strong>Guide</strong> <strong>for</strong> <strong>Windows</strong> <strong>XP</strong> <strong>with</strong> <strong>Windows</strong> <strong>Wireless</strong>8/28/12 8:13 AMto "Click here to select a certificate or other credentials <strong>for</strong> connection to the network <strong>UCSFwpa</strong>."10. Click in the balloon to bring up the logon screen.11. At the Logon Screenenter your MyAccess or mail@UCSF* username and password;leave the Logon domain field blank;click the OK button.*Also known as an Active Directory (AD)/computer logon account.Congratulations! You are now connected to the <strong>UCSFwpa</strong> wireless network.http://its.ucsf.edu/main/wireless/user_guides/xp.html?layoutType=plainPage 6 of 6