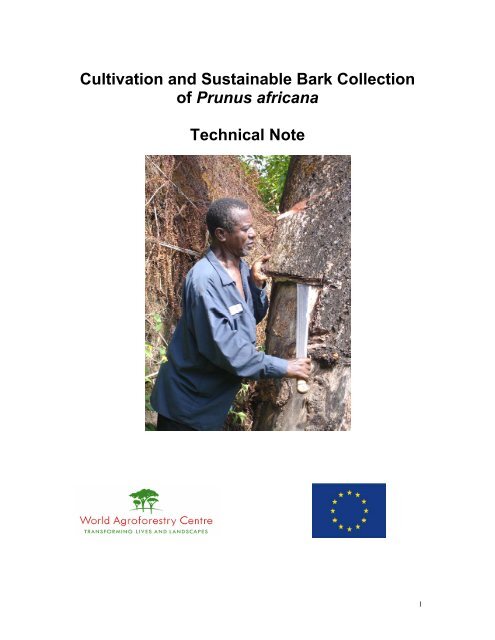
Cultivation and Sustainable Bark Collection of Prunus africana ...
Cultivation and Sustainable Bark Collection of Prunus africana ...
Cultivation and Sustainable Bark Collection of Prunus africana ...

You also want an ePaper? Increase the reach of your titles
YUMPU automatically turns print PDFs into web optimized ePapers that Google loves.
) For medicinal use• <strong>Bark</strong> extracts are used in pharmaceutical industries for the manufacture <strong>of</strong>medicine that cures prostate enlargement <strong>and</strong> other urinary infections. More than19 medicinal products made from bark extracts exist, among which Tadenan(Laboratory <strong>of</strong> Debat <strong>and</strong> Fournier), Proscar (Merck <strong>and</strong> Dohme LTD), Pygenil(Indena Spa) are the most popular.• Leaves are used as an inhalant to treat fever.• Leaves are drunk as an infusion to improve appetite.• Infusion <strong>of</strong> bark is used to treat chest infections.• Water is added to pounded bark, <strong>and</strong> the red liquid is used as a remedy forstomach-ache.• <strong>Bark</strong> extract may be used as a purgative for cattle.• In Cameroon more than thirty human <strong>and</strong> animal ailments are reported to betreated with P. <strong>africana</strong>.c. For other usesThe wood <strong>of</strong> prunus is hard <strong>and</strong> strong <strong>and</strong> it is used in making tools like axe <strong>and</strong>h<strong>and</strong>les <strong>of</strong> hoe <strong>and</strong> also as poles for building <strong>of</strong> houses.7
• Propagate <strong>and</strong> plant <strong>Prunus</strong> treesHOW TO PROTECT THE SPECIES• Adopt appropriate methods for sustainable bark harvestingA. PROPAGATION TECHNIQUES<strong>Prunus</strong> can be propagated by two techniques, namely:• Propagation by seeds• Propagation through rooting <strong>of</strong> cuttings.For both, the construction <strong>of</strong> a shade house is required.CONSTRUCTION OF A SHADE HOUSE- Materials: sticks, planks, nails, zinc/mats for ro<strong>of</strong>ing, bamboo…- ProcedureConstruct a shade house to protect plants from direct sun <strong>and</strong> heavy rain. Surround the shedwith a fence made <strong>of</strong> bamboos orother local material to keepanimals away. The dimensionsdepend on the objective <strong>of</strong> thenursery <strong>and</strong> the space available.For example, the number <strong>of</strong> plantsto produce will determine thenumber <strong>of</strong> propagators, the size <strong>of</strong>the production area <strong>and</strong> storageplace.Fig. 2: NurseryThe ro<strong>of</strong> can be made <strong>of</strong> zinc (aluminium sheets) or thatches. The shed should be highenough to facilitate the entry <strong>of</strong> sun light (for example, a shed <strong>of</strong> 4 m X 6 m with 2 slopesshould be at least 3m high in the middle <strong>and</strong> 2m on each side like shown in figure 2.8
MULTIPLICATION BY SEEDMultiplication by seed is the technique most commonly used by farmers for thepropagation <strong>of</strong> <strong>Prunus</strong>.• Materials: Cutlass, harvesting bag, polythene bag, watering can, sprayer, pesticide,s<strong>and</strong>, black soil• Steps:a) Tree selectionCollect seeds from at least 50 mother trees <strong>and</strong> take about 50 – 100 seeds per tree. Ifpossible, make sure that the trees from which you collect seeds are at least 100m apartto maintain the genetic diversity.b) Fruit collectionFruiting <strong>of</strong> <strong>Prunus</strong> in Cameroon generally occurs from February to May. Before thefruits start to fall:- clean under the tree crown;- protect the site against rats, primates <strong>and</strong> some birds which are highlyattracted by <strong>Prunus</strong> fruits;- every morning for as long as the fruits fall, collect fallen mature fruits (purplecolour) <strong>and</strong> store in a disease <strong>and</strong> pest-free bucket, bag or fruit container.c) Seed extraction- Store fruits for a few days just to allow them to rot.- Use s<strong>and</strong> to remove pulp <strong>and</strong> extract the seed.d) Seed conservation- Dry seeds in the sun for 3 days.- Conserve them in a dry <strong>and</strong> well aerated container <strong>and</strong> keep in ambienttemperature.- Seeds can not be stored for more than 3 weeks at ambient temperature. Afterthat period they will no longer germinate.9
e) Seed germination- Prepare seed bed <strong>of</strong> max 1m large.- Use s<strong>and</strong>, sawdust or a mixture <strong>of</strong> s<strong>and</strong> <strong>and</strong> sawdust, as substrate.The indicated planting depth is 2 cm. Germination starts after 2 weeks, <strong>and</strong> maycontinue to up to 2 months.f) Potting <strong>and</strong> weaning seedlings- Remove the seedlings from the seed bed when they have 2 or more leaves.- Transplant them into a 1 litre polythene bag <strong>and</strong> water them. The substrate iscomposed <strong>of</strong> 3 parts <strong>of</strong> soil <strong>and</strong> 1 part <strong>of</strong> s<strong>and</strong> or 2 parts <strong>of</strong> soil, 1 part <strong>of</strong> s<strong>and</strong><strong>and</strong> 1 part <strong>of</strong> compost.- If the roots are too long (more than 5 cm), reduce them to about 3 cm with ascissor or a sharp knife.- Store plants under a shed to protect them from sun <strong>and</strong> heavy rainfall.10
MULTIPLICATION BY ROOTING OF CUTTINGSRooting <strong>of</strong> cuttings is a vegetative propagation technique that consists in inducing therooting <strong>of</strong> a uni-nodal cutting, collected from a selected tree <strong>and</strong> placed in a propagator.The rooted cutting will then grow into an independent plant.Fig. 3: Leafy stem cutting processRooting <strong>of</strong> stem cuttings allows for mass propagation (a propagator <strong>of</strong> 3 m by 1 m canproduce about 700 cuttings per year), a better planning <strong>of</strong> the production (rooting cantake place at any time, you do not have to wait for seed production) <strong>and</strong> selection (youcan produce a large number <strong>of</strong> cuttings <strong>of</strong> superior trees).The different steps involved in rooting <strong>of</strong> leafy stem cuttings include: propagator building<strong>and</strong> establishment, collection <strong>and</strong> pre-treatment <strong>of</strong> cuttings, setting <strong>of</strong> cuttings into thepropagator, maintenance, evaluation <strong>of</strong> rooting <strong>and</strong> weaning.• Materials: Non-mist propagator, harvesting bag, pruning shears, bucket, surgeryblade or any other sharp knife, sprayer, watering can, polythene bags <strong>and</strong>pesticide.11
• Steps:a) Establishment <strong>of</strong> a stock plant areaEstablish a stock plant area with seedlings from diverse mother trees <strong>and</strong>provenances. The recommended number <strong>of</strong> seeds from each tree is at least 50 (topreserve the genetic diversity).b) Construction <strong>and</strong> establishment <strong>of</strong> a rooting propagatorWhat is a non-mist propagator?A propagation frame or non-mist propagator is a simple wooden box covered with atransparent plastic sheet. The frame contains a water reserve under a rootingsubstrate. The propagator allows for maximum satisfaction <strong>of</strong> the conditions forrooting <strong>of</strong> cuttings, such as:- constant high moisture,- moderate light intensity,- constant temperatures, <strong>and</strong>- protection against wind, heavy rain, diseases <strong>and</strong> insects.How to construct <strong>and</strong> install the propagator?- Assemble planks (8/4 <strong>and</strong> 30/3) to form a woody box <strong>of</strong> 3 m length, 60 cm heightin front <strong>and</strong> 80 cm height behind <strong>and</strong> 1 m width, divided in 3 compartments.- Level the ground properly.- Place the frame horizontally in the East - West direction <strong>and</strong> fix its feet.- Add a thin layer <strong>of</strong> fine s<strong>and</strong> on the bottom <strong>of</strong> the frame to prevent the plasticfrom tearing.- Fix strong plastic (transparent or not) to the frame with nails or drawing pins as t<strong>of</strong>orm a waterpro<strong>of</strong> basin; double or triple layers if necessary.- Carefully fill the frame as follows:- Put a thin layer (5 mm) <strong>of</strong> fine s<strong>and</strong>,- Fill with 10 cm <strong>of</strong> stones <strong>and</strong> 10 cm <strong>of</strong> gravel,- Add water until these layers are completely covered,6
- In one <strong>of</strong> the corners, place a tube <strong>of</strong> 20 cm length (beforeh<strong>and</strong>, mark theinside <strong>of</strong> the tube with white paint at 10 cm) on the stone layer to enablechecking <strong>of</strong> the water level,- Put 10 cm <strong>of</strong> rooting substrate composed <strong>of</strong> sawdust, s<strong>and</strong> or a mixture <strong>of</strong>half s<strong>and</strong> <strong>and</strong> half sawdust,- Cover the rest <strong>of</strong> the box with transparent plastic.Fig. 4: Non-mist propagator7
c) Selection <strong>of</strong> the best treeThe selection criteria to be used at farmer level are the health <strong>of</strong> the tree <strong>and</strong> thethickness <strong>of</strong> the bark. Unfortunately, so far there is no straightforward way to be ableto choose prunus trees which have high concentration <strong>of</strong> active ingredient in the bark.This aspect is still under investigation.d) Collect cuttings- Early in the morning, go to the stock plant area or parent tree (managed toproduce healthy <strong>and</strong> vigorous shoots),- Spray the leaves <strong>of</strong> the shoots with water to minimize water stress after collection,- Identify the non attacked,s<strong>of</strong>t <strong>and</strong> vertical branches,<strong>and</strong> cut them with a pruningshears,- Reduce the leaf area at 25cm 2 (or cut each <strong>of</strong> theleaves by half).Fig. 5: Choosing <strong>of</strong> the best cutting- Keep the cuttings in a wet bag to transport them from the place <strong>of</strong> collection to thenursery.c) Prepare <strong>and</strong> set cuttings in the propagator- Keep the cuttings in an unused compartment <strong>of</strong> the propagator,- Before you start preparing the cuttings, open the propagator, wet the substratewith a sprayer, check the water level <strong>and</strong> adjust if necessary.- With a surgery knife or other sharp knife,cut cuttings <strong>of</strong> 3 cm length from thecollected branches, make sure the cut atthe base is circular, <strong>and</strong> slanted at the top.Fig. 6: Cutting ready to be put in- Keep the prepared cuttings in a bucket <strong>of</strong>the propagatorwater.8
- When you have prepared about 5 or 10cuttings, make small holes in the substrate<strong>and</strong> place the cuttings by fixing themfirmly. Always start at the back <strong>of</strong> thepropagator <strong>and</strong> avoid that the leaves toucheach other.- Spray the cuttings with water <strong>and</strong> close thepropagator.Fig. 7 : Cuttings in propagatord) Maintenance <strong>of</strong> cuttings inside the propagator- Every day before 9 h in the morning, open the propagator <strong>and</strong> remove deadleaves.- Check the water level <strong>and</strong> adjust if necessary (remove water with a sponge if thelevel is too high or add water in the tube if the level is too low, i.e. under thewhite mark)- Use a dirt-free sponge to clean the plastic cover on the inside (overnightevaporation may have formed which limits penetration <strong>of</strong> sunlight) <strong>and</strong> outside.- Spray the leaves with water <strong>and</strong> close the propagator.e) Evaluate rooting, pot <strong>and</strong> wean rooted cuttings- After 3 weeks, remove cuttings one after the other with a stick.- Check the base <strong>of</strong> the cutting for roots<strong>and</strong> if there is at least one root with alength <strong>of</strong> about 1 cm, proceed topotting <strong>of</strong> the cutting.- Place unrooted cuttings back in thepropagator <strong>and</strong> manage them asexplained early.- Put the rooted cutting in a polythenebag containing a substrate composedFig. 8: Rooted cutting9
<strong>of</strong> a mixture <strong>of</strong> soil <strong>and</strong> s<strong>and</strong> (3/1) orsoil, s<strong>and</strong> <strong>and</strong> compost (2/1/1).- Place the pot in a weaning propagator.- Water when necessary, but at least 2 - 3 times per week.- When new shoots appear, remove the plant from the propagator <strong>and</strong> keep under ashed for about 2 weeks.- After that period, progressively reduce the shade to acclimatise the plants beforetransferring them to the field.- While in the nursery, apply fungicides <strong>and</strong> insecticides once a month.- Apply 2 – 3 g (a bottle cap) <strong>of</strong> fertilizerper plant (NPK 20-10-10) every 3months. The fertiliser should be appliedon the soil around the plant, not on theplant.- Weed regularly.Fig. 9: Application <strong>of</strong> fertilizer- Change the position <strong>of</strong> the pot every 3 months to avoid that roots pierce thebottom <strong>of</strong> the bag <strong>and</strong> penetrate in the soil.10
B. INTEGRATION AND MANAGEMENTa. PlantingWhen the <strong>Prunus</strong> plant attains 30 cm in height (about 6 months after sowing or rooting),remove the shade completely <strong>and</strong> leave the plants for about 2 weeks before transplanting.Transplanting should ideally take place at the beginning <strong>of</strong> the rainy season.In the field, early in the morning or late in theafternoon:- Dig a hole <strong>of</strong> 30cm x 30cm x 30cm- Put 5 to 10 cm <strong>of</strong> black top soil (orcompost) in the hole,- Remove the poly bag <strong>and</strong> place theplant with the soil in the hole- Fill with the black top soilFig. 10: TransplantationThe recommended planting density is 5 m by 5 m in pure st<strong>and</strong>s <strong>and</strong> about 10 m by 10 min associated cropping. For monocropping, it is recommended to associate with annualcrops during the first years to ease management. <strong>Prunus</strong> can also be planted on theboundaries <strong>of</strong> farm plots or in hedges to minimise competition with food crops.b. fertilisation- After 1 month, apply fertilizer (50g per plant, which is the equivalent <strong>of</strong> a smalltin <strong>of</strong> tomato concentrate) (e.g. NPK 20-10-10)- Repeat this operation at the interval <strong>of</strong> 3 months.- Follow the instructions on the labels <strong>of</strong> all chemical products you use- During the first year, mulch with dry grass during the dry season to avoid excess<strong>of</strong> evaporation <strong>and</strong> water loss.12
c. pest <strong>and</strong> disease controlCausal agent Damage Appropriate treatmentproposedCaterpillarsConsume leavesCurative treatment: ApplySnailConsume leave <strong>and</strong> cutplant at snare pointcyperdim or otherappropriated insecticide justBorersBore adult stems <strong>and</strong>branchesat the beginning <strong>of</strong> theattackAphidsBite <strong>and</strong> suck serfPreventive treatment: 2CochinealAgglutinate on internal <strong>and</strong> weeks after planting. applyexternal face <strong>of</strong> leaves appropriated insecticide likewhich wither <strong>and</strong> fell down cyperdim <strong>and</strong> repeat theAntForm galleries on the stem operation every monthGommoseSticky exudation flow outfrom armpit <strong>of</strong> stem orsome branchesIt is recommended to plantat higher altitudesd. Origin <strong>of</strong> planting materialIt is possible to take prunus cuttings <strong>and</strong> seedlings from one place to another. Forexample, material collected from Southwest province <strong>of</strong> Cameroon can be planted inNorthwest province without affecting the growth <strong>of</strong> the tree. The effect on theconcentration <strong>of</strong> active ingredient however is not yet known.e. pruning <strong>of</strong> branchesIn general, the branching <strong>of</strong> cuttings occurs at the lower part <strong>of</strong> the trunk. As it is the bark<strong>of</strong> prunus that is exploited, pruning <strong>of</strong> the lower branches is recommended for maximumbark production.13
C. HARVEST PRUNUS, NO KILL’AM: SUSTAINABLE HARVESTINGTECHNIQUESTo sustainably harvest prunus <strong>and</strong> get good quality products, there are operations thatoccur before, during <strong>and</strong> after harvesting.• Before harvesting* Get your permit:Because <strong>Prunus</strong> <strong>africana</strong> is a threatened species, by law you must have a specialpermit to be able to harvest prunus bark from the wild. A permit is not required whenyou exploit prunus trees that have been planted on your farm. To avoid possibleproblems in the future, farmers are advised to register the trees they plant with theChief <strong>of</strong> Post <strong>of</strong> the Ministry <strong>of</strong> Forestry <strong>and</strong> Wildlife (MINFOF). A short lettercontaining the location, the number <strong>of</strong> trees <strong>and</strong> the date <strong>of</strong> planting, stamped by thechief <strong>of</strong> post will be enough. To obtain a permit to harvest prunus, you need to havean organised group <strong>and</strong> apply through the Provincial Delegate <strong>of</strong> MINFOF.Presently the quota <strong>of</strong> exploitation in the mount Cameroon area is 300 tons per year.* Prepare the harvesting equipment:- cutlass,- safety belt,- ladder or pole,- measuring tape,- peeling stick or stake,- foam.• During harvestinga) Period: the indicated period is the rainy season in order to reduce the risk <strong>of</strong> stressto the tree after harvesting <strong>and</strong> to ease bark removal.b) Measurement <strong>and</strong> marking:- Take measurement with the tapealong the trunk <strong>of</strong> the tree <strong>and</strong>mark the point at 1.30 m above theground.14
- Run the tape around the tree at that point <strong>and</strong> if thecircumference is less than 1 m, DO NOT HARVEST.- If the circumference is comprised between 1 <strong>and</strong> 1.5 m,divide the trunk into 4 parts <strong>and</strong> mark to harvest 2opposite parts (2 <strong>and</strong> 4 or 1 <strong>and</strong> 3).- If the circumference is more than 1.5 m, divide thetrunk into 8 parts <strong>and</strong> mark to harvest 4 opposite parts.Fig. 11: Measurement <strong>of</strong> the trunkcircumference1324Fig. 12: Divided tree into collected <strong>and</strong> kept partsc) Harvesting- Use the safety belt, ladder or pole to climb.- Use your peeling stick or stake to harvest at thelimit indicated above, but without hurting thewoody part <strong>of</strong> the stem so as to accelerate theregeneration.- Repeat the harvesting on the opposite parts thatyou reserved after at least 5 years’ interval whenthe exploited parts have recovered.- Harvesting starts from above to thefirst big branch- Collect fallen debris to increase the quantity <strong>of</strong> bark.Fig. 13: <strong>Bark</strong> harvesting15
- Using the appropriate method, you can harvest between 15 -100kg from a tree ateach harvest depending on the size <strong>of</strong> the tree.d) Packaging- Properly tie the harvested bark into bundles to avoid losses.- Foam <strong>and</strong> belt firmly for easy carrying.- Avoid carrying in containers infected by toxic products.For buyers: Avoid buying bark collected from young trees or very thin bark to avoiddestruction <strong>of</strong> the species <strong>and</strong> low quality products.Some useful contacts if you need plantsWhile national <strong>and</strong> provincial nursery networks are establishing, you can get <strong>Prunus</strong>seedlings <strong>and</strong> cuttings from the farmer groups listed below.FarmerGroupnameMIFACIGProvince Division SubdivisionNorth-WestGoodwill North-WestRiba North-WestPROAGRO West NkoungkhiVillageName <strong>of</strong>contactpersonBoyo Belo Njinikejem KuhEmmanuelBoyo Belo Kikfuini NgongAaronBui Kumbo Kishi Riba GeorgesKangongBayangam Bayangam BlaiseKomAPADER West Nde Bangangte Feutap RogerKwidjaPhone / Email75 46 51 64mifacig@yahoo.com75 10 31 6777 94 99 90gkangong@yahoo.com77 02 16 38 / 96 16 9826gicproagro@yahoo.fr99 76 77 71apader@yahoo.frFurther ReadingAvana ML. 2005. Domestication de <strong>Prunus</strong> <strong>africana</strong> (Hook. F.) Kalkam (Rosaceae) :Etude de la germination et du bouturage. Ph.D Thesis,Department <strong>of</strong> PlantBiology, Faculty <strong>of</strong> Sciece, University <strong>of</strong> Yaounde I, Cameroon. 151 p.Avery R. Etone M., Ewane D., Mahop M. <strong>and</strong> Serkfem B. 2001. <strong>Prunus</strong>: A booklet forextension workers. LBG, CERUT, UWS, ICRAF <strong>and</strong> DFID. 22p.16
Cunningham, A.B., Ayuk E., Franzel S., Duguma B. <strong>and</strong> Asanga C. 2002. An economicevaluation <strong>of</strong> medicinal tree cultivation, <strong>Prunus</strong> <strong>africana</strong> in Cameroon. People<strong>and</strong> Plants working paper 6. UNESCO Paris. 36 p.GTZ. 2007. Monitoring <strong>of</strong> <strong>Prunus</strong> <strong>africana</strong> exploitation on Mont Cameroon. GTZ SouthWest Province, Buea. 20 p.ICRAF. Propagator <strong>and</strong> Propagation by cutting : Technical note. ICRAF-WCA/HT. 8p.Ingram V., Nsawir A. 2007. Pygeum: Money growing on trees in the CameroonHighl<strong>and</strong>s? In Mansur E. (ed). La valeur de la biodiversité. Nature <strong>and</strong> Faune.Vol. 22, Issue 1. PP 32 – 39.Owono A.et Manirakiza D. 2007. Rapport de l’étude de base du <strong>Prunus</strong> <strong>africana</strong> dans leNord-Ouest et le Sud-Ouest Cameroun. CIFOR. 42 p.Vivien J. et Faure J.J. 1985. Arbres des forêts denses d’Afrique Centrale. Ministère desRelations extérieures, Coopération et Développement. Agence de CoopérationTechnique. Paris. 565 p.17