Service manual and spare parts list - BUKH Bremen
Service manual and spare parts list - BUKH Bremen
Service manual and spare parts list - BUKH Bremen

Create successful ePaper yourself
Turn your PDF publications into a flip-book with our unique Google optimized e-Paper software.
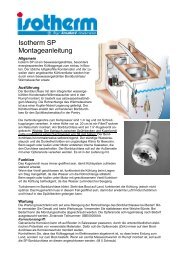
6.14 Mounting the actuating lever<br />
cover plate<br />
6.14.1 Place gasket (29) or Loctite 574<br />
on pre-assembled cover plate <strong>and</strong> fit it<br />
to gearbox. Watch for proper engagement<br />
of actuating cam <strong>and</strong> shifting fork.<br />
The cover plate can be mounted when<br />
the shifting fork is in the middle (=neutral)<br />
position. It is important to adjust the<br />
actuating lever to exactly midway position<br />
in neutral.<br />
Screw the cover plate in place in this<br />
position.<br />
The lever travel from 0 to A <strong>and</strong> from 0<br />
to B should be equal. After a lever travel<br />
of 28 to 31 mm (1.10 to 1.22 in) the transmission<br />
should be in gear.<br />
If the lever travel from «0» to «A» <strong>and</strong><br />
from «0» to «B» is not equal adjust cover<br />
position by light hammer blows on the<br />
cover up to reach the equal travels. Fit<br />
spring washer (4) <strong>and</strong> screw nuts (22).<br />
Tighten to a torque of 20 Nm (15 ft lb).<br />
If studs (69) need to be replaced, fit them<br />
with Loctite 270 on the housing.<br />
Fig. 40<br />
46<br />
Manual <strong>and</strong> Spare Parts List ZF M line<br />
6.14.2 Fit spring washers (4) <strong>and</strong> screws<br />
(5), using a 13 mm spanner (wrench).<br />
Tighten to a torque of 14 Nm (10 ft lb).<br />
Check actuating lever for proper operation.<br />
6.14.3 Fit oil drain plug (20) with sealing<br />
ring (18) <strong>and</strong> oil dipstick (19) with sealing<br />
ring (18).<br />
Tighten to a torque of 20 Nm (15 ft lb).<br />
6.15 Mounting the cooling unit<br />
(if provided)<br />
6.15.1 Attach the cooling unit on the side<br />
opposite the cover plate (9). By means<br />
of 4 screws M8x65 <strong>and</strong> washers (available<br />
on kit pag. 23 item 1.2.10).