Service manual and spare parts list - BUKH Bremen
Service manual and spare parts list - BUKH Bremen
Service manual and spare parts list - BUKH Bremen

You also want an ePaper? Increase the reach of your titles
YUMPU automatically turns print PDFs into web optimized ePapers that Google loves.
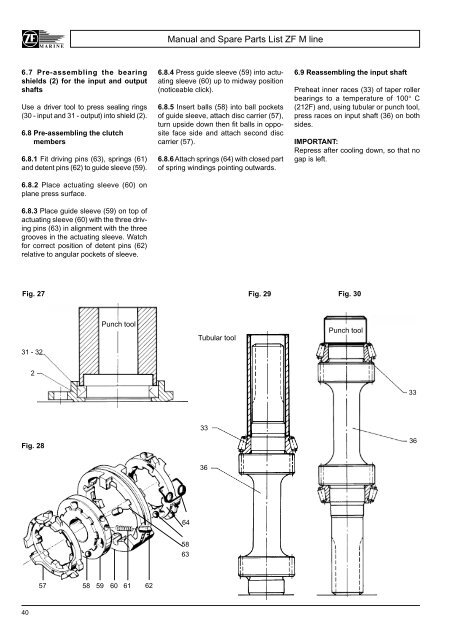
6.7 Pre-assembling the bearing<br />
shields (2) for the input <strong>and</strong> output<br />
shafts<br />
Use a driver tool to press sealing rings<br />
(30 - input <strong>and</strong> 31 - output) into shield (2).<br />
6.8 Pre-assembling the clutch<br />
members<br />
6.8.1 Fit driving pins (63), springs (61)<br />
<strong>and</strong> detent pins (62) to guide sleeve (59).<br />
6.8.2 Place actuating sleeve (60) on<br />
plane press surface.<br />
6.8.3 Place guide sleeve (59) on top of<br />
actuating sleeve (60) with the three driving<br />
pins (63) in alignment with the three<br />
grooves in the actuating sleeve. Watch<br />
for correct position of detent pins (62)<br />
relative to angular pockets of sleeve.<br />
Fig. 27<br />
31 - 32<br />
40<br />
2<br />
Fig. 28<br />
57<br />
58<br />
59<br />
Punch tool<br />
60<br />
61<br />
62<br />
Manual <strong>and</strong> Spare Parts List ZF M line<br />
6.8.4 Press guide sleeve (59) into actuating<br />
sleeve (60) up to midway position<br />
(noticeable click).<br />
6.8.5 Insert balls (58) into ball pockets<br />
of guide sleeve, attach disc carrier (57),<br />
turn upside down then fit balls in opposite<br />
face side <strong>and</strong> attach second disc<br />
carrier (57).<br />
6.8.6 Attach springs (64) with closed part<br />
of spring windings pointing outwards.<br />
64<br />
58<br />
63<br />
Tubular tool<br />
33<br />
36<br />
6.9 Reassembling the input shaft<br />
Preheat inner races (33) of taper roller<br />
bearings to a temperature of 100° C<br />
(212F) <strong>and</strong>, using tubular or punch tool,<br />
press races on input shaft (36) on both<br />
sides.<br />
IMPORTANT:<br />
Repress after cooling down, so that no<br />
gap is left.<br />
Fig. 29 Fig. 30<br />
Punch tool<br />
33<br />
36