X3:Reunion Manual - Steam
X3:Reunion Manual - Steam X3:Reunion Manual - Steam
the target where it will be when your shots arrive. This is what the laser-targeting computerachieves. It can be disabled in the options menu and like most equipment, upgraded. Allenemy objects will appear as red in the Radar.Below is an active HUD trackingA single click on a symbol of the target system or on a bracketed object will set the activetarget and open the context menu for it. A double click will activate the default action in thecontext menu.1 2 3 4 5Images 1 to 5 show different versions of the bars holdinginformation for tracked objects:1 - A ship icon as seen in the target brackets. Only has short shield energy bar.2 - The active target icon as part of the target brackets. Shield and hull + brackets.3 - A ship on screen and in range but not actively targeted: Shield and hull.4 - Active target on screen: shield and hull5 - Ship with surrounding onscreen brackets at max sizeThe size of brackets marking an object in the players view scales depending on the visiblesize of the object onscreen. It has a minimum size that is just a little bigger than the bracketsaround the active target icon in the target system circle and a maximum size for closeobjects.You can also open multiple “mini-monitor” views andtarget them via the function keys (see keyboard section)that enable you to track and control many objects and/ortargets at once.25There are two potential monitors one left one on theright. The left one is always dedicated to auto target; theright one is the only monitor than can be mapped toanother action.
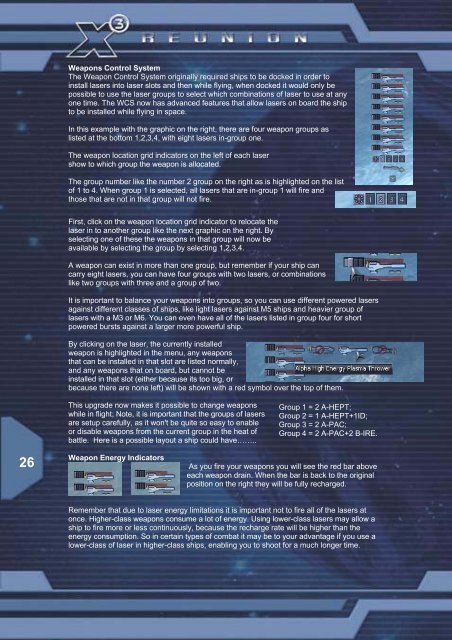
Weapons Control SystemThe Weapon Control System originally required ships to be docked in order toinstall lasers into laser slots and then while flying, when docked it would only bepossible to use the laser groups to select which combinations of laser to use at anyone time. The WCS now has advanced features that allow lasers on board the shipto be installed while flying in space.In this example with the graphic on the right, there are four weapon groups aslisted at the bottom 1,2,3,4, with eight lasers in-group one.The weapon location grid indicators on the left of each lasershow to which group the weapon is allocated.The group number like the number 2 group on the right as is highlighted on the listof 1 to 4. When group 1 is selected, all lasers that are in-group 1 will fire andthose that are not in that group will not fire.First, click on the weapon location grid indicator to relocate thelaser in to another group like the next graphic on the right. Byselecting one of these the weapons in that group will now beavailable by selecting the group by selecting 1,2,3,4.A weapon can exist in more than one group, but remember if your ship cancarry eight lasers, you can have four groups with two lasers, or combinationslike two groups with three and a group of two.It is important to balance your weapons into groups, so you can use different powered lasersagainst different classes of ships, like light lasers against M5 ships and heavier group oflasers with a M3 or M6. You can even have all of the lasers listed in group four for shortpowered bursts against a larger more powerful ship.By clicking on the laser, the currently installedweapon is highlighted in the menu, any weaponsthat can be installed in that slot are listed normally,and any weapons that on board, but cannot beinstalled in that slot (either because its too big, orbecause there are none left) will be shown with a red symbol over the top of them.This upgrade now makes it possible to change weaponswhile in flight; Note, it is important that the groups of lasersare setup carefully, as it won't be quite so easy to enableor disable weapons from the current group in the heat ofbattle. Here is a possible layout a ship could have……..Group 1 = 2 A-HEPT;Group 2 = 1 A-HEPT+1ID;Group 3 = 2 A-PAC;Group 4 = 2 A-PAC+2 B-IRE.26Weapon Energy IndicatorsAs you fire your weapons you will see the red bar aboveeach weapon drain. When the bar is back to the originalposition on the right they will be fully recharged.Remember that due to laser energy limitations it is important not to fire all of the lasers atonce. Higher-class weapons consume a lot of energy. Using lower-class lasers may allow aship to fire more or less continuously, because the recharge rate will be higher than theenergy consumption. So in certain types of combat it may be to your advantage if you use alower-class of laser in higher-class ships, enabling you to shoot for a much longer time.
- Page 2 and 3: “With the shock of the last destr
- Page 4 and 5: GETTING STARTEDSYSTEM REQUIREMENTSP
- Page 6 and 7: -Sound errors can also be caused by
- Page 8 and 9: EAX - stands for Environmental Audi
- Page 10 and 11: KEYBOARD, JOYSTICK, MOUSE AND GAMEP
- Page 12 and 13: - Menu[ Default View ] Num 5[View f
- Page 14 and 15: Mouse ControlThe mouse is by far th
- Page 16 and 17: Auto. Save at Stations:When you doc
- Page 18 and 19: There are a number of optional game
- Page 20 and 21: TRADE, FIGHT, BUILD, THINKTradeWhil
- Page 22 and 23: The overlay will also appear on the
- Page 26 and 27: MissilesJust below the icons for th
- Page 28 and 29: are usually light on shields, with
- Page 30 and 31: HOW TO TRAVEL TO DIFFERENT SECTORST
- Page 32 and 33: STRATEGIES OF PLAYIn this section t
- Page 34 and 35: HOW TO START TRADINGTrading is one
- Page 36 and 37: While docked, go to the trading men
- Page 38 and 39: Each race has a hierarchy of goods
- Page 40 and 41: WHERE TO BUILD YOUR FACTORYWhen you
- Page 42 and 43: Once the factory is positioned, you
- Page 44 and 45: How to connect FactoriesDoing this
- Page 46 and 47: Basic materials:High tech commoditi
- Page 48 and 49: You can purchase fighter craft and
- Page 50 and 51: this will stun them, and then allow
- Page 52 and 53: Advanced, standard Satellite or a s
- Page 54 and 55: On firing remember to fire in short
- Page 56 and 57: The Teladi sectors can be good plac
- Page 58 and 59: Some not so fortunate travellers ha
- Page 60 and 61: can use the energy of the lasers cu
- Page 62 and 63: Q: What is the "missile probability
- Page 64 and 65: Q: How do I set up turrets to fire
- Page 66 and 67: MISSIONSNon-Plot Missions (Got ship
- Page 68 and 69: In the next few stages you will nee
- Page 70 and 71: UPGRADES & EQUIPMENTUpgrades/Equipm
- Page 72 and 73: Navigational BeaconHazard Warning B
Weapons Control SystemThe Weapon Control System originally required ships to be docked in order toinstall lasers into laser slots and then while flying, when docked it would only bepossible to use the laser groups to select which combinations of laser to use at anyone time. The WCS now has advanced features that allow lasers on board the shipto be installed while flying in space.In this example with the graphic on the right, there are four weapon groups aslisted at the bottom 1,2,3,4, with eight lasers in-group one.The weapon location grid indicators on the left of each lasershow to which group the weapon is allocated.The group number like the number 2 group on the right as is highlighted on the listof 1 to 4. When group 1 is selected, all lasers that are in-group 1 will fire andthose that are not in that group will not fire.First, click on the weapon location grid indicator to relocate thelaser in to another group like the next graphic on the right. Byselecting one of these the weapons in that group will now beavailable by selecting the group by selecting 1,2,3,4.A weapon can exist in more than one group, but remember if your ship cancarry eight lasers, you can have four groups with two lasers, or combinationslike two groups with three and a group of two.It is important to balance your weapons into groups, so you can use different powered lasersagainst different classes of ships, like light lasers against M5 ships and heavier group oflasers with a M3 or M6. You can even have all of the lasers listed in group four for shortpowered bursts against a larger more powerful ship.By clicking on the laser, the currently installedweapon is highlighted in the menu, any weaponsthat can be installed in that slot are listed normally,and any weapons that on board, but cannot beinstalled in that slot (either because its too big, orbecause there are none left) will be shown with a red symbol over the top of them.This upgrade now makes it possible to change weaponswhile in flight; Note, it is important that the groups of lasersare setup carefully, as it won't be quite so easy to enableor disable weapons from the current group in the heat ofbattle. Here is a possible layout a ship could have……..Group 1 = 2 A-HEPT;Group 2 = 1 A-HEPT+1ID;Group 3 = 2 A-PAC;Group 4 = 2 A-PAC+2 B-IRE.26Weapon Energy IndicatorsAs you fire your weapons you will see the red bar aboveeach weapon drain. When the bar is back to the originalposition on the right they will be fully recharged.Remember that due to laser energy limitations it is important not to fire all of the lasers atonce. Higher-class weapons consume a lot of energy. Using lower-class lasers may allow aship to fire more or less continuously, because the recharge rate will be higher than theenergy consumption. So in certain types of combat it may be to your advantage if you use alower-class of laser in higher-class ships, enabling you to shoot for a much longer time.


