COMPACT LINE - Stiga.org
COMPACT LINE - Stiga.org
COMPACT LINE - Stiga.org

You also want an ePaper? Increase the reach of your titles
YUMPU automatically turns print PDFs into web optimized ePapers that Google loves.
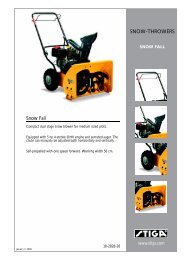
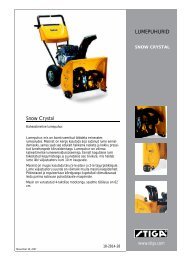
STIGA<strong>COMPACT</strong> <strong>LINE</strong>SNOW ELECTRICBRUKSANVISNINGKÄYTTÖOHJEETBRUGSANVISNINGBRUKSANVISNINGGEBRAUCHSANWEISUNGINSTRUCTIONS FOR USEMODE D’EMPLOIISTRUZIONI PER L´USOINSTRUKCJA OBS£UGI»HC“P”K÷»fl œOÀ‹«Œ¬¿“EÀflNÁVOD K POU®ITÍHASZNÁLATI UTASÍTÁSNAVODILA ZA UPORABOSV ....4FI .....8DA ..12NO .16DE...20EN...24FR....28IT.....32PL ....36RU...40CS ...45HU ..49SL ....548218-2218-71
112243BA563441C562
7893
ENENGLISH1 SYMBOLSThe following symbols appear on the machine. They arethere to remind you of the care and attention required in use.This is what the symbols mean:Warning. If the regulations are not followed, thereis a risk of danger to life and machine breakdown.Read the owner’s manual before operating themachine.Keep bystanders at a safe distance from themachine.Warning of hard objects flying off.The power supply must be disconnected beforecarrying out cleaning or maintenance. Shut off themotor before unclogging the discharge shute.The electric cable must be kept away from the augeropening. Check that the connection cable is alwaysfault free. Only fault-free cables may be used.Keep hands and feet away from rotating parts.Risk of death and maiming. Avoid injury from therotating auger, keep hands, feet and clothing away.Risk of fatal electric shocks2 SAFETY INSTRUCTIONS2.1 GENERAL• Please read through these instructions carefully. Learn allthe controls and the correct use of the machine.• Never allow children or anyone who is not familiar withthese instructions to use the snow thrower. Localregulations may impose restrictions as regards the age ofthe driver.• Never use the machine if others, particularly children oranimals, are in the vicinity.• Remember that the driver is responsible for accidents thathappen to other people or their property.• Be careful not to trip or fall, especially when reversingthe machine.• Never use the snow thrower under the influence ofalcohol or medication and if you are tired or ill.2.2 PREPARATIONS• Check the area to be cleared and remove any loose orforeign objects.• Disengage all controls before starting the engine.• Never use the snow thrower unless properly dressed.Wear footwear that improves your grip on a slipperysurface.• Adjust the height of the auger housing to ensure it staysabove gravel paths.• Check that the mains voltage corresponds with the snowthrower’s rated voltage.• Never, under any circumstances, make adjustments whilethe engine is running (unless otherwise specified in theinstructions).• Allow the snow thrower to adjust to the outdoortemperature before using it.• Always use protective goggles or a visor during use,maintenance and service.2.3 OPERATION• Keep hands and feet away from rotating parts. Alwaysavoid the discharge chute opening.• Be careful when driving on or crossing gravel paths,pavements and roads. Be aware of hidden dangers andtraffic.• Never direct the discharge chute towards a public road ortraffic.• If the snow thrower hits a foreign object, stop the engine,disconnect and carefully inspect the machine for damage.Repair the damage before using the machine again.• If the machine starts vibrating abnormally, stop theengine and look for the cause. Vibration is normally asign of something wrong.• The snow thrower may only be connected to power socketsthat are supplied with earth leakage circuit breakers.The earth leakage circuit breaker must have a trip currentof max. 30 mA.• Risk of tripping over the electric cable. Always be awareof the whereabouts of the electric cable so that it does notget in the way of your feet or anything else moving aboutin the area.• The snow thrower may only be connected with a cablethat is approved for outdoor use.• The electric cable with which the snow thrower is connectedmust always be intact. It must never be used if itdisplays signs of damage.• The snow thrower must never be used if its plug, electriccable or other electrical equipment is damaged.• Repairs to the electrical equipment may only be carriedout by an authorised electrician.• Never drive over the electric cable for the snow throwerwhile working.• If the electric cable for the snow thrower has been damagedwhile working, the following instructions must befollowed:A. Stop the motor.B. Leave the site in the opposite direction from the damagedpoint on the cable.C. Disconnect the cable from the power socket.• Stop the motor and disconnect the power supply:A. If the driver leaves the machine.B. If the auger housing or discharge chute is blocked andmust be cleaned.C. Before beginning repairs or adjustments.• Stop the engine and disconnect the spark plug cable:A. If the machine steers away from the driving position.B. If the auger housing or discharge chute is blocked andmust be cleaned.C. Before beginning repairs or adjustments.24
ENGLISHEN• Always make sure the rotating parts have stopped and allthe controls are disengaged before cleaning, repairing orinspection.• Before leaving the machine unattended, disengage all thecontrols, put it into neutral gear, stop the engine andremove the ignition key.• Never run the engine indoors except when taking it in andout of its place of storage. In this case ensure the door tothe storage place is open. Exhaust fumes are toxic.• Never drive across a slope. Move from the top down, andfrom the bottom to the top. Be careful when changingdirection on a slope. Avoid steep slopes.• Never operate the machine with insufficient protection orwithout the safety devices in place.• Existing safety devices must not be disconnected ordisengaged.• Do not alter the engine’s regulator setting and do not racethe engine. The possibility of personal injury increaseswhen the engine is run at high revs.• Never use the snow thrower near enclosures, cars,windowpanes, slopes etc. without properly setting thedischarge chute deflector.• Always keep children away from areas to be cleared. Getanother adult to keep the children under supervision.• Do not overload the machine by driving it too fast.• Take care when reversing. Look behind you before andduring reversing to check for any obstacles.• Never point the discharge chute towards bystanders. Donot allow anyone to stand in front of the machine.• Disengage the auger when the snow thrower is to betransported or is not in use Do not drive too fast onslippery surfaces when transporting.• Only use accessories that are approved by the machine’smanufacturer.• Never drive the snow thrower in bad visibility or withoutsatisfactory lighting.• Always ensure you have a good balance and a tight gripon the handle.• Never use the snow thrower on a roof.• Do not touch engine components because they are warmduring use. Risk of burn injuries.2.4 MAINTENANCE AND STORAGE• Tighten all nuts and screws so that the machine is in safeworking condition. Check the shear bolts regularly.• Always use genuine spare parts. Non-genuine spare partscan entail a risk of injury, even if they fit the machine.• Never store the machine with petrol in the tank inbuildings where the fumes can come into contact withopen flames or sparks.• Allow the engine to cool before putting the machine instore.• Before a long storage, check the instructions forrecommendations.• Replace damaged warning and instruction stickers.• Let the engine run a couple of minutes with the augerconnected after use. This prevents the auger fromfreezing solid.3 ASSEMBLY3.1 UNPACKING1. Open the packing and take out all parts.2. Check that all parts are supplied. The parts are as follows:• Lower part of the handle• Upper part of the handle• Start control• Cable holder• Six black knobs.• Four long screws with square fittings.• Two short screws with square fittings.• Four screws with washers for the chute attachment.• Chute attachment.• Ratchet with springs for the chute.• Chute.• Two plane washers for the deflector.• Deflector.• Cable holders• Two clamps for fixing of the cable.• Two screws for the start control.3. If anything is missing or damaged, take immediatelycontact with the supplier.3.2 HANDLE3.2.1 Lower part of the handleSee fig. 2.Assemble the lower part of the handle with two knobs andtwo long screws with square fittings.3.2.2 Upper part of the handleSee fig. 3.Assemble the cable holder (4) to the upper part of the handle.Assemble the upper part of the handle on the lower part of thehandle. Fix with two long screws with square fittings and twoknobs.3.2.3 Start controlSee fig. 4.Assemble the start control (1) on the upper part of the handle.Secure the cable to the handle with two clamps (C).3.2.4 Chute1. Assemble the ratchet with the two springs. See fig. 5.2. Assemble the chute in the opening and against theratchet. See fig. 6.3. Assemble the chute attachment with four screws and fourwashers. See fig. 7.4. Assemble the deflector with two short screws, twowashers and two knobs. See fig. 8.25
ENENGLISH4 CONTROLSThe snow thrower is fitted with the following controls anddevices.See fig. 9-12.Starting handle (1) – Starts and stops the electric motor.Ignition lock (2) – Facilitates activation of the starting handle.Connector (3) – For electrical connection.Cable support (4) – For supporting the connection cable.Deflector lock (5) – Locks the deflector in position.Direction lever (6)– Changes the direction of the dischargechute.Discharge chute (A) – Ejects the snow.Deflector (B) – Determines the distance the snow is thrown.5 USING THE MACHINE5.1 GENERALNever start the engine until all the above measures under‘ASSEMBLY’ have been carried out.Never use the snow thrower without first readingand understanding the enclosed instructions andall the warning and instruction stickers on thesnow thrower and in these instructions.Always wear protective goggles or a visor duringuse, maintenance and service.5.2BEFORE STARTINGThe connection cable and its plugs must be faultfree and approved for outdoor use.The connection cable may only be connected topower sockets equipped with an earth leakage circuitbreaker with a trip current of max. 30 mA.The connection cable must be suspended on the cablesupport. Otherwise there is a risk of damagealongside the plug which is potentially life-threatening.Connect the snow thrower with the electric cable from theproperty’s power socket.Suspend the cable on the cable support (4) and connect to theconnector (3). See fig. 9.5.3 STARTStart the motor and the auger as described below.See fig. 1.1. Lean the snow thrower back slightly so that the auger israised a little above the ground.2. Press in and hold the button (2) . Squeeze the handle (1).3. Release the ignition lock, lower the auger towards theground and start to clear the snow.5.5 SNOW CLEARANCESee fig. 1.Never aim the snow at bystanders.Always stop the engine before unclogging.Always wear eye protection when operating thesnow thrower.If the auger is blocked, never try to keep the motorengaged for more than 20 seconds. Extensive engagementwill damage the motor.1. Start the motor as described above and check the ejectiondistance and direction.2. If necessary, stop the motor and adjust the deflector (B).Upwards gives a longer throwing distance and downwardsgives a shorter throwing distance. Lock the deflectorin position using the knob (5).3. If necessary, stop the motor and adjust the dischargechute (A) with the lever (6) so that the snow is ejected inthe desired direction.4. Stop working by releasing the starting handle (1).5. Any unclogging can easily be carried out with a piece ofwood or similar after the engine has stopped.The snow thrower is propelled automatically with the aid ofthe auger. To facilitate propulsion, raise the handlebar a little.Do not push the snow thrower.5.5.1 Dry and normal snowSnow up to 20 cm deep can be removed quickly and easilyby clearing at an even speed. Plan for downwind discharge ofthe snow.5.5.2 Wet, packed snowDrive slowly forward. If the wet, packed snow blocks the dischargechute, back up and jab a little way into the snow a fewtimes to clear the deflector.5.6 AFTER USEThe snow thrower must never be rinsed with water.Risk of damage to the electrical system andrisk of electric shocks.1. Stop the motor.2. Disconnect the electric cable from the snow thrower andthe property’s power socket.3. Allow the snow thrower to cool for 30 minutes.4. Clean the inside and outside of the snow thrower with asuitable brush.5. Check that there are no damaged or loose parts. Repair/replace parts if necessary.5.4 STOPStop the motor and the auger by releasing thestarting handle (1). See fig. 1.26
ENGLISHEN6 MAINTENANCEThe electrical connection must be disconnectedbefore carrying out maintenance work.6.1 BEFORE USE• Every time the snow thrower is to be used, check that theelectrical equipment is intact and free of faults. The snowthrower must not be used if there are any faults or if anythingis missing.• Check that the auger rotates easily.• Check that all screw joints are tightened. Tighten if necessary.• Apply silicon spray to the auger. This prevents icing.• Check that the starting handle cannot be activated withoutthe ignition lock being moved to the left.6.2 FAULT-TRACINGThe faults described below can usually be rectified directlyby the user. If there is any doubt, contact an authorised agent.The motor does not start:• The electric cable is not connected or is defective.• The fuse has blown. If a higher amp fuse needs to be installed,contact an authorised electrician.The motor hums, but does not start:• Auger or discharge chute blocked.• The capacitor is defective. Contact your GGP agent.The motor stops suddenly:• Loose plugs.• The overload protection has been tripped. Wait for 10minutes, then attempt to start again.The snow thrower vibrates:• Loose parts.• Defective auger.• The motor is loose.The snow thrower does not clear any snow:• Auger or discharge chute blocked.The drive belt is loose or defective.8 PURCHASE TERMSA full warranty is issued against manufacturing and materialdefects. The user must carefully follow the instructions givenin the enclosed documentation.The warranty does not cover damage due to:- Neglect by users to acquaint themselves withaccompanying documentation- Carelessness- Incorrect and non-permitted use or assembly- The use of non-genuine spare parts- The use of accessories not supplied or approved by GGPNeither does the warranty cover:- Wear parts such as drive belts, augers, wheels- Normal wear- Engines. These are covered by the engine manufacturer’swarranties, with separate terms and conditions.The purchaser is covered by the national laws of eachcountry. The rights to which the purchaser is entitled with thesupport of these laws are not restricted by this warranty.7 STORAGEWhen the snow thrower is to be stored for an extended period,such as during that part of the year when snow clearancedoes not need to be carried out, the following measures mustbe taken.1. Clean the whole snow thrower thoroughly.2. Inspect the snow thrower for damage. Repair if necessary.3. Touch up any paint damage.4. Rust-proof unpainted metal surfaces.5. Store the snow thrower in a clean, dry place.27
www.stiga.comGGP Sweden AB · Box 1006 · SE-573 28 TRANÅS