Care for your child's Central Venous Catheter (CVC) - Cook Children's
Care for your child's Central Venous Catheter (CVC) - Cook Children's
Care for your child's Central Venous Catheter (CVC) - Cook Children's

You also want an ePaper? Increase the reach of your titles
YUMPU automatically turns print PDFs into web optimized ePapers that Google loves.
<strong>Care</strong> <strong>for</strong> <strong>your</strong> child’s<strong>Central</strong> <strong>Venous</strong> <strong>Catheter</strong>(<strong>CVC</strong>)This booklet is intended <strong>for</strong> general in<strong>for</strong>mational purposes only. You should consult<strong>your</strong> doctor <strong>for</strong> medical advice. Please call the clinic or <strong>your</strong> home health nurse if youhave any questions or concernsPage 1 of 10REVISION DATE February 2011Copyright © <strong>Cook</strong> Children’s Health <strong>Care</strong>Family Copy1
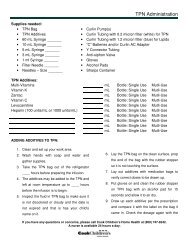
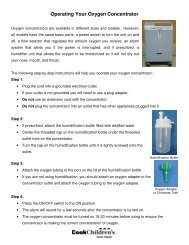
Caring <strong>for</strong> Your Child’s <strong>Central</strong> <strong>Venous</strong> <strong>Catheter</strong>A central venous catheter is a small, hollow, flexible tube that is surgically placed into a largeblood vessel, usually above the heart. It is used <strong>for</strong> taking blood samples or <strong>for</strong> giving blood,chemotherapy or medications. You may also hear this catheter referred to as a Hickmancatheter (a name brand) or <strong>CVC</strong>.Where the catheter comes out of the skin is called the exit site. This is usually in the chest. Thecatheter may separate into one, two or three tubes called lumens (<strong>for</strong> example a double lumenhas two and a triple lumen has three).This booklet is designed to help you take care of the catheter. Be<strong>for</strong>e <strong>your</strong> child is dischargedfrom the hospital, the nurses will help teach you and explain the procedures needed. You willbe able to demonstrate all of the steps needed to take care of <strong>your</strong> child’s catheter.• The Hematology/Oncology clinic number is (682)885-4007.• The 3-North Hospital Nurses’ Station number is (682)885-4410.• The 3-South Hospital Nurses’ Station number is (682)885-4247.• After hours and on weekends, please contact the hospital operator at (682) 885-4000 and ask <strong>for</strong> the hematology/oncology doctor on call.• Where to get <strong>your</strong> supplies: ____________________________________Always ask questions! We want you to feel as com<strong>for</strong>table as possible taking care of<strong>your</strong> child’s catheter.Be<strong>for</strong>e you start:• Find a clean, safe place at home to do the dressing change.• Turn off fans and keep pets away.• Clean the area with antibacterial spray.• We suggest you place the supplies on a clean cookie sheet.Keep <strong>your</strong> supplies away from other children and in a clean, dry place. You maywant to store them together in zip lock bags to keep them unopened and clean.Store them in a safe place where other children cannot reach.Page 2 of 10REVISION DATE February 2011Copyright © <strong>Cook</strong> Children’s Health <strong>Care</strong>Family Copy2
Tools Needed <strong>for</strong> Dressing Changes:1- Mask1 - Chloraprep stick1 - Biopatch (antibiotic disc)1 - clear, transparent waterproof (occlusive) dressing1- Hand Antiseptic Gel or SanitizerAdhesive tape remover (optional)CHANGING THE DRESSINGWEEKLYYour child’s dressing needs to be changed every 7 days, or if it gets wet or soiled1. Gather <strong>your</strong> supplies.2. Remove <strong>your</strong> jewelry if possible.3. Wash <strong>your</strong> hands with liquid antibacterial soap <strong>for</strong> at least 1 minute. Rinse and drywith a paper towel. Turn the water off using a paper towel rather than <strong>your</strong> cleanhand.4. Put on mask.5. Open the dressing package without touching the dressing, and open the Biopatchpackage without touching the Biopatch.6. Open the Chloraprep stick. Do not place it on the opened dressing.7. Remove the old dressing.8. Wash <strong>your</strong> hands again (if hands are visibly dirty), or you may use a hand sanitizer.9. Observe the site around the catheter <strong>for</strong> signs of infection or damage• redness• swelling• drainage• torn or broken skin• tenderness above the opening• fluid leaking around or through the side of the catheterIf you see any of these changes, call <strong>your</strong> clinic nurse or doctor10. Activate the Chloraprep by squeezing the wings. Clean around the catheter exit sitewith a vigorous scrub <strong>for</strong> 30 seconds. Make sure to clean about 3 inches out in orderto cover the entire area that the dressing will cover.11. With the same Chloraprep stick, gently clean the line itself approximately 3 to 6inches out from the exit site.Page 3 of 10REVISION DATE February 2011Copyright © <strong>Cook</strong> Children’s Health <strong>Care</strong>Family Copy3
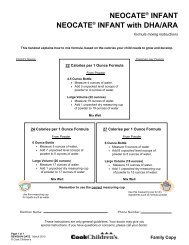
12. Allow the skin to dry <strong>for</strong> about 30 seconds. Resist the urge to blow on the skin or fanwith anything to make it dry faster!13. Place the Biopatch around the catheter, with the smooth foam side next to the skin.(The shiny side is up).14. Loop the catheter around the exit site.15. Place the transparent dressing over the site, making sure you can still clearly seethe exit site, and keeping the loop under the dressing.16. Press around the edges and around the loop to make sure the dressing is sticking tothe skin.If you are using a NON-TRANSPARENT dressing(one that you can not see the exit site through)• Change DAILY• Clean the site as instructed above• Cover the site with the Biopatch, a split 2X2 pad and a 2X2 gauze• Place the dressing over the gauze• Loop the line on the outside of the dressing and secure it with tapeFlushing the <strong>Catheter</strong>Each lumen of <strong>your</strong> child’s catheter should be flushed with heparin every day toprevent blood from clotting in the <strong>CVC</strong>.You will need the following tools <strong>for</strong> each lumen:1 – alcohol1 – prefilled 3cc Heparin syringe (100 units/ml)1. Wash <strong>your</strong> hands with liquid antibacterial soap <strong>for</strong> at least 1 minute. Rinse and drywith a paper towel. Turn the water off using a paper towel rather than <strong>your</strong> cleanhand.2. If there are any air bubbles in the syringe, gently tap the syringe so that the airgoes to the top (toward the needle) and push the plunger until a drop of liquidcomes out.3. Clean the cap on one end of the <strong>CVC</strong> lumen with a new alcohol swab (about 15seconds).Page 4 of 10REVISION DATE February 2011Copyright © <strong>Cook</strong> Children’s Health <strong>Care</strong>Family Copy4
4. Holding the syringe like a pencil, screw the syringe into the center of the cap.Slowly and easily inject the Heparin.Clamp the catheter at the same time you are injecting the last ½ ml. ofHeparin. Clamp the line on the “thickest” part of the line and in a differentspot each day to prevent wear on the line.5. Repeat this flushing procedure <strong>for</strong> each lumen of the catheter.Some things to remember:• Flush EACH lumen every day• Try to flush at the same time every day• If you <strong>for</strong>get, flush as soon as you can• NEVER <strong>for</strong>ce the Heparin into the line• IF you can not flush the Heparin into the line, check to make sure the line isunclamped• IF you still can not easily flush the Heparin, call <strong>your</strong> clinic or home health nurse• If <strong>your</strong> home health supplies are different, please have them instruct you on their useCHANGING THE CAPSupplies needed to change the cap:1 – alcohol swab1 – Sterile cap1 – MaskWEEKLY and with Lab DrawsYour child’s cap needs to be changed every 7 days.1. After flushing the line with Heparin, leave the line clamped.2. Put on mask.3. Open the package with the new cap in it.4. Open the alcohol swab and clean around the cap and the connection <strong>for</strong> 30 to 60seconds.5. Remove the old cap and replace it with the new cap.Page 5 of 10REVISION DATE February 2011Copyright © <strong>Cook</strong> Children’s Health <strong>Care</strong>Family Copy5
It may be helpful to carry an EMERGENCY KIT with you in a zip lock bag containing:• Unopened catheter cap• Clamps (one <strong>for</strong> each lumen)• Chloraprep sticks and alcohol swabs• Spare dressing• Heparin flushing suppliesHELPFUL HINTSSupplies• Always store needles and supplies away from children and pets’ reach.• Do not call the clamps “scissors”. Young children may misunderstand and usereal scissors on the line…oops!• It may be helpful to have smaller children wear snug fitting t-shirts to help securethe line and dressing.• Clamp the line on the “thickest” part of the line and try to clamp in a different spoteach day to prevent wear on the line.•Remember, if <strong>your</strong> home health company brings you different supplies, pleasehave them clarify how to use them.Heparin• Do not refrigerate the Heparin, but also avoid extreme heat (like living in Texas inAugust!)If <strong>your</strong> child can "taste" the Heparin, you may:• push the Heparin at a slow, steady pace,• have the child sip on a drink, suck a piece of hard candy or chew gum during theHeparin injection.Page 6 of 10REVISION DATE February 2011Copyright © <strong>Cook</strong> Children’s Health <strong>Care</strong>Family Copy6
GLOSSARYAdhesive tape remover: a pad that is wet with a special liquid that helps remove tape.It must be completely cleaned off with the Chloraprep be<strong>for</strong>e the new dressing will stickAntibacterial soap: a soap that kills germs, the liquid pump version is best. Examplesare Dial®, Zest ®, Safeguard® and Soft Soap® antibacterial brands.Biopatch: a medicated disc that is placed around the exit site to prevent infectionCC or ML: cubic centimeter or milliliter. Small units used to measure how muchmedicine is in a syringe. 1 cc is the same as 1 ml.<strong>Central</strong> venous catheter (<strong>CVC</strong>): a thin, hollow rubber-like tube that has been placed ina large vein near <strong>your</strong> child’s heart. A doctor or surgeon inserts this during surgery while<strong>your</strong> child is asleep. This catheter will be used <strong>for</strong> drawing blood samples and givingmedicine, chemotherapy, IV fluids and blood products. There may be one, two or threetubes or openings, called lumens with a plastic clamp and cap on each end.Chloraprep: a solution filled swab used to clean the skin around the exit site of acentral venous catheter. This solution kills bacteria on contact, and continues working<strong>for</strong> up to 5 days.Clamps: a special piece of plastic on the catheter used to compress the catheter lineduring the cap change or when the line is uncapped (also called a “line clamp”). Spareclamps, which may look like scissors, will be given to you by <strong>your</strong> home health companyto use if the line should break or develop a leak.Clot: when the blood clumps together, <strong>for</strong>ming a “patch” to stop bleeding. Sometimes aclot will <strong>for</strong>m in the catheter and “clog up” the line. Heparin helps to prevent clots from<strong>for</strong>ming.Exit site: where the catheter comes out through the skinGauge: the size of a needleHeparin: a drug that prevents blood clots from <strong>for</strong>ming inside the catheter. Dailyflushing of each catheter lumen will help prevent this.Hickman / Broviac <strong>Catheter</strong>: types of central venous cathetersInjection Cap or CAP: the special cap on the end of each catheter lumen that keepsblood from leaking out of the tube and keeps germs and air from going in. Other namesare infusion cap and intermittent infusion port.Page 7 of 10REVISION DATE February 2011Copyright © <strong>Cook</strong> Children’s Health <strong>Care</strong>Family Copy7
Intravenous (IV): into the veinIV gauze: also called a split gauze; used when a dressing that can not be seen throughis on the catheter exit siteOcclusive dressing: a clear, completely sealed dressing that is waterproof. The linesite can be seen through a transparent dressing.Syringe plunge or plunger: the inside part of the syringe with the black rubber tip thatpushes the medicine out of the syringe.Page 8 of 10REVISION DATE February 2011Copyright © <strong>Cook</strong> Children’s Health <strong>Care</strong>Family Copy8
FREQUENTLY ASKED QUESTIONSWhat if I am unable to push the Heparin into the catheter?• This may be caused by a blood clot inside the catheter or at the end of the tube• Never <strong>for</strong>ce the Heparin or you could cause the catheter to break or split.• If you are unable to push the Heparin in easily, call the clinic or home health nurse.• Try and remember to flush the catheter the same time every day to establish aroutine.• When flushing the catheter, close the catheter clamp during the last ½ cc of theHeparin to create positive pressure and reduce blood backing up into the line.What happens if I see blood inside the cap?• Check to make sure the cap is on tight.• Flush the line with Heparin using <strong>your</strong> usual technique.• If the blood does not flush out of the cap, change it using the steps instructed in thisbooklet.• Blood backing up into the cap is not an indication of a problem, but if it continues tohappen, let <strong>your</strong> clinic or home health nurse know.• Keeping the blood out of the catheter will help to prevent an infection, but only flushthe catheter one extra time per day if needed.How will I know if the line is infected?• Look at the exit site every day.• Look <strong>for</strong> redness, swelling, pus or drainage around the exit site.• Ask <strong>your</strong> child if the line site is sore or tender to touch either around the exit orabove the exit where the line is underneath the skin.• Call <strong>your</strong> clinic nurse or doctor if you notice any of these signs.• Another sign may be a low-grade fever or fever within an hour of flushing thecatheter. If this happens, call <strong>your</strong> doctor, <strong>your</strong> child may need antibiotics.• Always remember to wash <strong>your</strong> hands be<strong>for</strong>e changing the dressing and flushing.• Change the dressing if it gets wet or soiled or becomes loose.Page 9 of 10REVISION DATE February 2011Copyright © <strong>Cook</strong> Children’s Health <strong>Care</strong>Family Copy9
What do I do if the cap comes off?• Immediately close the catheter clamp.• Clean the end of the catheter with alcohol.• Replace the old cap with a new, sterile one.• Insert a new empty syringe into the capped line and draw back on the syringeplunger until you get blood in the syringe.• Flush with Heparin using <strong>your</strong> usual procedure.• If <strong>your</strong> child begins to have a hard time getting his or her breath (shortness ofbreath) or if a lot of blood came out of the catheter when the cap was off, call <strong>your</strong>doctor immediately.What should I do if the line breaks or gets a hole in it?• Immediately clamp the catheter above the break…between the exit site at the skinand where the tear has happened.• Call <strong>your</strong> clinic nurse.• You will need to come into the clinic or emergency room. The line can probably berepaired.• Remember, never try and <strong>for</strong>ce the Heparin into the line when flushing.What if the catheter cuff is showing or the line gets pulled out?• If the catheter is pulled out, put firm pressure on the opening <strong>for</strong> at least 15 minutesuntil the bleeding has stopped.• Cover the opening with a dressing.• Call <strong>your</strong> clinic nurse or doctor immediately.• Remember to loop the catheter under the dressing and change the dressing if theloop comes out. If you or any of <strong>your</strong> family members would like to attend anotherclass to practice central line care, please contact an education coordinator at 682-885-1631. We will be glad to schedule you in a class.Page 10 of 10REVISION DATE February 2011Copyright © <strong>Cook</strong> Children’s Health <strong>Care</strong>Family Copy10