You also want an ePaper? Increase the reach of your titles
YUMPU automatically turns print PDFs into web optimized ePapers that Google loves.
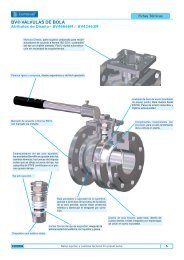
©<strong>COMEVAL</strong>, S.L. www.comeval.es Technical Dept. Ref. IOM-<strong>BV</strong> <strong>SS</strong>-02/08Comeval, S.L. reserves the right to alter any technical data contained in this leafl et without prior notice.INSTALLATION, START-UPAND MAINTENANCE<strong>BV</strong>26666<strong>BV</strong>36666<strong>BV</strong>23V6666 <strong>BV</strong>46666<strong>BV</strong> <strong>SS</strong> - <strong>BALL</strong> <strong>VALVES</strong><strong>BV</strong> <strong>SS</strong> - <strong>BALL</strong> <strong>VALVES</strong>
<strong>BV</strong> <strong>SS</strong> - <strong>BALL</strong> <strong>VALVES</strong>Use: Ball valves are devices to stop the fl ow in a piping system. The valve closes by turning the handle 90º clockwise,which turns the inside ball against the seats. Leaving standard ball valves in partially open position could lead to prematurewear of seats and ball depending on media, pressure drop and velocity.Please contact us for valve selection in case of use with any media that can solidify, crystallize, polymerise or vaporize inservice. <strong>BV</strong> ball valves are classifi ed in accordance with Pressure Equipment Directive PED 97/23/CE.For particular valve specification and parts description and materials, please refer to the corresponding approved orderdrawing. Further information at www.comeval.es.Reception: Check that valves are received in proper condition. If not please report immediately to the forwarder within24 hours after reception.Essential Safety Guidelines: Valves to be installed by qualifi ed personnel, according to this manual, followingsafety working regulations and applications limits stated in our technical information.Preservation and Handling: Keep storage protection and leave valve in open position until installation. Avoidextreme temperatures, high humidity or corrosive environment. Keep the valves away form rain or fl ames. Avoid bumpingor scratching. Do not use levers or actuators to handle big valves.©<strong>COMEVAL</strong>, S.L. www.comeval.es Technical Dept. Ref. IOM-<strong>BV</strong> <strong>SS</strong>-02/08Comeval, S.L. reserves the right to alter any technical data contained in this leafl et without prior notice.Installation and Start-up:- Check the equipment design codes in relation with the applicable plant codes.- Check that materials and valve service limits conform with the duty.- Consider the interaction between the system and the equipment. Foresee elements to absorb vibrations, pipe dilatations,guides, anchoring and proper support according to the weight of the components.- Allow enough space for maintenance operation.- Valve optimal position is horizontal with stem pointing upwards. Small sizes can alternatively be installed in verticalpipelines. Always avoid the stem pointing downwards.- Ball valves are bi-directional unless there is an arrow in the body pointing out the fl ow direction.- For three way valves, select inside confi guration and connections in relation with fl ow circulation required.- Protect the valve soft parts from heating caused by welding works at the plant during commissioning.- Remove remaining protective packing just before installation and check that the valve is clean of foreign particles.- Flush the pipe system thoroughly to eliminate all the particles and impurities which could remain in the pipes and particularlywelding residue, tool remains, etc. that could damage the equipment during start-up.SCREWED END <strong>VALVES</strong>: Ensure threads compatibility; use proper sealant in the thread; to avoid damages in the valve,tighten with a plain or adjustable wrench on the valve hexagon end only; do not try to force the thread and avoid wrenchextensions. Do not exceed tightening torque of 30 Nm. Ensure that pipe does not interfere with valve inner parts.FLANGED <strong>VALVES</strong>: Ensure compatibility of fl ange and counter-fl ange; pipe and valve to be perfectly aligned and supportedto avoid tensions in the union. Use suitable gaskets between fl anges according to duty and centre them properly.Flanges should fi t smoothly. Tighten in a crosswise, moderate and uniform manner.WELD END <strong>VALVES</strong>: Ensure compatibility of ends; clean valve and pipe ends carefully, tack-weld the valve on the pipein four points on both end caps, putting trim away to prevent heat exposure. Once the welding process is fi nished, waituntil system cools down before inserting the trim back.ACTUATORS: If the valve requires pneumatic, electric or hydraulic actuators, separate actuator IOMs shall be alsofollowed.Make sure that the actuator is suitable for service particular requirements, valve adaptability, function needed, adequatetorque for the valve, need for limit switches, etc. Take into account torque increase with increase in working pressure,viscous liquids or non-lubricating media such as gases. Contact our Technical Department for advice.- Once the valve installed, check the correct working and tightness of the valve with the system under pressure (if duringtests pressure is going to be raised above maximum working pressure, do it only with valve open!). If any leakage is observed,retighten moderately the packing nut or union bolts, or replace gaskets if necessary. Packing nut is tightened moderatelyin factory and retightening at start-up could be necessary in case that packing rings relaxation had occurred.Operate the valve gradually to avoid water hammers in the system.- Warning! Temperatures above 50ºC or below 0ºC may cause personnel injuries if valves are touched. Ensure that thecorresponding warning signs are displayed on the valve or surrounding area, or isolate the equipment in case of danger.Maintenance and spare parts:- Operate the valve often, to avoid torque increase and prevent from deposits.- Wait the valve medium to cool down before starting any maintenance job at the plant, release the pressure from thesystem. In the event of dangerous fluids drain the pipe system before dismounting, and test the valve in bench beforereinstalling it.- Please inspect the valve ball and seat surface as well as the stem packing.- According to service level, it can be advisable to prevent set of seats, packings, or complete valves.
©<strong>COMEVAL</strong>, S.L. www.comeval.es Technical Dept. Ref. IOM-<strong>BV</strong> <strong>SS</strong>-02/08Comeval, S.L. reserves the right to alter any technical data contained in this leafl et without prior notice.SYMPTOM LIKELY REASON CORRECTIVE ACTIONNo fl ow Valve is closed Open the valveEnd covers still placed Remove end coversLittle fl ow Ball not open enough Keep on turning the handle or actuator.Upstream strainer basket clogged withdirtiesClean/replace the spare basketClogged pipe lines Check pipe linesAtmospheric Leakage Stem packing seals or sealing surfacesare damaged or worn downTighten the packing trying to eliminateleakageStem jamming, very highoperation torqueWorking duties are beyond permissibleparameters (viscous or dry medium,high pressure, etc.))If necessary check surfaces and replacepackingCheck with us working conditionsStem not lubricated enough Proceed to lubricateWrong turn direction (opposite) Turn in the correct direction (valve openbeing handle parallel to pipe, clockwisedirection to close).Packing too tightened Slightly loose packing slightly making surethere is no leakageBody bolts too tightened Slightly loose bolts making sure there is noleakageSeat Leakage Valve is not properly closed Tight the lever fi rmly without using anyadditional wrenchEnd connections or halvesconnections brokenDirt trapped between ball and seat Open and close again to sweep dirty. Installa strainer upstreamPTFE seats damaged Replace seats and/or ballToo high differential pressure See previous point. Check actuator selectionPipe and/or halves misalignment.Bolts not uniformly tighten or too tightenInstall a new valve, making sure of properalignment of pipe and halves as well asproper tightenFull technical support always available through our website www.comeval.es or your local distributor.PARTS DISA<strong>SS</strong>EMBLY AND A<strong>SS</strong>EMBLYFirstly separate the body halves by removing the body bolting. Then manual operator or actuator should be removed.Once the operation device removed, the stop collar and associated washers can be removed from the top-works. Thenrelieve packing-box compression by removing packing bolting. Turn the valve to the closed position. Remove the seatsand the ball should slide out through the body port with a gentle push. Push the stem downwards and stem packing andremove through the body port. Place all removed parts in a clean and secure place. Parts with symptoms of wear orcorrosion should be replaced.Before mounting again be sure that seats and gaskets surfaces are free from dirt. Follow the above steps in the reverseorder to reassemble the valve. Seats should perfectly fit; if necessary slightly strike with a soft hammer. Once mounted,slowly operate the valve till a complete manoeuvre is covered, to allow perfect adjustment between ball and seats.Operate again the valve once tightened to check that operating torque is not excessive. To reinstall the valve follow thismanualTroubleshooting table:<strong>BV</strong> <strong>SS</strong> - <strong>BALL</strong> <strong>VALVES</strong>
<strong>BV</strong>26666<strong>BV</strong>36666
<strong>BV</strong>23V6666<strong>BV</strong>46666