Create successful ePaper yourself
Turn your PDF publications into a flip-book with our unique Google optimized e-Paper software.
KV-21FT2<br />
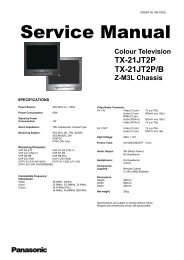
2-7. Rear Cover Removal<br />
=><br />
=><br />
=><br />
Remove the rear cover fixing screws indicated. Pull the rear<br />
cover straight back until clear of chassis.<br />
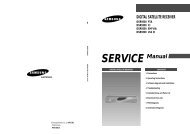
2-9. Service Position<br />
=><br />
=><br />
=><br />
Position the A board as shown to gain access to its solder side.<br />
Take care not to trap the interconnecting leads in the process.<br />
14<br />
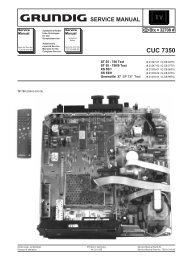
2-8. Chassis Removal and Refitting<br />
To remove the chassis release the clips indicated at opposite<br />
sides of the main bracket and slide the chassis away from the<br />
beznet. Ensure that the interconnecting leads are released from<br />
their purse locks to prevent damage being caused.<br />
2-10. Wire Dressing<br />
=><br />
Ensure that all wires do not touch heat-sinks and high temperature<br />
hot spots. All wires must be kept at a minimum distance of<br />
20mm away from the EHT lead.