You also want an ePaper? Increase the reach of your titles
YUMPU automatically turns print PDFs into web optimized ePapers that Google loves.
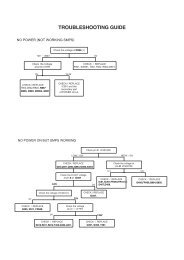
2-6. Picture Tube Removal<br />
WARNING:<br />
BEFORE REMOVING<br />
THE ANODE CAP<br />
High voltage remains in the CRT even<br />
after the power is disconnected. To<br />
avoid electric shock, discharge CRT<br />
before attempting to remove the anode<br />
cap. Short between anode and CRT<br />
coated earth ground strap.<br />
Coated Earth<br />
Ground Strap<br />
Removal of the Anode-Cap<br />
* REMOVING PROCEDURES.<br />
a<br />
1 Turn up one side of the rubber cap in 2 Using a thumb pull up the rubber cap<br />
the direction indicated by the arrow a firmly in the direction indicated by the<br />
arrow b<br />
How to handle the Anode-Cap<br />
1. To prevent damaging the surface of the anode-cap do not use<br />
sharp materials.<br />
2. Do not apply too great a pressure on the rubber, as this may cause<br />
damage to the anode connector.<br />
3. A metal fitting called a shatter hook terminal is fitted inside the<br />
rubber cap.<br />
4. Do not turn the rubber foot over excessively, this may cause damage<br />
if the shatter hook sticks out.<br />
7<br />
9<br />
b<br />
8<br />
1. Discharge the anode of the CRT and remove the anode cap.<br />
2. Release the EHT lead from its CRT support bracket.<br />
3. Unplug all interconnecting leads from the Deflection yoke,<br />
degaussing coils and CRT grounding strap.<br />
4. Remove the C Board from the CRT.<br />
5. Remove the chassis assembly.<br />
6. Loosen the Deflection yoke fixing screw and remove.<br />
7. Place the set with the CRT face down on a cushion.<br />
8. Unscrew the four CRT fixing screws [ located on each CRT<br />
corner ] and remove the CRT.<br />
9. Remove the Degaussing Coils.<br />
Remove the CRT grounding strap and spring tentioners.<br />
[Take care not to handle the CRT by the neck.]<br />
13<br />
b<br />
c<br />
6<br />
Anode button<br />
3 When one side of the rubber cap is<br />
separated from the anode button, the<br />
anode-cap can be removed by turning<br />
up the rubber cap and pulling it up in<br />
the direction of the arrow c<br />
1<br />
2<br />
5<br />
3<br />
4