Liquid Machines Document Control Administration ... - Check Point
Liquid Machines Document Control Administration ... - Check Point
Liquid Machines Document Control Administration ... - Check Point

You also want an ePaper? Increase the reach of your titles
YUMPU automatically turns print PDFs into web optimized ePapers that Google loves.
<strong>Liquid</strong> <strong>Machines</strong> <strong>Document</strong> <strong>Control</strong><strong>Administration</strong> GuideVersion 6.4
ContentsSupported Environment ................................................................................... 5Server Requirements ................................................................................................ 5Hardware .......................................................................................................... 5Software ........................................................................................................... 5Client Requirements................................................................................................. 6Hardware .......................................................................................................... 6Software ........................................................................................................... 6Typical Deployment Configurations............................................................................... 6Basic Installation ................................................................................................. 6Enterprise Installations and Fault Tolerance................................................................. 6<strong>Liquid</strong> <strong>Machines</strong> <strong>Document</strong> <strong>Control</strong> Services ................................................................. 7Advanced Architectures ......................................................................................... 9Microsoft RMS ..................................................................................................... 9Installing the <strong>Liquid</strong> <strong>Machines</strong> <strong>Document</strong> <strong>Control</strong> Server.....................................................10Prerequisites......................................................................................................... 10Building the Server Platform................................................................................... 10DNS Aliases for Scalability and Recovery .................................................................... 10SSL Certificate ................................................................................................... 11Master Encryption Key .......................................................................................... 11Service Accounts and Logins ................................................................................... 11Installing a New <strong>Liquid</strong> <strong>Machines</strong> <strong>Document</strong> <strong>Control</strong> 6.x Server............................................. 13Overview .......................................................................................................... 13Installing the Software.......................................................................................... 13Running the Post-Install Configuration on the First Server ............................................... 14Configuring Security Services.................................................................................. 21Load Balancing and Configuring Additional Servers ........................................................... 27Aliasing the Service ............................................................................................. 27Copying Master Keys ............................................................................................ 27Installing Additional Servers ................................................................................... 28Reimporting Master Keys ....................................................................................... 28Removing a Server.................................................................................................. 29Removing Additional Files and Web Site Settings .......................................................... 29Upgrading the Server.................................................................................................31Installing the <strong>Liquid</strong> <strong>Machines</strong> <strong>Document</strong> <strong>Control</strong> Client......................................................33Prerequisites......................................................................................................... 33Microsoft RMS: Adjusting Internet Explorer Security Settings ............................................... 33Specifying a <strong>Control</strong> Service ...................................................................................... 34Installing the Client Software..................................................................................... 34<strong>Liquid</strong> <strong>Machines</strong> <strong>Document</strong> <strong>Control</strong> Version 6.4 <strong>Administration</strong> Guide Page 3
Upgrading the Client..................................................................................................36Setup.exe Method .................................................................................................. 36<strong>Liquid</strong> <strong>Machines</strong> <strong>Document</strong> <strong>Control</strong>.msi Method ............................................................... 36Installing Application Security Module Updates.................................................................37Loading the Application Security Modules ...................................................................... 37Disaster Recovery .....................................................................................................39Preparing for Disaster Recovery.................................................................................. 39Backing Up the SQL Database.................................................................................. 39Backing Up the Master Key..................................................................................... 39Testing Disaster Recovery ......................................................................................... 40Testing the Infrastructure Restore Procedure .............................................................. 40Testing the Data-Only Restore Procedure ................................................................... 41Disaster Recovery................................................................................................... 41Server Recovery with Database and Master Key Backups ................................................. 41<strong>Document</strong> Only Restore......................................................................................... 42Page 4<strong>Liquid</strong> <strong>Machines</strong> <strong>Document</strong> <strong>Control</strong> Version 6.4 <strong>Administration</strong> Guide
Server RequirementsHardwareSoftwareSupported Environment<strong>Liquid</strong> <strong>Machines</strong> <strong>Document</strong> <strong>Control</strong> servers must have access to a Microsoft SQLServer 2000 SP4 or SQL 2005 database server instance. The Microsoft SQLServer instance can:• Be installed on a <strong>Liquid</strong> <strong>Machines</strong> server.• Be installed on a separate server machine.• Come from an existing SQL Server infrastructure.For high availability, <strong>Liquid</strong> <strong>Machines</strong> recommends that you either cluster SQLServer, or that you use log shipping to store data on a warm spare SQL Serverinstance.If you want users to automatically and transparently use their Active Directorylogin credentials when logged into Windows, you must join the <strong>Liquid</strong> <strong>Machines</strong>servers to the Active Directory forest or trust realm where the user accountsreside.<strong>Liquid</strong> <strong>Machines</strong> <strong>Document</strong> <strong>Control</strong> employs the primary email address of a useras the identifier in protected documents. This means that, when integratingwith Active Directory, only mail-enabled users, mail-enabled groups, and, ofcourse, distribution lists, can be used as parameters in defining roles in policiesfor protecting documents.Finally, if you will enable Microsoft Rights Management Services as a SecurityService that supports the <strong>Liquid</strong> <strong>Machines</strong> installation, you must have alreadydeployed and configured a fully working Microsoft RMS installation in theproduction environment where you will install the <strong>Liquid</strong> <strong>Machines</strong> <strong>Document</strong><strong>Control</strong> server.• Pentium IV• 1 GB RAM• 20 GB disk space• Windows 2003 Server SP1• Internet Information Server (IIS) 6.0, enabled with an SSL certificate.• Microsoft .NET Framework 2.0• Internet Explorer 6.0 or Mozilla Firefox 1.x or 2.xYou must install the Application Server role and enable ASP.NET. You must theninstall .NET 2.0 and reconfigure IIS to use the 2.0 Framework. Furtherinstructions follow.<strong>Liquid</strong> <strong>Machines</strong> <strong>Document</strong> <strong>Control</strong> Version 6.4 <strong>Administration</strong> Guide Page 5
Client RequirementsHardwareSoftware• Pentium IV• 256 MB RAM• 1 GB disk spaceOne of the following:• Windows 2000 Workstation SP4• Windows XP SP1 or SP2• Windows 2003 Server, including SP1 or SP2 (for terminal servicesinstallations)To use Microsoft RMS as a security service, you must also install the MicrosoftRMS Client SP1 or SP2.In addition to the operating system, to make use of <strong>Liquid</strong> <strong>Machines</strong> <strong>Document</strong><strong>Control</strong>, you must install one or more supported desktop applications:• Microsoft Office 2000• Microsoft Office XP SP3 Professional• Microsoft Office 2003 SP1 or SP2 Professional• Adobe Acrobat versions 6 or 7• Acrobat Reader versions 7 or 8• Microsoft Visio 2002 or 2003Within the Microsoft Office Professional suite, Word, Excel, and Power<strong>Point</strong> aresupported. You may install one or a combination of these from the suite.Note: Using Word as the editor in Outlook is supported; however, the <strong>Liquid</strong><strong>Machines</strong> functionality is not available to Word when it is acting as an Outlookeditor.Typical Deployment ConfigurationsBasic InstallationThe most common and recommended configuration for smaller installations isone server dedicated to Microsoft SQL Server 2000 or 2005 and one serverdedicated to <strong>Liquid</strong> <strong>Machines</strong> <strong>Document</strong> <strong>Control</strong> server.Enterprise Installations and Fault ToleranceFor enterprise installations, <strong>Liquid</strong> <strong>Machines</strong> <strong>Document</strong> <strong>Control</strong> servers can beconfigured to utilize a single common database and act as a single applicationor server farm. A third-party load-balancing solution, such as Windows LoadPage 6<strong>Liquid</strong> <strong>Machines</strong> <strong>Document</strong> <strong>Control</strong> Version 6.4 <strong>Administration</strong> Guide
Balancing Services, must be used to provide a single point of access to theservers.For enterprise installations, <strong>Liquid</strong> <strong>Machines</strong> also recommends a highlyavailable or fault tolerant configuration for the Microsoft SQL Server. Onesupported approach is to cluster SQL Server. The other supported approach isto use log shipping to duplicate the database onto a warm spare SQL Server. Inthe event the primary SQL Server fails, you can quickly configure the <strong>Liquid</strong><strong>Machines</strong> servers to access the warm spare.If users outside your organization or network perimeter will access the <strong>Liquid</strong><strong>Machines</strong> servers, it is possible to place servers in a DMZ and have them accessthe same SQL database. DMZ servers must be able to access the SQL Server andalso LDAP port 389 on any domain controllers for Active Directory domainswhere user accounts reside.For details on how to implement any of these configurations, contact <strong>Liquid</strong><strong>Machines</strong> Product Support.<strong>Liquid</strong> <strong>Machines</strong> <strong>Document</strong> <strong>Control</strong> ServicesThe <strong>Liquid</strong> <strong>Machines</strong> server infrastructure provides three different kinds ofservices to the client:• A control service• A policy service• A security service, sometimes called a key service<strong>Control</strong> ServiceAs a control service, the <strong>Liquid</strong> <strong>Machines</strong> <strong>Document</strong> <strong>Control</strong> server isresponsible for managing the client code. It supplies the client withcommunications information, specifies policy server configuration, and deliversclient software updates and information about supported applications. Thisinformation is delivered to the client at workstation startup, during periodicclient polling (based on the configurable polling period), or after an explicituser request through the Client Console.Users can specify only one control service during a custom client installation;however, one is not required. If a server is specified as a control service, apolicy service is automatically created with the same name. Such a policyservice and control service are said to be co-resident; they cannot be removed.The control service defines global policy services through its own co-residentpolicy service to every user who has identified the server as a control service.If a control service is not specified, clients will not automatically get codeupdates.Policy ServiceAs a policy service, the <strong>Liquid</strong> <strong>Machines</strong> <strong>Document</strong> <strong>Control</strong> server distributespolicies and keys that are specific to an authenticated user. The policy servicealso receives audit information from authenticated users.At least one policy service must be identified on the client computer for theuser to be able to protect documents or access protected documents. Thepolicy service may be the co-resident policy service, or there may be policyservices that have been identified separately. In either case, the user must be<strong>Liquid</strong> <strong>Machines</strong> <strong>Document</strong> <strong>Control</strong> Version 6.4 <strong>Administration</strong> Guide Page 7
a member of a role in a policy on that policy service and have the appropriaterights to access protected documents.Users can manage their policy services list manually by adding and removingpolicy services and setting the stored credentials for each policy service. Policyservices can also be added automatically when a user attempts to open adocument that is protected by a policy in a new policy service. A policy servicethat is co-resident with a control service cannot be removed.The client checks the server for updated policy information during any of theseevents:• System login• Reconnect to the server• Scheduled updates• Explicit updates requested by the user through the Client Console• When access to a protected document is denied, to determine if the user’srights have expanded to allow accessProtected documents cannot be directly changed from a policy on one policyservice to a policy on another policy service. To change a document'sprotection from a policy on one policy service to a policy on another policyservice, the user (with appropriate rights in both policies) must first unprotectthe document and then select a policy from the other policy service.Merge operations (cut and paste, copy and paste, and drag and drop) cannot bedone between policy services. To merge protected content into a documentprotected by a policy on a different policy service, the user (with appropriaterights in both policies) must first unprotect the content to be merged and thencopy, cut, or drag it to the destination document.Security Service<strong>Liquid</strong> <strong>Machines</strong> <strong>Document</strong> <strong>Control</strong> persistently protects documents through atransparent encryption process. The <strong>Liquid</strong> <strong>Machines</strong> <strong>Document</strong> <strong>Control</strong> serverdoes not store the documents. When users protect their documents with apolicy, the <strong>Liquid</strong> <strong>Machines</strong> <strong>Document</strong> <strong>Control</strong> client uses a random key toencrypt the document.When the system protects documents, users can safely distribute them howeverthey choose. When a user attempts to open a protected document, the clientverifies the rights defined for the user.When authorized <strong>Liquid</strong> <strong>Machines</strong> <strong>Document</strong> <strong>Control</strong> users need to accessprotected documents offline, they can do so as they would any document. Ifthe user is allowed access, the client decrypts the content through the policykeys. The keys remain on the client machine until the end of the offline perioddefined in the role. If users need to work offline beyond that time, they mustconnect to the network to renew their keys.If a user changes the policy that protects a document, and the current policyallows the change, the system re-encrypts the document and associates it withthe keys of the new policy.If users remove protection from documents (decrypting the files), and thecurrent policy allows it, the client no longer checks user access when they openthe documents, because the files no longer need keys to encrypt and decrypttheir content.Page 8<strong>Liquid</strong> <strong>Machines</strong> <strong>Document</strong> <strong>Control</strong> Version 6.4 <strong>Administration</strong> Guide
Installing the <strong>Liquid</strong> <strong>Machines</strong> <strong>Document</strong> <strong>Control</strong> ServerPrerequisitesBuilding the Server PlatformWe recommend that you build each <strong>Liquid</strong> <strong>Machines</strong> server platform accordingto the follow procedure:1. Install Windows 2003 Server.2. From Start Menu > All Programs > Administrative Tools, select ManageYour Server. Use the Server Manager to add the Application Server role. Inthe Add Role wizard for an Application Server, be sure to select the EnableASP.NET check box.3. If your Windows 2003 installation media was not already updated to ServicePack 1 or 2, install Service Pack 1 or 2 now. Install the latest securitypatches.4. Install any additional Windows updates you might choose or that areapproved or required by your company.5. Install Microsoft .NET 2.0 Framework Runtime. The framework is availablefor download from the Microsoft Web site at:http://www.microsoft.com/downloads/details.aspx?familyid=0856EACB-4362-4B0D-8EDD-AAB15C5E04F5&displaylang=en6. Open a command prompt. Use the change directory command to go toc:\WINDOWS\Microsoft.NET\Framework\v2.0.50727. Run the command:aspnet_regiis –iNote: This will upgrade all existing .NET applications on the machine to2.0. For this reason, we strongly recommend the machine be dedicated tothe <strong>Liquid</strong> <strong>Machines</strong> product.7. Identify the Microsoft SQL Server that will be used. Update the MicrosoftSQL Server with the latest service packs and security patches. Identify anddocument the exact version that is running.It is possible to host both Microsoft RMS and <strong>Liquid</strong> <strong>Machines</strong> <strong>Document</strong> <strong>Control</strong>Services on the same server, and this configuration has been tested by <strong>Liquid</strong><strong>Machines</strong>.If you intend for users to automatically and transparently make use of theirWindows credentials when accessing the <strong>Liquid</strong> <strong>Machines</strong> server, then the RMSserver must be joined to the same Active Directory forest where those useraccounts reside.DNS Aliases for Scalability and RecoveryWe strongly suggest that you create a DNS alias that <strong>Liquid</strong> <strong>Machines</strong> <strong>Document</strong><strong>Control</strong> clients can use to access the <strong>Liquid</strong> <strong>Machines</strong> server or server farm.Using such a DNS alias allows you to easily configure a load-balancing orfailover mechanism for <strong>Liquid</strong> <strong>Machines</strong> <strong>Document</strong> <strong>Control</strong> servers now or later.For example, create a DNS alias securedoc.acme.com and configure it to pointto the canonical host name of the first <strong>Liquid</strong> <strong>Machines</strong> server you will install.Page 10<strong>Liquid</strong> <strong>Machines</strong> <strong>Document</strong> <strong>Control</strong> Version 6.4 <strong>Administration</strong> Guide
SSL CertificateWe strongly suggest that you create a DNS alias that <strong>Liquid</strong> <strong>Machines</strong> serverscan use to access the SQL Server instance. Using such a DNS alias allows you toeasily switch over to a new SQL Server instance should the primary one fail orneed to be repurposed. For example, create a DNS alias lmsql.acme.com andconfigure it to point to the canonical host name of the SQL Server instance.You must enable IIS to support SSL over HTTP or HTTPS communication. To doso, you must acquire and install an SSL certificate into IIS on each <strong>Liquid</strong><strong>Machines</strong> <strong>Document</strong> <strong>Control</strong> server.The common name of the certificate should match exactly the DNS alias youcreated, the one that clients use to access the <strong>Liquid</strong> <strong>Machines</strong> server.You may issue the certificate from an internal authority if you so choose. Ifpersons outside your company will access a given <strong>Liquid</strong> <strong>Machines</strong> server, itmay make sense to acquire the certificate from a widely trusted authority,such as Verisign. Using a certificate from your internal authority will mean thatthe certificate is untrusted outside your network, and this may cause problemsfor external users’ Web proxies, their RMS Client installation if they make useof it, or other network infrastructure.It is possible to install a single certificate, issued to a single common name, onmultiple servers. You would do this, for example, to support load-balancedservers in a farm. You export the certificate, including the private key, fromthe first server, and then import it into other servers. A public authority suchas Verisign may require an additional licensing fee for the legal right to do this.If you need help acquiring, installing, importing, or exporting an SSLcertificate, contact <strong>Liquid</strong> <strong>Machines</strong> Product Support.Master Encryption KeyYou must obtain a PFX or PKCS#12 file that contains an x.509 certificate with aprivate key.Service Accounts and LoginsWeb Application Service AccountThe <strong>Liquid</strong> <strong>Machines</strong> server is a .NET Web application. You will need to createan Active Directory account under which this application runs. The one identityis used by all servers in an installation.The identity must have both the Log on as a batch job and the Allow LogonLocally privileges on the server machine. While these privileges will be grantedby the automated configuration procedure below, you must ensure that noActive Directory Group Policy will override and remove the privilege.SQL Security LoginYou must create an SQL Server security login for use by the <strong>Liquid</strong> <strong>Machines</strong><strong>Document</strong> <strong>Control</strong> server.You may create a blank database on your SQL Server for use with <strong>Liquid</strong><strong>Machines</strong>. If you choose to do so, then the SQL login must have DatabaseOwner privileges on this database during the initial configuration.<strong>Liquid</strong> <strong>Machines</strong> <strong>Document</strong> <strong>Control</strong> Version 6.4 <strong>Administration</strong> Guide Page 11
Alternatively, you can allow the configuration to create the database for you.In that case, the login must have at least Database Creator privileges duringthe initial configuration.After the initial configuration, you can lower the login’s privileges toReader/Writer privileges on the configured database.You can create a login that uses SQL database authentication. You specifythese credentials during part of the initial configuration phase documentedbelow.Alternatively, you can create a login that uses Windows domain-basedauthentication. If you use Windows authentication, then the login will need tobe the same Windows credentials as the one under which the <strong>Liquid</strong> <strong>Machines</strong>Web application runs, the one you created above as the service account.Active Directory ConnectionsFor each Active Directory you will connect to the <strong>Liquid</strong> <strong>Machines</strong> installations,each <strong>Liquid</strong> <strong>Machines</strong> server must be able to query and find in the directory anyuser, group, or distribution list object and read the relevant properties on thatobject. You will need to create a user account in the directory that hassufficient privileges to execute a query.LDAP connections over TCP port 389 as well as secure LDAP connections aresupported.Page 12<strong>Liquid</strong> <strong>Machines</strong> <strong>Document</strong> <strong>Control</strong> Version 6.4 <strong>Administration</strong> Guide
Installing a New <strong>Liquid</strong> <strong>Machines</strong> <strong>Document</strong> <strong>Control</strong> 6.x ServerOverviewIn a load-balanced scenario, you can install the software on the first servermachine. You must then initialize the database and create the initialconfiguration. After that, you can install the software on additional servers andcopy the master key file to all subsequent installations that will point to thesame database.For additional servers, do not attempt to access the application on a server inany way—not via the Server <strong>Administration</strong> Console, nor by configuring a clientto access it—until you have properly configured all LMDC Servers to point to theshared database.Installing the SoftwareThe installation does not need any configuration parameters. The installationcopies code files into the Web root of the default Web site and configures themfor use with IIS and .NET. You do not need to reboot the machine or restart IIS.The software must be installed by a logged in user with Local Administratorprivileges.1. Copy the setup files for the server to the hard disk of the server machine.2. From the <strong>Liquid</strong> <strong>Machines</strong> distribution files, in the ServerInstall folder, runsetup.exe.3. To move past the welcome screen, click Next.4. Read the license agreement, select I Agree if you choose to accept thelicense, and click Next.5. To confirm the installation, click Next.6. As the installation completes, you are prompted to enter the credentials ofthe service account you created above. These credentials will be used toconfigure the application pool under which the <strong>Liquid</strong> <strong>Machines</strong> .NET Webapplication runs.a. Enter the Active Directory Domain where the service account resides,for example, acme.com.<strong>Liquid</strong> <strong>Machines</strong> <strong>Document</strong> <strong>Control</strong> Version 6.4 <strong>Administration</strong> Guide Page 13
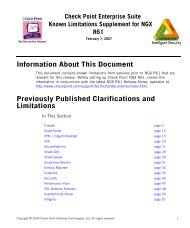
. Enter the service account Username, for example lmdcadmin.c. Enter the service account’s Password.d. When you are finished, click OK.7. To exit the Installation wizard, click Close.Running the Post-Install Configuration on the First ServerYou must now initialize the database for use with all servers. As part of thisprocess, you will also automatically and transparently configure the firstserver.TLS 1.0 must be enabled for the browser connecting to servers whereFIPS 140-2 compliance is required.1. Log in to the <strong>Liquid</strong> <strong>Machines</strong> server as a user with local administrativeprivileges.2. From Start Menu > All Programs > <strong>Liquid</strong> <strong>Machines</strong> <strong>Document</strong> <strong>Control</strong>,select Login.3. A Web browser is launched. If an SSL certificate warning message appears,click OK to close it.4. If a message indicates that Microsoft Internet Explorer’s enhanced securityconfiguration is enabled, you can select In the future, do not show thismessage. To close the dialog box, click OK. The Database ConnectionDetails page appears.Database Connection DetailsOn this page, you must configure the database connection. This step isrequired.Page 14<strong>Liquid</strong> <strong>Machines</strong> <strong>Document</strong> <strong>Control</strong> Version 6.4 <strong>Administration</strong> Guide
1. DATABASE SERVER NAME: Enter the DNS alias you created for the SQLdatabase, the one that <strong>Liquid</strong> <strong>Machines</strong> servers will use to access the SQLServer instance.Note: <strong>Liquid</strong> <strong>Machines</strong> does not support SQL instances other than thedefault, unnamed instance on a given SQL server.2. Select one of the following:oooUse this existing database: (must already exist, all data in db will belost).Note: This only reuses the database container and files. All existingdata and schema will be removed from the database. This means theSQL login you use must have at least Database Owner rights on theexisting database. This feature is meant to permit reuse of thecontainer, not to preserve existing data.Create a new database with this name: (if exists, will be dropped first).Use a prepopulated, existing database, maintaining the data.Note: This choice requires that the database has already been set up,generally because this is an upgrade, or is an install as part of acluster.3. DATABASE NAME: Enter the name that the configuration program will usewhen it creates the SQL database. The name must conform to SQL Serverrequirements and conventions.4. Select one of the following:ooUse Integrated Windows Authentication: If you will use Windowsauthentication to access the database. The credentials used will be thesame ones you used in the Service Account Credentials dialog box,described on page 13.Use the following SQL Server credentials: If you will use SQLauthentication to access the database.• USERID: Enter the login name of the SQL login you created, the onethat has at least Database Creator privileges.• PASSWORD: Enter the password for this SQL login.• CONFIRM PASSWORD: Enter the password again.5. When you are done, click Next. The Directory Service Settings pageappears.<strong>Liquid</strong> <strong>Machines</strong> <strong>Document</strong> <strong>Control</strong> Version 6.4 <strong>Administration</strong> Guide Page 15
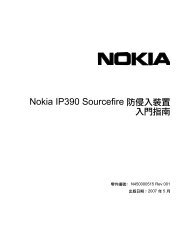
Directory Service SettingsOn this page, you must configure a connection to the first Active Directory orLDAP Server. This step is required.1. Select a directory type.o Microsoft Active Directory Server (see page 16)o Sun ONE LDAP Server (see page 17)Microsoft Active Directory Server1. For directory type Microsoft Active Directory Server, complete thefollowing fields.oooDOMAIN NAME: Enter the Active Directory fully qualified domain nameof the domain you will access, for example acme.com.DESCRIPTION: Enter the Active Directory description.DIRECTORY SERVICE CREDENTIALS: Select one of the following:• Use the credentials of service account.• Use the following credentials:• USER ACCOUNT: Enter the plain user account login, forexample, lmadmin.• PASSWORD: Enter the user’s password.• CONFIRM PASSWORD: Enter the user’s password again.2. When you are done, click Next. If you are not also configuring a Sun ONELDAP Server, continue with the Add Administrator for this Server page (seepage 19).Page 16<strong>Liquid</strong> <strong>Machines</strong> <strong>Document</strong> <strong>Control</strong> Version 6.4 <strong>Administration</strong> Guide
Sun ONE LDAP Server1. For directory type Sun ONE LDAP Server, complete the following fields.o SERVICE NAME: How the directory will be referenced. When logginginto the <strong>Liquid</strong> <strong>Machines</strong> server as a Sun ONE LDAP user, the form ofthe name will be userID@ServiceName. For example, if the LoginAttribute is the user’s unique ID, and the service name is Acme.com,the login might look like fsmith@Acme.com. The Service Name must beunique.ooNote: The Service Name provides a level of indirection for referencingthe server, so that an Active Directory domain server and a Sun ONELDAP server could potentially share the same name space.SERVER HOST NAME: The actual DNS name of the Sun ONE server.PORT: The port of the Sun ONE Directory Server. A non-SSL port shouldonly be used in secure testing environments or when the security ofdirectory information is considered unimportant. Passwords and othersensitive information are passed in the clear and are subject todiscovery by network sniffers.<strong>Liquid</strong> <strong>Machines</strong> <strong>Document</strong> <strong>Control</strong> Version 6.4 <strong>Administration</strong> Guide Page 17
Add Administrator for this ServerOn this page, you must configure the first administrator account. This step isrequired.1. USER NAME: Enter the user name of a user account in the Directory Serviceyou just configured. Use the simple login name with no domain qualifier.This user account will have Full Administrator privileges on the <strong>Liquid</strong><strong>Machines</strong> installation, and you will use it to log in to the Server<strong>Administration</strong> Console and further manipulate the installation. With theServer <strong>Administration</strong> Console, you can add other accounts asadministrators or remove this one later.2. When you are done, click Next. The Server Information page appears.Server InformationOn this page, you must enter some additional information that will affect howclients connect to the server.1. Client-facing Hostname: Enter the DNS alias you created as part of theprerequisites, the one that clients will use to connect to the <strong>Liquid</strong><strong>Machines</strong> server. When you install clients, you will configure them to pointthis DNS alias.2. Server Friendly Name: Enter a name that will clearly identify this serverinstallation to your client users, for example, ACME <strong>Document</strong> ProtectionServer. This name will be visible to users in the client interface when theymake choices that protect documents. The Configuration Progress pageappears.<strong>Liquid</strong> <strong>Machines</strong> <strong>Document</strong> <strong>Control</strong> Version 6.4 <strong>Administration</strong> Guide Page 19
Configuration ProgressThe Configuration Progress page shows the steps it will take after you finish.1. When you are finished, click Finish to complete the configuration process.The configuration program now creates the SQL database on the SQL Serverinstance or uses the specified database and initializes it with configurationdata.The program also automatically configures this server to use the database.It immediately presents you with a login page to the administrativeinterface for the installation.Log InPage 20<strong>Liquid</strong> <strong>Machines</strong> <strong>Document</strong> <strong>Control</strong> Version 6.4 <strong>Administration</strong> Guide
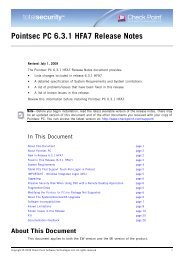
Enabling the <strong>Liquid</strong> <strong>Machines</strong> Security Service1. To enable the <strong>Liquid</strong> <strong>Machines</strong> Security Service, on the Security Servicespage, next to <strong>Liquid</strong> <strong>Machines</strong> Security Service, click Edit. The LMKSMaster Key Configuration page appears.LMKS Master Key ConfigurationOn this page, you will be required to upload an X.509 certificate withprivate key.2. The Master Key File Name appears; you cannot change it.3. Master Key Location: Enter the fully qualified path where the master keystore is to be created. The path must be a directory on the server's fixedhard drive; UNC paths, mapped network drives, and removable drives arenot supported.o Create directory if it does not already exist: To create the directoryfor the master key, select this check box. If you do not select thischeck box, the directory for the master key must already exist.o Notes:• The Master Key Location must be the same across all servers in acluster.• if you selected the option to use a prepopulated database duringpost-install configuration, this option is not available.• The Master Key Location directory must be manually configured onsubsequent <strong>Liquid</strong> <strong>Machines</strong> <strong>Document</strong> <strong>Control</strong> server installationsin a clustered environment. The directory must be identical to thefirst installation.4. Master Key Password: Enter a password to protect the master key.5. Confirm Password: Enter the Master Key Password again, forconfirmation.Page 22<strong>Liquid</strong> <strong>Machines</strong> <strong>Document</strong> <strong>Control</strong> Version 6.4 <strong>Administration</strong> Guide
6. Fully Qualified Domain: Enter the fully qualified domain name of theservice account.7. User Account: Enter the login name for the service account.8. Account Password: Enter the password for the service account.9. When you are done, click Save. The <strong>Liquid</strong> <strong>Machines</strong> Security Servicepage appears.<strong>Liquid</strong> <strong>Machines</strong> Security Service10. Select the check box to Enable the <strong>Liquid</strong> <strong>Machines</strong> Security Service. Theother fields become activated.11. Content Key: Select the encryption algorithm and bit strength for the keysthat will protect each individual document.<strong>Liquid</strong> <strong>Machines</strong> <strong>Document</strong> <strong>Control</strong> Version 6.4 <strong>Administration</strong> Guide Page 23
5. RMS TEMPLATE DIRECTORY: Enter the directory where you store RMStemplates, the one where RMS clients look to find them. If you do not useRMS templates, you can skip this step.6. To activate your changes, click Save. The Security Services page appears.Selecting a Default Security ServiceWhen you enable a security service, you allow client applications to use thatservice as the infrastructure when protecting documents. On the SecurityServices page, you can select one as the default, to have that service appear asthe first or most accessible option in the client application.Security Services1. Below the service you want as the default, select Set as Default.Aliasing the ServiceIf you followed our recommendation and created a DNS alias for the <strong>Liquid</strong>Machine <strong>Document</strong> <strong>Control</strong> installation, we assume you entered it as theClient-facing Hostname on the Server Information page (step 1 on page 19) in“Running the Post-Install Configuration on the First Server.” If you did not,follow the steps under “Aliasing the Service,” below, to configure the serverwith the DNS alias.Page 26<strong>Liquid</strong> <strong>Machines</strong> <strong>Document</strong> <strong>Control</strong> Version 6.4 <strong>Administration</strong> Guide
Load Balancing and Configuring Additional ServersAliasing the ServiceTo load balance several servers against the same configuration, you must firstalias the service name by which clients will address these servers. We assumeyou already did this as part of “Running the Post-Install Configuration on theFirst Server” on page 19. If you did not, we strongly recommend that you takethis step now, even if you do not plan to load balance. Taking this step willgive you broader options in the future for scalability and help streamlinedisaster recovery.First, choose a DNS name by which clients will address the load-balancedservers, or service. Choose a name that makes sense given your company’s DNSinfrastructure and the scope of installation. For example, if this is a companywideinstallation and you will support users outside the company, choose aname at the root of your DNS domains, and one that is published to theInternet, for example, lmdc.acme.com.For now, create a DNS alias with this name and make its target be thecanonical host name or IP address of your first <strong>Liquid</strong> <strong>Machines</strong> server. Later,when you have configured your load balancer and prepared additional <strong>Liquid</strong><strong>Machines</strong> servers for use with it, you can set this DNS alias to have the loadbalancer’s IP address as its target.Now you must reset the Client-facing Hostname of the <strong>Liquid</strong> <strong>Machines</strong>configuration. (To ensure client connectivity, these steps must be completedbefore copying to additional machines).1. Log in to the <strong>Liquid</strong> <strong>Machines</strong> Server Administrator Console as theadministrator you defined in the configuration.2. Click in the upper-right corner.3. Click in the navigation bar at the left.4. In the Client-facing Hostname field, enter the fully qualified DNS alias youdefined above, for example lmdc.acme.com.5. To save your changes, click Save.Copying Master KeysTo configure additional servers to make use of the installation, you must copythe master key from a working server. It isn't absolutely necessary to stop IIS,but client polls will fail until the redundant server's master keys have beenupdated.If you enabled the <strong>Liquid</strong> <strong>Machines</strong> Security Service, on the working server, youmust copy the master.pfx file from the master key location on the workingserver to the same location on the new server. The master.pfx file will be inthe directory you specified on the LMKS Master Key Configuration page (seepage 22). You must also grant the Web Application Service Account full rightsto this location on the new server.<strong>Liquid</strong> <strong>Machines</strong> <strong>Document</strong> <strong>Control</strong> Version 6.4 <strong>Administration</strong> Guide Page 27
Installing Additional ServersInstall the new version on the first server, according to the instructions in“Installing the Software,” on page 13. Do not continue with the steps in“Running the Post-Install Configuration on the First Server.”Running the Post-Install Configuration on Additional Servers1. Log in to the <strong>Liquid</strong> <strong>Machines</strong> server as a user with local administrativeprivileges.2. From Start Menu > All Programs > <strong>Liquid</strong> <strong>Machines</strong> <strong>Document</strong> <strong>Control</strong>,select Login.3. A Web browser is launched. If an SSL certificate warning message appears,click OK to close it.4. If a message indicates that Microsoft Internet Explorer’s enhanced securityconfiguration is enabled, you can select In the future, do not show thismessage. To close the dialog box, click OK.5. The Database Connection Details page appears. On this page, you mustconfigure the database connection. This step is required.6. DATABASE SERVER NAME: Enter the same database server name as on thefirst server and select Use a prepopulated, existing database, maintainingthe data.7. DATABASE NAME: Use the same method and credentials as on the firstserver.8. When you are done, click Next. The Login page appears, and the machineis ready for use.You can now configure clients to access this server, or your load-balancing orfailover configuration to consider this server as available.You can also log in to this server’s Server <strong>Administration</strong> Console and furtherconfigure the installation. Changes you make to the installation on any serverwill be written to the shared database and automatically affect all servers.Refer to the online server help for more information.Reimporting Master KeysMaster keys can be changed on the <strong>Liquid</strong> <strong>Machines</strong> Security Service page, asdescribed on page 24. Whenever the master keys on any server are modified,you must copy the updated master.pfx from the server where you modified thekeys to each of the other servers. Because all the servers are sharing adatabase that maintains information about the current key, redundant serversshould be temporarily stopped before copying the modified master.pfx to aredundant server. A failure to stop a redundant server will not result in a fatalerror, but it will result in failed client polls until the master keys are updatedon the redundant server.1. Make a copy of the master.pfx on the updated server.2. Make a backup copy of the master.pfx on each redundant server.3. Replace the master.pfx on each redundant server with the updated copyyou made in step 1.Page 28<strong>Liquid</strong> <strong>Machines</strong> <strong>Document</strong> <strong>Control</strong> Version 6.4 <strong>Administration</strong> Guide
Removing a Server4. Restart the redundant servers.Note: While there is no notion of a primary or master server, <strong>Liquid</strong> <strong>Machines</strong>recommends that you select a specific server from which you will maintain yourmaster keys. Before uploading a new X.509 certificate, you should always makea backup copy of the existing master.pfx.You can remove any server from the installation at any time. There is no notionof a primary or master server. All servers are equal peers; the SQL databaseholds the master configuration.1. Make sure you mark the server as unavailable in your load-balanced orfailover configuration, or otherwise remove client access to it.2. Then uninstall the software by choosing to remove the software from theWindows <strong>Control</strong> Panel Add/Remove Programs. Removing the softwaremight cause the machine to reboot.Removing Additional Files and Web Site SettingsYou might need to take additional manual action to fully uninstall the serversoftware:1. In IIS Manager, delete the <strong>Liquid</strong><strong>Machines</strong>-<strong>Document</strong><strong>Control</strong> and Servicesfolders from the default Web site.2. Also in IIS Manager, delete the two <strong>Liquid</strong><strong>Machines</strong>… application pools thatwere created during the installation.3. On the file system, delete the <strong>Liquid</strong><strong>Machines</strong>-<strong>Document</strong><strong>Control</strong> andServices folders from the root folder of the default Web site, typicallyc:\inetpub\wwwroot.4. If you enabled the <strong>Liquid</strong> <strong>Machines</strong> Security Service, after making sure youbacked up the master key and its password, delete the master key andthe folder that was created to house it.Important: When performing an upgrade, do not perform this step as themaster key will be required for the upgraded server.<strong>Liquid</strong> <strong>Machines</strong> <strong>Document</strong> <strong>Control</strong> Version 6.4 <strong>Administration</strong> Guide Page 29
Upgrading the ServerThis section covers upgrading the LMDC Server from a 6.x version to 6.3.x orhigher. For those users upgrading from LMDC Server 5.2, please contact <strong>Liquid</strong><strong>Machines</strong> Product Support for special instructions.Important! Upgrading your <strong>Liquid</strong> <strong>Machines</strong> server installation might require aconversion of the SQL database and other server related data. Before you beginany upgrade, you must contact <strong>Liquid</strong> <strong>Machines</strong> Product Support to determinewhether such a conversion is required. If you need to convert the databaseand/or other related data, <strong>Liquid</strong> <strong>Machines</strong> Product Support will instruct you inthe use of a tool called LmServerMigration.It is very important to read any Release Notes attached to the distributedLmServerMigration utility for additional information.Before you begin: You will need to know the credentials (username, domain,and password) of the Service Account that the current server is running under.You will also need to know the Database Server name, Database name, thetype (SQL or Windows) of SQL authentication, and in the case of SQLauthentication the SQL username and password. DO NOT PROCEED if you donot have this information available. Make note of the exact version and buildnumber currently installed before uninstalling.The procedure for upgrading a server is as follows:1. Uninstall the <strong>Liquid</strong> <strong>Machines</strong> server software from all servers. Make sure tofollow the additional instructions in “Removing a Server,” on page 29.Important: The uninstall does not remove the MasterKey.pfx file, and youshould not, if it exists.2. Back up the SQL database that houses the <strong>Liquid</strong> <strong>Machines</strong> data.Important: Do not skip this step or perform it out of order. If you do, andthe conversion process later fails, you could end up with a permanentlycorrupted database.3. If this server uses LMKS, back up the Master Keys.4. If <strong>Liquid</strong> <strong>Machines</strong> Product Support has instructed you to perform adatabase/data upgrade, execute that procedure, with their oversight, now.5. Install the new version on the same machine as the first server, accordingto the instructions in “Installing the Software,” on page 13. Use the samecredentials for the Service Account that were recorded prior to starting thisupgrade.6. Complete the database connection step in “Running the Post-InstallConfiguration on the First Server.” It is important to use the samedatabase server, database and connection credentials that the originalserver used, these values should have been recorded prior to starting thisupgrade.7. Log in to the Server <strong>Administration</strong> console and verify that it is operatingproperly. Use the <strong>Liquid</strong> <strong>Machines</strong> client to verify that legacy data can stillbe accessed and that users still retain the <strong>Liquid</strong> <strong>Machines</strong> policies of whichthey were members.<strong>Liquid</strong> <strong>Machines</strong> <strong>Document</strong> <strong>Control</strong> Version 6.4 <strong>Administration</strong> Guide Page 31
8. When you are satisfied that the server is operating correctly, installadditional servers, according to the instructions in “Load Balancing andConfiguring Additional Servers” on page 27.Page 32<strong>Liquid</strong> <strong>Machines</strong> <strong>Document</strong> <strong>Control</strong> Version 6.4 <strong>Administration</strong> Guide
Installing the <strong>Liquid</strong> <strong>Machines</strong> <strong>Document</strong> <strong>Control</strong> ClientPrerequisitesIn addition to Windows XP SP2 or Windows 2003 Server (for terminal servicesinstallations), in order to use the client you will need to have applicationsinstalled that can be managed by <strong>Liquid</strong> <strong>Machines</strong> <strong>Document</strong> <strong>Control</strong>.Applications that are currently supported by <strong>Liquid</strong> <strong>Machines</strong> <strong>Document</strong> <strong>Control</strong>6.x for RMS include:• Microsoft Office 2003 Professional• Microsoft Office XP• Microsoft Office 2000• Microsoft Visio 2002 or 2003• Adobe Acrobat and Reader 6• Adobe Acrobat and Reader 7In addition, if you will use Microsoft RMS as a security service, you must installthe Microsoft RMS Client software.Microsoft RMS: Adjusting Internet Explorer Security SettingsIf you will use Microsoft RMS as a security service, it is a best practice to adjustInternet Explorer security settings to accommodate the RMS system. TheMicrosoft RMS Client uses Internet Explorer to communicate with RMS servers.Faulty Internet Explorer security settings can disrupt this communication.1. In Internet Explorer, on the Tools menu, click Internet Options.2. In the Internet Options dialog box, click the Security tab.3. Click Local Intranet and then click Sites.4. Click Advanced.5. Under Add this website to the zone, enter the host names in your RMSLicensing and Certification URL, for example, rms.acme.com. Then clickAdd.6. To return to the Security tab, click OK twice.7. Click Custom Level.8. In the Security Settings dialog box, scroll to the bottom of the Settingslist. Under User Authentication, Logon, make sure that Automatic LogonOnly in Intranet Zone is selected.9. To close the dialog boxes, click OK twice.You can use Active Directory Group Policy or the Internet Explorer<strong>Administration</strong> Kit to distribute these settings automatically to all workstations.For more information, search the Microsoft KnowledgeBase.<strong>Liquid</strong> <strong>Machines</strong> <strong>Document</strong> <strong>Control</strong> Version 6.4 <strong>Administration</strong> Guide Page 33
Specifying a <strong>Control</strong> ServiceInstalling the Client SoftwareAs part of the client installation, you can specify a control service. For moreinformation on control services, see “Typical Deployment Configurations,” onpage 6.1. To start the Client Installation wizard, double-click the <strong>Liquid</strong> <strong>Machines</strong>Client.msi file located in the Client-MSI folder. The Preparing to Installwindow appears.2. Follow the Installation wizard through the process. The list below describesthe pages displayed during the installation and the action required.o License Agreement: Review the license agreement text.• To accept the terms of the agreement and proceed with theinstallation, click I Accept.• If you do not accept the terms of the agreement, click Cancel. Theinstallation process terminates.ooCustomer Information: Enter a User Name and your Company Nameand then click Next.Setup Type: Select the type of installation:• Standard: If no <strong>Liquid</strong> <strong>Machines</strong> <strong>Document</strong> <strong>Control</strong> service will beused or if you’re not sure which option to choose.• Custom: If a <strong>Liquid</strong> <strong>Machines</strong> <strong>Document</strong> <strong>Control</strong> service will beused. Enter the <strong>Liquid</strong> <strong>Machines</strong> <strong>Document</strong> <strong>Control</strong> 6.x controlservice as servername.domainname.com.To continue, click Next.Page 34<strong>Liquid</strong> <strong>Machines</strong> <strong>Document</strong> <strong>Control</strong> Version 6.4 <strong>Administration</strong> Guide
oTo continue, click Next. The Custom Setup window appears.oTo continue, click Next.Ready to Install the Program: To continue, click Install. A series ofprogress bars appear while the <strong>Liquid</strong> <strong>Machines</strong> <strong>Document</strong> <strong>Control</strong> 6.xclient software is installed.o InstallShield Wizard Complete: The appearance of this windowindicates that the installation process is completed. To continue, clickFinish.3. When the software installation process is completed, you are prompted torestart the computer.ooTo begin using the <strong>Liquid</strong> <strong>Machines</strong> <strong>Document</strong> <strong>Control</strong> Client for RMSimmediately, click Yes to restart your computer.To restart at a later time, click No.<strong>Liquid</strong> <strong>Machines</strong> <strong>Document</strong> <strong>Control</strong> Version 6.4 <strong>Administration</strong> Guide Page 35
Setup.exe MethodUpgrading the ClientTo install a <strong>Liquid</strong> <strong>Machines</strong> client software update, you can use either of twosingle-reboot methods. One method uses a setup.exe file, and one uses a<strong>Liquid</strong> <strong>Machines</strong> <strong>Document</strong> <strong>Control</strong> Client.msi file. Both files are supplied withthe product CD or download.1. On the client computer, in the Client\Client-setup folder of the product CDor download, double-click the setup.exe file.Setup.exe recognizes the previously installed version of the client softwareand installs the update over it, retaining the settings from the previousinstallation.2. When the update is completed, you are prompted to reboot the clientcomputer. Reboot the computer.<strong>Liquid</strong> <strong>Machines</strong> <strong>Document</strong> <strong>Control</strong>.msi Method1. On the client computer, open a command window and change directoriesto the folder where the <strong>Liquid</strong> <strong>Machines</strong> <strong>Document</strong> <strong>Control</strong> Client.msi fileis located. By default, the file is located in the Client/Client-msi folder.2. Enter the following command:msiexec /i "<strong>Liquid</strong> <strong>Machines</strong> <strong>Document</strong> <strong>Control</strong> Client.msi"REINSTALLMODE=vomus REINSTALL=ALLThe .msi file recognizes the previously installed version of the clientsoftware and installs the update over it, retaining the settings from theprevious installation.3. When the update is completed, you are prompted to reboot the clientcomputer. Reboot the computer.Page 36<strong>Liquid</strong> <strong>Machines</strong> <strong>Document</strong> <strong>Control</strong> Version 6.4 <strong>Administration</strong> Guide
Installing Application Security Module UpdatesYou can distribute upgrade releases to the <strong>Liquid</strong> <strong>Machines</strong> <strong>Document</strong> <strong>Control</strong>clients via Application Security Modules, where the server pushes updates tothe clients that are then automatically injected into running applications.Loading the Application Security ModulesThe server control service automatically distributes code updates to all clients.These updates are distributed similarly to how virus definitions might be in acentrally managed installation. They do not require any invasive measures onclient workstations, including any reboots, restart of any applications, or anyuser dialogs or intervention.In <strong>Liquid</strong> <strong>Machines</strong> <strong>Document</strong> <strong>Control</strong> 6.x for RMS, code updates are calledApplication Security Modules.To load Application Security Modules:1. Log in to any <strong>Liquid</strong> <strong>Machines</strong> Server <strong>Administration</strong> Console.2. In the upper-right corner, click .3. In the navigation bar at left, click .4. To find and select the Application Security Modules package file, clickBrowse.5. To install the new Application Security Modules, click .6. By default, all applications in the list are disabled.o To enable all applications, select the Select All checkbox and thenclick Enable.o Alternatively, enable only the applications you choose.Application Security Modules are written to the <strong>Liquid</strong> <strong>Machines</strong> <strong>Document</strong><strong>Control</strong> databases and then distributed by all servers to all clients at the nextclient polling cycle.<strong>Liquid</strong> <strong>Machines</strong> <strong>Document</strong> <strong>Control</strong> Version 6.4 <strong>Administration</strong> Guide Page 37
Page 38<strong>Liquid</strong> <strong>Machines</strong> <strong>Document</strong> <strong>Control</strong> Version 6.4 <strong>Administration</strong> Guide
Preparing for Disaster RecoveryDisaster RecoveryTo prepare for disaster recovery:• You must back up the SQL database that was created as part ofconfiguration.• If you enable the <strong>Liquid</strong> <strong>Machines</strong> Security Service, you must also back upthe <strong>Liquid</strong> <strong>Machines</strong> server master key.Note: All references to master keys only apply when the <strong>Liquid</strong> <strong>Machines</strong>Security Service is enabled. The master key is not used by the RMS SecurityService.Backing Up the SQL DatabaseThe database is critical to recovery and houses all necessary recoveryinformation.1. Back up the <strong>Liquid</strong> <strong>Machines</strong> database in its entirety. We suggest you backup the database, whether as a checkpoint, incrementally, or fully, at leastonce a day.2. Copy the backup file to an external location, not on the machine that hoststhe SQL server.Backing Up the Master KeyTo back up the <strong>Liquid</strong> <strong>Machines</strong> server master key, copy the master.pfx to areliable, external location. This copy will be protected with the password youused to protect the original master key and will be used to recover the serverin the event of failure.To support document recovery, you should also export the keys, using theexport tool, LmExportKeys.Make sure you write down the password used to protect the exported masterkey and store it in a safe location. Because the backup contains passwordprotectedPKCS#12 files, you must remember this password. The passwordcannot be recovered by any means.If you use the Server <strong>Administration</strong> Console to change the parameters of thekey, for example its bit strength or encryption algorithm, you must make a newbackup both before and after saving your changes.<strong>Liquid</strong> <strong>Machines</strong> <strong>Document</strong> <strong>Control</strong> Version 6.4 <strong>Administration</strong> Guide Page 39
Exporting KeysTesting Disaster RecoveryTo back up the <strong>Liquid</strong> <strong>Machines</strong> server master key:1. Run LmExportKeys with the following options:o If you are using Integrated Windows Authentication to access thedatabase and have access to the database:LmExportKeys key-store=key-output=db-host= db-name=db-authn-type=wino If you are using SQL Server Authentication to access the database andhave access to the database:LmExportKeys key-store=key-output=db-host= db-name=db-authn-type=sql db-user=fips-enabled=o If you do not have access to the database:LmExportKeys key-store=key-output=fips-enabled=This will create a Zip file at the key-output location. Inside the Zip file willbe multiple files, depending on the number of keys in the system. It willcontain a manifest.xml file and a .pfx file for each key that was exported.This Zip file will be needed for LmUnsecure.Note: To print out detailed usage information on LmExportKeys, at thecommand line prompt, type:LmExportKeys ?2. Copy the backup file to a secure external location.Be sure to follow the “Testing Disaster Recovery” procedure below to test thatthe backed up key is valid.Testing the Infrastructure Restore ProcedureTo simulate a disaster recovery scenario, create an isolated infrastructure thatincludes at least DNS, Active Directory, workstations built using productionimages, and the SQL and IIS servers necessary to house the <strong>Liquid</strong> <strong>Machines</strong>installation.The test infrastructure should mirror as closely as possible your productioninfrastructure:• You must be able to resolve in DNS the same server identifier that is usedin production.• User accounts that will be used for the test must match similar useraccounts in production. The match must occur in that the canonical name,or CN, must be the same.Page 40<strong>Liquid</strong> <strong>Machines</strong> <strong>Document</strong> <strong>Control</strong> Version 6.4 <strong>Administration</strong> Guide
Before you begin the test, create protected content in the productioninstallation, and then save this content to an area you can access from the testinstallation. Create several documents with different kinds of protections.Use the procedures documented above to restore your installation to the testinfrastructure.When you have completed the restore, attempt to access the protectedcontent you created, with the same users and in the same ways as you would inproduction, but using the test installation. There should be no loss offunctionality in accessing content.Testing the Data-Only Restore ProcedureDisaster RecoveryBefore you begin the test, create protected content in the productioninstallation, and then save this content to an area you can access from the testinstallation. Create several documents with different kinds of protections.1. Acquire the exported Zip file that you acquired from LmExportKeys.exe.2. Load this file onto the same machine where you have protected documentsyou need to recover.3. For each test file:a. Using the LmUnsecure command-line utility on the recovery media, incombination with the master keys on the media, remove theprotections from one of the test files.b. Open the test file and verify that it is not protected and that theoriginal data is fully intact.Server Recovery with Database and Master Key BackupsDisaster recovery procedures assume the following conditions:• All infrastructure, including the SQL server and all <strong>Liquid</strong> <strong>Machines</strong> servers,is lost.• The goal is to restore the server-side infrastructure to an operational state,one that allows client applications to access existing protected content, aswell as generate new protected content.• You have followed the procedure to back up the master keys associatedwith the installation, and the passwords that protect them, and you haveaccess to a known-good backup of these keys and passwords.• You have backed up the MS SQL databases for the <strong>Liquid</strong> <strong>Machines</strong>installation and have access to a known-good copy of these databases.The high-level outline of the disaster recovery procedure is as follows:1. Per company procedures, install Microsoft SQL Server into yourinfrastructure and make it ready to support the <strong>Liquid</strong> <strong>Machines</strong> databases.2. Restore the backup copy of the <strong>Liquid</strong> <strong>Machines</strong> databases to the server.3. Create an SQL security login that has reader/writer access to the <strong>Liquid</strong><strong>Machines</strong> databases.<strong>Liquid</strong> <strong>Machines</strong> <strong>Document</strong> <strong>Control</strong> Version 6.4 <strong>Administration</strong> Guide Page 41
4. Create a DNS alias, for example lmsql.acme.net, that has as its target theSQL server you have prepared. This alias may already exist in yourinfrastructure from the prior installation, and so you may need to updateits target.5. Copy the backed up key file to the new server that will host the new <strong>Liquid</strong><strong>Machines</strong> server.6. Per company procedures, prepare the first Windows Server 2000 or 2003machine that will house the <strong>Liquid</strong> <strong>Machines</strong> primary server, as per <strong>Liquid</strong><strong>Machines</strong> installation requirements.7. Install the <strong>Liquid</strong> <strong>Machines</strong> server software as per the <strong>Liquid</strong> <strong>Machines</strong>installation instructions for a new server.8. Log in to the Admin UI of the server for post-install. Select Use aprepopulated, existing database, maintaining the data, and enter theinformation for the restored database.9. Copy the backed up master.pfx to the original location.10. Start IIS.11. Create a DNS alias so that the new server has the alias of the old server.12. You can now add additional <strong>Liquid</strong> <strong>Machines</strong> secondary servers the same asyou would in normal circumstances. For further instructions, see “LoadBalancing and Configuring Additional Servers,” on page 27.13. Go to the client machine and verify that:o The protected files can be opened.o New protected files can be created.o All other operations are normal.<strong>Document</strong> Only Restore1. Acquire the exported Zip file that you acquired from LmExportKeys.exe.2. Load this file onto the same machine where you have protected documentsyou need to recover.3. Using the LmUnsecure command-line utility on the recovery media, incombination with the exported keys Zip file on the media, removeprotections from files.Page 42<strong>Liquid</strong> <strong>Machines</strong> <strong>Document</strong> <strong>Control</strong> Version 6.4 <strong>Administration</strong> Guide