Create successful ePaper yourself
Turn your PDF publications into a flip-book with our unique Google optimized e-Paper software.
78 78<strong>Boiler</strong> For Gas, Light Oil, Gas/Light Oil Fired Burners<strong>Boiler</strong> <strong>Manual</strong>• Installation• Start-Up• Maintenance• PartsInstaller: Leave all documentation received with boiler and burnerwith unit for future reference.User: <strong>Boiler</strong> and burner must be installed and serviced by aqualified service technician.This manual must only be used by a qualified heating installer/servicetechnician. Failure to comply could result in severe personal injury,death or substantial property damage.Part No. 550-141-705/0600
<strong>Weil</strong>-<strong>McLain</strong> 78 <strong>Boiler</strong> For Gas, Light Oil, Gas/Light Oil Fired BurnersContents1. Before Installing <strong>Boiler</strong>.............................................................. page 32. Set Packaged <strong>Boiler</strong> or Block Assembly in Place................ page 53. Assemble Block.......................................................................... page 64. Perform Hydrostatic Pressure Test....................................... page 125. Connect Water <strong>Boiler</strong> Piping.................................................. page 136. Connect Steam <strong>Boiler</strong> Piping................................................. page 157. Install Jacket ............................................................................. page 198. Pipe Tankless Heaters............................................................. page 199. Install Water <strong>Boiler</strong> Controls .................................................. page 2010. Install Steam <strong>Boiler</strong> Controls ................................................. page 2111. Connect Breeching and Venting Systems........................... page 2312. Install Burner............................................................................. page 2413. Wiring and Fuel Piping............................................................ page 2414. Make Final Adjustments.......................................................... page 2515. Data and Dimensions .............................................................. page 2716. Parts............................................................................................ page 2917. Ratings ....................................................................................... page 31Warranty...................................................................................... Back CoverWhen Calling or Writing about the <strong>Boiler</strong>Please have model and series from boiler rating label and CP number(s) from boiler jacket or controls.Hazard DefinitionsThe following defined terms are used throughout this manual to bring attention to the presence of hazards ofvarious risk levels, or to important information concerning the life of the product.Indicates presence of hazards that will cause severe personal injury, death or substantialproperty damage if ignored.Indicates presence of hazards that can cause severe personal injury, death or substantialproperty damage if ignored.Indicates presence of hazards that will or can cause minor personal injury, death or substantialproperty damage if ignored.Indicates special instructions on installation, operation or maintenance that are important but notrelated to personal injury.Read all instructions beforeinstalling. Failure to follow allinstructions in proper order cancause severe personal injury, deathor substantial property damage.Do not use petroleum-basedcleaning or sealing components inboiler system. Severe damage tosystem components can result,causing substantial propety damage.2Part No. 550-141-705
• Installation • Start-Up • Maintenance • Parts1a Before Installing <strong>Boiler</strong>Installation must comply with:• State, provincial and local plumbing,heating and electrical codes.• Regulations of serving utilities.• National codes where applicable.Before selecting boiler location:• Check for nearby connections to:– fuel supply– electrical power– system water or steam piping– venting systems - see page 23– combustion and ventilation air supply - see“Provide combustion and ventilation airsupply openings” below• Check area around boiler for and remove anycombustible materials, gasoline and otherflammable vapors and liquids.Failure to keep boiler area clear and free ofcombustible materials, gasoline and otherflammable liquids and vapors can result in severepersonal injury, death and substantial propertydamage.Provide combustion and ventilationair openings:Do not install an exhaust fan in boiler room.Adequate combustion and ventilation air must beprovided to assure proper combustion andprevent possibility of flue gas leakage and carbonmonoxide emissions, causing severe personalinjury or death.Grating – Min.12" above avg.snowlineGRADENote:Size of areawayand grating to beequal to orgreater than totallouver area.Opening sizes must comply with state, provincialor local codes. In their absence, use the followingwhen boiler is in a confined room:• Provide two permanent openings in boilerroom - one within 12 inches of ceiling, onewithin 12 inches of floor. Minimum dimensionof each opening - 3 inches.- When all air is taken from within building,each opening should be at least one squareinch/1,000 Btuh boiler input and freelyconnect with areas having adequateinfiltration from outside- When all air is taken from outdoors, eachopening should connect directly or by ductsfrom outdoors or crawl or attic spaces thatfreely connect with outdoors and sized aslisted below:- through outside wall or vertical ducts - atleast one square inch/4,000 Btuh boilerinput- through horizontal ducts - at least onesquare inch/2,000 Btuh boiler input- where ducts are used, they should be samecross-sectional area as free area ofopenings they are connected to- compensate for louver, grille or screenblockage when calculating free airopenings. Refer to their manufacturer’sinstructions for size. If unknown, use:- wood louvers - 20-25% free air- metal louvers or grilles - 60-75% free air- screens - not less than 1/4 inch meshLock louvers in open position, or interlockwith equipment to prove open beforeboiler operation.Louver – Min.12" above avg.snowlineGRADENote:Duct sizeequal to totallouver areaAreawayLouver<strong>Boiler</strong> roomfloor<strong>Boiler</strong> roomfloorFigure 1 Combustion and Ventilation AirOpenings <strong>Boiler</strong> Room Below GradeFigure 2 Combustion and Ventilation AirOpenings <strong>Boiler</strong> Room Partially or CompletelyPart No. 550-141-705Above Grade3
<strong>Weil</strong>-<strong>McLain</strong> 78 <strong>Boiler</strong> For Gas, Light Oil, Gas/Light Oil Fired Burners1b Before Installing <strong>Boiler</strong>Provide clearances for servicingaround boiler:• Back, for breeching - 30 inches.• Left side, for cleaning and tankless heaterremoval - 34 inches• Allow sufficient space on remaining sidesfor cleaning, servicing and burnerinstallation. See burner literature for length.• Clearance from vent pipe to combustiblematerials:- singlewall vent pipe - 18 inches- doublewall vent pipe - refer to vent pipemanufacturer’s recommendations for ventpipe clearancesLay a foundation, if needed:Floor construction and condition must besuitable for weight of boiler when filled withwater. See page 31 for boiler weight/waterweight.A level concrete or brick foundation isrequired when:• A floor could possibly become flooded• Non-level conditions exist<strong>Boiler</strong> Foundation Length Table<strong>Boiler</strong> “L” <strong>Boiler</strong> “L”Model Inches Model Inches378 23 878 58478 30 978 65578 37 1078 72678 44 1178 79778 51 1278 862" Min.30"“L”Figure 3 <strong>Boiler</strong> Foundation4Part No. 550-141-705
• Installation • Start-Up • Maintenance • Parts2a Set Packaged <strong>Boiler</strong> or Block Assembly in PlaceFor packaged boiler:1. Remove top jacket panel. Set aside until afterboiler is piped.2. Remove lag screws (2 in front, 2 in rear) fromshipping rails.3. Remove boiler from skid. Cables are alreadyattached to block assembly. See Lifting WeightChart.• Using crane - hook middle of each cable toeye of crane.• Using hoist - hook middle of each cable tohoist. Raise boiler off skid. Use pipe rollersunder skid angles to roll boiler.4. Place boiler in final position. Center boiler onfoundation, if used.5. Level boiler. Shim under skid angles, ifnecessary.6. Cut off cables.Cables are not intended for long-term usage.Cables may corrode inside boiler, weakening theirlifting strength. Failure to remove cables canresult in severe personal injury, death orsubstantial property damage.7. Proceed to “4a: Perform Hydrostatic PressureTest,” page 12.For block assembly:1. Remove lag screws (2 in front, 2 in rear) fromshipping rails.2. Remove boiler from skid. Cables are alreadyattached to block assembly. See Lifting WeightChart.• Using crane - attach free end of cables to eyeof crane.• Using hoist - attach free end of cables tohoist. Raise boiler off skid. Use pipe rollersunder steel skid angles to roll boiler.3. Place boiler in final position. Center boiler onfoundation, if used.4. Level boiler. Shim under skid angles, ifnecessary.5. Cut off cables.Cables are not intended for longtermusage. Cables may corrodeinside boiler, weakening theirlifting strength. Failure toremove cables can result insevere personal injury, death orsubstantial property damage.6. Inspect block assembly for disjointed sections.Check gas-tight seal of flue collector hood, fluecollar and cleanout plates.Gas tight seal must bemaintained to prevent possibleflue gas leakage and carbonmonoxide emissions, resultingin severe personal injury ordeath.a. Open damper in flue collar.b. Check inside section assembly for any lightpassing through unsealed areas.c. Mark all unsealed areas.d. At unsealed areas, check for damagedgaskets, sealing rope not in place, loose boltsor nuts, or missing holddown clips. Correctall conditions and repeat step b. If unsealedareas still exist, contact your <strong>Weil</strong>-<strong>McLain</strong>distributor or sales office before continuinginstallation.7. Proceed to “4a: Perform Hydrostatic PressureTest,” page 12.Lifting Weight ChartPackaged Assembled Packaged Assembled<strong>Boiler</strong> <strong>Boiler</strong> Block <strong>Boiler</strong> <strong>Boiler</strong> BlockModel Lbs. Lbs. Model Lbs. Lbs.378 1355 1150 878 2650 2325478 1615 1385 978 2910 2560578 1875 1620 1078 3165 2795678 2130 1855 1178 3425 3030778 2390 2090 1278 3680 3265Part No. 550-141-705 5
<strong>Weil</strong>-<strong>McLain</strong> 78 <strong>Boiler</strong> For Gas, Light Oil, Gas/Light Oil Fired Burners3a Assemble BlockSections are top heavy. Unbolted sections mayfall if not supported, resulting in severepersonal injury or death.Install back refractory blanket:1. Lay back section on floor with ports face up.2 Apply water glass as an adhesive to blanket.3. Press blanket against back target wall asshown in Figure 4.4. Using knife, cut hole through blanket toexpose observation port opening.Prepare back section:1. Apply 1/8" continuous bead of sealing ropeadhesive in sealing rope grooves. See Figure4. Do not get any adhesive on machined portsurfaces.2. Place 1/2" sealing rope in groove. Aroundcurves, grasp at 1" intervals and pushtogether. Do not stretch.Sealing ropeCut off ropeeven withedgeCut off ropeeven withedgesDo not pre-cut rope. Gas tightseal must be maintained toprevent possibility of flue gasleakage and carbon monoxideemissions, causing severepersonal injury or death.3. Remove any grit from port machinedsurfaces with clean rag.Do not use petroleum-basedcleaning or sealing compoundsin boiler system. Severedamage to system componentscan result, causing substantialproperty damage.4. Place 7-1/2" and 3-1/2" sealing rings inappropriate port openings. See Figure 4. Ifsealing ring slips out of groove, stretch ringgently for several seconds, then reposition ingroove.7 1/2"SealingringSealingropeCut offropeevenwithedgeCut outobservationport openingBack refractory(apply waterglassto entire back side)63 1/2” Sealing ringFigure 4Part No. 550-141-705
<strong>Weil</strong>-<strong>McLain</strong> 78 <strong>Boiler</strong> For Gas, Light Oil, Gas/Light Oil Fired Burners3c Assemble BlockPrepare remaining sections:1. Follow “Prepare intermediate section” forremaining intermediate and front sections:a. Remove any grit from threads inside tappedholes with clean rag.Do not use petroleum-based cleaning or sealingcompounds in boiler system. Severe damage tosystem components can result, causingsubstantial property damage.b. Install TI (Tankless Intermediate) and SI(Supply Intermediate) sections (when used)in order shown in “Section ArrangementTable”.c. Check each section for proper sealing ropeposition before proceeding to next section.Failure to position sealing rope properly cancause boiler to not seal gas-tight. Gas-tight sealprevents possible flue gas leakage and carbonmonoxide emissions, resulting in severe personalinjury or death.Section Arrangement TableMaximum Section Arrangement<strong>Boiler</strong> No. of (all heaters must beModel Heaters on left side of boiler)378 W&S 1 F-TI-B478 W&S 1 F-TI-I-B578 W&S 2 F-TI-I-TI-B678 W&S 2 F-TI-I-TI-I-B778 W&S 2 F-TI-I-TI-I-I-B878 W&S 3 F-TI-I-TI-I-I-TI-B978 W&S 3 F-TI-I-TI-I-TI-I-I-B1078 W 3 F-TI-I-TI-I-I-TI-I-I-B1078 S 3 F-TI-I-TI-SI-I-TI-I-I-BIf you would like to pressure-test blockassembly now, proceed to page 12.d. Make sure bottom refractory blanket hasbeen installed per instructions on page 7.Install burner mounting plate on frontsection:1. Install four 1/2" x 4-3/4" studs to secure burnermounting plate to section:a. Thread and lock together two nuts onrounded end of stud. Thread flat end of studinto one of four holes located around opening.b. Remove nuts.c. Repeat steps a and b for remaining studs.2. Install burner mounting plate:a. Apply 1/8" continuous bead of sealing ropeadhesive in groove around opening in section.b. Position 1/2" sealing rope in groove. Overlapends at least one inch.c. Install burner mounting plate. Use 1/2"washers and nuts.Install observation port assemblieson front and back sections:1. Install front observation port assembly:a. Apply 1/8" continuous bead of sealing ropeadhesive in groove on observation port.b. Position 3/8" sealing rope in groove.Overlap ends at least one inch.c. Secure assembly to section. Use 5/16-18 x3/4" slotted head screws.2. Repeat above steps for back observation portassembly.If using TI sections:Install tankless heaters and gaskets or heatercover plates and gaskets. Use 3/8" x 3/4" studsand nuts.1178 W 4 F-TI-I-TI-I-I-I-TI-I-TI-B1178 S 4 F-TI-I-TI-I-SI-I-TI-I-TI-B1278 W 4 F-TI-I-TI-I-I-I-I-TI-I-TI-B1278 S 4 F-TI-I-TI-I-SI-I-I-TI-I-TI-BW=Water, S=Steam, F=Front, TI=TanklessIntermediate, I=Intermediate, SI=SupplyIntermediate for steam boilers, B=Back. “I”sections can be substituted for “TI” sections.8Part No. 550-141-705
<strong>Weil</strong>-<strong>McLain</strong> 78 <strong>Boiler</strong> For Gas, Light Oil, Gas/Light Oil Fired Burners3e Assemble BlockPrepare flue collector hoodassembly:Make sure gaskets are intact, not torn orotherwise damaged. These conditions cancause possible flue gas leakage and carbonmonoxide emissions, resulting in severepersonal injury or death.1. Stand one collector hood module on end.2. Wipe all flanged surfaces with clean rag.3. Lay gasket on flange. Refer to Figure 8.4. Place end cap on gasket, aligning flangedsurfaces. Secure with six 5/16" x 5/8" flangedbolts and flanged nuts. Tighten to 30 - 35 in.-lbs.5. For 878 - 1278:a. Stand remaining hood module on end.b. Wipe all flanged surfaces with clean rag.c. Lay gasket on flange.d. Carefully place open end of first module ontop of gasket, aligning flanged surfaces.e. Secure with six 5/16" x 5/8" flanged boltsand flanged nuts.6. Attach flat-stitched sealing rope to hoodassembly. See Figure 9:a. Lay hood on floor with flanged side up.b. Wipe flanged surface with clean rag toremove dirt and oil.c. Apply double-faced tape to flanged surface.d. Apply rope to tape beginning on one side ofopen end of hood, leaving 1/4" extendingpast edge. Around corners, bend rope, do notcut. Do not stretch rope.Do not pre-cut rope. Gas-tightseal must be maintained toprevent possible flue gas leakageand carbon monoxide emissions,resulting in severe personalinjury or death.e. Continue around entire flange. At other openend, leave 1/4" rope extending past edge offlange. Cut off excess rope.Double-faced tape serves only tohold sealing rope in place duringinstallation. It will disintegrateover time. If collector hood andsealing rope is removed for anyreason, new tape and new gasketmust be applied.Flat-stitchedsealing ropeDouble-facedtape applied toflangeBend rope do notcut or stretchExtend rope 1/4"past open endsFlue collectorhood end capFlue collectorhood modulesFigure 9Sealing Rope Application on Collector Hood Assembly10Part No. 550-141-705
• Installation • Start-Up • Maintenance • Parts3fAssemble BlockInstall flue collector hood assembly:1. Place hood on top of sections with open endof hood tightly against flue collar. Make sureflue collar gasket is in place, not broken, bentor folded.2. Install 5/16" x 2" carriage bolts, flat washersand regular nuts on both sides of boilerstarting at back section joint, continuing ateach joint. See Figure 10. Tighten nuts.3. Fasten hood to sections and flue collar:a. Slide holddown clip over carriage bolt andflange on hood. Finger-tighten 5/16"flanged nut on carriage bolt. See Figure 10.Repeat for each clip. Where hood jointinterferes with clip installation, do notinstall clip.b. Install and finger-tighten six 5/16" x 1"flanged bolts and flanged nuts joining hoodassembly to flue collar.c. Center collector hood, making sure it istight against flue collar. Evenly tighten nutson holddown clips, being careful not todistort hood.Flanged nutd. Tighten six 5/16" x 1" flanged bolts andflanged nuts on flue collar to 30 - 35 in.-lbs.Overtightening bolts in fluecollector hood assembly willcause gasket material to extrude,causing possible flue gasleakage and carbon monoxideemissions, resulting in severepersonal injury or death.4. Check gas-tight seal of flue collector hood andflue collar.Gas tight seal must bemaintained to prevent possibleflue gas leakage and carbonmonoxide emissions, resulting insevere personal injury or death.a. Open damper in flue collar.b Check inside section assembly for any lightpassing through unsealed areas.c. Mark all unsealed areas.d. At unsealed areas, check for damagedgaskets, sealing rope not in place, loosebolts or nuts, or missing holddown clips.Correct all conditions and repeat step b. Ifunsealed areas still exist, contact your<strong>Weil</strong>-<strong>McLain</strong> distributor or sales officebefore continuing installation.Holddown clipRegular nutFlat washerCarriage boltFlue collectorhood<strong>Boiler</strong> sectionsFlat-stitchedsealing ropeFigure 10 Holddown Clip InstallationPart No. 550-141-705 11
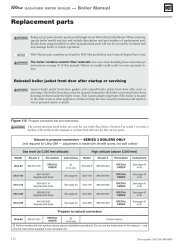
• Installation • Start-Up • Maintenance • Parts5a Connect Water <strong>Boiler</strong> PipingGeneral water piping information:• System water supply and return piping shouldbe installed and piping connections attached toboiler before erecting jacket or installingcontrols.• Do not pipe in through supply and out throughreturn. This creates reverse water flow throughboiler that must not be used.• When three-way valves are used fortemperature modulation, install slow-opening(minimum 10-minute) valves and boilermixing pump to minimize potential of boilerthermal shock. See W-M Bulletin AE-8402.Install piping:Install piping as shown in Figure 12 below forsingle boilers, page 14 for multiple boilers.Improperly piped systems or undersized pipingcan contribute to erratic boiler operation andpossible boiler or system damage.1. Connect supply and return piping:a. Size according to tables below.1)For unknown flow rates, size pipingper Table below, using 20°F. temperaturerise through boiler.Systemsupply(front only)Coldwater fillSystem return(front or rear)ExpansiontankCheckvalve<strong>Manual</strong>isolationvalvePressurereducingvalve(when used)Watermeter<strong>Manual</strong>isolationvalveRecommended Minimum Pipe Sizesfor Unknown Flow Rates*Supply Return<strong>Boiler</strong> Pipe Size Pipe SizeModel A B378 2" 2"478 2-1/2" 2-1/2"578-678 3" 3"778-1278 4" 4"* All piping sizes based on 20°F. temperaturerise through boiler.2)For known flow rates or higher flowrate through boiler, size piping per Tablebelow.Flow at higher velocities thanshown in Table below for pipesize can damage boiler, causingsubstantial property damage.Recommended Minimum Pipe Sizesfor Known Flow RatesWater Supply ReturnFlow Rate Pipe Size Pipe SizeGPM A BUp to 35 2" 2"36 to 50 2-1/2" 2-1/2"51 to 77 3" 3"78 to 142 4" 4"b. Locate circulator in supply piping.c. For return piping, use full diameter pipe for10 times that diameter before making anyreduction. For example, a 4-inch returnshould not be reduced any closer to boilerreturn tapping than 40 inches.d. Install system blow-off (drain) valve inlowest part of return piping close to boiler.ASME Size requirements are shown inTable below.ASME Drain Valve Size<strong>Boiler</strong> ModelValve Size (in.)378-478 3/4578-1178 11278 1-1/4Part No. 550-141-705Figure 12 Water <strong>Boiler</strong> Piping13
• Installation • Start-Up • Maintenance • Parts6a Connect Steam <strong>Boiler</strong> PipingColdwater fillGeneral steam piping information:• Hartford Loop piping arrangement and wetreturn are required for steam boilers.• Maintain 24-inch minimum from waterline tobottom of header (56-1/4" from bottom ofsection).• When using condensate receiver, feed pumpmust be energized by boiler-mounted pumpcontroller.Checkvalve<strong>Manual</strong>isolationvalvePressurereducing valve(when used)Figure 14Water meter<strong>Manual</strong>isolationvalveCold Water Fill PipingTo condensatereturn piping orcondensatereceiver(see fig. 18,page 17)Install piping:Install piping as shown on page 16 for singleboilers, page 18 for multiple boilers.Improperly piped systems orundersized piping can contributeto erratic boiler operation andpossible boiler or systemdamage. Piping system must beinstalled as shown, using pipesizes shown. Consult local <strong>Weil</strong>-<strong>McLain</strong> distributor or sales officebefore installing alternate piping.1. Connect supply and return piping:a. See table below and:1)Size forced condensate return piping bypump.2)Size gravity condensate return same asequalizer “J” pipe size.b. Install system drain valve in lowest part ofreturn piping close to boiler. ASME sizerequirements are shown in Table, page 13.c. Connect cold water fill piping as shown inFigure 14. Also shown are recommendedvalves and water meter, if used. Water meterwill detect added makeup water, indicatingleaks in system.Steam <strong>Boiler</strong> Pipe Size TableBased on 2-Pipe Steam System*Riser * *Pipe Size - In. H JFig. <strong>Boiler</strong> Header EqualizerNo. Model A B C In. In.15 378 3 3 215 478 4 4 215 578 4 4 2-1/216 678 3 3 4 2-1/216 778 4 4 4 2-1/216 878 4 4 4 316 978 4 4 6 317 1078-1278 4 4 4 6 3* Based on ASHRAE Handbook recommendations, allowing 1/2 oz. pressure drop per 100 feet of pipe for dry return.**Based on ASHRAE Handbook recommendations, allowing 2 oz. pressure drop per 100 feet of pipe at 3.5 PSIG.Maintain minimum 24" height from waterline to header.Part No. 550-141-705 15
<strong>Weil</strong>-<strong>McLain</strong> 78 <strong>Boiler</strong> For Gas, Light Oil, Gas/Light Oil Fired Burners12a Install BurnerTo install burner:1. Unpack burner.2. Place gasket around air tube and againstburner mounting flange. If sealing rope isused, apply 1/8" continuous bead of ropeadhesive around burner mounting flange andapply sealing rope to make gas-tight seal.3. Mount burner into opening in burnermounting plate.Maintain gas-tight seal betweenburner mounting flange and plateto prevent damage to air tube.4. Level burner using burner support bracketswhere required.5. Secure with furnished bolts.6. Retain burner information packet. Keep withboiler.13a Wiring and Fuel PipingElectric shock hazard. Can cause severepersonal injury or death if power source is notdisconnected before installing or servicingboiler and burner.To wire burner and boiler controls:1. Install all wiring in compliance with:• National Electrical Code ANSI/NFPA 70.• Any additional national, state, or localcodes.2. Follow burner manual and wiring diagramfound in burner information packet.3. Use 14 ga. wire for operating and safetycircuit wiring.4. Where burner motor voltage differs fromcontrol voltage, supply proper voltage to each.Size fused disconnect(s) and conductors perNational Electrical Code ANSI/ NFPA 70.To install gas and/or oil piping:1. Install all piping in compliance with:• Local, state or national codes andregulations.• Separate burner manual provided withburner.2. Use pipe joint compound (pipe dope)resistant to corrosive action of fuel oil orliquified petroleum gases. Apply sparinglyto male threads of pipe joints. Do not useany kind of pipe tape.3. Oil piping - use flare-type fittings, notcompression type.Do not use compression orsoldered fittings. No saferepair can be made. Severepersonal injury, death orsubstantial property damagewill result.24Part No. 550-141-705
• Installation • Start-Up • Maintenance • Parts14a Make Final AdjustmentsTo fill water boilers:1. Close manual air vents and drain cocks.2. Fill to correct system pressure. Correct pressurewill vary with each installation.3. Starting on lowest floor, open air vents one at atime until water squirts out. Close vent. Repeatwith remaining vents.4. Refill boiler to correct pressure.To fill steam boilers:1. Do not fill (except for leakage test) until boileris ready to be fired.2. Fill to normal waterline, halfway up gaugeglass.3. Recommend boiler water pH 7.0 to 8.5.Adjust burner and breeching damper:Make final burner adjustmentsusing combustion test equipmentto assure proper operation. Donot fire boiler without water.Sections will overheat, damagingboiler and resulting in severeproperty damage.1. Lock open breeching damper.2. Refer to burner manual for start-up and service.3. Let burner advance to high fire. Heat boiler todesign conditions.4. Using combustion test equipment, adjust burnerfor:a. 12% (± 1/4%) C02 for No. 2 fuel oil,0 smoke.b. 9 - 10% C02 natural gas, CO in flue gas tonot exceed 100 ppm (0.01%).5. Adjust breeching damper to assure 0.1" W. C.positive pressure at test opening. Securedamper.6. Adjust barometric draft control, when used, todesign conditions.7. Check per steps 4 through 6. Adjust asrequired.8. Plug test opening with 1/8" brass plug.Test PlugBreechingdamperLock(Slide down toopen damper)Figure 29 Breeching Damper AdjustmentPart No. 550-141-705 25
<strong>Weil</strong>-<strong>McLain</strong> 78 <strong>Boiler</strong> For Gas, Light Oil, Gas/Light Oil Fired Burners14b Make Final AdjustmentsSkim steam boilers:Clean all newly install steam boilers to removeoil. Failure to properly clean can result inviolent water level fluctuations, water passinginto steam mains, or high maintenance costs onstrainers, traps and vents. Skim boiler only. Donot clean old piping or leaks can occur.Do not use petroleum-based cleaning or sealingcompounds in boiler system. Severe damage tosystem components can result, causingsubstantial property damage.1. Remove 2" plug from 3" x 2" bushing at skimtapping. Provide 2" skim piping from tappingto floor drain.2. Raise waterline to midpoint of skim piping.3. Fire burner to maintain temperature belowsteaming rate during skimming process.4. Feed in water to maintain water level. Cycleburner to prevent rise in steam pressure.5. Continue skimming until discharge is clear.This may take several hours.6. Drain boiler. While boiler is warm but nothot, flush all interior surfaces under fullpressure until drain water runs clear.7. Remove skim piping. Re-insert plug at boilerskim tapping.8. Close drain cock. Fill with fresh water tonormal water line. Start burner and steam for15 minutes to remove dissolved gases. Stopburner.9. Check traps and air vents for properoperation.Determine if water treatment isneeded (water boilers only):Do not use petroleum-basedcleaning or sealing compoundsin boiler system. Severe damageto system components canresult, causing substantialproperty damage.Continual make-up water will reduce boiler life.Minerals can build up in sections, reducing heattransfer, overheating cast iron and causingsection failure.For unusually hard water areas or low pHconditions (less than 7.0) consult local watertreatment company.Freeze protection (when used):1. Use antifreeze especially made for hydronicsystems. Inhibited propylene glycol isrecommended.Do not use automotive, ethyleneglycol or undiluted antifreeze.Severe personal injury or deathcan result.2. 50% solution provides protection to about-30°F.3. Local codes may require back-flow preventeror actual disconnect from city water supply.4. Determine quantity according to system watercontent. <strong>Boiler</strong> water content is listed on page31. Percent of solution will affect sizing ofheat distribution units, circulator andexpansion tank.5. Follow antifreeze manufacturer’s instructions.Check boiler for gas-tight seal:<strong>Boiler</strong> must be sealed gas-tightto prevent possible flue gasleakage and carbon monoxideemissions, resulting in severepersonal injury or death.1. Remove boiler jacket side and top panels.2. Start burner. Observe all sealing points andchalk mark any not gas-tight.3. To seal all chalk-marked areas:a. use silicone sealant on section flueways.b. check gaskets and sealing rope placement.4. Reinstall all jacket panels.26Part No. 550-141-705
• Installation • Start-Up • Maintenance • Parts15a Data and DimensionsDataDimensionsSupply TappingsQuantityAnd Size*Return TappingsQuantityAnd Size*<strong>Boiler</strong>Model Water Steam Water Steam A B D E H W L378 2 - 4" 2 - 4" 2 - 3" 2 - 3" 13-1/8 -- 8 42-1/2 13-1/2 20-3/8 21-1/2478 2 - 4" 2 - 4" 2 - 3" 2 - 3" 20-1/8 -- 8 42-1/2 20-1/2 27-3/8 28-1/2578 2 - 4" 2 - 4" 2 - 3" 2 - 3" 27-1/8 -- 8 42-1/2 27-1/2 34-3/8 35-1/2678 2 - 4" 2 - 4" 2 - 3" 2 - 3" 34-1/8 -- 8 42-1/2 34-1/2 41-3/8 42-1/2778 2 - 4" 2 - 4" 2 - 3" 2 - 3" 41-1/8 -- 10 41-1/2 41-1/2 48-3/8 49-1/2878 2 - 4" 2 - 4" 2 - 3" 2 - 3" 48-1/8 -- 10 41-1/2 48-1/2 55-3/8 56-1/2978 2 - 4" 2 - 4" 2 - 3" 2 - 3" 55-1/8 -- 10 41-1/2 55-1/2 62-3/8 63-1/21078 2 - 4" 3 - 4" 2 - 3" 2 - 3" 62-1/8 27-1/8 10 41-1/2 62-1/2 69-3/8 70-1/21178 2 - 4" 3 - 4" 2 - 3" 2 - 3" 69-1/8 34-1/8 10 41-1/2 69-1/2 76-3/8 77-1/21278 2 - 4" 3 - 4" 2 - 3" 2 - 3" 76-1/8 41-1/8 12 40-1/2 76-1/2 83-3/8 84-1/2* Use piping connections shown in manual, pages 13 - 18.Part No. 550-141-705 27
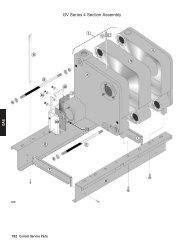
<strong>Weil</strong>-<strong>McLain</strong> 78 <strong>Boiler</strong> For Gas, Light Oil, Gas/Light Oil Fired Burners15b Data and DimensionsMinimum forheaterremoval3" NPTreturn3" NPTreturnFrontBack4" NPTsupply outletsWaterlineW=<strong>Boiler</strong>section lengthSideIntermediate28Part No. 550-141-705
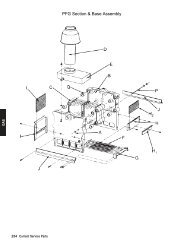
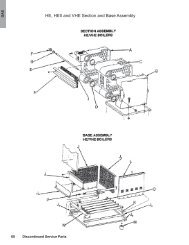
• Installation • Start-Up • Maintenance • Parts16a PartsMKPJKLPDHIQFEGCBAONPart No. 550-141-705 29
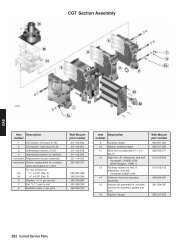
<strong>Weil</strong>-<strong>McLain</strong> 78 <strong>Boiler</strong> For Gas, Light Oil, Gas/Light Oil Fired Burners16b PartsFigure No. Description W-M Sales Ref. No.A Front Section (7813) 11B329BIntermediate Section Regular (7815)Intermediate Section Supply - Steam (7814)11B33011B331C Intermediate Section Tankless (7816) 11B332D Back Section (7818) 11B333Section Assembly Kit (includes for one joint - sealing ropeadhesive, sealing rings, silicone sealant, tie rods, washers, nuts)11B334E Heater Cover Plate Carton (includes cover plate, gasket, studs, nuts) 11B335F Tankless Heater Carton (includes tankless heater, gasket, studs, nuts) 11B336G Heater Gasket 11B302H Cleanout Plate 11B337I Cleanout Plate Gasket 11B304Flue Collector Hood "A"Flue Collector Hood "B"11B33811B339J Flue Collector Hood "C" 11B340KFlue Collector Hood "D"Flue Collector Hood "E"Flue Collector Hood Hardware Kit (includes flat-stitched sealing rope,double-faced tape, flue collar gasket, collector hood gaskets,holddown clips, hardware)Collector Hood Gasket Kit (includes flue collector hood gasket, fluecollar gasket, flat-stitched sealing rope and double-faced tape)11B34111B35111B34211B311L Flue Collector Hood End Cap 11B343Flue Collar Assembly 8"11B344M Flue Collar Assembly 10" 11B345NFlue Collar Assembly 12"Combustion Chamber Kit (includes back refractory blanket, bottomrefractory blanket, waterglass, sealing rope, sealing rope adhesive)Burner Mounting Plate Front Refractory 4-1/2" Burner OpeningBurner Mounting Plate Front Refractory 6-1/8" Burner Opening11B34611B34811B34911B350O Refractory Retainer Clip 10B960PObservation Port Assembly (includes observation port assembly,sealing rope, screws)11B300Q Sealing Rope 10B98530Part No. 550-141-705
• Installation • Start-Up • Maintenance • Parts17a Ratings◆I=B=R Burner ✝ ✝ <strong>Boiler</strong> WaterCapacity Net I=B=R Ratings ❏ Content Gals. Packaged✝ ■ * * Positive <strong>Boiler</strong>* * Gross Net Stack Presure I=B=R WeightLight ❍ ■ I=B=R ■ ■ Firebox Gas In Vent Steam LessOil Gas Output Steam Steam Water <strong>Boiler</strong> Volume Volume Firebox Dia. to Water<strong>Boiler</strong> Model GPH MBH MBH Sg. Ft. MBH MBH H.P. Cu. Ft. CFM In. W.C. Inches Water Waterline Lbs.▲ -378- *F ● 2.40 346 278 871 209 242 8.3 2.61 139 0.22 8 37.5 27.5 1355▲ -478- *F ● 3.40 494 400 1250 300 348 11.9 3.97 198 0.22 8 49.0 36.0 1615▲ -578- *F ● 4.45 641 521 1629 391 453 15.6 5.33 259 0.21 8 60.5 44.5 1875▲ -678- *F ● 5.50 789 643 2008 482 559 19.2 6.69 320 0.21 8 72.0 53.0 2130▲ -778- *F ● 6.50 937 7642388 573 66422.8 8.05 378 0.21 10 83.5 61.5 2390▲ -878- *F ● 7.50 1084 886 2771 665 770 26.4 9.41 436 0.20 10 95.0 70.0 2650▲ -978- *F ● 8.50 1232 1007 3154755 876 30.1 10.77 4940.20 10 106.5 78.5 2910▲ -1078- *F ● 9.60 1379 1129 3533 847 982 33.7 12.13 558 0.20 10 118.0 87.0 3165▲ -1178- *F ● 10.60 1527 1250 3917 938 1087 37.3 13.49 616 0.19 10 129.5 95.5 3425▲ -1278- *F ● 11.60 1674 1372 4321 1039 1193 41.0 14.85 675 0.19 12 141.0 104.0 3680▲ Use prefix “BL” for light oil, “BG” for gas, “BGL” for gas-light oil, or “H” for boiler only for use with approved burners. Add prefix “A” to designatorfor factory-assembled 78 (ABL-478). Substitute “P” for “B” for fire-tested package unit (PL-478).* Substitute “S” for steam, “W” for water.● For T-intermediate section(s) and tankless heater(s) add suffix “(number required) TIH”; for T-intermediate section(s) with cover plate(s) only add suffix “(numberrequired) TIP”.◆ Burner input based on maximum of 2,000 feet altitude - for higher altitudes consult a <strong>Weil</strong>-<strong>McLain</strong> representative.** No. 2 fuel oil - Commercial Standard Spec. CS75-56. Heat value of oil - 140,000 Btu/Gal.❍ Consult <strong>Weil</strong>-<strong>McLain</strong> BURNER SPEC AND DATA SHEET for gas pressures required.■ MBH refers to thousands of BTU per hour.✝✝✝Gross I=B=R ratings have been determined under the I=B=R provision governing forced draft boiler-burner units.Net I=B=R ratings are based on net installed radiation of sufficient quantity for the requirements of the building and nothing need be added for normal piping andpick-up. Water ratings are based on a piping and pick-up allowance of 1.15. Steam ratings are based on the following allowances: 378 through 1178 - 1.333; 1278- 1.321. An additional allowance should be made for gravity hot water systems or for unusual piping and pick-up loads. Consult a <strong>Weil</strong>-<strong>McLain</strong> representative.*** Stack gas volume at outlet temperature.❏ With 0.10" W.C. positive at flue collar.Note: Sections tested for 80 PSIG working pressure.Part No. 550-141-705 31
32Part No. 550-141-705/0600