You also want an ePaper? Increase the reach of your titles
YUMPU automatically turns print PDFs into web optimized ePapers that Google loves.
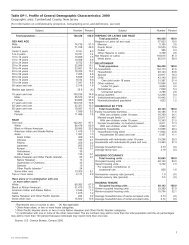
16<strong>Fire</strong> <strong>Hose</strong>,<strong>Nozzles</strong>,<strong>Streams</strong>, <strong>and</strong><strong>Foam</strong>
16Skill Drill 16-1Replacing the Swivel Gasket (1 of 2)1. Fold the new gasket,bringing the thumb <strong>and</strong>forefinger together <strong>and</strong>creating two loops.2. Place either of the twoloops into the coupling <strong>and</strong>against the gasket seat.
16Skill Drill 16-1Replacing the Swivel Gasket (2 of 2)3. Using the thumb, pushthe remaining unseatedportions into the couplinguntil the entire gasket isproperly positionedagainst the coupling seat.
Skill Drill 16-2Performing the One-<strong>Fire</strong> Fighter Foot-TiltMethod of Coupling a <strong>Fire</strong> <strong>Hose</strong> (1 of 2)161. Place one foot on thehose behind the malecoupling. Push down withyour foot to tilt the malecoupling upward.2. Place one h<strong>and</strong> behindthe female coupling <strong>and</strong>grasp the hose.
Skill Drill 16-2Performing the One-<strong>Fire</strong> Fighter Foot-TiltMethod of Coupling a <strong>Fire</strong> <strong>Hose</strong> (2 of 2)163. Place the other h<strong>and</strong> onthe coupling swivel. Bringthe two couplings together<strong>and</strong> align the Higbeeindicators. Rotate theswivel in a clockwisedirection to connect thehoses.
Skill Drill 16-3Performing the Two-<strong>Fire</strong> Fighter Method ofCoupling a <strong>Fire</strong> <strong>Hose</strong> (1 of 3)161. Pick up the male end ofthe coupling. Grasp itbehind the coupling <strong>and</strong>hold it against the body.2. The second fire fighterholds the female couplingfirmly with both h<strong>and</strong>s.
Skill Drill 16-3Performing the Two-<strong>Fire</strong> Fighter Method ofCoupling a <strong>Fire</strong> <strong>Hose</strong> (2 of 3)163. The second fire fighterbrings the female couplingto the male coupling.4. The second fire fighteraligns the female couplingwith the male coupling. Usethe Higbee indicators.
Skill Drill 16-3Performing the Two-<strong>Fire</strong> Fighter Method ofCoupling a <strong>Fire</strong> <strong>Hose</strong> (3 of 3)165. The second fire fighterturns the female couplingcounterclockwise until itclicks, which indicates thatthe threads are aligned.6. Turn the female couplingclockwise to couple thehoses.
Skill Drill 16-4Performing the One-<strong>Fire</strong> Fighter Knee-PressMethod of Uncoupling a <strong>Fire</strong> <strong>Hose</strong> (1 of 2)161. Pick up the connection bythe female coupling end.2. Turn the connectionupright, resting the malecoupling on a firm surface.
Skill Drill 16-4Performing the One-<strong>Fire</strong> Fighter Knee-PressMethod of Uncoupling a <strong>Fire</strong> <strong>Hose</strong> (2 of 2)163. Place a knee on thefemale coupling <strong>and</strong> pressdown on it with your bodyweight. Turn the femaleswivel counterclockwise<strong>and</strong> loosen the coupling.
Skill Drill 16-5Performing the Two-<strong>Fire</strong> Fighter Stiff-ArmMethod of Uncoupling a <strong>Fire</strong> <strong>Hose</strong> (1 of 2)161. Two fire fighters faceeach other <strong>and</strong> firmly grasptheir respective coupling.2. With elbows lockedstraight, the fire fighterspush toward each other.
Skill Drill 16-5Performing the Two-<strong>Fire</strong> Fighter Stiff-ArmMethod of Uncoupling a <strong>Fire</strong> <strong>Hose</strong> (2 of 2)163. While pushing towardeach other, the fire fightersturn the couplingcounterclockwise,loosening the coupling.
16Skill Drill 16-6Uncoupling a <strong>Hose</strong> with Spanners (1 of 2)1. With the connection onthe ground, straddle theconnection above thefemale coupling.2. Place one spannerwrench on the femalecoupling with the h<strong>and</strong>le ofthe wrench to the left.
16Skill Drill 16-6Uncoupling a <strong>Hose</strong> with Spanners (2 of 2)3. Place the second spannerwrench on the malecoupling with the h<strong>and</strong>le ofthe wrench to the right.4. Push both spannerh<strong>and</strong>les down toward theground, loosening theconnection.
Skill Drill 16-7Connecting Two Lines with a DamagedCoupling1. Using a hose jacket, open the hose jacket <strong>and</strong>place the damaged coupling in one end.2. Place the second coupling in the other end ofthe jacket.3. Close the hose jacket, ensuring that the latchis secure. Slowly bring the hose line up topressure, allowing the gaskets to seal aroundthe hose ends.16
16Skill Drill 16-8Cleaning <strong>and</strong> Maintaining <strong>Hose</strong>s (1 of 2)1. Lay the hose out flat.Rinse the hose with water.2. Gently scrub the hosewith mild detergent, payingattention to soiled areas.
16Skill Drill 16-8Cleaning <strong>and</strong> Maintaining <strong>Hose</strong>s (2 of 2)3. Turn over the hose <strong>and</strong>repeat steps 1 <strong>and</strong> 2. Givea final rinse to the hosewith water. Lay or hangthe hose <strong>and</strong> allow it todry before properly storingit.
16Skill Drill 16-9Marking a Defective <strong>Hose</strong>Inspect the hose fordefects. Upon finding adefect, mark the area onthe hose <strong>and</strong> remove thehose from service. Tagthe hose as defective witha description of the defect,take it out of service, <strong>and</strong>notify your superiors.
16Skill Drill 16-11Performing a Straight <strong>Hose</strong> Roll (1 of 2)1. Lay the length of hose tobe rolled flat <strong>and</strong> straight.2. Begin by rolling the malecoupling over on top of thehose.
16Skill Drill 16-11Performing a Straight <strong>Hose</strong> Roll (2 of 2)3. Roll the hose to thefemale coupling.4. Set the hose roll on itsside, <strong>and</strong> tap any protrudinghose flat with a foot.
16Skill Drill 16-12Performing a Single-Doughnut Roll (1 of 2)1. Place the hose flat <strong>and</strong> ina straight line.2. Locate the midpoint of thehose.
16Skill Drill 16-12Performing a Single-Doughnut Roll (2 of 2)3. From the midpoint, move5 feet toward the malecoupling end. Start rollingtoward the female coupling.4. Wrap the excess hose ofthe female end over themale coupling to protect thethreads.
16Skill Drill 16-13Performing a Twin-Doughnut Roll (1 of 2)1. Lay the hose flat <strong>and</strong> in astraight line.2. Bring the male couplingalongside the femalecoupling.
16Skill Drill 16-13Performing a Twin-Doughnut Roll (2 of 2)3. Fold the far end over <strong>and</strong>roll toward the couplings,creating a double roll.4. The roll can be carried byh<strong>and</strong>, rope, or strap.
Skill Drill 16-14Performing a Self-Locking Twin-DoughnutRoll (1 of 3)161. Lay the hose flat <strong>and</strong>bring the couplingsalongside each other.2. Move one side of thehose over the other,creating a loop. This loop isthe carrying shoulder loop.
Skill Drill 16-14Performing a Self-Locking Twin-DoughnutRoll (2 of 3)163. Bring the loop backtoward the couplings to thepoint where the hosecrosses.4. Where the hose crosses,roll the hose toward thecouplings with the loop asits center.
Skill Drill 16-14Performing a Self-Locking Twin-DoughnutRoll (3 of 3)165. On completion of therolling, position thecouplings on the top ofthe rolls.6. Position the loops so oneis larger than the other.Pass the larger loop overthe couplings.
16Skill Drill 16-15Performing a Forward <strong>Hose</strong> Lay (1 of 2)1. Grasp enough hose toreach <strong>and</strong> loop around thehydrant. Signal thedriver/operator to proceedonce the hose is secured.2. Remove the appropriatesizehydrant cap nearest tothe fire. Attach the supplyhose to the outlet.
16Skill Drill 16-15Performing a Forward <strong>Hose</strong> Lay (2 of 2)3. The driver/operatorsignals to charge thehose. Slowly open thehydrant completely. Followthe hose back to theengine <strong>and</strong> remove anykinks from the supply line.
Skill Drill 16-16Attaching a <strong>Hose</strong> to a Four-Way HydrantValve (1 of 3)161. Grasp the four-way valve,the attached hose, <strong>and</strong>enough hose to reach to<strong>and</strong> loop around thehydrant.2. Remove the steamer portfrom the fire hydrant. Attachthe four-way valve <strong>and</strong> thehydrant wrench.
Skill Drill 16-16Attaching a <strong>Hose</strong> to a Four-Way HydrantValve (2 of 3)163. When the supply enginearrives at the fire scene, thedriver/operator stops at thehydrant.4. The driver/operatorattaches a hose from thefour-way valve outlet to theintake side of the engine.
Skill Drill 16-16Attaching a <strong>Hose</strong> to a Four-Way HydrantValve (3 of 3)165. Attach a second hose tothe inlet side of the four-wayvalve <strong>and</strong> connect the otherend to the pump discharge.6. Change the position of thefour-way valve to direct theflow from the hydrantthrough the supply engine<strong>and</strong> into the line.
16Skill Drill 16-17Performing a Reverse <strong>Hose</strong> Lay (1 of 3)1. Pull sufficient hose toreach from the supplyengine to the inlet of theattack engine.2. The supply engine drivesaway, laying out hose fromthe attack engine to thewater source.
16Skill Drill 16-17Performing a Reverse <strong>Hose</strong> Lay (2 of 3)3. Connect the supply line tothe inlet of the attackengine.4. The supply engineuncouples the supply hose<strong>and</strong> attaches it to thedischarge side.
16Skill Drill 16-17Performing a Reverse <strong>Hose</strong> Lay (3 of 3)5. The driver/operatorconnects the supplyengine to the hydrant orwater source. Upon thesignal from the attackengine, the supply enginedriver/operator chargesthe supply line.
16Skill Drill 16-18Performing a Split <strong>Hose</strong> Lay (1 of 4)1. The driver/operator of the first-arriving enginecompany stops at the intersection or drivewayentrance.2. Remove the supply line from the hose bed <strong>and</strong>anchor it in a kneeling position.3. The driver/operator proceeds slowly toward thestructure fire.
16Skill Drill 16-18Performing a Split <strong>Hose</strong> Lay (2 of 4)4. Either proceed by foot to the structure fire orwait at the intersection for the supply engine.Follow the local SOP.5. If the supply engine returns to the structurefire, it first stops <strong>and</strong> connects the supply hoseto the hose end laid in the street by the attackengine. If threaded couplings are used, adouble-male adaptor may be required.
16Skill Drill 16-18Performing a Split <strong>Hose</strong> Lay (3 of 4)6. If the supply engine remains at theintersection, anchor the supply line from thesecond engine company. After the hose is laidto a hydrant, connect the two lines to form onesupply line.7. The driver/operator of the attack engine startspumping water from the booster tank <strong>and</strong>connects the supply hose to the pump intake.
16Skill Drill 16-18Performing a Split <strong>Hose</strong> Lay (4 of 4)8. The driver/operator of the supply enginepositions the apparatus at the hydrantaccording to the local SOP.9. The driver/operator of the supply engine pullsoff hose from the hose bed until the nextcoupling. The hose is broken at this connection<strong>and</strong> is connected to the pump discharge or thefour-way hydrant valve. Follow the local SOP.10. Upon the signal from the attack engine, thesupply engine driver/operator charges the line.
16Skill Drill 16-19Performing a Flat <strong>Hose</strong> Load (1 of 3)1. For a forward lay, placethe male coupling in first.For a reverse lay, place thefemale coupling in first.2. Start the hose lay with thecoupling at the front end ofthe hose compartment.
16Skill Drill 16-19Performing a Flat <strong>Hose</strong> Load (2 of 3)3. Fold the hose back onitself at the rear of the hosebed.4. Run the hose back to thefront end on top of theprevious length of hose.Fold the hose back on itself.
16Skill Drill 16-19Performing a Flat <strong>Hose</strong> Load (3 of 3)5. While laying the hoseback to the rear of the hosebed, angle the hose to theside of the previous fold.6. Continue to lay the hosein neat folds until the wholehose bed is covered with alayer of hose.
16Skill Drill 16-20Performing a Horseshoe <strong>Hose</strong> Load (1 of 3)1. For a forward lay, startwith the male coupling in therear corner. For a reverselay, start with the femalecoupling in the rear corner.2. Lay the first length ofhose on its edge against theright or left wall of the hosebed.
16Skill Drill 16-20Performing a Horseshoe <strong>Hose</strong> Load (2 of 3)3. At the front, lay the hoseacross the width of the bed<strong>and</strong> continue down theopposite side.4. Fold the hose back onitself <strong>and</strong> continue laying itback toward the front of thehose bed.
16Skill Drill 16-20Performing a Horseshoe <strong>Hose</strong> Load (3 of 3)5. Continue to pack thehose on the first layer.Once the center of thehorseshoe is filled in,begin a second layer.Complete additional layersusing the same pattern asused for the first layer.
16Skill Drill 16-21Performing an Accordion <strong>Hose</strong> Load (1 of 2)1. Lay the first length ofhose in the hose bed on itsedge against the side of thehose bed.2. Double the hose back onitself at the rear of the hosebed. Leave the female endextended.
16Skill Drill 16-21Performing an Accordion <strong>Hose</strong> Load (2 of 2)3. Fold the hose at the frontof the hose bed so that thebend is even to the edge ofthe hose bed.4. Alternate the length of thehose folds at each end toallow more room for thefolded ends.
Skill Drill 16-22Attaching a Soft Suction <strong>Hose</strong> to a <strong>Fire</strong>Hydrant (1 of 5)161. The driver/operatorpositions the apparatus sothat its inlet is the correctdistance from the hydrant.2. Remove the hose, anyneeded adaptors, <strong>and</strong> thehydrant wrench.
Skill Drill 16-22Attaching a Soft Suction <strong>Hose</strong> to a <strong>Fire</strong>Hydrant (2 of 5)163. Attach the soft suctionhose to the inlet of theengine if it is not alreadyattached to the engineintake.4. Unroll the hose.
Skill Drill 16-22Attaching a Soft Suction <strong>Hose</strong> to a <strong>Fire</strong>Hydrant (3 of 5)165. Remove the large hydrantcap.6. Attach the soft suctionhose to the hydrant.
Skill Drill 16-22Attaching a Soft Suction <strong>Hose</strong> to a <strong>Fire</strong>Hydrant (4 of 5)167. Ensure that there are nokinks or sharp bends in thehose that might restrict theflow of water.8. Open the hydrant slowlywhen so indicated by thedriver/operator. Check allconnections for leaks.
Skill Drill 16-22Attaching a Soft Suction <strong>Hose</strong> to a <strong>Fire</strong>Hydrant (5 of 5)169. Place chafing blocksunder the hose where itcontacts the ground toprevent mechanicalabrasion.
Skill Drill 16-23Attaching a Hard Suction <strong>Hose</strong> to a <strong>Fire</strong>Hydrant (1 of 2)161. The driver/operatorpositions the apparatus sothat the intake is located thecorrect distance from thehydrant.2. Remove the pump inletcap. Remove the hydrantsteamer outlet cap. Removea section of hard suctionhose.
Skill Drill 16-23Attaching a Hard Suction <strong>Hose</strong> to a <strong>Fire</strong>Hydrant (2 of 2)163. Connect the hard suctionhose to the large intake onthe engine.4. Connect the opposite endto the hydrant. Slowly openthe hydrant when instructedby the driver/operator.
16Skill Drill 16-24Performing a Minuteman <strong>Hose</strong> Load (1 of 3)1. Connect the female endof the first length of hose tothe discharge outlet.2. Flat load the hose even tothe edges of the hose bed.
16Skill Drill 16-24Performing a Minuteman <strong>Hose</strong> Load (2 of 3)3. Assemble the remaininghose sections <strong>and</strong> attachthe nozzle. Place the nozzleon the hose bed.4. Load the remaining 100feet of hose into the bed,alternating the folds.
16Skill Drill 16-24Performing a Minuteman <strong>Hose</strong> Load (3 of 3)5. Connect the last sectionloaded to the first sectionplaced in the bed.6. Lay the remaining loosehose on top of the load.
16Skill Drill 16-25Advancing a Minuteman <strong>Hose</strong> Load (1 of 2)1. Grasp the nozzle <strong>and</strong> thefolds next to it.2. Pull the load one third outof the bed.
16Skill Drill 16-25Advancing a Minuteman <strong>Hose</strong> Load (2 of 2)3. Place the load on theshoulder. Walk away fromthe apparatus until all hoseis clear of the hose bed.4. Continue walking away,pulling the remaining hosefrom the hose bed.
16Skill Drill 16-26Performing a Preconnected Flat Load (1 of 2)1. Attach the female end ofthe hose to the preconnectdischarge.2. Begin laying the hose flatin the hose bed.
16Skill Drill 16-26Performing a Preconnected Flat Load (2 of 2)3. Make an 8-inch loop atthe end of the hose bed.Make a second pulling loopthat is about twice the sizeof the first loop.4. Finish loading the hose,attach the nozzle, <strong>and</strong> placeit on top of the hose bed.
16Skill Drill 16-27Advancing a Preconnected Flat <strong>Hose</strong> Load (1 of 3)1. Place an arm through thelarger lower loop. Grasp thesmaller loop with the sameh<strong>and</strong>.2. Grasp the nozzle with theopposite h<strong>and</strong>.
16Skill Drill 16-27Advancing a Preconnected Flat <strong>Hose</strong> Load (2 of 3)3. Pull the load from thebed.4. Walk away from thevehicle.
16Skill Drill 16-27Advancing a Preconnected Flat <strong>Hose</strong> Load (3 of 3)5. As the load deploys,drop the small loop.Extend the remaininghose to length.
16Skill Drill 16-28Performing a Triple-Layer <strong>Hose</strong> Load (1 of 3)1. Attach the female end ofthe hose to the preconnectdischarge.2. Connect the sections ofhose together.
16Skill Drill 16-28Performing a Triple-Layer <strong>Hose</strong> Load (2 of 3)3. Extend the hose directlyfrom the hose bed. Pick upthe hose two-thirds of thedistance from the dischargeto the hose nozzle.4. Carry the hose back tothe apparatus, forming athree-layer loop.
16Skill Drill 16-28Performing a Triple-Layer <strong>Hose</strong> Load (3 of 3)5. Pick up the entire lengthof folded hose.6. Lay the tripled foldedhose in the hose bed in anS-shape with the nozzle ontop.
16Skill Drill 16-29Advancing a Triple-Layer <strong>Hose</strong> Load (1 of 3)1. Grasp the nozzle <strong>and</strong> thetop fold.2. Turn away from the hosebed <strong>and</strong> place the hose onthe shoulder.
16Skill Drill 16-29Advancing a Triple-Layer <strong>Hose</strong> Load (2 of 3)3. Walk away from vehicleuntil the entire load is out ofthe bed.4. When the load is out ofthe bed, drop the fold.
16Skill Drill 16-29Advancing a Triple-Layer <strong>Hose</strong> Load (1 of 3)5. Extend the nozzle theremaining distance.
16Skill Drill 16-30Unloading <strong>and</strong> Advancing Wyed Lines (1 of 2)1. Grasp one of the attacklines <strong>and</strong> pull it from thebed.2. Pull the second attackline from the bed <strong>and</strong> placeit far enough from the firstline so that you can walkbetween the hose lines.
16Skill Drill 16-30Unloading <strong>and</strong> Advancing Wyed Lines (2 of 2)3. Grasp the gated wye <strong>and</strong>pull it from the bed. Placethe gated wye so that oneattack line is on the otherside.4.The individual attack linescan now be extended.
16Skill Drill 16-31Performing a Working <strong>Hose</strong> Drag (1 of 3)1. Place the end of the hoseover the shoulder.2. Hold onto the couplingwith the h<strong>and</strong>.
16Skill Drill 16-31Performing a Working <strong>Hose</strong> Drag (2 of 3)3. Walk in the direction youwant to advance the hose.4. As the next hose couplingis ready to come off thehose bed, a second firefighter grasps the coupling.
16Skill Drill 16-31Performing a Working <strong>Hose</strong> Drag (3 of 3)5. Continue this processuntil enough hose hasbeen pulled out of thehose bed.
16Skill Drill 16-32Performing a Shoulder Carry (1 of 2)1. Grasp the end of the hose<strong>and</strong> place it over yourshoulder. Have a secondfire fighter place additionalhose on your shoulder.2. Continue to hold the hose<strong>and</strong> move forward about 15feet. A second fire fighterthen st<strong>and</strong>s at the tailboardto receive a load of hose.
16Skill Drill 16-32Performing a Shoulder Carry (1 of 2)3. When enough fire fightershave received hose loads,the hose can be uncoupledfrom the hose bed.4. All of the fire fighters startwalking toward the fire.Each fire fighter lays out hisor her supply of hose.
16Skill Drill 16-33Advancing an Accordion Load (1 of 3)1. Using two h<strong>and</strong>s, graspthe end of the load <strong>and</strong> thenumber of folds it will take tomake an adequate shoulderload.2. Pull the accordion loadabout one third of the wayoff the apparatus.
16Skill Drill 16-33Advancing an Accordion Load (2 of 3)3. Twist the folds so theybecome flat,with the end ofthe accordion load on thebottom of the load.4. Transfer the hose to theopposite shoulder whileturning so that you face inthe direction you will walk.
16Skill Drill 16-33Advancing an Accordion Load (3 of 3)5. Place the shoulder loadover your shoulder <strong>and</strong>grasp it tightly with bothh<strong>and</strong>s.6. Walk away from theapparatus, pulling theshoulder load out of thehose bed.
16Skill Drill 16-34Advancing a <strong>Hose</strong> Line Up a Stairway (1 of 2)1. Use a shoulder carry toadvance up the stairs.2. When ascending thestairway, lay the hoseagainst the outside of thestairs to reduce trippinghazards.
16Skill Drill 16-34Advancing a <strong>Hose</strong> Line Up a Stairway (2 of 2)3. Arrange excess hose sothat it is available to firefighters entering the firefloor.
16Skill Drill 16-35Advancing a <strong>Hose</strong> Line Down a Stairway (1 of 2)1. Advance a charged hoseline.2. Descend stairs feet first.If there is smoke, positionyourself underneath it.
16Skill Drill 16-35Advancing a <strong>Hose</strong> Line Down a Stairway (2 of 2)3. Position fire fighters atareas where hose linescould snag.
Skill Drill 16-36Advancing an Uncharged <strong>Hose</strong> Line Up aLadder (1 of 3)161. Advance the hose line tothe ladder.2. Pick up the nozzle; placethe hose across the chest,with the nozzle draped overthe shoulder.
Skill Drill 16-36Advancing an Uncharged <strong>Hose</strong> Line Up aLadder (2 of 3)163. Climb up the ladder withthe uncharged hose line.Enforce a limit of one firefighter per fly section.4. The nozzle is placed overthe top rung of the ladder<strong>and</strong> advanced into the firearea.
Skill Drill 16-36Advancing an Uncharged <strong>Hose</strong> Line Up aLadder (3 of 3)165. Additional hose can befed up the ladder untilsufficient hose is inposition. The hose can besecured to the ladder witha hose strap to support itsweight <strong>and</strong> keep it frombecoming dislodged.
16Skill Drill 16-37Operating a <strong>Hose</strong> Stream from a Ladder (1 of 2)1. Climb the ladder with ahose line to the height atwhich the line will beoperated.2. Place the hose <strong>and</strong>secure the hose to theladder with a rope hose tool,rope, or piece of webbing.
16Skill Drill 16-37Operating a <strong>Hose</strong> Stream from a Ladder (2 of 2)3. Carefully operate thehose stream from theladder. Be careful whenopening <strong>and</strong> closingnozzles <strong>and</strong> redirectingthe stream because of thenozzle backpressure. Thisforce could destabilize theladder.
Skill Drill 16-38Connecting a <strong>Hose</strong> Line to Supply a <strong>Fire</strong>Department Connection (1 of 2)161. Extend a hose line fromthe engine discharge to thefire department connection.2. Remove the caps on thest<strong>and</strong>pipe inlet.
Skill Drill 16-38Connecting a <strong>Hose</strong> Line to Supply a <strong>Fire</strong>Department Connection (1 of 2)163. Visually inspect theinterior of the connectionto ensure that there is nodebris that could obstructthe water flow. Attach thehose line to theconnection. Notify thedriver/operator when theconnection has beencompleted.
Skill Drill 16-39Connecting <strong>and</strong> Advancing an AttackLine from a St<strong>and</strong>pipe Outlet (1 of 2)161. Carry a st<strong>and</strong>pipe hosebundle to the st<strong>and</strong>pipeconnection below the fire.Remove the cap fromst<strong>and</strong>pipe.2. Attach the proper adaptoror an appliance such as agated wye.
Skill Drill 16-39Connecting <strong>and</strong> Advancing an AttackLine from a St<strong>and</strong>pipe Outlet (2 of 2)163. Flake the hose up thestairs to the floor above thefire.4. Extend the hose to thefire floor <strong>and</strong> prepare for thefire attack.
Skill Drill 16-40Replacing a Defective <strong>Hose</strong> Section1. Shut down or clamp off the damaged line.2. Remove the damaged section of the hose.3. Replace the damaged section with two newsections to ensure that the hose’s length willbe adequate. Restore the water flow.16
16Skill Drill 16-41Draining a <strong>Hose</strong> (1 of 2)1. Lay the section of hosestraight on a flat surface.2. Start at one end of thesection, lift the hose toshoulder level.
16Skill Drill 16-41Draining a <strong>Hose</strong> (2 of 2)3. Move down the length ofhose, folding it back <strong>and</strong>forth over the shoulder.4. Continue down the lengthuntil the entire section is onthe shoulder.
16Skill Drill 16-42Operating a Smooth-Bore Nozzle (1 of 3)1. Select the desired tip size<strong>and</strong> attach the nozzle shutoffvalve.2. Attain a stable stance (ifst<strong>and</strong>ing).
16Skill Drill 16-42Operating a Smooth-Bore Nozzle (2 of 3)3. Slowly open the valve,allowing water to flow.4. Open the valvecompletely to achievemaximum effectiveness.
16Skill Drill 16-42Operating a Smooth-Bore Nozzle (3 of 3)5. Direct the stream to thedesired location.
16Skill Drill 16-43Operating a Fog-Stream Nozzle (1 of 2)1. Attain a stable stance (ifst<strong>and</strong>ing).2. Slowly open the valve,allowing water to flow.
16Skill Drill 16-43Operating a Fog-Stream Nozzle (2 of 2)3. Open the valvecompletely.4. Select the desired waterpattern by rotating the bezelof the nozzle. Apply waterwhere needed.