
Create successful ePaper yourself
Turn your PDF publications into a flip-book with our unique Google optimized e-Paper software.
---,--------- ,-~-,- --<br />
IIMI
- - - - ~-- - - - - - - - - - -- -- -- -~- - ---,-" --~-<br />
BEFORE YOU BEGIN<br />
. - -- -- - --- -----<br />
INSPECT YOUR ORDER-First, make sure every item on your packing list is<br />
enclosed. If not, another package with the missing product should arrive in a day or<br />
two. Examine your plants. If some branches or roots are broken, that's OK. Just prune<br />
off the broken shoots.<br />
PARTIAL ORDERS----Some items are shipped to you directly from the grower or<br />
are split into more than one shipment so that you can receive your plants faster and at<br />
the proper planting time for your area. If your order has been split, the packing list will<br />
indicate "Shipping Separately. "The rest of your order should arrive shortly.<br />
-- - - . - - ---- - - - ---<br />
WHAT TO DO WHEN YOUR PLANTS ARRIVE<br />
- -- -- - ~ -- - - - - ---~- ~ -<br />
DORMANT AND BAREROOT PLANTS-Keep in mind that many of our products<br />
are shipped to you in a dormant (or resting) state, which is why they may look<br />
different than you had expected. Most of us are familiar with tulip and daffodil bulbs<br />
but you may be startled at the appearance of other, less familiar plants. For example,<br />
a dormant clematis plant often looks like a dead brown stick when it arrives. Many<br />
perennials will arrive at your door as ''bareroots'' with a few dried leaves. Don't worry,<br />
the root system is strong and healthy and ready to grow once planted. This is the safest<br />
way to ship many plants, trees and shrubs, and their appearance is perfectly normal.<br />
PLANT YOUR ORDER RIGHT AWAY-Your order has been shipped to you at the<br />
proper planting time for your area. If unusual weather keeps you from planting bulbs<br />
right away, store them in a cool, dry place. If you can't plant bareroot perennials<br />
immediately, moisten their roots, rewrap them in their original packaging, then keep<br />
them in a spare refrigerator until you can plant. (Do not keep them with fresh vegetables<br />
or fruit, as they emit ethylene gas, which can damage nearby plants.) To hold bareroot<br />
roses, shrubs and trees, either: 1) Store them in an unheated outbuilding, garage or<br />
basement. First moisten the roots, then rewrap the plants in their original packaging. Or,<br />
2) "Heel in" the plants. Dig a trench deep enough and wide enough to cover all roots<br />
and part of the top of the plant. Place plants in the trench, fill in loosely with soil and<br />
then water thoroughly.<br />
Potted plants should be put in a protected but bright area or placed on the windowsill<br />
with indirect light. Don't allow the potted plants to dry out. If cold temperatures are<br />
forecast, make sure your plants are protected from freezing.<br />
Remember such measures are only temporary until you can plant your stock properly.<br />
BE PATIENT-Because new growth starts from the roots, even plants which lose<br />
their foliage in transit will grow. And don't be concerned about small bulbs or starts<br />
because size has nothing to do with quality. You'll still get beautiful results, so please<br />
give each bulb or plant its chance to surprise you!<br />
Proper planting depth and spacing are included on the label attached to each plant.<br />
_ _ -- - _ --_ -'._ r < _ _ _<br />
SITE PREPARATION<br />
Choose a location best suited for your plant: one that has sun, shade or a combination of<br />
both as necessary. Make sure your planting area has good drainage, since plants appreciate<br />
moist, but not soggy, soil. If your soil is heavy or claylike, improve it by mixing in<br />
organic matter such as peat moss, dehydrated manure or sand.<br />
PAGE 2
It's a good idea to check your soil acidity. Plants can't absorb the nutrients they need if the<br />
soil does not have the proper pH level. While most plants prefer a neutral soil (pH 6.5-7.0),<br />
plants such as azaleas and blueberries require an acidic soil (pH 5.5-6.0). You can test your<br />
soil's pH yourself, using a kit sold at your local garden center. Or, contact your county or<br />
state agriculture extension service. Instead of testing it yourself, you may send soil samples<br />
to either of these outlets to test soil pH and nutrients for you.<br />
FERTILIZING-The plants you obtain from <strong>Michigan</strong> <strong>Bulb</strong> are guaranteed to grow<br />
without the addition of plant food, but enriching your plant site with selected nutrients<br />
such as those found in Wonder X" Plant Food or Power Pills will encourage fuller growth<br />
and more profuse blooming. (See back cover.)<br />
- -<br />
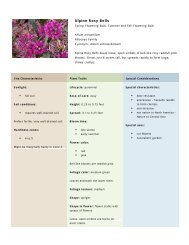
HARDY BULBS<br />
This section also includes TUBERS, CORMS,<br />
RHIZOMES AND TUBEROUS ROOTS.<br />
'-- ..1-_-'-__ -' Spring-flowering bulbs, such as tulips and daffodils, can be<br />
interplanted among perennials to provide the garden with<br />
color in spring-a time when most perennial borders are short on color. Store bulbs in a<br />
cool, dry place until ready to plant. When planting, dig generously sized holes.<br />
Please refer to the planting depths shown on the bulb bag. As a general rule, bulbs should<br />
be planted at a depth that is two to three times the height of the bulb. Position your bulbs<br />
in the hole and cover with loose soil. Most bulbs should be planted with the pointed end<br />
up, unless indicated otherwise on the label attached to the bulb package.<br />
If you are planting a large quantity of bulbs, you may want to speed up the process. Dig a<br />
large planting area to the appropriate bulb depth. Position each bulb in this planting area;<br />
cover with loose soil and water thoroughly.<br />
<strong>Bulb</strong>s that stay underground year-round should be protected by mulch in winter. Summer<br />
mulching to conserve moisture is a good idea, too. After blooming season is over, do not<br />
cut back the leaves. Let the foliage yellow and die down naturally. The leaves provide<br />
nourishment to the bulb to produce next year's blooms.<br />
PINK DAFFODILS=-When pink daffodils first unfold, the trumpet is a lovely yellowapricot<br />
color which will gradually change to a soft pink. It is important to plant this<br />
variety in a full sun area, as full sunlight will turn the trumpet a deeper pink.<br />
- - - - - - -<br />
TENDER BULBS<br />
Summer-flowering bulbs such as dahlias, begonias, gladiolus, cannas and calla lilies are<br />
less hardy in colder climates and should be lifted each fall. You may lift your bulbs prior<br />
to a killing frost or as soon as the frost has blackened the foliage. Dig up the bulbs gently,<br />
being careful not to cut or damage them. Store them in a well-ventilated, frost-free area<br />
until the foliage has dried up. Remove the foliage and place your bulbs in an unsealed<br />
paper bag, old nylon stocking or a shallow, plastic-lined box with a blanket of peat moss<br />
or vermiculite.<br />
Summer-flowering bulbs require winter storage temperatures between 35-45°F. An ideal<br />
storage location would be the vegetable compartment of a refrigerator, an unheated garage<br />
or cellar-type basement. Most modem basements aren't cool enough for winter bulb storage.<br />
PAGE 3
- - _.. -<br />
GROWING BULBS INDOORS '<br />
AMARYLLIS-Plant your amaryllis bulb in a 6" diameter planting pot or other container<br />
of comparable size. Make sure the container has a drainage hole in the bottom.<br />
Place a small amount of potting mix in the bottom of the container. Hold your amaryllis<br />
bulb so that approximately 1/3 of the bulb will be above soil level, spread roots out<br />
carefully and fill in potting mixture around bulb and roots, pressing firmly. Water<br />
thoroughly.<br />
Water sparingly until the flower stem appears, then gradually water more. Water as needed<br />
to keep from drying out.<br />
If the bulb does not show a bud once planted, set the potted bulb in a warm place to<br />
encourage growth. Bottom heat may be beneficial. When growth begins, move your<br />
amaryllis to a brightly-lit area, turning the pot one-quarter turn each day. Blooms should<br />
appear within 6-8 weeks, although the amount of time may vary.<br />
Remove blooms as they fade. After all flowers have finished blooming, cut away the<br />
flower stem. This may stimulate the growth of a second flower stem. Broad sword-like<br />
leaves usually appear after the plant has flowered.<br />
To save your amaryllis for future seasons, move the container to a sunny outside spot after<br />
danger of frost has passed in late spring, or plant the bulb directly in your garden. Water<br />
regularly and feed the bulb monthly with a water-soluble houseplant fertilizer to encourage<br />
next season's bloom.<br />
In late summer, and before the first frost, discontinue watering and prepare the bulb for<br />
storage. Place it in your garage or basement untiI the leaves have turned yellow. Then cut<br />
off leaves above the neck of the bulb and remove most of the soil from the roots. Store<br />
the bulb in a paper bag for 6-8 weeks at 65-70° F. Repot the bulb as described above.<br />
Water thoroughly.<br />
PAPER WHITE NARCISSUS-Unpack your bulbs upon arrival, but do not pot them<br />
immediately. Store them in a cool place (40-50° F [5-10° CD until approximately six<br />
weeks before you want them to flower.<br />
To plant, fill a 3-4" deep container half full of pebbles or marble chips, and set the bulbs<br />
about y," apart on this surface. Then add more pebbles around the bulbs until one-third of<br />
each bulb shows above the pebbles.<br />
Pour water into the bowl until it nearly touches the bottoms of the bulbs and set in a<br />
cool, dark place. As soon as root growth is active and top growth begins (in about<br />
2-3 weeks), bring the planter into a bright, sunny place. Maintain the water level at<br />
all times. Placing the container in a cool location during flowering will extend the life of<br />
the blooms.<br />
If you wish, you can also "plant" your Paper White Narcissus in a commercial potting<br />
soil. Plant them firmly, so that the top of the bulb is just above soil level. Water enough to<br />
moisten the potting mix and place pot in a moderately cool (45-55° F [7-13° CD location<br />
out of direct sunlight until growth begins. During this time, keep the soil damp but not wet.<br />
As soon as the green tips emerge, you should bring your potted Paper White Narcissus into<br />
a sunny location at normal room temperature.<br />
Saving Paper White Narcissus bulbs for future seasons is generally unsuccessful and is<br />
not recommended.<br />
PAGE 4
HYACINTHS IN VASES-Your Hyacinths were sent to you as dormant bulbs, each with<br />
its own vase. If you get started right away, you'll have fragrant blooms in 6 to 8 weeks!<br />
You can stagger your blooms over a period of time by storing them in a cool, dry place<br />
until ready to use.<br />
When ready, place the bulb on the small upper section of the glass container pointed side<br />
up. Add water up to about y.." below the base of the bulb. Never let the bulb actually touch<br />
the water, as this may cause the bulb to rot.<br />
Place in a cool, dark area (48-52° F). When the shoots are about two inches tall and the<br />
root system extends to the bottom of the jar (about 4 to 6 weeks) remove them to a warm<br />
room with indirect sunlight. Blooms will appear in about two weeks. Temperatures of<br />
60-70° F will ensure longest flowering.<br />
Make certain to always keep the level of water close to the base of the bulb.<br />
Saving the bulbs for future seasons is not recommended,<br />
PERENNIALS '<br />
Don't worry if your perennials have lost their leaves in transit. They have strong roots<br />
which will renew the foliage after planting. Make sure roots are moist. Soak briefly before<br />
planting. To improve poor soil, add organic matter such as compost, dehydrated manure,<br />
leaf mold, peat or a complete fertilizer. If perennials begin to crowd one another, they<br />
should be lifted, cut apart and replanted in a different bed.<br />
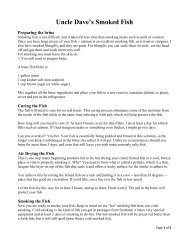
ROOT TYPES-There are five basic methods of planting bareroot perennials:<br />
_ A<br />
.;.<br />
Fibrou.sroots (i.e..:~'<br />
-",. . carnations, geraruums, '..: . ,,,. B Long taproots (i.e .<br />
hollyhocks, hibiscus,<br />
phlox, etc.) need to . .... columbine, poppies,<br />
be spread downward / etc.) should extend<br />
and not cramped. The crown (where almost straight down. To<br />
roots meet stems) should be level with or avoid possible rotting conditions, place<br />
slightly above the soil. the crown just below the soil line.<br />
_ ~<br />
~<br />
C Rhizomes (i.e. bearded,<br />
Japanese and Siberian<br />
"~<br />
Jl'r\t)f'<br />
D Roots with eyes (i.e.<br />
peonies) are placed in<br />
irises) should be a hole on a cone of soil with the crown<br />
planted near the surface. A small portion just below ground level. Spread roots<br />
of the rhizome, where the leaves connect, around the cone. Lightly cover the crown<br />
should be visible above the soil. with soil.<br />
E Fleshy roots (examples: daylilies, hostas) ... Dig a hole twice as wide<br />
and twice as deep as the bareroots. Create a mound in the planting<br />
hole to hold the roots and the crown (where roots meet the stem) at<br />
ground level. Spread the roots over the mound. Fill the planting hole with<br />
soil and firm with both hands. Water thoroughly.<br />
PAGES
POTTED PLANTS-When you receive your potted plants, you may find some of the<br />
leaves appear to be yellowing or perhaps even dead. But that doesn't mean the plants are<br />
dead. As long as the root system is healthy, upper foliage will soon regenerate.<br />
Your potted plants require little attention before transplanting:<br />
• Check to make sure the planting medium is still moist and water if the top is dry.<br />
Groom the plant by pinching off any less-than-healthy leaves (for example, leaves that<br />
are yellowed or withered).<br />
• Transplant potted plants to their new home as soon as possible after your shipment<br />
arrives.<br />
• Remove plants from their shipping pots by lightly squeezing or tapping the sides of<br />
the container to loosen the planting medium in which the plant has been growing. Then,<br />
invert the pot, gently shake the plant loose and proceed with planting.<br />
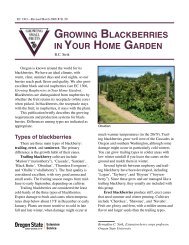
Plants which seem to be tightly bound to their pots may be "root bound." However, they<br />
are easy to remove and prepare for planting:<br />
• First, squeeze the container to loosen the compacted root ball inside.<br />
• Invert the pot and shake the plant out of the container.<br />
• If you find a mass of roots tightly woven into the planting medium, cut or tear off the<br />
bottom third of the root ball.<br />
Squeeze, invert & shake Cut offbottom third<br />
of the root ball<br />
t.<br />
Score s ides of root ball<br />
• Then, using a knife or trowel, score a vertical mark on all four sides of the root ball.<br />
Even though you will be cutting some of the roots by scoring, loose ends will have a<br />
tendency to grow outward into the surrounding soil, while unscored roots will continue<br />
to grow in the root ball itself after planting and may cause decreased vigor.<br />
GROUND COVERS-Ground cover plants prefer deeply worked, properly fertilized<br />
soil which is free from weeds.<br />
Dig individual planting holes and plant each ground cover plant as outlined above for other<br />
potted plants. To create the most natural effect, stagger your planting so the individual<br />
plants aren't lined up like ranks of soldiers. If your planting will be on a slope, follow the<br />
contours with staggered spacing, leaving a depression around each plant to catch water.<br />
Spread a 1-2" layer of mulch over the area surrounding the plants, being careful not to<br />
bury them. This will help retain moisture in the soil and retard weed growth. Maintain the<br />
mulch covering until your ground cover plants have spread to cover the entire planting site.<br />
BAREROOT GROUND COVERS-Some bareroot plants may need to be separated<br />
before planting. When dividing clumps of plants make sure each lead has sufficient roots<br />
on each divided bareroot plant to insure successful growing.<br />
PAGE 6
VINES-Most vines will grow best when allowed to climb up a vertical support. When<br />
planting a climbing vine near a building, fence, wall or tree, set the plant at least 18" from<br />
the structure which will support it. Then gradually train it to grow over to the structure.<br />
Garden arbors, trellises and similar supporting structures intended especially for vines<br />
usually are in the open. Prepare the soil as recommended, planting the vine close to the<br />
support. Do the same for mesh-type fencing.<br />
Don't let your vines form into a tangle. They should be pruned frequently through the<br />
summer, spreading and tying the shoots to keep them to a single "layer" over the support.<br />
Of the flowering vines, clematis is the first choice of the majority of American gardeners.<br />
A key essential to getting your clematis plants established is to make sure the root system<br />
will be kept cool. A sunny location where roots can grow under a cool covering, such as<br />
other perennials or mulch, is ideal. Deep planting-about a half inch deeper than it was<br />
grown in the nursery--encourages extra-strong root development and frequent, thorough<br />
watering will encourage vigorous growth.<br />
Soak roots for at least an hour before planting.<br />
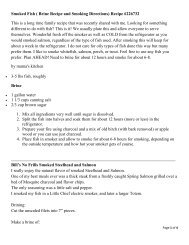
BAREROOT TREES, SHRUBS AND HEDGES-There are six basic steps for planting<br />
trees, shrubs and hedges:<br />
1. Dig a hole large enough 10<br />
give the raots plenty of raom,<br />
with a few inches of space<br />
beyond the root tips and the<br />
sides of the hole. Build a mound<br />
of soil in the bottom of the hole<br />
and spread raots in a natural<br />
position atop the mound.<br />
4. Fill the planting hole<br />
with water and let it soak<br />
in. Straighten the plant in<br />
the hole and finish filling<br />
with soil.<br />
2. Position the plant so the<br />
previous soil line will be<br />
even with ground level. (The<br />
stem/trunk will be darker<br />
in color below the original<br />
planting line and lighter in<br />
color above it.)<br />
5. Form a "saucer" of soil<br />
around the edges of the<br />
planting hole and fill it with<br />
water. (To promote growth,<br />
dig four small holes, 4-6"<br />
deep, around the perimeter<br />
of the planting hole and drop<br />
a Power Pill in each hole.<br />
[See back cover for information<br />
on Power Pills.})<br />
PAGE 7<br />
3. Once the plant is positioned<br />
at the proper planting<br />
depth, begin filling the<br />
hole with soil. Work the soil<br />
around the roots with your<br />
hands. When the hole is<br />
half filled, tamp the soil to<br />
remove any air pockets.<br />
6. The lower trunk of newly<br />
planted trees should be<br />
wrapped with heavy paper<br />
or special tree wrap from a<br />
local garden supply store.<br />
This will protect tender bark<br />
from sunscald and rodents.<br />
A cylinder of screen wire is<br />
useful to protect the trunk<br />
from destructive animals.
--- - - -- - - -. ~<br />
. ROSES .<br />
L ~ _ _ _ _ _ •••• _ _ ~ _<br />
Soak roses in water for 1-2 hours before ,----------,<br />
planting. Remove any injured canes or<br />
roots. Cut long canes back to 6-9" just<br />
above an outward-facing bud. Choose a<br />
sunny location and plant in well-drained<br />
soil. Space roses 2-3' apart.<br />
PLANTING ROSES-The same tech- rl<br />
nique described on page 7 for bareroot :~" .<br />
trees, shrubs and hedges can be adapted ~'.:~.;.• !:".., .<br />
for planting roses: ' ...•....... ; •.; .....•...<br />
• Dig a hole 10-12" deep and equally . ". ..' '.'. ..••......<br />
~ Soil level<br />
~ Spread roots<br />
around soil<br />
mound.<br />
wide. Build a mound in the bottom of the hole to hold roots. The rose plant should be positioned<br />
atop the mound so the bud union (a bulge on the stem of the rose plant indicating<br />
where the rose plant has been grafted onto the roots) is at ground leveL Fill in or remove<br />
soil from the mound to achieve this. (In colder regions, the bud union may be planted 2"<br />
below ground leveL)<br />
• Fill the hole halffull with soil, firm around the roots and then fill the planting hole with<br />
water. After the water has soaked in, fill the remainder of the hole with soil and water<br />
thoroughly.<br />
• Mound soil over 3/4 of the length of the canes, then water. As buds begin emerging,<br />
gradually loosen the soil away from the canes to ground leveL<br />
Miniature roses and potted roses grow and bloom best when placed in full sun. When<br />
you're ready to plant, follow directions for potted plants on page 6.<br />
MINIATURE ROSES-lNDOORS: Place in 4" or 5" pot of well-drained houseplant<br />
soil and keep in full sun. Water immediately after planting. Keep soil moist, not soggy.<br />
Fertilize regularly during spring and summer, less often during fall and winter. Remove<br />
spent blooms regularly to encourage retlowering. Prune lightly as needed to keep a nice<br />
shape.<br />
--~ - -. - -- -- -- ~ --- --~--~ -~ ~<br />
TIPS FOR FOOLPROOF GARDENING ;~<br />
- - - - - -- - - - ~-- - -- - - -----......<br />
WATERING-After planting, firm down the soil and water generously to work air pockets<br />
out of the soil. Water new plantings early in the day for several days. It is always best to water<br />
early in the moming or late in the day as midday sun evaporates water before plants can absorb<br />
it. Supplement natural rainfall when it is less than 1" a week and keep watering right through<br />
fall. More plants die from lack of water in autumn than from winter kill.<br />
PRUNING-Occasional pruning is necessary to keep plants, large or small, looking their<br />
best. Sometimes this means lopping off big, healthy branches, but more often and more<br />
importantly, it involves trimming out dead or damaged wood and weak shoots. Generally,<br />
plants should be pruned with sharp tools during their active growing season, usually spring,<br />
or right after they bloom. Eliminate straggly stems by cutting them back by half at a 45° angle,<br />
just above a strong shoot or bud, facing outward. Spring-blooming trees and shrubs should<br />
be pruned after blooming in spring. Other shrubs and trees prefer late-winter or early-spring<br />
pruning. After the old, dead growth is removed, artistic clipping and shaping will enhance<br />
PAGES
your landscape. Plants will grow fuller and bloom more profusely with occasional trimming.<br />
Ground covers thicken and flower more when cut back about halfway. Many indoor plants<br />
need tips pinched off to encourage branching out.<br />
MULClllNG-Protect your plants from weed competition and drought by mulching with<br />
an organic material such as straw, several layers of wet newspaper, shredded bark or peat<br />
moss immediately after planting. Renew it as needed throughout the summer.<br />
WINTER PROTECTION OF YOUNG TREES-Never fertilize trees in August or<br />
September as this stimulates new growth that is susceptible to early-winter freeze damage.<br />
Protect the lower 18-24" of the tree trunk with tree guards to avoid rodent damage during<br />
the winter months. (Remove the guards in the spring, then replace again in fall.)<br />
POTTING-Place a curved pot shard over the bottom drainage hole of your new pot so<br />
excess water will drain out but soil will stay in place. Put the plant in the pot at the depth it<br />
was growing in the shipping pot. Fill with good potting soil up to 1/2 to I inch below the<br />
container rim. Water generously. Press soil down to eliminate air pockets but avoid packing<br />
so tightly that drainage is blocked. Repot plants when roots poke through the drainage holes.<br />
WATERING-Each plant has different moisture requirements. Overwatering is the biggest<br />
mistake indoor gardeners make. Know each plant's particular moisture needs. Pot<br />
size, room temperature, soil type and species of plant should all be considered in your<br />
watering schedule. As a general rule, water when soil is dry to the touch. Plants appreciate<br />
humidity. Setting pots on gravel in trays of shallow water increases moisture in the air.<br />
Misting plants with a spray bottle is beneficial. Patio plants may require daily watering in<br />
hot summer weather.<br />
LIGHT-Most flowering plants need full light. A south or southeast window is usually a<br />
full-light location. Foliage plants require less light, especially those with dark green leaves.<br />
Be sure to match your plants with the type of light available. If your plant's light needs are<br />
not being met, it may droop, drop leaves, lose its leaf color or seem to stop growing.<br />
FERTILIZER-Most houseplants and patio plants thrive on a monthly application of<br />
water-soluble plant food. Be sure to follow the feeding instructions on the package.<br />
VENTILATION-Fresh air is good for plants, but not hot or cold drafts. Keep plants away<br />
from heating and cooling outlets. In summer, indoor plants may enjoy a change of scenery<br />
outdoors, but be careful to avoid extremely hot sun and temperatures.<br />
REPOTTING AND PRUNING-Healthy plants balance their foliage and root growth.<br />
Good pruning and repotting habits help plants maintain this balance. Regular pruning and<br />
pinching back encourages fuller growth.<br />
GENERAL lllNTS-If a plant isn't doing well, try a new location. To avoid lopsided<br />
growth, rotate your plants regularly. When plant growth slows down, indicating a seasonal<br />
rest period, reduce its water and food.<br />
WINTERIZING PATIO FRUITS-In early fall, when night temperatures drop below<br />
50°F, plants such as Citrus, Dwarf Banana, Dwarf Fig, Patio Pineapple and Dwarf<br />
Pomegranate need to be moved indoors. Provide as much sun as possible; a south- or<br />
west-facing window is ideal. Avoid areas that would expose your plants to hot dry air,<br />
such as near heat registers. Growth will slow down in winter. Withhold fertilizer at this<br />
time and only water as needed. Return to a patio setting once danger of frost has passed<br />
in late spring.<br />
PAGE 9
WINTERIZING CONTAINERS-For items such as Patio Blueberry, Patio Strawberry,<br />
Patio Apple, Elephant Ears, Bougainvillea and Angel Trumpet, providing winter protection<br />
is very important, especially when outdoor temperatures drop below 29°F. Before freezing<br />
weather arrives, move your containers indoors to an unheated garage or cellar. Withhold<br />
fertilizer and water just enough to keep the soil slightly moist. In spring, when the danger of<br />
frost has passed, bring the containers outdoors once again and water thoroughly.<br />
-- - --<br />
FRUITS<br />
- -<br />
FRUIT & NUT TREES--Our 3-in-1 Apple tree is self-pollinating, so there's no need for<br />
another tree. Follow the six basic steps for planting bareroot trees, shrubs and hedges found<br />
on page 7. Proper planting depth is critical. The graft or bud union must be 1-2" above the soil<br />
surface and staking may be necessary to stabi lize the tree as it grows.<br />
Additionally, young fruit trees are subject to damage during winter months from foraging rabbits.<br />
Until year four, the lower 18-24" of the trunk requires a protective barrier during winter.<br />
For best results, plant nut trees in groups of two or more of like variety within 50 feet to<br />
increase their chances of pollination. Those not self-fruitful need a pollinator planted nearby.<br />
As your trees grow, prune in early spring, removing crossed or injured limbs and any branches<br />
which rub against each other. This allows light into the center of the tree. Don't cut short spurs<br />
from the main stem since these bear first fruit.<br />
The general rule is to prune less during the juvenile or early years, removing only the limbs that<br />
compete with desired limbs. Apple and pear varieties with a natural upright habit should have<br />
their limbs spread to a 60° angle.<br />
Starting in year five, prune out shaded or crowded limbs annually in late winter. Never leave<br />
stubs; cut limbs where they connect with the trunk or other limbs you want to keep.<br />
Regular spraying stops insects before they can damage your crop. Apply dormant oil before<br />
buds begin to swell in the spring. Spray trees with liquid fruit tree spray when flower petals fall.<br />
Make follow-up applications every 10 days or so until the harvest nears.<br />
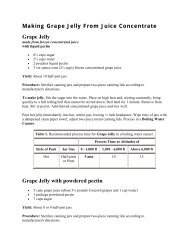
BLACKBERRIES-All brambles require deep,<br />
well-drained loam soil high in organic matter. They<br />
can't tolerate sandy soil or soil that's so heavy it<br />
leaves moisture standing around the roots. Apply a<br />
balanced fertilizer at a rate of 10 pounds per 1,000<br />
square feet. Cut plants back to 6 inches and place<br />
them in the hole at the same depth they grew in the<br />
nursery row. Space blackberries 5-6 feet apart in<br />
rows 8-10 feet apart and provide a trellis for trailing<br />
types. Canes can be woven or tied to keep them in<br />
place. Do not allow canes to set fruit the first year.<br />
Water heavily and mulch to reduce weeds. Thick<br />
layers of shredded bark, leaves, wood chips and hay<br />
make excellent mulch for any type of berry.<br />
CURRANTS & GOOSEBERRIES-These plants<br />
do best in rich soil that is cool and moist but has good<br />
drainage. Plant 5 feet apart, in rows 8 feet apart, in full<br />
sun where summers are mild and in a partially shaded<br />
location where summers are hot and dry. Trim stems<br />
back by 213 after planting. Prune in spring after flowering.<br />
Fruit is produced on older wood-in the fall,<br />
remove any wood more than 3 years old.<br />
PAGE 10<br />
Training Blackberries<br />
Weave onto trellis
BLUEBERRIES-Blueberries must be planted<br />
where they have full sun most of the day and<br />
in acidic soil (a pH of 4.5 to 5.5) that's well<br />
drained, porous and high in organic matter. The<br />
plants have shallow root systems and must be<br />
irrigated. A heavy mulch will help retain soil<br />
moisture and keep the roots cool. Prune half of<br />
the top growth and space plants 4-5 feet apart<br />
in rows 8-10 feet apart. Incorporate plenty<br />
of organic matter in and around the planting<br />
holes. Control weeds with mulch instead of<br />
cultivation.<br />
In cold climates, blueberries benefit from a thick layer of mulch during the winter. Prune<br />
for fewer but larger berries by removing old branches; fruit is produced on year-old wood.<br />
Before<br />
Pruning<br />
Pruning<br />
blueberries<br />
Cutout<br />
weak<br />
laterals<br />
Cut out<br />
heavy old stems<br />
Pruning Grapevines GRAPES--Grapes thrive in fertile, well-drained soil.<br />
Choose a site that offers protection from wind and late<br />
frost. If possible, run vines east-west to reduce shade<br />
cast by the trellis. Work in fair amounts of compost<br />
before planting but don't overfertilize. Set the plants 8<br />
After feet apart in rows 10 feet apart. For the first year, main<br />
Pruning stems should be allowed to grow unchecked, and vines<br />
~~_~~oWl~t2:15~~!B: should be trained on a trellis using two support wires.<br />
Prune in winter when dormant but before the weather<br />
becomes too cold. Canes that have borne fruit should be pruned back sharply (see illustration<br />
above). Remove old canes coming from the main stem and leave four new canes (shoots that<br />
started to grow the previous spring). The new canes should be cut back to 6 or 8 inches and<br />
have 3 or 4 buds. These buds, found at the joints, produce the new shoots that bear leaves<br />
and grapes the following summer. Four of these new shoots will be used to repeat the same<br />
fruiting-and-pruning process the following winter.<br />
RASPBERRIES-Raspberries are a bramble Pruning Red Raspberries<br />
fruit and should be cultivated as you would<br />
blackberries. Plants are more erect, but still<br />
benefit greatly from a simple trellis. Space red<br />
and yellow varieties 2 feet apart in rows 6 feet<br />
apart; blacks and purples 3 feet apart in rows 8 Pull<br />
feet apart. (NOTE: Plant blacks and reds 300 feet ~:~kers<br />
apart to prevent the spread of disease.) Except in<br />
the case of fall-bearing types, new canes don't<br />
produce fruit and put out few, if any, branches. Pruning Black Raspberries<br />
Little thinning is needed until plants have been<br />
in the ground for a few years.<br />
When thinning brambles, leave the thickest canes<br />
and remove the thinnest. Prune red and yellow<br />
raspberries back to 8-12 buds on a cane, leaving the<br />
thickest canes at least 4-6 inches apart in the spring.<br />
Remove the fruiting canes after harvest. Prune<br />
blacks and purples when new growth starts in the<br />
spring, leaving 10-15 buds per cane and 4-5 canes<br />
per clump. Encourage branching by pinching back the tips of black raspberry plants in late summer.<br />
With reds, remove suckers rather than canes from original plants (see illustration abovej.,<br />
PAGE 11
RHUBARB-Plant divisions in spring, Rhubarb <strong>Planting</strong> Depth<br />
spacing plants. 3 feet apart in fertile soil.<br />
Position crowns 3-4 inches below the soil 3-4"<br />
surface (see illustration at right). Water<br />
heavily, cultivate regularly and feed<br />
generously the first year. Stalks can be lightly<br />
harvested the second year. After that, they may<br />
be pulled over a 6-week period from early spring<br />
until early summer. Plants can be mowed, dug<br />
and divided in either fall or spring.<br />
STRAWBERRIES-Strawberries need well-worked soil with good drainage and plenty<br />
of organic matter. Add 1 pound of fertilizer per 100 square feet. Plant so that the crown is<br />
even with the surface of the soil and make sure all the roots are covered.<br />
Junebearing strawberries produce a single crop. Everbearers produce one crop during<br />
the regular strawberry season and another smaller one later in fall, plus a few fruits in<br />
between. Day neutrals are the truest everbearers, producing fruit spring, summer and fall.<br />
Set strawberries 15-24 inches apart, water well and mulch with straw. Remove blossoms<br />
from Junebearers the first year. Remove everbearer and day-neutral blossoms until July 1,<br />
then allow the plants to set fruit. This alJows the plants to become established so they'll<br />
set far more berries the second year than they ordinarily would have. Water them well,<br />
keeping the top 2 inches of soil evenly moist all season long. Protect in cold climates<br />
with a winter mulch.<br />
ASPARAGUS-Plant 12-18 inches apart<br />
Trenching in Asparagus<br />
in spring or fall. Prepare a deep trench filled<br />
with compost and rich topsoil. Spread the<br />
crowns over the soil and cover them with<br />
2 inches of soil (see illustration at right).<br />
Gradually fill the trench with soil as the<br />
plants grow. If planting in fall, fill the trench<br />
in completely. Each spring, apply 3-5 pounds<br />
of fertilizer per 100 square feet. Work into<br />
the soil before growth starts. Repeat application<br />
after the harvest is complete. Cut the<br />
tops back and mulch in late fall to help prevent deep freezing and sudden changes in soil<br />
temperature. Limit the first harvest to one or two cuttings by mid June of the second year.<br />
A full crop can be harvested the third year after planting, when the spears are 6-10 inches<br />
tall. Harvest for 6-8 weeks only, or until about the first of July in the North. When harvesting,<br />
snap off or cut spears at ground level to avoid injuring new growth.<br />
GOJI BERRIES-Goji berries, or wolfberries, tolerate almost any type of soil, except<br />
wet, soggy soil. They tend to fruit best in well-drained soil of moderate quality. Space<br />
plants 5-8 feet apart in an area with full sun to partial shade. Heavy pruning in the fall<br />
will help keep the plant looking nice and increase fruit production. Goji berries will typically<br />
begin yielding after their second or third growing season, and fruit will ripen over<br />
an extended period starting in July.<br />
HONEYBERRIES-Plants do best in moderately drained, yet moist soil. Mulch to<br />
retain moisture. Plant in full sun where summers are mild; in partial sun where hot and<br />
dry. Set plants 4-5 feet apart-plant at least two varieties, as cross-pollination is required<br />
to produce fruit. Fertilize and mulch annually; prune to maintain shape.<br />
PAGE 12
-- -<br />
VEGETABLE AND HERB PLANTS<br />
If your vegetable or berb plants arrive on a cloudy day after the danger of frost is past, plant<br />
right away. If it is hot and sunny, wait to set the plants out until late in the afternoon or early<br />
evening. Following the spacing suggestion on each plant label, place plants in each hole and fill<br />
the holes with water and let it soak in. The first soaking gives the roots plenty of moisture to get<br />
the plants off to a good start. Fill in the holes with surrounding soil and leave a slight depression<br />
around each plant to collect and hold water so it soaks in around each plant. If temperatures<br />
happen to dip below freezing unexpectedly, protect newly planted vegetables and herbs by<br />
covering them with protective caps or covers.<br />
GARLIC-Divide garlic bulbs into smaller cloves to increase the number of plantings. In early<br />
spring or fall, plant cloves 4 inches apart and I inch deep. Full sun and rich soil is recommended<br />
to produce best crop. Harvest bulbs after the foliage has yellowed. Cure in the sun for 2 weeks<br />
or until dry. Place in mesh bags and hang in a cool, dry, dark spot.<br />
ONION SETS-Plant sets 1-2 inches deep and 3-4 inches apart. Onions are ready to harvest<br />
when 3/4 of the tops have fallen over. After digging, leave bulbs in the garden to cure for a<br />
few days until the roots are brittle. Spread out on newspaper in a dry, dark spot for 2-3 weeks.<br />
Remove any excess soil. Cut tops to 1-1/2 inch above the bulb. Store onions in a mesh bag<br />
in a cool, airy spot. Use the ones with thick stem areas first as they are more likely to spoil.<br />
POTATOES-In order to achieve greater yields, whole seed potatoes may be cut into pieces.<br />
Be sure that each potato seed piece has at least one or two eyes, cut into sections and allow<br />
them to air dry at room temperature for 2-4 days prior to planting. Place cut seed pieces or sets<br />
8-10" apart in rows and cover with at least 3" of soil. Be careful to not cultivate too deeply<br />
and damage the potatoes forming close to the soil surface. Harvest young potatoes when they<br />
are deemed large enough to eat, usually 7-8 weeks after planting. Dig rest of crop for winter<br />
storage in late summer or fall after plant tops begin to dry. Dry harvested potatoes 2-3 hours,<br />
then store in a cool, dark, well-ventilated spot.<br />
Herb Height Spacing Hardiness<br />
Cilantro 2-3' 12-IS" Annual<br />
Italian Basil 12-14" 12-18" Annual<br />
Dill 2-3' 18-24" Annual<br />
Oregano 18-30" 12-18" Zones 6-10<br />
Marjoram 12-24" 12-18" Annual<br />
Chives 18-24" 12-18" Zones 3-9<br />
Fennel 3-S' 10-IS" Zones S-9<br />
Rosemary 2-S' 24-36" Zones 7-9<br />
Tarragon 18-24" 18-24" Zones 4-8<br />
Sage 18-30" 18-24" Zones 4-8<br />
Thyme 8-10" 12-18" Zones S-IO<br />
Parsley 8-12" 8-12" Annual<br />
PAGE 13
Power Pills<br />
It can't get much easier<br />
than this! No-muss, no-fuss<br />
way to keep plants healthy.<br />
High-potency 20-10-5 pills<br />
are time-released to feed<br />
plants continually for up to<br />
2 years. Becausethese convenient,easy-to-use5-grampills<br />
provide year-round feeding,<br />
you'll no longer need<br />
to worry about wben to<br />
fertilize next. Won't burn<br />
plants. Terrific for trees,<br />
shrubs, bulbs and plants.<br />
02477<br />
20/$5.99 40/$10.99<br />
100/$23.99<br />
~'!~~®<br />
Give yout flowering plants and<br />
bulbs the nutrients they need<br />
to bloom long and strong!<br />
Specially compounded, slowrelease<br />
Wonder X formula promotes<br />
growth find blooming of<br />
all types of flowering plants.<br />
Plant experts helped develop this premium blend,<br />
applying their experience to what works best. Slow<br />
release means it will continually provide valuable<br />
nutrients to your plants and cut down on the number<br />
of applications, so it's also economical. Covers 40<br />
sq. ft., 100-150 bulbs or 15-25 perennials.<br />
71445 lib. $5.99 ea. 3/$15.99<br />
'LIFETIME GUARANTEE<br />
If you're not happy with any item you order from us, notify us<br />
anytime for a full refund or replacement, whichever you prefer.<br />
What's more, any item that does not grow and flourish to your<br />
complete satisfaction will be replaced FREE-with no time<br />
limit-for as long as you garden.<br />
Order online at<br />
<strong>Michigan</strong><strong>Bulb</strong>.com<br />
IIMl~HI <strong>Michigan</strong> <strong>Bulb</strong> Company<br />
P.O. Box 4180, Lawrenceburg, IN 47025-4180<br />
513-354-1498 Mon. - Fri., 8 am - 5 pm ET<br />
s~rvice@<strong>Michigan</strong><strong>Bulb</strong>.com<br />
02009 Scarlet Tanager LLC, dIbIa <strong>Michigan</strong> <strong>Bulb</strong> Co. All rights reserved.<br />
<strong>Michigan</strong> <strong>Bulb</strong> Company trademarks are registered trademarks of Scarlet Tanager LLC.<br />
Printed in the U.S.A.<br />
MB-PG-F09