S3.25 Leg Press Station - Precor
S3.25 Leg Press Station - Precor
S3.25 Leg Press Station - Precor
- No tags were found...

Create successful ePaper yourself
Turn your PDF publications into a flip-book with our unique Google optimized e-Paper software.
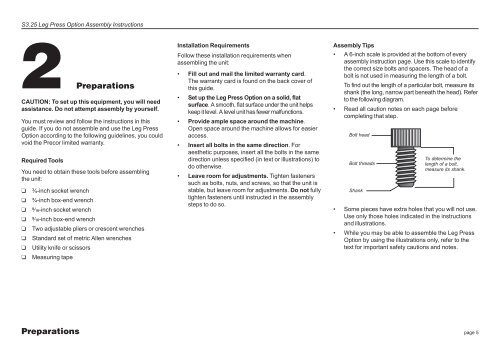
<strong>S3.25</strong> <strong>Leg</strong> <strong>Press</strong> Option Assembly Instructions2 PreparationsCAUTION: To set up this equipment, you will needassistance. Do not attempt assembly by yourself.You must review and follow the instructions in thisguide. If you do not assemble and use the <strong>Leg</strong> <strong>Press</strong>Option according to the following guidelines, you couldvoid the <strong>Precor</strong> limited warranty.Required ToolsYou need to obtain these tools before assemblingthe unit:❑❑❑❑❑❑❑❑¾-inch socket wrench¾-inch box-end wrench⁹⁄₁₆-inch socket wrench⁹⁄₁₆-inch box-end wrenchTwo adjustable pliers or crescent wrenchesStandard set of metric Allen wrenchesUtility knife or scissorsMeasuring tapeInstallation RequirementsFollow these installation requirements whenassembling the unit:• Fill out and mail the limited warranty card.The warranty card is found on the back cover ofthis guide.• Set up the <strong>Leg</strong> <strong>Press</strong> Option on a solid, flatsurface. A smooth, flat surface under the unit helpskeep it level. A level unit has fewer malfunctions.• Provide ample space around the machine.Open space around the machine allows for easieraccess.• Insert all bolts in the same direction. Foraesthetic purposes, insert all the bolts in the samedirection unless specified (in text or illustrations) todo otherwise.• Leave room for adjustments. Tighten fastenerssuch as bolts, nuts, and screws, so that the unit isstable, but leave room for adjustments. Do not fullytighten fasteners until instructed in the assemblysteps to do so.Assembly Tips• A 6-inch scale is provided at the bottom of everyassembly instruction page. Use this scale to identifythe correct size bolts and spacers. The head of abolt is not used in measuring the length of a bolt.To find out the length of a particular bolt, measure itsshank (the long, narrow part beneath the head). Referto the following diagram.• Read all caution notes on each page beforecompleting that step.Bolt headBolt threadsShankTo determine thelength of a bolt,measure its shank.• Some pieces have extra holes that you will not use.Use only those holes indicated in the instructionsand illustrations.• While you may be able to assemble the <strong>Leg</strong> <strong>Press</strong>Option by using the illustrations only, refer to thetext for important safety cautions and notes.Preparationspage 5