Manual - Toma
Manual - Toma
Manual - Toma

Create successful ePaper yourself
Turn your PDF publications into a flip-book with our unique Google optimized e-Paper software.
Program Controller SE 9 - 66.2 Connecting of the controllerContents1. Introduction . . . . . . . . . . . . . . . . . . . . . . 32. The first start . . . . . . . . . . . . . . . . . . . . . . . 33. Working with the SE 9-63.1 Buttons and Displays. . . . . . . . . . . . . . . 43.2 Choosing and starting saved programmes . . . . . . . . . 53.2.1 Factory set programmes . . . . . . . . . . . . . . . 63.3 Altering programmes . . . . . . . . . . . . . . . . 73.3.1 Meaning of the LED’s . . . . . . . . . . . . . . . 84. The firing process . . . . . . . . . . . . . . . . . . . . . 8PageWireHarting 7DNameNr.Pin-Nr.+ red (orange)-white (white)34Wire of thermocoupleType S1 5 Input L12 2 Input N3 6 Output Heating-Relay4 1 Output N7 7 Output Safety-RelayTable: Connecting of the controllerSE9-6+3Thermocouple5. Error messages . . . . . . . . . . . . . . . . . . . . . . 9-46.Technical Data6.1 Data . . . . . . . . . . . . . . . . . . . . . 106.2 Connecting of the SE 9-6 . . . . . . . . . . . . . 11NL2567DoorswitchSafety-RelayHeating-RelayK1K21Furnace-HeatingelementK1K2211
Program Controller SE 9 - 66.0 Technical Data6.1 DataPower200 - 250Volt 50 / 60HzFuse32 mATConsumption2 VAOutput2 Contacts230 V max. 4 AInputThermoelement Type SPt10Rh / PtAccurate 1 °CResolution0,3 % , +/- 1 DigitMeasures200 * 100 * 45 mmWeight0,6 kgAmbient temperature 0 - 50 °C1. IntroductionThe controller SE 9-6 enables you to exactly control your furnace. Three of the nine availableprogrammes are already pre-set for the most common uses. You can always alter and save any ofthese programmes to fit your individual needs.The controller is fixed to the side of the furnace by a mount that is delivered along whit the controller.You can easily take the controller out of the mount to set up a programme and put it back after theprogramme has been started.Important Note:- Do not put the controller on the top of the furnace during the firing process.- Do not alter the length of the cable connecting the controller to the furnace in any way.All of our controllers are checked and tested intensively in our company. But if there is a malfunction,please try to find out the problem using chapter 5 of this manual. If the problem can not be solved thisway, please contact your local distributor.Table: Technical Data of the SE 9-62. The first startThe controller is connected to the furnace by the controllers cable with a connector. This connector fitsonly in one position, and therefore can not be hooked up wrong.At the bottom of the controller is the main power switch. When you switch on the controller, the currentfurnace temperature will be displayed. The controller is now ready to be programmed.103
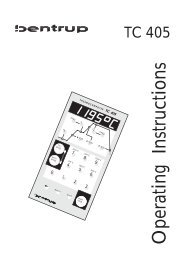
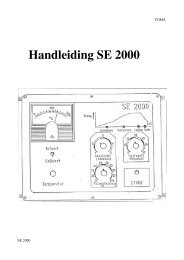
Program Controller SE 9 - 63. Working with the SE 9-65.0 Error Messages3.1 Control elements an displaysThe controller will permanently supervise all important processes. In case of a malfunction, thecontroller will abort the firing process and display one of the following error messages:DisplayI320temperaturesegmentsDisplay: FIDisplay: F2When the furnace is heated with maximum power output, the temperature has to increaseat least 1°C in 20 min. If this is not the case, FI will be displayed.Possible reason:• Heating elements are too old or defective.• On a 3 phase system: one phase missing (check house-fuse).• Thermocouple short cut.• Door contact switch not closed.This error massage will be shown whenever the furnace heats for more than 18 hourswhit maximum power.move onesegment backtime segmentsmove onesegment aheadDisplay: F3Possible reason:• Heating elements are too old or defective.• On a 3 phase system: one phase missing (check house-fuse).If the measured temperature is too high, F3 will be displayed.set upsegments temperatureset upsegments timePossible reason:• Thermocouple defective.• wiring of the thermocouple defective.load / savea programmeDisplay: F4If the measured temperature has a negative value, F4 will be displayed:start / stopa programmePossible reason:• Thermocouple is connected wrong.• Wiring for the thermocouple is connected wrong.Display: F5 or F6F5 or F6 will be displayed whenever the controller has detected an internal error.Possible reason:• The controller is defective. To check this, switch off and on the controller. If the erroroccurs please call your distributor.Picture: The SE 9-6Display: F7F7 will be displayed if the temperature of the furnace is above 20°C over the programmedtemperature.Possible reason:• Power-Relay of the furnace is defective.49
Program Controller SE 9 - 63.3.1 Meaning of the LED’sThe blinking of the LED’s will have following meanings:t0: delay timeThe firing process will be delayed after pushing the buttonby the set amount of time.Note: The delay time can not be saved to an programme.t1 – t6: heat-up, soak, cool-off timesHere you can enter heat-up, soak and cool-off timesNote: When entering a cool-off time, you can not cool-off the furnace fasterthan it’s natural cooling.end: endThis LED shows that the firing process has been finished and the heating has beenswitched off. The furnace will now cool off.The LED’s above the time LED’s show the currently set temperature of the segment.4.0 The firing processAfter choosing a programme (see chapter 3.1), and pressing the button, the firingprocess will be started. In case that you have entered a delay time, the delay time will bedisplayed and counted backwards after starting the programme. As soon as the timereaches zero, the actual firing process will be started. The delay time is especially useful for furnacesthat use night power which is cheaper.The controller will start to carefully heat up the furnace in segment ‘t1’ to the temperature of the firstsegment. As soon as the temperature has been reached, the controller will start with the nextsegment. After the controller has finished all the segments, the ‘end’-LED will light up and display,during the cooling-off process.3.2 Choosing and strarting seved programmesThe SE 9-6 has 9 programmes that con be individually altered and saved.Stating a saved programmePush the button to call up the programme mode. The display will show ‘P=’ .Use the keypad to choose your desired programme.Then push the button to start firing, using the previously chosen programme.For example:To choose and start programme number 3, push the following button:> >If you push the button again, the programme will be stopped.3.2.1 Factory set programmesThe programmes 1-3 are pre-set by the factory, and work for the most common uses.These programmes can by changed as well.Programme Number t1 Temp 1 t2 Temp 2Schrühen 1 1 0 min 600 °C 480 min 900°CSchrühen 2 2 0 min 600 °C 240 min 900 °CGlasur 3 0 min 250 °C 120 min 1050 °CTable: Factory set programmes85
Program Controller SE 9 - 63.3 Changing the programmesTo change the controllers programmes, first choose a programme as described earlier in chapter 3.2.Entering the Time SegmentsPush the button once. The LED ‘t1’ will start blinking. You are now in the altering mode for‘time’ . You con now change the value that is displayed using the keypad. Use the buttonsand to move back and forth through the time segments scale.Entering the TemperaturesPush the button once. The first temperature LED will start blinking. You are now in the alteringmode for temperature. You can change the value that is displayed using the keypad. Use thebuttons and to back or forth through the temperature segments scale.When finished setting up the programme, you can start it any time by pressing thebutton. During the time firing process, the time segments will be counted backwards. Incase you would like to restart your programme, you can either reload it in case you have it stored, toset the time segments back to their original time, ore you can re-enter the time segments.Clearing a ProgrammeYou can set all current time and temperature data to zero by choosing the programme number ‘0’(see chapter 3.2). This is useful if you want to set up a completely new programme.Note. Saved programmes will not be affected by this.Saving a programmeYou can save up to 9 programmes for your most common uses.To save a programme, follow these instructions:First set up a programme like you wish. Then push theshow ‘S=’ . Now enter your desired programme numberbutton. The programme will now be saved.button twice. The display will nowand then push theExample:We now want to enter and save programme number 4 with the following specifications:Programme Number t1 Temp 1 t2 Temp 2MyProg 4 30 min 250 °C 60 min 1100 °CTo do this, follow these instructions:1. Clear the old programme:2. Enter the time segments:> >> > > > > >3. Enter the temperature segments:> > > > >> > > >4. Save the programme:> > >67