13500 Appliance Replacing DC Power Supply Units - Check Point
13500 Appliance Replacing DC Power Supply Units - Check Point
13500 Appliance Replacing DC Power Supply Units - Check Point
- No tags were found...

Create successful ePaper yourself
Turn your PDF publications into a flip-book with our unique Google optimized e-Paper software.
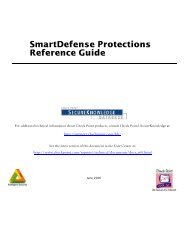
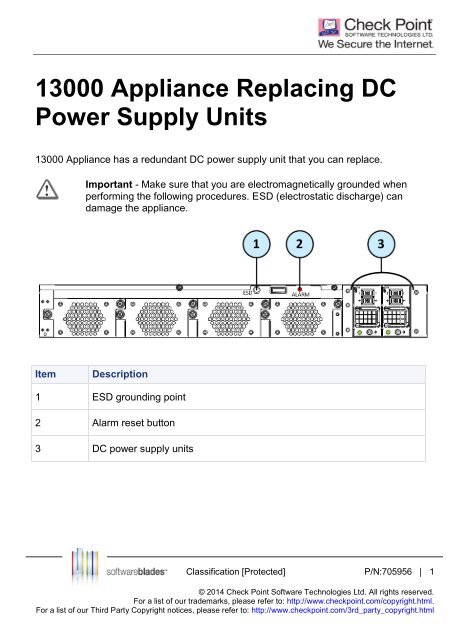
705956Protected201413000 <strong>Appliance</strong> <strong>Replacing</strong> <strong>DC</strong><strong>Power</strong> <strong>Supply</strong> <strong>Units</strong>13000 <strong>Appliance</strong> has a redundant <strong>DC</strong> power supply unit that you can replace.Important - Make sure that you are electromagnetically grounded whenperforming the following procedures. ESD (electrostatic discharge) candamage the appliance.ItemDescription1 ESD grounding point2 Alarm reset button3 <strong>DC</strong> power supply unitsClassification [Protected] P/N:705956 | 1© 2014 <strong>Check</strong> <strong>Point</strong> Software Technologies Ltd. All rights reserved.For a list of our trademarks, please refer to: http://www.checkpoint.com/copyright.html.For a list of our Third Party Copyright notices, please refer to: http://www.checkpoint.com/3rd_party_copyright.html
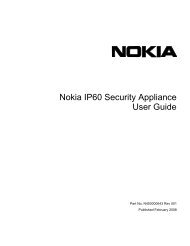
ItemDescription1 <strong>DC</strong> power connector2 Terminal for - 48V <strong>DC</strong> wire3 Terminal for + battery return wire4 Extraction handle5 Battery ground connection6 Release lever7 <strong>Power</strong> supply screw8 <strong>Power</strong> LED| 2
To remove a <strong>DC</strong> power supply unit:1. Turn off the circuit breaker that supplies power to the <strong>DC</strong> power supply unit.Make sure that the power supply LED is not illuminated.2. On the <strong>DC</strong> power connector, loosen the screws to these wires: + battery return - 48V <strong>DC</strong>3. Remove the wires from the <strong>DC</strong> power supply unit.4. Loosen the battery ground connection screw located and remove the wire.5. Loosen the power supply screw.6. Engage and hold the release lever on the <strong>DC</strong> power supply unit.7. Pull the extraction handle to remove the <strong>DC</strong> power supply unit.Note - To prevent damaging the power supply, use only the extractionhandle to remove the <strong>DC</strong> power supply unit.8. If the alarm sounds, press the red Alarm Off button to the left of the <strong>DC</strong> powersupply units.The alarm stops.3 |
Installing a Replacement <strong>DC</strong> <strong>Power</strong><strong>Supply</strong> UnitImportant - To protect the appliance and the <strong>DC</strong> power supply unitsfrom damage, make sure that you connect the wires to the <strong>DC</strong> powerconnector terminals correctly.To install a replacement power supply:1. Insert the power supply into its slot and push until it clicks into position.2. Tighten the power supply screw.3. Connect the ground wire to the Battery Ground Terminal.4. Connect the + battery return wire to the + terminal on the <strong>DC</strong> power connector.5. Tighten the + screw on the <strong>DC</strong> power connector.6. Do steps 4 - 5 again for the - 48V <strong>DC</strong> wire and -48 terminal on the <strong>DC</strong> powerconnector.7. Turn on the circuit breaker that supplies power to the <strong>DC</strong> power supply unit.8. Make sure that the green power supply LED is illuminated.| 4