Inlay String Tool System - Lee Valley Tools
Inlay String Tool System - Lee Valley Tools
Inlay String Tool System - Lee Valley Tools
- No tags were found...

Create successful ePaper yourself
Turn your PDF publications into a flip-book with our unique Google optimized e-Paper software.
<strong>Inlay</strong> <strong>String</strong> <strong>Tool</strong> <strong>System</strong>
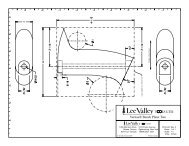
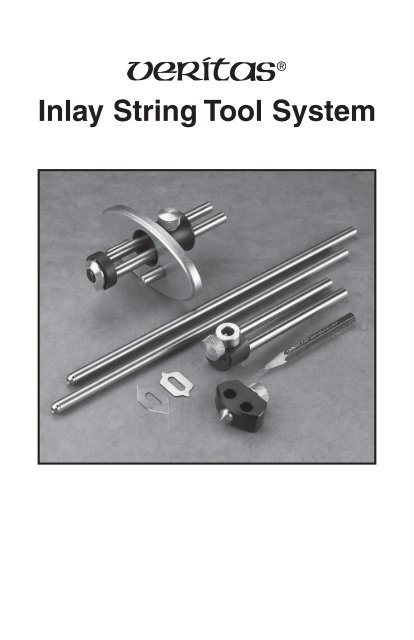
The components of the Veritas ® <strong>Inlay</strong> <strong>String</strong> <strong>Tool</strong> <strong>System</strong> can beassembled in a variety of ways to produce a range of tools forembellishing woodworking projects with inlay strings. The individualcomponents are shown in Table 1.Table 1: Individual Components of the <strong>Inlay</strong> <strong>String</strong> <strong>Tool</strong> <strong>System</strong><strong>Inlay</strong> Groove Cutter & Slicing <strong>Tool</strong> 05K11.01Straight Fence with Pair of Guide PinsUsed to run a line or narrow and shallowgroove parallel to a straight edge. Accepts auser-made wooden sub-fence for use whencutting grooves offset from a curved edge.Cutting HeadCarries the V-notched hook blade forcutting narrow and shallow grooves or theslicing blade for slicing strings off veneer.Compass Center 05K11.02Used as a center for compass applicationsor cutting circular grooves.Pencil Holder 05K11.03Carries a pencil for laying out the inlaystring pattern.Pair of 10" Rods 05K11.04Used for laying out or cutting largeradiusarcs.<strong>Inlay</strong> Groove Blade05K11.11, 05K11.12 & 05K11.13Used for cutting narrow and shallowgrooves. When pushed, the sides of theV-notch slice through the wood fibers,preventing tear-out. When pulled, the hookcuts out a thin shaving to clear the groove.Available in three thicknesses: 0.025",0.032" and 0.040".Slicing Blade 05K11.10Used for slicing strings off veneer.2
1. Since the layout tools are built on the same platform as the cutting tools,the practice ensures that the cutting tools can, in fact, do what you want.Let’s say, for example, that your design includes a 3/4" circle. While thiscan be drawn with a regular compass, neither the layout compass nor thegroove cutter can make circles smaller than 11/8" in diameter.2. Practicing the layout provides the opportunity to work out the sequence.This is the key to stringing. Unlike typical woodworking practice whereeach step is done to completion before the next is started (e.g., all themortises are cut first, then all the tenons are cut to match), the processof applying inlay string is a cycle of cutting grooves, inlaying string,scraping smooth, and repeating. This process prevents the tear-outthat occurs when one groove intersects another. Also, practicing thesequence allows you make certain that the pin hole that results fromusing the compass is cut away by subsequent steps.Table 3 illustrates how to work out a inlay string sequence using acrosshair design.Table 3: Working Out a <strong>Inlay</strong> string SequenceLet us say, for example, that the crosshair design shownis to receive inlay string. (The width of each string isexaggerated for clarity.)An inspection of this design shows that there are fourseparate strings required: two straight lines and two circles.Notice, also, that the two circles do not touch or crosseach other, and that the two straight lines cross bothcircles and each other. This design can, therefore, be cutin three steps; each line by itself and the circles as a pair.One approach is to draw the vertical line followed by thehorizontal line, then finish with the two circles.However, by finishing with the two circles, the compasspoint poked the horizontal string and left a pin hole.Since this is a test run, you have the opportunity tochange the sequence. While starting with the circlesinitially leaves a pin hole in the center of the design, itis subsequently removed when the straight lines are cut.Since the second sequence produced the desired results, you would firstconfigure the tool as a small-radius groove cutter, inlay the string into thecircles, and then reconfigure the tool as a straight-groove cutter and inlaythe string into the straight lines.4
Cutting Narrow and Shallow GroovesConfigure the groove-cutting tools as required for your design. Figure 1illustrates how to hold the straight-groove cutter and radius cutter, but it isbiased for a right-handed user. If you are left-handed, the cutter should beflipped such that the hook faces the opposite direction.Straight-GrooveCutterNoteorientationof cutterhook.Radius CutterFigure 1: Holding the cutting tools.Regardless of which cutter is being used, cutting a groove is a two-stepprocess; you will need to first score the wood, then cut it to prevent tearout.To achieve this, push or rotate the tool away from you so that theblade scores the fibers, then pull or rotate the tool toward you to make thecut, as shown in Figure 2.Pushto score.Pullto cut.Figure 2: Using the cutting tools.5
Table 4 illustrates some tips to keep in mind when using the inlaystring tools.Table 4: Tips for Using the <strong>Inlay</strong> <strong>String</strong> <strong>Tool</strong>sMark the Centers of ArcsTo maintain accuracy when stringing arcs,the center of those arcs needs to be preciselylocated. Before using the radius cutter, be sureto mark the center with the inlay pin awl.Use the Guide PinsOnce a groove has been started, the cutterstend to follow it. To get to this point, the first fewcuts are key, but it can be tricky to start a cutwhile keeping the fence against the workpiece.The guide pins have been provided to make thiseasier. Position the tool against the workpiecesuch that the fence contacts the side and aguide pin rests atop the surface. Then rotatethe tool until the blade touches.Work in Short IncrementsWhen cutting circles and arcs, it is not practicalto try to take complete strokes. Instead, start atone end and work a 20° to 30° portion of thearc to full depth, and then rotate the workpiecebefore moving on to the next portion.Limit the Depth of CutThese tools have been designed to limit thedepth of cut. Once the cutting head is ridingon the workpiece, the inlay groove bladewill no longer remove any shaving.First StepSecond StepCurrent StepNext StepMaximum DepthReachedCuttingHeadGuidePinLimit the Projection of the Groove CutterWhen creating your stringing design, bearin mind that the groove cutter is limitedto about a 1 1 /2" offset from the edge of aworkpiece. As the offset increases, chatterbecomes a problem.For cutting grooves in the middle of a workpiece,use a Veritas ® Template Groove Cutter.Use a Wooden ShoeIf your design calls for a string offset from theedge of a curved workpiece (such as a roundtable), you can configure the groove cutter tofollow the required curve by attaching a woodenshoe with a slightly smaller radius to the brassface. Remove the guide pins and secure theshoe with two #10-32 screws (not included).Middle ZoneUse a template groove cutter.1 1 /2"Edge ZonesUse a straightcutter.Wooden Shoe#10-32 PanHead Screws(Recessed)RoundWorkpiece6
Slicing VeneerConfigure the veneer sliceras shown in Table 2. You canmake a simple cutting jig bygluing a self-healing cuttingmat onto a wooden substrate,as shown in Figures 3 and 4.Trim together to form asquare edge.To use the low-volume jigshown in Figure 3, visuallyalign the veneer to the edgeof the mat and draw theveneer slicer along the edge.<strong>String</strong>s do not needed to beof uniform width across theirlength. One edge will beburied in the workpiece andthe other scraped off.If you will be slicing a lotof inlay string, you can addan adjustable fence to thejig to make quick work ofpositioning the veneer forconsistent slices. The fenceheight is adjustable to allowfor different thicknessesof veneer.To slice a string, position the veneer in the required location on the jig. Lay aguide rod atop the veneer and press the fence against the side of the jig. Rotatethe tool down until the blade contacts the cutting mat. Draw the tool acrossthe veneer, making certain that the guide rods keep the veneer in place.SharpeningCutting MatCutting MatL-ShapedSubstrate(to straddlebench)Freshly Sliced<strong>String</strong>Low ClampingScrews (to clearstraight slitter)HeightAdjustable FenceFence setto thicknessof veneer.Figure 5: Using the veneer slicer.Wooden SubstrateFigure 3: Low-volume string slicing jig.Figure 4: High-volume string slicing jig.The inlay groove hook blade can be sharpened in one of two ways. Ifyou have a 60° needle file and a magnifying loupe, you can sharpen theV-notch by taking a single stroke. Alternatively, a small-diameter dowel(less than 3/8") with some fine-grit sandpaper can be used to remove asmall amount of material from the front face of the blade. If you wish, bothtechniques can be used.7
To extend the usable life of theslicing blade, it has four bevellededges. Eventually, it will need tobe sharpened.Remove the blade, and by hand,draw each bevel across an 800xor 1000x stone. To preserve thesymmetry of the blade and ensureuniform wear, use the samenumber of strokes for each bevel.Five is usually enough.After all four bevels have beensharpened, slide the back of theblade across the stone just onceto remove any burrs.PSASandpaperUsinga DowelUsing aNeedle FileFigure 6: Techniques for sharpeninga hook on inlay groove blade.Figure 7: Sharpening the slicing blade.The slicing blade has been ground to a uniform thickness; it shouldnot be lapped flat. Not only will lapping change the blade thickness,making it more prone to bending, but it will also wear away the bevelsat different rates.Accessories05K11.01 <strong>Inlay</strong> Groove Cutter and Slicing <strong>Tool</strong>05K11.02 Compass Center05K11.03 Pencil Holder05K11.04 Pair of 10" Rods05K11.05 Cutter Head05K11.11 0.025" <strong>Inlay</strong> Groove Blade05K11.12 0.032" <strong>Inlay</strong> Groove Blade05K11.13 0.040" <strong>Inlay</strong> Groove Blade05K11.10 Replacement Slicing Blade05K12.01 <strong>Inlay</strong> Pin Awl05K12.21 0.025" <strong>Inlay</strong> Chisel05K12.22 0.032" <strong>Inlay</strong> Chisel05K12.23 0.040" <strong>Inlay</strong> Chisel05K12.11 0.025" Template Groove Cutter05K12.12 0.032" Template Groove Cutter05K12.13 0.040" Template Groove Cutter05K12.31 0.025" Groove Cutter/Chisel Set05K12.32 0.032" Groove Cutter/Chisel Set05K12.33 0.040" Groove Cutter/Chisel Set814 Proctor AvenueOgdensburg NY 13669-2205United States1090 Morrison DriveOttawa ON K2H 1C2Canadacustomerservice@veritastools.com© Veritas <strong>Tool</strong>s Inc. 2013 www.veritastools.com 936 IWE-567 Rev. B