Internal Prosthetic Manual - BioHorizons
Internal Prosthetic Manual - BioHorizons
Internal Prosthetic Manual - BioHorizons
- No tags were found...

You also want an ePaper? Increase the reach of your titles
YUMPU automatically turns print PDFs into web optimized ePapers that Google loves.
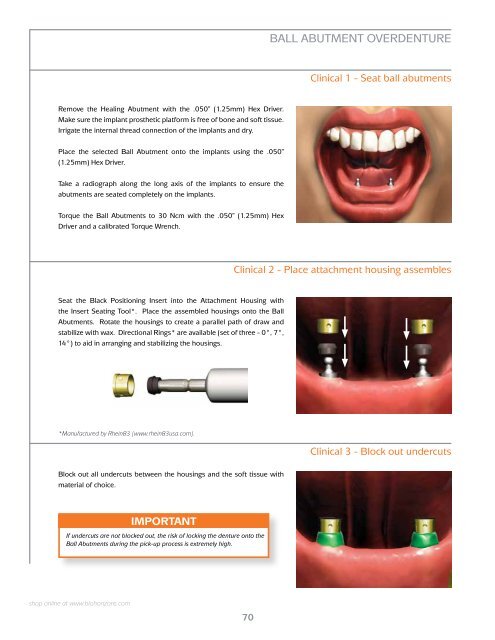
BALL ABUTMENT OVERDENTUREClinical 1 - Seat ball abutmentsRemove the Healing Abutment with the .050” (1.25mm) Hex Driver.Make sure the implant prosthetic platform is free of bone and soft tissue.Irrigate the internal thread connection of the implants and dry.Place the selected Ball Abutment onto the implants using the .050”(1.25mm) Hex Driver.Take a radiograph along the long axis of the implants to ensure theabutments are seated completely on the implants.Torque the Ball Abutments to 30 Ncm with the .050” (1.25mm) HexDriver and a calibrated Torque Wrench.Clinical 2 - Place attachment housing assemblesSeat the Black Positioning Insert into the Attachment Housing withthe Insert Seating Tool*. Place the assembled housings onto the BallAbutments. Rotate the housings to create a parallel path of draw andstabilize with wax. Directional Rings* are available (set of three - 0°, 7°,14°) to aid in arranging and stabilizing the housings.*Manufactured by Rhein83 (www.rhein83usa.com).Clinical 3 - Block out undercutsBlock out all undercuts between the housings and the soft tissue withmaterial of choice.IMPORTANTIf undercuts are not blocked out, the risk of locking the denture onto theBall Abutments during the pick-up process is extremely high.shop online at www.biohorizons.com70