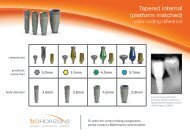
Internal Prosthetic Manual - BioHorizons
Internal Prosthetic Manual - BioHorizons
Internal Prosthetic Manual - BioHorizons
- No tags were found...

You also want an ePaper? Increase the reach of your titles
YUMPU automatically turns print PDFs into web optimized ePapers that Google loves.
IMPLANT-LEVEL IMPRESSIONClinical 3 - Try-in impression trayTry in the impression tray to verify that the coping screw protrudesthrough the tray.The custom tray is fabricated using a tray material of choice. A windowis cut out of the tray over the area of the implant to allow clearance forthe coping screw.Alternatively, a stock impression tray may be modified to accommodatethe coping screw which will protrude through the top of the tray.Clinical 4 - Make an impressionSyringe a medium or heavy-bodied impression material around thecoping assembly. Load the full arch impression tray with a medium orheavy-bodied impression material and seat it in the mouth. Wipe excessimpression material off the coping screw before it sets.Clinical 5 - Remove coping screwsAfter the impression material has set, first remove the coping screw andthen remove the tray from the mouth. Verify that the impression materialis completely adapted around the pick-up copings.Replace the Healing Abutment immediately to prevent soft tissuecollapse.Send to Lab• Impression with coping inside• Coping screw• Implant Analog• Abutment and screw (if chosen)• Bite registration• Opposing model or impression• Shadeshop online at www.biohorizons.com23