Internal Prosthetic Manual - BioHorizons
Internal Prosthetic Manual - BioHorizons
Internal Prosthetic Manual - BioHorizons
- No tags were found...

Create successful ePaper yourself
Turn your PDF publications into a flip-book with our unique Google optimized e-Paper software.
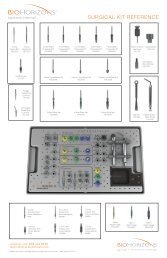
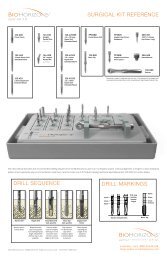
IMPLANT-LEVEL IMPRESSIONOPEN TRAY - DIRECT PICK-UP TECHNIQUEIMPORTANTOpen Tray Direct Pick-up Impression TechniqueThe Direct Pick-up impression technique requires the use of a custom tray or modified stock tray with screw access holes over the area of theimplants. The holes allow the long screws to protrude through the top of the tray. See pages 36-37 for custom tray fabrication.Clinical 1 - Remove healing abutmentRemove the Healing Abutment with the .050” (1.25mm) Hex Driver.Make sure that the implant prosthetic platform is free of bone and softtissue.The emergence of the impression coping selected should match theemergence of the Healing Abutment and the intended final abutment(either narrow, regular or wide). Custom Cast abutment emergencewill be determined by laboratory prescription.Helpful HintWhen placing impression copings on multiple implants,remove one Healing Abutment at a time, replacing itimmediately with the selected impression coping. Thisreduces the likelihood of soft tissue collapsing onto theimplant. Work from the posterior to the anterior.Clinical 2 - Place impression copingPlace the appropriate diameter Direct Pick-up Coping (either Hexed orNon-hexed) on the implant body and retain with the included DirectPick-up Coping Screw (hand-tighten).These screws feature a knurled top to aid in manual insertion, as well asa .050” hex access hole for insertion with the (1.25mm) Hex Driver.Take a radiograph along the long axis of the implant to ensure the copingis fully seated.shop online at www.biohorizons.com22