Internal Prosthetic Manual - BioHorizons
Internal Prosthetic Manual - BioHorizons
Internal Prosthetic Manual - BioHorizons
- No tags were found...

Create successful ePaper yourself
Turn your PDF publications into a flip-book with our unique Google optimized e-Paper software.
TABLE OF CONTENTSIntroduction1Treatment Planning2-5Restorative OptionsImplant-level Cement-retained RestorationsImplant-level Screw-retained RestorationsAbutment-level Screw-retained RestorationsBall Abutment Overdenture6789Impression TechniquesOverviewEmergence Profile ChartsPrepared Abutment Impression, Closed Tray - Crown and Bridge TechniqueImplant-level Impression, Closed Tray - Indirect Transfer TechniqueImplant-level Impression, Open Tray - Direct Pick-up TechniqueAbutment-level Impression, Closed Tray - Indirect Transfer TechniqueAbutment-level Impression, Open Tray - Direct Pick-up TechniqueBall Abutment Impression, Closed Tray - Indirect Transfer TechniqueCustom Tray Fabrication10-1112-1415-1617-2021-2425-2829-3233-3536-37Abutment Selection Flow Chart38-39Restorative OptionsSingle or Multiple-unit Cement-retained - Chairside Abutment ModificationSingle-tooth Screw-retained - Custom Cast Abutment (Hexed)Single-tooth Cement-retained - Laboratory Prepared AbutmentMultiple-unit Screw-retained - Custom Cast Abutments (Non-hexed)Multiple-unit Cement-retained - Laboratory Prepared AbutmentsBall Abutment Overdenture, Existing Denture, Chairside Pick-upBall Abutment Overdenture, New DentureBar Overdenture - Screw-retained Implant or Abutment-level, Cast BarBar Overdenture - Screw-retained Implant-level, Laser Welded BarIcon Legend41-4647-5153-5859-6263-6869-7273-7677-8485-9091shop online at www.biohorizons.comA
INTRODUCTION<strong>BioHorizons</strong> <strong>Internal</strong> and Tapered <strong>Internal</strong> implant systems share identical prosthetic platforms with a secure internal hexconnection to allow complete cross-compatibility between the two systems. Both implants offer the flexibility of either twostage,single-stage or immediate load treatment plans.Each <strong>Internal</strong> and Tapered <strong>Internal</strong> implant comes with a free, gold-hued esthetic 3inOne Abutment. This multi-purposeabutment may be used:• at placement as a surgical mount• as an impression coping when coupled with the Ball-top Screw• as a final/temporary abutment for a cemented restorationThe beveled restorative platform provides an excellent biomechanical seal at the implant/abutment interface and aids indistributing lateral load away from the Abutment Screw. These features, combined with the use of Spiralock® screw technology,virtually eliminate unwanted screw loosening.This manual serves as reference for <strong>BioHorizons</strong> <strong>Internal</strong> and Tapered <strong>Internal</strong> implants and prosthetic components. It is intendedsolely to provide instructions on the use of <strong>BioHorizons</strong> products. It is not intended to describe the methods or proceduresfor diagnosis, treatment planning, placement or restoration of implants; nor does it replace clinical training or a clinician’s bestjudgment regarding the needs of each patient. <strong>BioHorizons</strong> strongly recommends appropriate training as a prerequisite for theplacement/restoration of implants and associated treatment.The procedures illustrated and described within this manual reflect idealized patient presentations with conditions adequatefor commencement of the restorative phase of treatment. No attempt has been made to cover the wide range of actual patientconditions which may adversely affect prosthetic outcomes. Clinician judgment as related to any specific case must alwayssupersede any recommendations made in this or any <strong>BioHorizons</strong> literature.1shop online at www.biohorizons.com
TREATMENT PLANNINGFor ideal results in implant dentistry, the treatment team should be in agreement and in communication throughout all stagesof therapy. The patient, the restorative and surgical doctors, as well as the dental laboratory should understand and agree uponthe treatment plan. The treatment plan chosen will determine the design, number and position of the implants.Diagnostic CastsMounted study casts and a diagnostic wax-up are the foundation for determining implant location.Surgical Guide TemplatesOnce the diagnostic wax-up is finalized, the restorative doctor or dental laboratory fabricates the surgical guide template. Thisguide dictates to the surgeon the implant location that offers the best support for the prosthesis, as well as optimal estheticsand hygiene requirements. The surgical guide also provides information about the tooth and supporting structures that havebeen lost.Restoration MatrixA matrix of the diagnostic wax-up may also be utilized by the laboratory when developing the final prosthesis. The matrix actsas a guide for position and contour of the prosthesis.Fabricating a Surgical GuideSeveral methods of fabrication for the surgical template are available. One method is described below.1. Utilizing the diagnostic wax-up, create a duplicate stone model and then fabricate a clear acrylic thermoformguide over the waxed-up area and adjacent teeth. Extend the template to include several teeth on each sideof the implant site for template stability.2. The surgical guide is marked while on the study model in the area where the center of the implant should belocated. Implants are designed for axial load to the implant body. The marks on the surgical guide shouldreflect the optimal long-axis load location. For posterior teeth this would be through the occlusal table. Forcement-retained anterior teeth, the ideal location would be through the incisal edge.3. Drill holes through the template where the marks have been made from the study model. Dependent onimplant location, the facial or lingual walls of the surgical guide may need to be removed for easier surgicalaccess.4. For the totally edentulous arch, the template should extend onto unreflected soft tissue regions, i.e., thepalate and tuberosities in the maxilla or the retromolar pads in the mandible. This assures the template willbe stable after the soft tissues have been reflected from the bone during surgery.shop online at www.biohorizons.com2
TREATMENT PLANNINGTwo-stage Surgical ProtocolsThe original protocol for placing modern dental implants was two-stage(submerged) surgery, and it is still widely used today. The implant is placedbelow the soft tissue and protected from occlusal function and other forcesduring osseointegration. A low-profile Cover Cap is placed on the implantto protect it from the ingress of soft tissue.Following osseointegration, a second surgery exposes the implant and atransmucosal Healing Abutment is placed to allow for soft tissue healingand development of a sulcus. <strong>Prosthetic</strong> restoration begins after soft tissuehealing.Single-stage Surgical ProtocolsSingle-stage surgery leaves the implant/abutment connection exposed tothe oral cavity via an integrated transmucosal element (e.g. <strong>BioHorizons</strong>Single-stage), or a removable Healing Abutment (e.g. <strong>BioHorizons</strong><strong>Internal</strong>). This eliminates the need for a second surgery to expose theimplant. Although the implant is not in occlusal function, some forces canbe transmitted to it through the exposed transmucosal element.<strong>Prosthetic</strong> restoration begins following osseointegration of the implant andsoft tissue healing.Non-functional Immediate RestorationsSingle-stage surgery with non-functional immediate restoration providespatients a non-occlusal provisional prosthesis early in the treatment plan.An abutment may be placed on the implant at or shortly after surgery, anda provisional restoration secured to it with temporary cement. Alternatively,a screw-retained prosthesis may be fabricated. The provisional can helpcontour the soft tissue profile during healing.Immediate Function RestorationsSingle-stage surgery with Immediate Function is possible in good qualitybone where multiple implants exhibiting excellent initial stability canbe splinted together. Splinting implants together can offer a significantbiomechanical advantage over individual, unsplinted crowns.3shop online at www.biohorizons.com
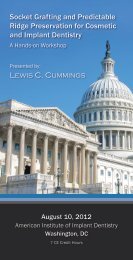
RESTORATIVE OPTIONSImplant-level Cement-retained RestorationsCement-retained implant restorations are very similar to crown& bridge restorations. A prepared implant abutment is screwedonto the implant. The crown or restoration is cemented to theprepared abutment, much like a prepared tooth.Indications• Single or multiple-unit implant restorations• Totally edentulous or partially edentulous arch• Ease of retrievabilityLimitationsAdvantages• Conventional crown & bridge procedures• Maximum control of occlusion• More esthetic than screw-retainedshop online at www.biohorizons.com6
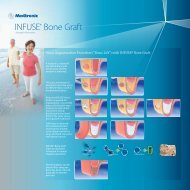
RESTORATIVE OPTIONSImplant-level Screw-retained Restorations (Custom Castable)Implant-level, screw-retained restorations are indicated wheninter-arch space is limited and/or a screw-retained restorationis planned. The restoration is retained by a screw that entersthrough the occlusal surface of the prosthesis and threads intothe implant.Indications• Single or multiple-unit restorations• Screw-retained restorations at the implant-level• Fixed-detachable (hybrid-type) restorations• Totally edentulous or partially edentulous arch• Minimal inter-arch space• Laboratory fabricated custom abutments• Implant-level bar overdenture fabrication• Increased ease of retrievabilityLimitations• Splinted restorations on implants with divergentangles greater than 10°• May restrict optimal occlusion when used forcrown & bridgeAdvantages• Easier to retrieve prosthesis for servicing,revisions and hygiene maintenance• Greater control of esthetics• Minimal inter-arch space required7shop online at www.biohorizons.com
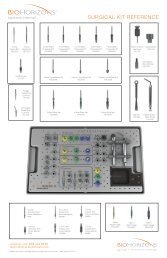
RESTORATIVE OPTIONSAbutment-level Screw-retained RestorationsAbutment-level, screw-retained restorations are used for a bar-retained and/or supportedoverdenture case when the treatment plan indicates the cast bar be 1-2mm supra-gingival. Thedenture is retained by the bar with attachments, i.e. clips or ball attachments. Typically, four to siximplants are recommended in the mandible for an implant-supported/implant-retained prosthesis.Six to ten implants are recommended in the maxilla for an implant-supported/implant-retainedprosthesis. An implant-retained, tissue-supported prosthesis is indicated when there are fewer thanfour implants in the mandible and fewer than six in the maxilla.Indications• Multiple-unit restorations• Abutment-level bar overdenture• Fixed-detachable (hybrid type) restorations• Extensive bone loss• Thick tissueLimitations• Limited inter-arch space to accommodate abutments, barand overdentureAdvantages• Bar overdenture removable by patient for hygiene• Fixed-detachable removable by dentist for hygieneshop online at www.biohorizons.com8
RESTORATIVE OPTIONSBall Abutment Overdenture RestorationsThe Ball Abutment retained overdenture is a tissue-supported prosthesis. The abutmentsscrew directly into the implant, providing a choice of female retention devices.Indications• Transitional prosthesis• Totally edentulous archLimitations• Minimum of two implantsAdvantages• Removable prosthesis for oral hygiene access• Existing denture may be used• Low financial investment by the patient9shop online at www.biohorizons.com
IMPRESSION TECHNIQUESOverviewThere are three types of impression techniquesutilized in implant dentistry:Prepared Abutment – An intra-oral impression ismade of prepared abutment(s), similar to a standardcrown & bridge impression.Implant-level – An intra-oral impression is madetransferring the emergence of the implant. Theimplant’s location and angle are recorded, with orwithout the orientation of the internal hex.Abutment-level – An intra-oral impression is madeof Abutments for Screw that have been placed ontothe implants. Abutments for Screw location andangle are recorded for screw-retained prosthesis.Prepared AbutmentImpression Technique OptionsImplant-level and abutment-level impressions canbe made by either of the following techniques:Closed Tray (Indirect) Transfer TechniqueorOpen Tray (Direct) Pick-up TechniquePrepared Abutment impressions are always madeusing the Closed Tray technique.Implant-levelThe option chosen is dependent on the treatmentplan and the degree of accuracy needed to fabricatethe final restoration. The Open Tray Technique ismore accurate than the Closed Tray Technique andis recommended in multiple-unit restorations.See the facing page for details on the two options.Abutment-levelshop online at www.biohorizons.com10
IMPRESSION TECHNIQUESClosed Tray - Indirect Transfer Impression TechniqueThis technique records the soft tissue profile as well as theimplant’s location. The implant’s internal hex orientation istransferred when using the 3inOne Abutment with a BallTransfer Screw or any of the Indirect, Hexed (Closed Tray)Copings. If the hex location is not needed for the prosthesisfabrication, the Direct Pick-up, Non-hexed (Open Tray) Copingsmay be used (see below).In the Closed Tray Transfer technique, the Indirect TransferCopings remain in the mouth when the impression is removedfrom the mouth. The copings are then removed from the mouthand connected with the appropriate Implant Analog. The copingwith analog is then indexed (transferred) into its correspondingposition in the impression. A working model is poured inminimal expansion, high hardness die stone, providing a replicaof the implant’s location in the patient’s mouth.Closed Tray – Indirect Transfer TechniqueOpen Tray - Direct Pick-up Impression TechniqueThis technique records the soft tissue profile as well as theimplant’s location. The implant’s internal hex orientation istransferred when using the Direct Pick-up Hexed (Open Tray)Copings. If the hex orientation is not needed for the prosthesisfabrication, the Direct Pick-up Non-hexed (Open Tray) Copingsare used.In the Open Tray Transfer technique, the Direct Pick-up Copingsremain in the impression when removed from the mouth. Forthis pick-up technique a custom tray or modified stock tray withscrew access holes in the areas above the implants is required.The Direct Coping Screw that holds the Direct Pick-up Copingsin place while the impression is made are removed throughthe access holes after the material sets. The impression isremoved with the Direct Pick-up Copings imbedded within theimpression. The Implant Analog is connected to the imbeddedcopings and a working model is poured in minimal expansion,high hardness die stone, providing a replica of the implant inthe patient’s mouth.Open Tray – Direct Pick-up Technique11shop online at www.biohorizons.com
EMERGENCE PROFILE CHARTS3.5mm <strong>Prosthetic</strong> PlatformHealing abutments, impression copings and abutments for the 3.5mm prosthetic platform are available in threedifferent emergence profiles: narrow, regular or wide. It is important to use components with the same emergencethroughout the treatment plan to ensure easy seating of prosthetic components without potential problems fromsoft tissue impingement.Custom Cast Abutments do not specify an emergence since the emergence will be determined by the contour ofthe final restoration.The chart below shows representative components of each of the three different emergences.NarrowEmergenceRegularEmergenceAbutmentsWideEmergenceImpression ComponentsHealing AbutmentsImplant & Analogshop online at www.biohorizons.com12
EMERGENCE PROFILE CHARTS4.5mm <strong>Prosthetic</strong> PlatformHealing abutments, impression copings and abutments for the 4.5mm prosthetic platform are available in threedifferent emergence profiles: narrow, regular or wide. It is important to use components with the same emergencethroughout the treatment plan to ensure easy seating of prosthetic components without potential problems fromsoft tissue impingement.Custom Cast Abutments do not specify an emergence since the emergence will be determined by the contourof the final restoration.The chart below shows representative components of each of the three different emergences.NarrowEmergenceRegularEmergenceAbutmentsWideEmergenceImpression ComponentsHealing AbutmentsImplant & Analog13shop online at www.biohorizons.com
EMERGENCE PROFILE CHARTS5.7mm <strong>Prosthetic</strong> PlatformHealing abutments, impression copings and abutments for the 5.7mm prosthetic platform are available in twodifferent emergence profiles: narrow or regular. It is important to use components with the same emergencethroughout the treatment plan to ensure easy seating of prosthetic components without potential problems fromsoft tissue impingement.Custom Cast Abutments do not specify an emergence since the emergence will be determined by the contourof the final restoration.The chart below shows representative components of each of the two different emergences.NarrowEmergenceRegularEmergenceAbutmentsImpression ComponentsHealing AbutmentsImplant & Analogshop online at www.biohorizons.com14
PREPARED ABUTMENT IMPRESSIONCLOSED TRAY, CROWN & BRIDGE TECHNIQUE3inOneAbutmentAngledAbutmentNarrowAbutmentAngled EstheticAbutmentStraight EstheticAbutment(3mm buccal)Straight EstheticAbutmentAbutment ScrewPackaged with alltwo-piece abutmentsTools needed.050” (1.25mm)Hex Driver.050” Hex Driver(long)30 NcmTorque WrenchHandWrench.050” Hex Driver(regular)Implant AnalogHandleParts shown are for the 4.5mm prosthetic platform (3.5mm and 5.7mm platforms are not shown). Please refer to theTapered <strong>Internal</strong> Catalog & Surgical <strong>Manual</strong> (L0603) or the <strong>Internal</strong> / Single-stage Product Catalog (ML0115) for completecomponent ordering information including part dimensions.15shop online at www.biohorizons.com
P R E P A R E D A B U T M E N T I M P R E S S I O NPREPARED ABUTMENT IMPRESSIONClinical 1 - Remove provisionalIf the patient presents to you with the abutment in place, simply remove thetemporary, if present, and proceed with the clinical step 2.Remove the Healing Abutment from the implant with the .050” (1.25mm) HexDriver. Make sure the implant prosthetic platform is free of bone and soft tissue.Place the prepared abutment onto the implant and hand-tighten the AbutmentScrew with the .050” (1.25mm) Hex Driver. Take a radiograph along the long axisof the implant to ensure that the abutment is seated completely in the hex of theimplant.Clinical 2 - Impression preparationTorque the Abutment Screw to 30 Ncm using a calibrated Torque Wrench andthe .050” (1.25mm) Hex Driver. Counter-torque may be applied by grasping theabutment with an abutment clamp or hemostat. Block out the screw access holeon the top of the abutment with material of choice.The use of retraction cord or impression medium may be necessary to ensure thetransfer of the margins on the modified abutment.Clinical 3 - Make impressionSyringe light or medium-bodied impression material around abutment. Usemedium or heavy-bodied impression material in the tray. Make a full-arch crown& bridge impression with the elastomeric impression material of choice. Sendthe impression, an opposing model or impression and a bite registration to thelaboratory for crown fabrication. For chair-side provisional fabrication, lightlylubricate the modified abutment and use the technique and material of choice.Send to Lab• Impression• Bite registration• Opposing model or impression• ShadeLab 4 - Fabricate stone modelPour the standard crown & bridge impression in die stone. A reinforced die maybe helpful if the preparation is extremely thin. Articulate and prepare accordingto standard laboratory procedures.shop online at www.biohorizons.com16
IMPLANT-LEVEL IMPRESSIONCLOSED TRAY - INDIRECT TRANSFER TECHNIQUENarrow IndirectCopingRegular IndirectCopingAbutment ScrewPackaged with alltwo-piece abutmentsWide IndirectCoping3inOneAbutmentBall-topScrewImplantAnalogTools needed.050” (1.25mm)Hex DriverHandWrench.050” Hex Driver(regular)Parts shown are for the 4.5mm prosthetic platform (3.5mm and 5.7mm platforms are not shown). Please refer to theTapered <strong>Internal</strong> Catalog & Surgical <strong>Manual</strong> (L0603) or the <strong>Internal</strong> / Single-stage Product Catalog (ML0115) for completecomponent ordering information including part dimensions.17shop online at www.biohorizons.com
IMPLANT-LEVEL IMPRESSIONClinical 1 - Remove healing abutmentsRemove the Healing Abutment with the .050” (1.25mm) Hex Driver.Make sure that the implant prosthetic platform is free of bone and softtissue.The emergence of the impression coping selected should match theemergence of the Healing Abutment and the intended final abutment(either narrow, regular or wide). Custom Cast emergence will bedetermined by the lab prescription.Helpful HintWhen placing impression copings on multiple implants,remove one Healing Abutment at a time, replacing itimmediately with the impression coping. This reduces thelikelihood of soft tissue collapsing onto the implant. Workfrom the posterior to the anterior.Clinical 2 - Place impression copingOption A - Seat the 3inOne Abutment and secure it with a Ball-topScrew (hand-tighten).Option B - Seat the Indirect Transfer Coping and secure it with theincluded screw (hand-tighten).Option AIf practical, orient the flat side of the abutment/coping to the facial foreasier indexing.Option BTake a radiograph along the long axis of the implant to ensure the copingis fully seated.Clinical 3 - Block out screw holeBlock out the hex hole on top of the Ball-top Screw (Option A); or thescrew access hole of the Indirect Transfer Coping (Option B) with amaterial of choice.Option AOption Bshop online at www.biohorizons.com18
IMPLANT-LEVEL IMPRESSIONClinical 4 - Apply impression materialRecord a full arch impression by syringing and completely covering thecoping assembly with medium or heavy body impression material.Remove the coping assembly after the tray has been removed. Replacethe Healing Abutment immediately to prevent soft tissue collapse.Send to Lab• Impression• Impression coping, either:• 3inOne/Ball-top Screw Combo, or• Indirect Transfer Coping• Abutment Screw (comes with 3inOne)• Implant Analog• Bite registration• Opposing model or impression• ShadeLab 5 - Assemble analogOption A - Assemble the 3inOne Abutment with the appropriatediameter Implant Analog using the Ball-top Screw.Option AOption BOption B - Assemble the Indirect Transfer Coping with the appropriatediameter Implant Analog using the included screw with the .050”(1.25mm) Hex Driver.Insert the coping assembly into the corresponding location in theimpression, ensuring that the flat of the coping aligns with thecorresponding indice in the impression.19shop online at www.biohorizons.com
IMPLANT-LEVEL IMPRESSIONLab 6 - Create soft tissue modelA soft tissue model material is recommended around the implant; verifyanalogs are seated properly and apply lubricant around the analogswhere soft tissue needs to be added.Lab 7 - Fabricate stone modelFabricate a working cast. Articulate according to normal laboratoryprocedures.shop online at www.biohorizons.com20
IMPLANT-LEVEL IMPRESSIONOPEN TRAY - DIRECT PICK-UP TECHNIQUENarrow Direct Coping,HexedRegular Direct Coping,HexedWide Direct Coping,HexedDirect Coping,Non-hexedImplantAnalogDirect CopingScrewTools needed.050” (1.25mm)Hex DriverHandWrench.050” Hex Driver(regular)Parts shown are for the 4.5mm prosthetic platform (3.5mm and 5.7mm platforms are not shown). Please refer to theTapered <strong>Internal</strong> Catalog & Surgical <strong>Manual</strong> (L0603) or the <strong>Internal</strong> / Single-stage Product Catalog (ML0115) for completecomponent ordering information including part dimensions.21shop online at www.biohorizons.com
IMPLANT-LEVEL IMPRESSIONOPEN TRAY - DIRECT PICK-UP TECHNIQUEIMPORTANTOpen Tray Direct Pick-up Impression TechniqueThe Direct Pick-up impression technique requires the use of a custom tray or modified stock tray with screw access holes over the area of theimplants. The holes allow the long screws to protrude through the top of the tray. See pages 36-37 for custom tray fabrication.Clinical 1 - Remove healing abutmentRemove the Healing Abutment with the .050” (1.25mm) Hex Driver.Make sure that the implant prosthetic platform is free of bone and softtissue.The emergence of the impression coping selected should match theemergence of the Healing Abutment and the intended final abutment(either narrow, regular or wide). Custom Cast abutment emergencewill be determined by laboratory prescription.Helpful HintWhen placing impression copings on multiple implants,remove one Healing Abutment at a time, replacing itimmediately with the selected impression coping. Thisreduces the likelihood of soft tissue collapsing onto theimplant. Work from the posterior to the anterior.Clinical 2 - Place impression copingPlace the appropriate diameter Direct Pick-up Coping (either Hexed orNon-hexed) on the implant body and retain with the included DirectPick-up Coping Screw (hand-tighten).These screws feature a knurled top to aid in manual insertion, as well asa .050” hex access hole for insertion with the (1.25mm) Hex Driver.Take a radiograph along the long axis of the implant to ensure the copingis fully seated.shop online at www.biohorizons.com22
IMPLANT-LEVEL IMPRESSIONClinical 3 - Try-in impression trayTry in the impression tray to verify that the coping screw protrudesthrough the tray.The custom tray is fabricated using a tray material of choice. A windowis cut out of the tray over the area of the implant to allow clearance forthe coping screw.Alternatively, a stock impression tray may be modified to accommodatethe coping screw which will protrude through the top of the tray.Clinical 4 - Make an impressionSyringe a medium or heavy-bodied impression material around thecoping assembly. Load the full arch impression tray with a medium orheavy-bodied impression material and seat it in the mouth. Wipe excessimpression material off the coping screw before it sets.Clinical 5 - Remove coping screwsAfter the impression material has set, first remove the coping screw andthen remove the tray from the mouth. Verify that the impression materialis completely adapted around the pick-up copings.Replace the Healing Abutment immediately to prevent soft tissuecollapse.Send to Lab• Impression with coping inside• Coping screw• Implant Analog• Abutment and screw (if chosen)• Bite registration• Opposing model or impression• Shadeshop online at www.biohorizons.com23
IMPLANT-LEVEL IMPRESSIONLab 6 - Assemble analogMate the Analog with the Direct Pick-up Coping by holding the Analogin place while inserting the long screws through the access holes in theimpression tray. Hand-tighten the screws.A soft tissue model material is recommended around the implant; verifyanalogs are seated properly and apply lubricant around the analogswhere soft tissue needs to be added.Lab 7 - Fabricate stone modelPour a working cast in minimal expansion, high hardness die stone.Articulate according to normal laboratory procedures.shop online at www.biohorizons.com24
ABUTMENT-LEVEL IMPRESSIONCLOSED TRAY - INDIRECT TRANSFER TECHNIQUECover Cap,Abutment for ScrewIndirect Transfer Coping,Abutment for ScrewAnalog,Abutment for ScrewAbutments for ScrewAngled Abutments for ScrewTools neededHandWrench30 NcmTorque Wrench.050” Hex Driver(regular)Hex Adapter,Abutment for ScrewParts shown are for the 4.5mm prosthetic platform (3.5mm and 5.7mm platforms are not shown). Please refer to theTapered <strong>Internal</strong> Catalog & Surgical <strong>Manual</strong> (L0603) or the <strong>Internal</strong> / Single-stage Product Catalog (ML0115) for completecomponent ordering information including part dimensions.25shop online at www.biohorizons.com
ABUTMENT-LEVEL IMPRESSIONClinical 1 - Remove healing abutmentsRemove the Healing Abutments from the implants with a .050” (1.25mm)Hex Driver.Make sure the implant prosthetic platform is free of bone and soft tissue.Irrigate the internal thread connection of the implant and dry.Helpful HintWhen working with multiple implants, remove oneHealing Abutment at a time, replacing it immediatelywith an Abutment for Screw. This reduces the likelihoodof soft tissue collapsing onto the implant. Work from theposterior to the anterior.Clinical 2 - Seat abutments for screwPlace the appropriate Abutments for Screw on the implant bodies withthe Hex Adapter. Take a radiograph along the long axis of the implants toensure the Abutments for Screw are fully seated. Torque the Abutmentsfor Screw to 30 Ncm using the Hex Adapter and a calibrated TorqueWrench. The abutments will remain in the mouth from this pointforward.The female hex of the HexAdapter engages the malehex of the Abutment forScrew during seating.Clinical 3 - Seat indirect transfer copingsPlace Indirect Transfer Copings onto the Abutments for Screw. Handtighten.shop online at www.biohorizons.com26
ABUTMENT-LEVEL IMPRESSIONClinical 4 - Make an impressionSyringe medium or heavy-bodied impression material around the copingassemblies.Clinical 5 - Make an impressionLoad the impression tray with a medium or heavy-bodied impressionmaterial and seat it in the mouth.Clinical 6 - Place cover capsRemove the impression tray after the material has set. Verify that theimpression material is completely adapted around the impressioncopings. Remove the Indirect Transfer Copings from the Abutments forScrew.Place the Cover Caps on the Abutments for Screw with the .050”(1.25mm) Hex Driver and hand-tighten.Send to Lab• Impression• Impression copings• Abutment for Screw Analogs• Bite registration• Opposing model or impressionshop online at www.biohorizons.com27
ABUTMENT-LEVEL IMPRESSIONClinical 7 - Modify temporary prosthesisModify the temporary prosthesis to accommodate the height of theAbutments for Screw and Cover Caps. A soft reline material may beplaced in the relieved areas to provide moderate retention while the finalprosthesis is being fabricated.Lab 8 - Assemble copings and analogsAssemble the Indirect Transfer Copings to the Abutment for ScrewAnalogs. Insert the assemblies into the corresponding locations in theimpression.Lab 9 - Fabricate stone modelFabricate a working cast.Articulate according to normal laboratory procedures.shop online at www.biohorizons.com28
ABUTMENT-LEVEL IMPRESSIONOPEN TRAY - DIRECT PICK-UP TECHNIQUEDirect Pick-up Coping.Abutment for ScrewScrew (regular)Abutment for ScrewScrew (long)Abutment for ScrewCover Cap,Abutment for ScrewAbutments for ScrewAngled Abutments for ScrewAnalog,Abutment for ScrewTools neededHandWrench.050” (1.25mm)Hex Driver30 NcmTorque Wrench.050” Hex Driver(regular)Hex Adapter,Abutment for ScrewParts shown are for the 4.5mm prosthetic platform (3.5mm and 5.7mm platforms are not shown). Please refer to theTapered <strong>Internal</strong> Catalog & Surgical <strong>Manual</strong> (L0603) or the <strong>Internal</strong> / Single-stage Product Catalog (ML0115) for completecomponent ordering information including part dimensions.29shop online at www.biohorizons.com
ABUTMENT-LEVEL IMPRESSIONOPEN TRAY - DIRECT PICK-UP TECHNIQUEIMPORTANTOpen Tray Direct Pick-up Impression TechniqueThe Direct Pick-up impression technique requires the use of a custom tray or modified stock tray with screw access holes over the area of theimplants. The holes allow the long screws to protrude through the top of the tray. See pages 36-37 for custom tray fabrication.Clinical 1 - Remove healing abutmentRemove the Healing Abutments from the implants with the .050”(1.25mm) Hex Driver.Make sure the implant prosthetic platform is free of bone and soft tissue.Irrigate the internal thread connection of the implant and dry.Helpful HintWhen working with multiple implants, remove one HealingAbutment at a time, replacing it immediately with theAbutments for Screw of choice. This reduces the likelihoodof soft tissue collapsing onto the implant. Work from theposterior to the anterior.Clinical 2 - Seat abutments for screwPlace the appropriate Abutments for Screw on the implant with the HexAdapter. Take a radiograph along the long axis of the implants to ensurethe Abutments for Screw are fully seated. Torque the Abutments forScrew to 30 Ncm using the Hex Adapter and a calibrated Torque Wrench.The abutments will remain in the mouth from this point forward.The female hex of the HexAdapter engages the malehex of the Abutment forScrew during seating.shop online at www.biohorizons.com30
ABUTMENT-LEVEL IMPRESSIONClinical 3 - Seat direct pick-up copingsPlace Abutment for Screw Direct Pick-up Copings onto the Abutmentsfor Screw. Hand-tighten.Try in the impression tray to verify that the screws protrude through theopenings without interference.Clinical 4 - Make an impressionSyringe a medium or heavy-bodied impression material around theentire Direct Pick-up Impression Copings.Clinical 5 - Make an impressionLoad the custom impression tray with a medium or heavy-bodiedimpression material and seat in the mouth.Wipe impression material off the top of the screws before it sets. Allowthe impression material to set.shop online at www.biohorizons.com31
ABUTMENT-LEVEL IMPRESSIONClinical 6 - Remove coping screwsAfter the impression material has set, remove the long screws. Removethe impression from the mouth. Verify that the impression material iscompletely adapted around the copings. Place the Cover Caps on theAbutments for Screw and hand-tighten.Modify the temporary prosthesis (as shown on page 28) to accommodatethe height of the Abutments for Screw and Cover Caps.Send to Lab• Impression• Direct Impression components• Abutment for Screw Analogs• Bite registration• Opposing model or impressionLab 7 - Assemble analogPlace Abutment for Screw Analogs onto the Direct Pick-up copings byholding the analog in place while inserting the long screws through theaccess holes in the impression tray. Hand-tighten the screws.Lab 8 - Fabricate stone modelFabricate a working cast. Articulate according to normal laboratoryprocedures.shop online at www.biohorizons.com32
BALL ABUTMENT IMPRESSIONCLOSED TRAY - INDIRECT TRANSFER TECHNIQUEBall AbutmentsBall AbutmentAnalogTools needed.050” (1.25mm)Hex DriverHandWrench.050” Hex Driver(regular)30 NcmTorque WrenchParts shown are for the 4.5mm prosthetic platform (3.5mm and 5.7mm platforms are not shown). Please refer to theTapered <strong>Internal</strong> Catalog & Surgical <strong>Manual</strong> (L0603) or the <strong>Internal</strong> / Single-stage Product Catalog (ML0115) for completecomponent ordering information including part dimensions.33shop online at www.biohorizons.com
BALL ABUTMENT IMPRESSIONClinical 1 - Remove healing abutmentsRemove the Healing Abutments from the implants with the .050”(1.25mm) Hex Driver. Make sure the implant prosthetic platform is freeof bone and soft tissue. Irrigate the internal thread connection of theimplant and dry.Helpful HintWhen working with multiple implants, remove one HealingAbutment at a time, replacing it immediately with aBall Abutment. This reduces the likelihood of soft tissuecollapsing onto the implant.Clinical 2 - Seat ball abutmentsPlace the selected Ball Abutments onto the implants using the .050”(1.25mm) Hex Driver.Take a radiograph along the long axis of the implants to ensure theabutments are seated completely on the implants.Tighten the Ball Abutments to 30 Ncm with the .050” (1.25mm) HexDriver and a calibrated Torque Wrench.Clinical 3 - Block hex holesBlock out the hex hole on top of the Ball Abutment with material ofchoice.shop online at www.biohorizons.com34
BALL ABUTMENT IMPRESSIONClinical 4 - Make an impressionSyringe medium or heavy-bodied impression material around ballabutments. Fill impression tray with medium or heavy-bodied materialand seat tray. A full arch impression is suggested.Clinical 5 - Modify dentureRelieve the patient’s existing denture to allow for the Ball Abutments. Asoft liner may be used to reline the denture and provide a transitionaldegree of retention prior to the processing of the final attachmentsSend to Lab• Impression• Ball Abutment Analogs• Bite registration• Opposing model or impressionLab 6 - Seat analogsInsert the Ball Abutment Analogs in the corresponding location in theimpression.Lab 7 - Fabricate stone modelFabricate a working cast. Articulate according to normal laboratoryprocedures.shop online at www.biohorizons.com35
CUSTOM TRAY FABRICATIONIN PREPARATION FOR OPEN TRAY, DIRECT PICK-UP TECHNIQUESImplant-levelDirect Pick-upCoping- either / or -Abutment-levelDirect Pick-up Coping,Abutment for ScrewTools / materials needed• Stone model with analogs madevia Indirect Transfer Technique. It willbe either an Implant-level model or anAbutment-level model depending onthe case (see page 10).Implant-level• Baseplate wax of choice• Custom tray material of choiceAbutment-level.050” (1.25mm)Hex DriverHandWrench.050” Hex Driver(regular)Parts shown are for the 4.5mm prosthetic platform (3.5mm and 5.7mm platforms are not shown). Please refer to theTapered <strong>Internal</strong> Catalog & Surgical <strong>Manual</strong> (L0603) or the <strong>Internal</strong> / Single-stage Product Catalog (ML0115) for completecomponent ordering information including part dimensions.shop online at www.biohorizons.com36
CUSTOM TRAY FABRICATIONLab 1 - Master castPlace direct copings on the analogs of a stone model that was made viathe appropriate Indirect Transfer Technique.For Implant-level see pages 17-20.For Abutment-level see pages 25-28.Helpful HintCustom trays better approximate the morphology of the archthan stock trays, allowing less impression material to be used.This results in a more accurate impression and subsequentstone model, making it easier to create a passive fittingrestoration.Lab 2 - Place wax spacerApply baseplate wax material around copings extending far enough tothe distal on each side to ensure an accurate intraoral seating along theretromolar pad.Lab 3 - Apply custom tray materialApply custom tray material around baseplate wax and cure per themanufacturer’s instructions. Remove the coping screws and separate thetray from the model. Remove the wax and copings from the hardenedtray. It may be necessary to slightly enlarge the screw access holes priorto clinical use. Use a trimming bur to remove only enough material toallow the tray to passively fit over the in situ coping screws.shop online at www.biohorizons.com37
ABUTMENT SELECTION FLOW CHARTABUTMENT SELECTION FLOW CHARTLab Modified Cement-retainedMay also be modified chair-side.<strong>Internal</strong> Abutments<strong>Internal</strong> Custom Castable AbutmentsCustom Cast (UCLA) Screw-retainedGold-base with burn-out plastic sleeve. Non-hex-engagingabutments are only for multiple-unit prostheses.Provisional Restorations<strong>Internal</strong> PEEK orTitanium Temporary AbutmentsMay be cement- or screw-retainedshop online at www.biohorizons.com38
ABUTMENT SELECTION FLOW CHARTThe Abutment Selection Flow Chart is provided to aid in the proper selection of the abutment(s) based on the final prostheticoption desired. Simply determine if the case is for a single-tooth, multiple-unit or overdenture restoration. Next,select the desired abutment based on cement-retained or screw-retained fixation. In the case of overdenture prosthesis,select the desired abutment based on a bar-retained or abutment-retained denture.Implant-level Cast Bar orHybrid (Fixed-detachable)<strong>Internal</strong> Custom CastableAbutments, Non-hexedImplant-level Laser Weld<strong>Internal</strong> Direct Pick-up Coping,Non-hexedAbutment for Screw-level Cast Bar orHybrid (Fixed-detachable)Abutments for ScrewBall AbutmentsAbutment-retained Overdenture,Tissue-supported39shop online at www.biohorizons.com
Restorative TechniquesTable of ContentsCement-retained Single / Multiple Unit - Chairside Abutment ModificationSingle-tooth Screw-retained - Custom Cast Abutment (Hexed)Single-tooth Cement-retained - Laboratory Prepared AbutmentMultiple-unit Screw-retained - Custom Cast Abutments (Non-hexed)Multiple-unit Cement-retained - Laboratory Prepared AbutmentsBall Abutment Overdenture - Existing Denture, Chairside Pick-upBall Abutment Overdenture - New DentureBar Overdenture - Screw-retained Implant or Abutment-level Cast BarBar Overdenture - Screw-retained Laser Welded Bar414753596369737785shop online at www.biohorizons.com40
CEMENT-RETAINED SINGLE / MULTIPLE UNITCHAIRSIDE ABUTMENT MODIFICATION3inOneAbutmentAngledAbutmentCeramicAbutmentPEEK TemporaryAbutmentNarrowAbutmentAngled EstheticAbutmentStraight EstheticAbutment(3mm buccal)Straight EstheticAbutmentAbutment ScrewPackaged with alltwo-piece abutmentsTools needed.050” (1.25mm)Hex Driver.050” Hex Driver(long).050” Hex Driver(regular)30 NcmTorque WrenchHandWrenchImplant AnalogHandleParts shown are for the 4.5mm prosthetic platform (3.5mm and 5.7mm platforms are not shown). Please refer to theTapered <strong>Internal</strong> Catalog & Surgical <strong>Manual</strong> (L0603) or the <strong>Internal</strong> / Single-stage Product Catalog (ML0115) for completecomponent ordering information including part dimensions.41shop online at www.biohorizons.com
CEMENT-RETAINED SINGLE / MULTIPLE UNITClinical 1 - Remove healing abutment and seat selected abutmentRemove the Healing Abutment from the implant with the .050” (1.25mm)Hex Driver. Make sure the implant prosthetic platform is free of boneand soft tissue.Place the selected abutment onto the implant and hand-tighten theAbutment Screw with the .050” (1.25mm) Hex Driver.Take a radiograph along the long axis of the implant to ensure theabutment is seated completely on the implant.Helpful HintWhen placing multiple abutments on implants, remove one HealingAbutment at a time, replacing it immediately with an abutment. Thisreduces the likelihood of soft tissue collapsing onto the implant.Work from the posterior to the anterior.Clinical 2 - Mark required adjustmentsCheck for inter-occlusal dimension and angulations. Mark requiredmodifications for vertical clearance and gingival contours.Clinical 3 - Replace healing abutmentRemove the abutment and immediately replace the Healing Abutmentonto the implant to prevent soft tissue migration over the implant.shop online at www.biohorizons.com42
CEMENT-RETAINED SINGLE / MULTIPLE UNITClinical 4 - Modify abutmentPlace the abutment onto the appropriate Analog Handle. Modify theabutment using carbide burs, cut-off disks or heatless stone wheels. Adiamond bur may be used to define the margins.Create an axial groove to indicate the buccal surface to assist re-indexingthe abutment in the mouth. If the flat of the abutment is removed duringthe preparation, a new anti-rotational feature must be defined on theabutment.IMPORTANTWhen preparing a margin on an abutment for cement retention it is important to respect the soft tissue contours rather thanthe pre-defined margin of the abutment. In some cases the pre-defined margin on the abutment will be too far below the softtissue to allow easy seating of the crown and removal of excess cement from the sulcus. In these instances the abutment must bemodified so that the margin is 0.5mm to 1mm subgingival in the esthetic zone and at the level of the gingiva in non-esthetic areas.Below are three examples of margin placement on a 4.5mm platform 3inOne Abutment.Clinical 5 - Replace abutmentRemove the Healing Abutments from the implants with the .050”(1.25mm) Hex Driver. Make sure the implant prosthetic platform is freeof bone and soft tissue. Irrigate the internal thread connection of theimplant and dry. Replace the modified abutment in the patient’s mouth.Take a radiograph along the long axis of the implant to ensure theabutment is seated completely on the implant. Retighten the AbutmentScrew to 30 Ncm torque. Use counter-torque by grasping the abutmentwith the Abutment Clamp. A carbide bur in a high-speed handpiece canbe used to make minor intra-oral modifications. A diamond bur may beused to define the margins. Copious irrigation should be used.43shop online at www.biohorizons.com
CEMENT-RETAINED SINGLE / MULTIPLE UNITFill the access hole in the abutment with a resilient material of choice.This allows easy access to the Abutment Screw in the future.Clinical 6 - Make an impressionSyringe light or medium-bodied impression material around abutment.Use medium or heavy-bodied impression material in the tray. Make a fullarch standard crown & bridge impression.Retraction cord or injectable retraction medium may be necessary torecord the margins prepared on the abutment.Prepare and cement provisional crown with technique and material ofchoice.Clinical 7 - Place provisional crownSend to Lab• Impression• Bite registration• Opposing model or impressionPour a working model in minimal expansion, high hardness die stoneand articulate according to standard laboratory procedures.Lab 8 - Pour working castCreate a wax coping/framework for the crown following conventionallaboratory procedures.Lab 9 - Wax on modelshop online at www.biohorizons.com44
CEMENT-RETAINED SINGLE / MULTIPLE UNITLab 10 - Sprue, invest and castSprue, invest and cast the coping/framework according to routinelaboratory procedures. A noble or high noble alloy is required.Lab 11 - Divest, fit and finishDivest, fit and finish the cast coping/framework following conventionallab techniques.Seat the finished coping/framework onto the working model and adjustas necessary.The coping/framework may now be returned to the dentist for metaltry-in.Send to Clinician• Metal coping• Working modelClinical 12 - Metal coping try-inSanitize coping (per standard clinical procedure). Remove provisionalprosthesis from the prepared abutment. Make sure the abutment andmargins are free of all temporary cement. Re-torque the Abutment Screwto 30 Ncm using a calibrated Torque Wrench and the .050” (1.25mm)Hex Driver.Try in the metal coping/framework. Verify fit and margins. Adjust asnecessary. Return to lab. Reseat provisional prosthesis.Send to Lab• Metal coping• Shade• Working modelshop online at www.biohorizons.com45
CEMENT-RETAINED SINGLE / MULTIPLE UNITLab 13 - Fabricate crownPrepare coping/framework to receive the opaque layer according toroutine lab procedures. Apply veneer material and finish. Polish metalmargins as routine. Return to clinician for patient delivery.Send to Clinician• Final crown• Working modelClinical 14 - Remove temporarySanitize the final prosthesis (per standard clinical procedure). Removethe provisional prosthesis. Make sure the abutment and margins are freeof all temporary cement.Clinical 15 - Final crown deliverySeat the crown and/or bridge on the modified abutment. Confirm fitand contour. Check and modify occlusion if necessary.Place a small amount of cement of choice around the inside margin of thecrown or bridge. Soft-access cement may be used for future retrievability.Seat the crown or bridge. Remove all excess cement from sulcus area.Take an x-ray for final prosthesis delivery records. The patient shouldreceive oral hygiene instructions prior to release.shop online at www.biohorizons.com46
SINGLE-TOOTH SCREW RETAINEDCUSTOM CAST ABUTMENT (HEXED)Abutment ScrewPackaged with alltwo-piece abutmentsCustom CastAbutment,HexedHelpful HintCustom Castable Gold Alloy Specifications• Melting range 1400-1490°C (2552-2714° F)• Coefficient of thermal expansion 12.45 x 10⁻⁶ in/in°C measured between25°C and 500°C• Vickers Hardness HV5 205• Yield Strength (.2% offset) 83K psi minimum• Ultimate Tensile Strength 92K psi minimum• Composition: 60% Gold, 19% Platinum, 20% Palladium, 1% IridiumTools needed.050” (1.25mm)Hex Driver30 NcmTorque Wrench.050” Hex Driver(long)HandWrench.050” Hex Driver(regular)Parts shown are for the 4.5mm prosthetic platform (3.5mm and 5.7mm platforms are not shown). Please refer to theTapered <strong>Internal</strong> Catalog & Surgical <strong>Manual</strong> (L0603) or the <strong>Internal</strong> / Single-stage Product Catalog (ML0115) for completecomponent ordering information including part dimensions.47shop online at www.biohorizons.com
SINGLE-TOOTH SCREW RETAINEDLab 1 - Pour working castFollow the steps for creating an Implant-level Stone Model (Hexed) usingeither the Indirect Transfer method (pages 17-20) or the Direct Pick-upmethod (pages 21-24).Lab 2 - Seat the custom cast abutmentSeat the Custom Cast Abutment (Hexed) onto the Implant Analog inthe working cast.Hand-tighten the Abutment Screw with the .050” (1.25mm) HexDriver, Long.Mark required modification needed to provide adequate room fordesired prosthesis.Lab 3 - Modify custom cast abutmentModify the plastic sleeve of the abutment with a cutting disk for correctvertical and interproximal clearances.shop online at www.biohorizons.com48
SINGLE-TOOTH SCREW RETAINEDLab 4 - Fabricate patternUse wax and/or acrylic burnout resin to incorporate the modified CustomCast Abutment into the pattern. Final contours of the pattern may bebuilt up with crown & bridge wax.Lab 5 - Prepare and sprue the frameworkSprue according to normal laboratory procedures.Apply a thin layer of wax or burnout resin at the junction of the premachinedgold portion of the abutment and the plastic sleeve to ensurea smooth casting.Lab 6 - Investing and castingInvest and cast the coping pattern in noble or high noble alloy accordingto manufacturer’s instructions.Divest, fit and finish the casting following conventional laboratorytechniques. Redefine the screw access hole within the casting with areamer as needed.IMPORTANTWhen divesting and casting, it is important not to sandblast theimplant / abutment interface. Doing so could result in a poor fitbetween the abutment and implant.Mounting the custom abutment onto the appropriate Analog Handleduring this step can prevent distortion of the implant / abutmentinterface.shop online at www.biohorizons.com49
SINGLE-TOOTH SCREW-RETAINEDLab 7 - Finish copingConfirm the fit of the coping to the implant on the working model. Returnthe coping and the Abutment Screw to the clinician for patient try-in.Send to Clinician• Metal coping• Abutment Screw• Working modelClinical 8 - Remove healing abutmentSanitize the coping (per standard clinical procedure). Remove the HealingAbutment from the implant with the .050” (1.25mm) Hex Driver. Makesure the prosthetic platform is free of bone and soft tissue.Clinical 9 - Coping try-inPlace the custom coping onto the implant and hand-tighten theAbutment Screw with the .050” (1.25mm) Hex Driver (Regular or Long,as needed). Take a radiograph along the long axis of the implant toensure the abutment is seated completely on the implant. Confirm fitand contour, assuring there is adequate space for the veneer material.Adjust as necessary. Remove the coping from the implant and replacethe Healing Abutment with the .050” (1.25mm) Hex Driver. Return thecoping to the lab.Send to Lab• Metal coping• Abutment Screw• Working model• Shadeshop online at www.biohorizons.com50
SINGLE-TOOTH SCREW-RETAINEDLab 10 - Finish custom crownPrepare the custom coping to receive the opaque layer accordingto routine laboratory procedures. Apply veneer material and finishaccording to manufacturer’s specification. Polish any metal margins as isroutine. Return to clinician.Send to Clinician• Final prosthesis• Abutment Screw• Working modelClinical 11 - Deliver final crownSanitize the crown and Abutment Screw (per standard clinicalprocedure). Remove the Healing Abutment with the .050” (1.25mm)Hex Driver. Make sure the implant prosthetic platform is free of boneand soft tissue. Place the custom screw-retained crown onto the implantwith the Abutment Screw using the .050” (1.25mm) Hex Driver (Regularor Long, as needed). Hand-tighten. Take a radiograph along the longaxis of the implant to ensure the abutment is seated completely on theimplant. Confirm fit, contour and occlusion of the crown and make anyadjustments necessary. Torque the Abutment Screw to 30 Ncm witha calibrated torque wrench and the .050” (1.25mm) Hex Driver. Usecounter-torque by grasping the crown with the Abutment Clamp.Clinical 12 - Fill the access holePlace resilient material of choice into the screw access channel. Thisallows easy access to the Abutment Screw in the future. Fill the remainderof the channel with composite resin material of choice. Take an x-ray forfinal prosthesis delivery records. The patient should receive oral hygieneinstructions prior to release.shop online at www.biohorizons.com51
NOTESshop online at www.biohorizons.com52
SINGLE-TOOTH CEMENT-RETAINEDLABORATORY PREPARED ABUTMENT3inOneAbutmentAngledAbutmentCeramicAbutmentPEEK TemporaryAbutmentNarrowAbutmentAngled EstheticAbutmentStraight EstheticAbutment(3mm buccal)Straight EstheticAbutmentAbutment ScrewPackaged with alltwo-piece abutmentsTools needed.050” (1.25mm)Hex Driver.050” Hex Driver(long).050” Hex Driver(regular)30 NcmTorque WrenchHandWrenchImplant AnalogHandleParts shown are for the 4.5mm prosthetic platform (3.5mm and 5.7mm platforms are not shown). Please refer to theTapered <strong>Internal</strong> Catalog & Surgical <strong>Manual</strong> (L0603) or the <strong>Internal</strong> / Single-stage Product Catalog (ML0115) for completecomponent ordering information including part dimensions.53shop online at www.biohorizons.com
S I N G L E - T O O T H C E M E N T - R E T A I N E DSINGLE-TOOTH CEMENT-RETAINEDLab 1 - Working castFollow the steps for creating an Implant-level Stone Model (Hexed) usingeither the Indirect Transfer method (pages 17-20) or the Direct Pick-upmethod (pages 21-24).Lab 2 - Abutment modificationSeat the selected abutment, engaging the hex of the Implant Analogon the mounted working cast. Hand-tighten the Abutment Screw withthe .050” (1.25mm) Hex Driver. Evaluate inter-occlusal dimensions andangulations. Mark the abutment for the required vertical reduction andgingival contour.Lab 3 - Finish copingRemove the marked abutment from the working cast and mount onthe appropriate Analog Handle using the Abutment Screw. Modify theabutment using carbide burs, cut-off disks or heatless stone wheels. Adiamond bur may be used to define the margins.Create an axial groove to indicate the buccal surface to assist re-indexingabutment on the working model and in the mouth.An anti-rotational feature must be defined on the abutment.shop online at www.biohorizons.com54
SINGLE-TOOTH CEMENT-RETAINEDLab 4 - Abutment modificationReturn the modified abutment to the mounted working cast and makefinal adjustments. A diamond bur may be used to modify and finessemargins.IMPORTANTWhen preparing a margin on an abutment for cement retention it is important to respect the soft tissue contours rather thanthe pre-defined margin of the abutment. In some cases the pre-defined margin on the abutment will be too far below the softtissue to allow easy seating of the crown and removal of excess cement from the sulcus. In these instances the abutment mustbe modified so that the margin is 0.5mm to 1mm subgingival in the esthetic zone and at the level of the gingiva in non-estheticareas. Below are three examples of margin placement on a 4.5mm platform 3inOne Abutment.55shop online at www.biohorizons.com
SINGLE-TOOTH CEMENT-RETAINEDLab 5 - WaxingCreate a wax coping for the crown on the modified abutment followingroutine crown & bridge procedures.Lab 6 - Sprue, invest and castSprue, invest and cast the coping pattern in high noble alloy according tomanufacturer’s instructions.Lab 7 - Finish castingDivest, fit and finish the cast coping following conventional laboratorytechniques.Seat the finished coping onto the modified abutment on the workingcast.Send to Clinician• Metal coping• Abutment and Abutment Screw• Working modelshop online at www.biohorizons.com56
SINGLE-TOOTH CEMENT-RETAINEDClinical 8 - Patient try-inSanitize modified abutment and coping (per standard clinical procedure).Remove the provisional restoration or Healing Abutment from thepatient’s mouth with the .050” (1.25mm) Hex Driver. Make sure theimplant prosthetic platform is free of bone and soft tissue.Place the modified abutment onto the implant and hand-tighten theAbutment Screw with the .050” (1.25mm) Hex Driver. Take a radiographalong the long axis of the implant to ensure the abutment is seatedcompletely on the implant. Seat the finished casting on the abutmentand verify fit and contour. Make adjustments as necessary. Return thecasting to the lab for completion.Send to Lab• Metal coping• Abutment and Abutment Screw• Working model• ShadeLab 9 - Finish castingSeat the finished coping onto the modified abutment on the workingcast. Prepare the coping to receive the opaque layer according to routinelaboratory procedures.Apply the veneer material to the coping and finish according to routinelaboratory procedures. Polish any metal margins as necessary. Seat thefinished crown on the working cast and return to the clinician for patientdelivery.Send to Clinician• Finished crown• Abutment and Abutment Screw• Working modelshop online at www.biohorizons.com57
SINGLE-TOOTH CEMENT-RETAINEDClinical 10 - Seat the final abutmentSanitize modified abutment and crown (per standard clinical procedure).Remove the Healing Abutment or provisional prosthesis from the implantwith the .050” (1.25mm) Hex Driver. Make sure the implant prostheticplatform is free of bone and soft tissue.Irrigate the internal thread connection of the implant and dry.Place the modified abutment and Abutment Screw onto the implant withthe .050” (1.25mm) Hex Driver. Hand-tighten.Take a radiograph along the long axis of the implant to ensure theabutment is seated completely on the implant. If the abutment is seatedcorrectly, torque the Abutment Screw to 30 Ncm with a calibrated TorqueWrench and the .050” (1.25mm) Hex Driver. Apply counter-torque bygrasping the abutment with the Abutment Clamp.Clinical 11 - Cement the final crownFill the screw access hole in the abutment with a resilient materialof choice. This allows for future access to the Abutment Screw ifnecessary.Try in crown to confirm fit and contour. Check and modify occlusion ifnecessary.Place a small amount of the cement of choice around the inside marginof the crown. Soft-access cement may be used for future retrievability.Seat the crown. Remove all excess cement from sulcus area.Take an x-ray for final prosthesis delivery records. The patient shouldreceive oral hygiene instructions prior to release.shop online at www.biohorizons.com58
MULTIPLE-UNIT SCREW-RETAINEDCUSTOM CAST ABUTMENTS (NON-HEXED)Abutment ScrewPackaged with alltwo-piece abutmentsCustom CastAbutment,Non-hexedHelpful HintCustom Castable Gold Alloy Specifications• Melting range 1400-1490°C (2552-2714° F)• Coefficient of thermal expansion 12.45 x 10⁻⁶ in/in°C measured between25°C and 500°C• Vickers Hardness HV5 205• Yield Strength (.2% offset) 83K psi minimum• Ultimate Tensile Strength 92K psi minimum• Composition: 60% Gold, 19% Platinum, 20% Palladium, 1% IridiumTools needed.050” (1.25mm)Hex Driver30 NcmTorque WrenchHandWrench.050” Hex Driver(long).050” Hex Driver(regular)Parts shown are for the 4.5mm prosthetic platform (3.5mm and 5.7mm platforms are not shown). Please refer to theTapered <strong>Internal</strong> Catalog & Surgical <strong>Manual</strong> (L0603) or the <strong>Internal</strong> / Single-stage Product Catalog (ML0115) for completecomponent ordering information including part dimensions.59shop online at www.biohorizons.com
MULTIPLE-UNIT SCREW-RETAINEDLab 1 - Pour working castFollow the steps for creating an Implant-level Stone Model using eitherthe Indirect Transfer method (pages 17-20) or the Direct Pick-up method(pages 21-24).Helpful HintThe use of the Direct Pick-up Copings (Non-hexed)is strongly recommended when there is significantdivergence (angulation) of the implants. Failure to doso may make it difficult to remove the impression fromthe patient’s mouth.Lab 2 - Place abutments, mark and modifySeat the selected Custom Cast Abutments (Non-hexed) onto the ImplantAnalogs in the working cast. Hand-tighten the Abutment Screws withthe .050” (1.25mm) Hex Driver, Long.Determine modifications needed to provide adequate room for thefabrication of bridge. Modify the plastic sleeves of the abutments with acutting disk for correct vertical and interproximal clearances.Lab 3 - Fabricate patternUse wax and/or acrylic burnout resin to incorporate the modified CustomCast Abutments into the pattern. Final contours of the pattern may bebuilt up with crown & bridge wax.shop online at www.biohorizons.com60
MULTIPLE-UNIT SCREW-RETAINEDLab 4 - Sprue, invest and castSprue according to normal laboratory procedures. Apply a thin layer ofwax or burnout resin at the junction of the machined gold copings andthe plastic sleeves to ensure a smooth casting.Invest and cast the bridge pattern in noble or high noble alloy accordingto manufacturer’s instructions.IMPORTANTWhen divesting and casting, it is important not to sandblast theimplant / abutment interfaces. Doing so could result in a poor fitbetween the framework and implants.Mounting Implant Analogs on the bridge casting during this step canprevent distortion of the implant / framework interface.Lab 5 - Finish frameworkDivest, fit and finish the casting following conventional laboratorytechniques. Redefine the screw access holes within the casting with areamer as necessary. Confirm the fit of the bridge framework to theimplants in the working model.Send to Clinician• Metal framework• Abutment Screws• Working modelClinical 6 - Patient try-inSanitize the bridge framework (per standard clinical procedure). Removethe Healing Abutments from the implants with the .050” (1.25mm) HexDriver (Regular or Long, as needed). Make sure the implant prostheticplatforms are free of bone and soft tissue. Irrigate the internal threadconnection of the implants and dry.Secure the custom bridge framework onto the implants with theAbutment Screws using the .050” (1.25mm) Hex Driver. Hand-tighten.Take a radiograph along the long axis of the implants to ensure theframework is seated completely on the implants.Confirm a passive fit of the framework. Remove framework and returnto laboratory for veneering.Send to Lab• Metal framework• Abutment Screws• Working model• Shadeshop online at www.biohorizons.com61
MULTIPLE-UNIT SCREW-RETAINEDLab 7 - Apply porcelainPrepare the bridge framework to receive the opaque layer according toroutine laboratory procedures.Apply veneer material to the framework and finish according to routinelaboratory procedures. Polish any metal margins as is routine.Seat the finished bridge onto the implants on the working cast and sendto clinician for patient delivery.Send to Clinician• Bridge• Abutment Screws• Working modelLab 8 - Seat bridgeSanitize the finished bridge (per standard clinical procedure).Remove the Healing Abutments from the implants with the .050”(1.25mm) Hex Driver (Regular or Long, as needed). Make sure theimplant prosthetic platforms are free of bone and soft tissue.Irrigate the internal thread connection of the implants and dry.Secure the bridge onto the implants with the Abutment Screws with the.050” (1.25mm) Hex Driver. Hand-tighten.Clinical 9 - Deliver final bridgeTake a radiograph along the long axis of the implants to ensure thebridge is seated completely on the implants. Confirm a passive fit of thebridge.Torque Abutment Screws to 30 Ncm with the .050” (1.25mm) Hex Driverand a calibrated Torque Wrench.Place resilient material of choice into the screw access channel. Thisallows easy access to the Abutment Screws in the future. Fill theremainder of the channels with composite resin material of choice. Takean x-ray for final prosthesis delivery records. The patient should receiveoral hygiene instructions prior to release.shop online at www.biohorizons.com62
MULTIPLE-UNIT CEMENT-RETAINEDLABORATORY PREPARED ABUTMENTS3inOneAbutmentAngledAbutmentCeramicAbutmentNarrowAbutmentAngled EstheticAbutmentStraight EstheticAbutment(3mm buccal)Straight EstheticAbutmentAbutment ScrewPackaged with alltwo-piece abutmentsTools needed.050” (1.25mm)Hex DriverHandWrench.050” Hex Driver(long).050” Hex Driver(regular)30 NcmTorque WrenchImplant Analog HandleParts shown are for the 4.5mm prosthetic platform (3.5mm and 5.7mm platforms are not shown). Please refer to theTapered <strong>Internal</strong> Catalog & Surgical <strong>Manual</strong> (L0603) or the <strong>Internal</strong> / Single-stage Product Catalog (ML0115) for completecomponent ordering information including part dimensions.63shop online at www.biohorizons.com
MULTIPLE-UNIT CEMENT-RETAINEDLab 1 - working castFollow the steps for creating an Implant-level Stone Model (Hexed) usingeither the Indirect Transfer method (pages 17-20) or the Direct Pick-upmethod (pages 21-24).Lab 2 - Place appropriate abutments and markSeat the selected abutments, engaging the hex’s of the Implant Analogson the mounted working cast.Hand-tighten the Abutment Screws with the .050” (1.25mm) Hex Driver.Evaluate inter-occlusal dimensions and angulations. Mark the abutmentsfor required vertical reduction and gingival contour.Lab 3 - Modify abutmentsRemove the marked abutments and screws from the working cast andmount on the appropriate Analog Handle.Modify the abutments using carbide burs, cut-off disks or heatless stonewheels.A diamond bur may be used to define the margins.Create an axial groove to indicate the buccal surface to assist re-indexingthe abutment in the mouth.shop online at www.biohorizons.com64
MULTIPLE-UNIT CEMENT-RETAINEDLab 4 - Abutment modificationReplace the modified abutments and screws on the mounted workingcast and make final adjustments. A diamond bur may be used to definethe margins.IMPORTANTWhen preparing a margin on an abutment for cement retention it is important to respect the soft tissue contours rather thanthe pre-defined margin of the abutment. In some cases the pre-defined margin on the abutment will be too far below the softtissue to allow easy seating of the crown and removal of excess cement from the sulcus. In these instances the abutment must bemodified so that the margin is 0.5mm to 1mm subgingival in the esthetic zone and at the level of the gingiva in non-esthetic areas.Below are three examples of margin placement on a 4.5mm platform 3inOne Abutment.65shop online at www.biohorizons.com
MULTIPLE-UNIT CEMENT-RETAINEDLab 5 - Create wax frameworkCreate a wax framework for the bridge on the modified abutmentsfollowing routine crown & bridge procedures.Lab 6 - Sprue, invest and castSprue, invest and cast thebridge framework according toroutine laboratory procedures.A noble or high noble alloy isrecommended.Lab 7 - Finish castingDivest, fit and finish the cast framework following conventional laboratorytechniques.Care should be taken to insure a passive fit of the framework on themodified abutments. Send the working cast, the modified abutmentsand the framework to the clinician for a metal framework try-in. Thedentist should confirm the passive fit of the framework prior to theapplication of the veneering material.Send to Clinician• Metal framework• Modified abutments and screws• Working modelshop online at www.biohorizons.com66
MULTIPLE-UNIT CEMENT-RETAINEDClinical 8 - Try in modified abutments and frameworkSanitize the modified abutments and the bridge framework (per standardclinical procedure). Remove the Healing Abutments from the implantswith the .050” (1.25mm) Hex Driver. Make sure the implant prostheticplatforms are free of bone and soft tissue. Irrigate the internal threadconnection of the implant and dry.Place the modified abutments and Abutment Screws onto the implantswith the .050” (1.25mm) Hex Driver. Hand-tighten. Take a radiographalong the long axis of the implants to ensure the abutments are seatedcompletely on the implants.Try in bridge framework. Confirm passive fit and that no additionaladjustments are necessary. Remove bridge framework. Remove themodified abutments with the .050” (1.25mm) Hex Driver, one at a time,replacing them with the Healing Abutments.Send to Lab• Metal framework• Modified abutments and screws• Working model• ShadeLab 9 - Final castingSeat the finished framework onto the modified abutments on the workingcast.Prepare the framework to receive the opaque layer according to routinelaboratory procedures.Veneer material is applied to the framework and finished according toroutine laboratory procedures.Polish any metal margins as is routine.Seat the finished bridge on the prepared abutments on the working castand send to clinician for patient delivery.Send to Clinician• Finished prosthesis• Modified abutments and screws• Working modelshop online at www.biohorizons.com67
MULTIPLE-UNIT CEMENT-RETAINEDClinical 10 - Seat the modified abutmentsSanitize prepped abutments and bridge (per standard clinical procedure).Remove the Healing Abutments or provisional prosthesis from theimplant with the .050” (1.25mm) Hex Driver. Make sure the implantprosthetic platforms are free of bone and soft tissue. Irrigate the internalthread connection of the implants and dry.Place the modified abutments and Abutment Screws onto the implantswith the .050” (1.25mm) Hex Driver. Hand-tighten. Take a radiographalong the long axis of the implants to ensure the abutments are seatedcompletely on the implants.If the abutments are seated correctly, torque the Abutment Screws withthe 30 Ncm Torque Wrench and .050” (1.25mm) Hex Driver. Applycounter-torque by grasping the abutments with the Abutment Clamp.Clinical 11 - Cement the final bridgeFill the screw access holes in the abutment with a resilient materialof choice. This allows for future access to the Abutment Screws ifnecessary.Try in crown to confirm fit and contour. Check and modify occlusion ifnecessary.Place a small amount of the cement of choice around the inside marginof the bridge. Soft-access cement may be used for future retrievability.Seat the bridge. Remove all excess cement from sulcus area.Take an x-ray for final prosthesis delivery records. The patient shouldreceive oral hygiene instructions prior to release.shop online at www.biohorizons.com68
BALL ABUTMENT OVERDENTUREEXISTING DENTURE, CHAIRSIDE PICK-UPTwo attachment options are available for securing dentures with Ball Abutments: the BallAttachment System and the O-ring Attachment System. The Ball Attachment System offers theadvantages of a greater degree of angulation correction and multiple options for insert retention.The O-Ring Attachment System offers a lower profile for cases with limited vertical height.The case demonstrated in this section shows the Ball Attachment System. For procedures withthe O-Ring Attachment system follow the same procedure, substituting the Encapsulators for theAttachment Housings and the O-Rings for the Nylon Inserts.Ball Attachment SetO-Ring Attachment SetAttachmentHousingPositioningNylon InsertDirectional Rings*0°, 7° and 14°Processing O-RingRelative RetentionClinical NylonInsertsClinical O-RingO-Ring EncapsulatorElasticExtra SoftSoftStandard (firmest)Tools neededHandWrenchInsert Seating Tool*30 NcmTorque Wrench.050” Hex Driver(regular)Reamer*Parts shown are for the 4.5mm prosthetic platform (3.5mm and 5.7mm platforms are not shown). Please refer to theTapered <strong>Internal</strong> Catalog & Surgical <strong>Manual</strong> (L0603) or the <strong>Internal</strong> / Single-stage Product Catalog (ML0115) for completecomponent ordering information including part dimensions.*Manufactured by Rhein83 (www.rhein83usa.com).69shop online at www.biohorizons.com
BALL ABUTMENT OVERDENTUREClinical 1 - Seat ball abutmentsRemove the Healing Abutment with the .050” (1.25mm) Hex Driver.Make sure the implant prosthetic platform is free of bone and soft tissue.Irrigate the internal thread connection of the implants and dry.Place the selected Ball Abutment onto the implants using the .050”(1.25mm) Hex Driver.Take a radiograph along the long axis of the implants to ensure theabutments are seated completely on the implants.Torque the Ball Abutments to 30 Ncm with the .050” (1.25mm) HexDriver and a calibrated Torque Wrench.Clinical 2 - Place attachment housing assemblesSeat the Black Positioning Insert into the Attachment Housing withthe Insert Seating Tool*. Place the assembled housings onto the BallAbutments. Rotate the housings to create a parallel path of draw andstabilize with wax. Directional Rings* are available (set of three - 0°, 7°,14°) to aid in arranging and stabilizing the housings.*Manufactured by Rhein83 (www.rhein83usa.com).Clinical 3 - Block out undercutsBlock out all undercuts between the housings and the soft tissue withmaterial of choice.IMPORTANTIf undercuts are not blocked out, the risk of locking the denture onto theBall Abutments during the pick-up process is extremely high.shop online at www.biohorizons.com70
BALL ABUTMENT OVERDENTUREClinical 4 - Mark and relieve denturePlace a transferable mark on top of each ball-top and seat the denturein the patient’s mouth to determine the ideal location of the AttachmentHousings in the denture. Relieve the denture to accommodate thehousings without contact between them and the denture.Small vent holes may be made in the lingual surface of the denture toallow excess acrylic to escape during the pick-up procedure.Clinical 5 - Housing assembly pick-upPlace a small amount of autopolymerizing acrylic resin or light-curingcomposite resin on top of the dry Attachment Housings and in therelieved areas of the denture.Position the denture in the mouth and have the patient close into lightcentric occlusion. Allow the acrylic resin to set per manufacturer’sinstructions.Carefully remove the denture with the incorporated housings. Repairany voids around the housings and polish.shop online at www.biohorizons.com71
BALL ABUTMENT OVERDENTUREClinical 6 - Place clinical inserts and seat final dentureSeat the denture with the Black Positioning Inserts still in place to gaugeinitial retention. If the retention is acceptable, the Black PositioningInserts may be worn clinically for a period of time determined by theclinician.When patient is ready for greater retention, remove the Black PositioningInserts. Place ONE Clinical Nylon Insert of choice into a positionedhousing with the Insert Seating Tool*.Seat the denture, engaging the Ball Abutment. Check retention bysnapping the denture on and off the Ball Abutment in the patient’smouth.Decrease the retention, if necessary, by inserting the Reamer* into theinsert and turning clockwise. Care should be taken not to over-adjust.When the desired retention is achieved, proceed to the second insertusing the same technique.Insert the finished denture in the patient’s mouth, engaging the BallAbutments.Make occlusal or tissue adjustments as necessary. Instruct the patient oninsertion and removal of the prosthesis and oral hygiene maintenance.Clinical Nylon InsertsRelative RetentionElasticExtra SoftSoftStandard (firmest)*Manufactured by Rhein83 (www.rhein83usa.com).shop online at www.biohorizons.com72
BALL ABUTMENT OVERDENTURENEW DENTURETwo attachment options are available for securing dentures with Ball Abutments: the BallAttachment System and the O-ring Attachment System. The Ball Attachment System offers theadvantages of a greater degree of angulation correction and multiple options for insert retention.The O-Ring Attachment System offers a lower profile for cases with limited vertical height.The case demonstrated in this section shows the Ball Attachment System. For procedures withthe O-Ring Attachment system follow the same procedure, substituting the Encapsulators for theAttachment Housings and the O-Rings for the Nylon Inserts.Ball Attachment SetO-Ring Attachment SetAttachmentHousingPositioningNylon InsertProcessing O-RingRelative RetentionClinical NylonInsertsClinical O-RingO-Ring EncapsulatorElasticExtra SoftSoftStandard (firmest)Tools neededHandWrenchInsert Seating Tool*30 NcmTorque Wrench.050” Hex Driver(regular)Reamer*Parts shown are for the 4.5mm prosthetic platform (3.5mm and 5.7mm platforms are not shown). Please refer to theTapered <strong>Internal</strong> Catalog & Surgical <strong>Manual</strong> (L0603) or the <strong>Internal</strong> / Single-stage Product Catalog (ML0115) for completecomponent ordering information including part dimensions.*Manufactured by Rhein83 (www.rhein83usa.com).73shop online at www.biohorizons.com
BALL ABUTMENT OVERDENTURELab 1 - Pour working castFollow the steps for the Ball Abutment impression technique and modelfabrication on pages 36-38.Lab 2 - Block out undercutsPlace the Black Positioning Insert in the Attachment Housing with theInsert Seating Tool*.Seat the assembled housings onto the Ball Abutments. Rotate thehousings to create a parallel path of draw. Stabilize the housings andblock out the undercuts with material of choice.*Manufactured by Rhein83 (www.rhein83usa.com).Lab 3 - Create stabilized baseplatePlace a sheet of light-curing baseplate material over the Cap AttachmentHousingsContour the material around the housings and the edentulous arch tofabricate a stabilized baseplate. Place a small amount of resin on thehousing and incorporate the housings into the stabilized baseplate.Create a wax occlusal rim on the baseplate and send assembly to theclinician for occlusal records.Send to Clinician• Baseplate with wax occlusal rim& incorporated housings/inserts• Working modelshop online at www.biohorizons.com74
BALL ABUTMENT OVERDENTUREClinical 4 - Bite registrationRemove the provisional prosthesis. Attach the baseplate and occlusalrim assembly to the Ball Abutments. Contour the occlusal rim and markthe midline and smile line. Record the vertical dimension of the occlusionwith a bite registration.Remove the baseplate and bite from the patient’s mouth and replace onthe working model.Select teeth and return to laboratory for the fabrication of a stabilizeddenture wax try-in.Send to Lab• Bite registration• Vertical dimension• Selected denture teeth• Working modelLab 5 - Denture set-upMount the working and opposing model on an articulator. Set dentureteeth on the stabilized baseplate and wax for try-in.Send to Clinician• Stabilized denture wax-up• Working modelClinical 6 - Wax try-inRe-torque the Ball Abutments to 30 Ncm with a calibrated TorqueWrench and the .050” (1.25mm) Hex Driver. Seat the denture try-in onthe Ball Abutments.Verify occlusion, esthetics and phonetics. Make necessary adjustments.Remove the denture wax try-in.Send to Lab• Denture wax-up• Working modelshop online at www.biohorizons.com75
BALL ABUTMENT OVERDENTURELab 7 - Process dentureProcess the denture using normal laboratory procedures. The BlackPositioning Inserts should be used throughout the entire process.Send to Clinician• Finished denture• Working modelClinical 8 - Deliver dentureSeat the denture with the Black Positioning Inserts still in place to gaugeinitial retention. If the retention is acceptable, the Black PositioningInserts may be worn clinically for a period of time determined by theclinician.When patient is ready for greater retention, remove the Black PositioningInserts. Place ONE Clinical Nylon Insert of choice into a positionedhousing with the Insert Seating Tool*.Seat the denture, engaging the Ball Abutment. Check retention bysnapping the denture on and off the Ball Abutment in the patient’smouth.Decrease the retention, if necessary, by inserting the Reamer* into theinsert and turning clockwise. Care should be taken not to over-adjust.When the desired retention is achieved, proceed to the second insertusing the same technique.Insert the finished denture in the patient’s mouth, engaging the BallAbutments. Make occlusal or tissue adjustments as necessary. Instructthe patient on insertion and removal of the prosthesis and oral hygienemaintenance.Clinical Nylon InsertsRelative RetentionElasticExtra SoftSoftStandard (firmest)*Manufactured by Rhein83 (www.rhein83usa.com).shop online at www.biohorizons.com76
BAR OVERDENTURE SCREW-RETAINEDABUTMENT-LEVEL CAST BARScrew (regular).Abutment for ScrewPlastic Coping.Abutment for ScrewCover Cap,Abutment for ScrewDirect Pick-up Coping.Abutment for ScrewAbutments for ScrewIMPLANT-LEVEL CAST BARDirect Coping,Non-hexedCustom CastAbutment,Non-hexedTools needed.050” (1.25mm)Hex DriverHandWrench30 NcmTorque Wrench.050” Hex Driver(regular)Hex Adapter,Abutment for ScrewParts shown are for the 4.5mm prosthetic platform (3.5mm and 5.7mm platforms are not shown). Please refer to theTapered <strong>Internal</strong> Catalog & Surgical <strong>Manual</strong> (L0603) or the <strong>Internal</strong> / Single-stage Product Catalog (ML0115) for completecomponent ordering information including part dimensions.77shop online at www.biohorizons.com
BAR OVERDENTURE SCREW-RETAINEDLab 2 - Fabricating a stabilized baseplate / occlusal rim / verification jigAssemble the appropriate diameter analog to the Direct Pick-up Copingwith the coping screw. Pour stone model following conventionallaboratory techniques.Place the direct pick-up copings on the model with the long copingscrews.Place a sheet of light-curing baseplate material around the direct pick-upcopings. Contour the material around the copings and posterior alongthe edentulous arch. This will be used to stabilized the wax rim later.Light-cure the material.Helpful HintABT2-3mmDo not extend the acrylic base tothe bottom of the coping. Keepclearance between 2-3mm fromthe bottom of the coping.Create a wax occlusal rim on the stabilized baseplate with ridges toallow access to the screws. Only two screws in the first cuspid areas areneeded to secure the assembly to the model.Index the occlusal rim to stabilize bite registration material used in nextstep.Send to Clinician• Base plate/occlusal rim mountedon master castshop online at www.biohorizons.com79
BAR OVERDENTURE SCREW-RETAINEDClinical 3 - Make the stabilized denture wax try-inRemove the healing components from the implants/abutments with the.050” (1.25mm) Hex Driver.Attach the baseplate and occlusal rim assembly to the implants/abutments with the short screws and finger-tighten with the .050” HexTool.Contour the occlusal rim and mark the midline and smile line. Record thevertical dimension of the occlusion with a bite registration.Remove the baseplate and bite from the patient’s mouth and reassembleon the working model with the screws. Replace the healing componentsonto the implants/abutments. Select teeth and return everything to thelaboratory for the fabrication of a stabilized denture wax try-in.Send to Lab• Tooth selection• Baseplate mounted on master cast• Bite registrationLab 4 - Mount working model on articulatorMount the working and opposing model on an articulator.Set denture teeth on the stabilized baseplate and wax for try-in.Access to the screws will be covered up by denture teeth. Create twoaccess holes lingual to the anterior teeth for stabilization at the patienttry-in.Send the stabilized denture wax-up to the dentist for patient try-in.Send to Clinician• Denture wax-up mounted on working castRemove the healing components from the implants/abutments with the.050” (1.25mm) Hex Driver. Seat the denture try-in onto the implants/abutments and place the screws through the two access holes in thewax-up. Hand-tighten.Clinical 5 - Denture try-inVerify occlusion, esthetics and phonetics. Make necessary adjustments,making new interocclusal records for a new set-up and try-in.Remove the denture wax try-in and replace the healing components.Replace the denture wax-up to the working model and secure.Send to Lab• Denture wax-up mounted on working castshop online at www.biohorizons.com80
BAR OVERDENTURE SCREW-RETAINEDLab 6 - Forming silicone putty matrixIndex the working model to allow for accurate repositioning of the labmatrix putty.Make a labial/occlusal matrix of the denture teeth in silicone putty torecord tooth position and labial borders of the prosthesis relative to theworking model.Lab 7 - Place abutmentsMount the desired burnout copings on the working model.Remove the teeth from the denture wax-up and place them into theirrespective locations in the silicon putty matrix. Lute them into positionwith sticky wax.Place the matrix with attached teeth onto the working model and useas a guide for modifying the copings and designing the bar within theconfines of the wax try-in.Lab 8 - Wax up barVerify attachment position, bar height and functional requirements.Design the overdenture bar using bar wax and/or a preformed pattern ofchoice, incorporating the copings within the bar pattern.Verify position of attachments with a surveyor and adjust as needed.shop online at www.biohorizons.com81
BAR OVERDENTURE SCREW-RETAINEDLab 9 - Sprue, cast and investSprue and invest the wax pattern per normal laboratory procedures.Cast the bar in a high noble alloy.Divest, finish and polish the bar. Refine the screw access holes within thecasting with the reamer as needed.Confirm a passive fit by placing the bar on the working model.Send the bar on the model to the clinician for try-in.Send to Clinician• Cast bar on working model• Short and long coping screwsIMPORTANTWhen divesting and casting, it is important not to sandblast the bar/ abutment or bar / implant interfaces. Doing so could result in apoor fit between the bar and the abutments or implants.Mounting the appropriate analogs on the bar casting during thisstep can prevent distortion of the interfaces.Helpful HintCustom Castable Gold Alloy Specifications• Melting range 1400-1490°C (2552-2714° F)• Coefficient of thermal expansion 12.45 x 10⁻⁶ in/in°C measured between25°C and 500°C• Vickers Hardness HV5 205• Yield Strength (.2% offset) 83K psi minimum• Ultimate Tensile Strength 92K psi minimum• Composition: 60% Gold, 19% Platinum, 20% Palladium, 1% IridiumClinical 10 - Optional - correct the master castPlace the cast bar on the implants and ascertain the passivity of fit. If thebar is not fitting passively, cut the bar and place back in the mouth.shop online at www.biohorizons.com82
BAR OVERDENTURE SCREW-RETAINEDClinical 11 - Make an impressionUse long impression screws to hold the sectioned bar in place. Modifya stock impression tray by creating screw access holes for the longimpression screws. Syringe light or medium-bodied impression materialaround the bar. Load the modified tray with medium or heavy-bodiedimpression material and seat in the mouth. Wipe impression materialoff the tip of the screws before it sets. After the material sets, removethe long screws and remove the impression. The bar will be picked upin the impressions.Clinical 12 - Assemble analogPlace analogs onto the bar in the impression by holding the analogsin place while inserting the screws through the access holes in theimpression tray. Hand-tighten.Send to Lab• Impression tray• Modified cast bar• Long screwsLab 13 - Correct non-passive barAfter the analogs have been set in stone, solder bar together to obtaina passive fit.Modify the denture as needed to fit the newly formed bar.shop online at www.biohorizons.com83
I M P L A N T / A B U T M EBAR N TOVERDENTURE - L E V E L CSCREW-RETAINEDA S T B A RLab 14 - Process dentureProcess the denture with the appropriate attachments according tonormal laboratory procedures. Return the denture and bar frameworkto the dentist for patient delivery.Send to Clinician• Finished denture• Bar• Short screws• Working modelClinical 15 - Seat final applianceRemove the Healing Abutments or Cover Caps from the implants/abutments with the .050” (1.25mm) Hex Driver. Make sure theprosthetic platforms are free of bone and soft tissue. Irrigate the internalthread connections and dry. Place the final cast bar and secure withthe appropriate screws using the .050” (1.25mm) Hex Driver. Handtighten.If the seating surface is subgingival, take an x-ray to insure thebar is seated completely. Torque the screws to 30 Ncm with the .050”(1.25mm) Hex Driver and a calibrated Torque Wrench.Insert the finished denture in the patient’s mouth, engaging theattachments. Make occlusal or tissue adjustments as necessary.Instruct the patient on insertion and removal of the prosthesis and oralhygiene maintenance.shop online at www.biohorizons.com84
BAR OVERDENTURE SCREW-RETAINEDIMPLANT-LEVEL, LASER WELDED BARAbutmentScrewDirect Coping,Non-hexedDirect CopingScrewTools / materials neededA working model fabricated via the ImplantlevelImpression, Open tray (Direct) Pick-upTechnique (see pages 21-24)..050” (1.25mm)Hex DriverHand Wrench.050” Hex Driver(long).050” Hex Driver(regular)30 NcmTorque WrenchParts shown are for the 4.5mm prosthetic platform (3.5mm and 5.7mm platforms are not shown). Please refer to theTapered <strong>Internal</strong> Catalog & Surgical <strong>Manual</strong> (L0603) or the <strong>Internal</strong> / Single-stage Product Catalog (ML0115) for completecomponent ordering information including part dimensions.85shop online at www.biohorizons.com
BAR OVERDENTURE SCREW-RETAINEDLab 1 - Working castFollow the steps for creating an Implant-level Impression and workingmodel using the Open Tray (Direct) Pick-up Technique (Non-hexed), seepages 21-24.IMPORTANTLaser-welding procedures allow the use of precision-machined titaniumparts to be used instead of castable components. This often results ina more passive-fitting bar. Use only a qualified, trained laser weldingdental lab.Lab 2 - Fabricating a verification barAttach the Direct Pick-up Copings to the Implant Analogs with theAbutment Screws. Remove the top section of the Direct Pick-up Copings.Laser weld the bar as prescribed, without attachments, to the modifiedDirect Pick-up Copings.Verify passive fit by removing all screws and reinserting a long screw in oneof the most distal copings. Hand-tighten with the .050” (1.25mm) HexDriver. Passive fit is verified if the remaining copings in the verificationsbar rest passively on the remaining implant analogs.IMPORTANTA verification bar is simply the final bar without attachments.Laser assembly provides the ability to modify the bar and configurethe attachments at any time during the fabrication process withoutthe risk of having to remake the bar. The attachments will be laserwelded onto the bar after a jaw relationship is established.Send to Clinician• Verification bar and baseplate• Working modelshop online at www.biohorizons.com86
BAR OVERDENTURE SCREW-RETAINEDClinical 3 - Verify accuracy of impression and bar passivityRemove the Healing Abutments from the implants with the .050”(1.25mm) Hex Driver. Make sure the prosthetic platforms are free ofbone and soft tissue.Place the framework (verification bar) onto the implants using theAbutment Screws and hand-tighten with the .050” (1.25mm) Hex Driver.Take a radiograph to ensure the framework is seated completely on theimplants.Confirm passive fit by removing the bar and reattaching to the most distalimplant with a single screw. Passive fit is verified if the remaining copingswithin the framework rest passively on the implants.Remove the framework, reattach to the working model and return to thelaboratory.Replace the Healing Abutments with the .050” (1.25mm) Hex Driver.Send to Lab• Passive bar (if not passive follow steps below)• Working modelClinical 4 - Correcting a non-passive framework (if required)If a bar framework does not fit passively, determine where the frameworkshould be cut and mark. Remove from the patient’s mouth and replacethe Healing Abutments on the implants. Replace bar on working modeland section the framework where necessary with a very thin separatingdisk and a high-speed handpiece. Remove the Healing Abutments andattach the sectioned framework to the implants with the AbutmentScrews and hand-tighten. Lute the sectioned framework together witha fast-setting autopolymerizing resin. Remove the sectioned, resinsecuredframework from the mouth. DO NOT reattach the frameworkto the working model. Return to the laboratory for laser assembly.Send to Lab• Sectioned and luted bar (DO NOT ATTACH BAR)• Working modelshop online at www.biohorizons.com87
BAR OVERDENTURE SCREW-RETAINEDLab 5 - Correcting the master castOnce a passive fit has been corrected in the mouth, the working modelmust be corrected.Remove the misaligned Implant Analogs from the working model, one ata time. When the framework rests passively on the remaining ImplantAnalogs; reattach the removed Implant Analogs to the framework. Seatthe framework on the model, securing the bar framework to the ImplantAnalogs that remained in the model. The reattached Analogs will besuspended within the hole created when they were removed from themodel. Soak the model in water. Carefully vibrate stone into the voidsaround the retentive undercuts of the Implant Analogs. Allow the stoneto set.Lab 6 - Laser weld correctionRemove the resin from the sectioned framework and clean each segmentof the bar. Return the framework to the corrected master cast and laserweldcorrections.Lab 7 - Fabricating a baseplate / occlusal rimPlace the retention clip of choice on the bar in the designated area.Block out the undercuts with wax. Adapt a sheet of light-cured baseplatematerial over the verification bar capturing the clip within the baseplatematerial. Contour the material around the bar and edentulous areas tocreate a stabilized baseplate. Create a wax occlusion rim on the stabilizedbaseplate. Send the verification bar assembly and baseplate to theclinician for fit verification and occlusal records.Send to Clinician• Verification bar and baseplate• Working modelshop online at www.biohorizons.com88
BAR OVERDENTURE SCREW-RETAINEDClinical 8 - Jaw relationshipRemove the Healing Abutments from the Implants with the .050”(1.25mm) Hex Driver. Place the framework onto the Implants with theAbutment Screws using the .050” (1.25mm) Hex Driver. Hand-tighten.Clip the baseplate and occlusal rim assembly to the bar. Contour theocclusal rim and mark the midline and smile line. Record the verticaldimension of the occlusion with a bite registration. Remove the baseplateand bite from the patient’s mouth. Remove the bar and reassemble onthe working model with the Abutment Screws. Replace the HealingAbutments onto the implants. Select teeth and return everything tolaboratory for the fabrication of a stabilized denture wax try-in.Send to Lab• Tooth selection• Occlusal rim• Working model• Bite records• BarLab 9 - Attachment configuration and processed denture baseMount the working and opposing model on an articulator. Laser-weldthe attachment of choice to the bar to support and retain the denture.Assemble the attachments on the bar and block out the undercuts inwax. Process an acrylic base capturing the retentive elements of theattachments. Trim and polish the borders. This is the final base for thedenture. Arrange the denture teeth in wax on the processed denturebase. Send the bar and set-up to the clinician for wax try-in.Send to Clinician• Denture base with selected teeth• Working modelshop online at www.biohorizons.com89
BAR OVERDENTURE SCREW-RETAINEDClinical 10 - Bar and prosthesis try-inSanitize bar and denture (per standard clinical procedure).Remove the Healing Abutments from the Implants with the .050”(1.25mm) Hex Driver.Seat the bar onto the Implants with the Abutment Screwsusing the .050” (1.25mm) Hex Driver. Hand-tighten.Insert the prosthesis into the patient’s mouth and engage theretention attachments on the bar. Evaluate fit, form and function.Adjust as necessary. Return wax denture and bar to the lab forfinal processing. Replace the Healing Abutments onto the Implantswith the .050” (1.25mm) Hex Driver.Clinical 11 - Deliver bar and dentureRemove the Healing Abutments or Cover Caps from the implants/abutments with the .050” (1.25mm) Hex Driver. Make sure theprosthetic platforms are free of bone and soft tissue. Irrigate theinternal thread connections and dry.Place the bar onto the Implants and secure with the Screws.Torque the Screws to 30 Ncm with the .050” (1.25mm) Hex Driverand a calibrated torque wrench.Insert the finished denture in the patient’s mouth, engaging theattachments. Make occlusal or tissue adjustments as necessary.Instruct the patient on insertion and removal of the prosthesis andoral hygiene maintenance.shop online at www.biohorizons.com90
ICON LEGENDSymbol descriptions for product labelingSingle use onlyREFLOTReference/article numberLot/batch numberUse before expirationdate (YYYY-MM)Manufacture date(YYYY-MM)Refer toInstructions for Use<strong>BioHorizons</strong> products carry the CE markand fulfill the requirements of the MedicalDevices Directive 93/42/EEC0473 EU Authorised RepresentativeQuality First InternationalLondon E7 0QY United KingdomTel. & Fax: +44-208-522-1937STERILE RNON-STERILESterile bygamma irradiationNon-sterile<strong>Prosthetic</strong> platformØ3.5mm <strong>Prosthetic</strong> PlatformRx OnlyCaution: Federal (USA)law restricts thesedevices to the sale,distribution and useby, or on the order of,a dentist or physician.Ø4.5mm <strong>Prosthetic</strong> PlatformØ5.7mm <strong>Prosthetic</strong> PlatformDisclaimer of Liability<strong>BioHorizons</strong> dental implants may only be used in conjunction with the associated original components and instruments according to<strong>BioHorizons</strong> Instructions for Use. Use of any non-<strong>BioHorizons</strong> products in conjunction with <strong>BioHorizons</strong> implants will void any warrantyor any other obligation, expressed or implied, of <strong>BioHorizons</strong>.This literature serves as a reference for <strong>BioHorizons</strong> <strong>Internal</strong> and Tapered <strong>Internal</strong> implants, prosthetics and instrumentation. It is notintended to describe the methods or procedures for diagnosis, treatment planning, or placement of implants, nor does it replaceclinical training or a clinician’s best judgment regarding the needs of each patient. <strong>BioHorizons</strong> recommends appropriate training as aprerequisite for the placement of implants and associated treatment.ValidityUpon its release, this literature supersedes all previously published versions.AvailabilityNot all products shown or described in this literature are available in all countries.<strong>BioHorizons</strong> strongly recommends completion of postgraduate dental implant education and strict adherence to the Instructions forUse (IFU) that accompany our products. Treatment planning and use of the products are solely your responsibility. <strong>BioHorizons</strong> isnot responsible for incidental or consequential damages or liability relating to use of our products alone or in combination with otherproducts, other than replacement or repair under our warranties.<strong>BioHorizons</strong> continually strives to improve its products and therefore reserves the right to improve, modify, change specifications ordiscontinue products at any time. Images depicted in this literature are not to scale.91shop online at www.biohorizons.com
Direct Offices<strong>BioHorizons</strong> Canada866-468-8338<strong>BioHorizons</strong> USA888-246-8338 or205-967-7880<strong>BioHorizons</strong> Spain+34 91 713 10 84<strong>BioHorizons</strong> UK+44 (0)1344 752560<strong>BioHorizons</strong> Germany+49 7661-909989-0<strong>BioHorizons</strong> Australia+61 2 8399 1520<strong>BioHorizons</strong> Chile+56 2 361 9519DistributorsFor contact information in our other 70 markets, visit www.biohorizons.com<strong>BioHorizons</strong>®, Laser-Lok®, MinerOss®, Autotac® and Mem-Lok® are registered trademarks of <strong>BioHorizons</strong>, Inc.Grafton® DBM and LADDEC® are registered trademarks of Osteotech, Inc. AlloDerm®, AlloDerm® GBR and LifeCell are registered trademarks of LifeCell Corporation.Spiralock® is a registered trademark of Spiralock Corporation. Locator is a registered trademark of Zest Anchors, Inc.Delrin® is a registered trademark of E.I. du Pont de Nemours and Company. Pomalux® is a registered trademark of Westlake Plastics Co.Mem-Lok® is manufactured by Collagen Matrix, Inc.Not all products shown or described in this literature are available in all countries. As applicable, <strong>BioHorizons</strong> products are cleared for sale in the European Union underthe EU Medical Device Directive 93/42/EEC and the tissues and cells Directive 2004/23/EC. We are proud to be registered to ISO 13485:2003, the international qualitymanagement system standard for medical devices, which supports and maintains our product licences with Health Canada and in other markets around the globe.Original language is English. © 2010 <strong>BioHorizons</strong>, Inc. All Rights Reserved.s h o p o n l i n e a tw w w . b i o h o r i z o n s . c o m*ML0118*ML0118REV B FEB 2010