212 Schwinn Recumbent Exercise Bike - GymStore.com
212 Schwinn Recumbent Exercise Bike - GymStore.com
212 Schwinn Recumbent Exercise Bike - GymStore.com
- No tags were found...

You also want an ePaper? Increase the reach of your titles
YUMPU automatically turns print PDFs into web optimized ePapers that Google loves.
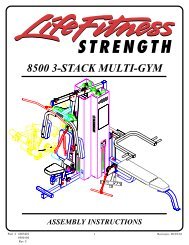
(4) Computer Screws (item #3)Step 13: Before sliding the HANDLEBAR POST (#4) onto the MAIN UNIT (#13),attach both HR CABLES (#7 & #10) as well as the COMPUTER CABLE (#8 & #9).Slide the HANDLEBAR POST (#4) onto the MAIN UNIT (#13). Fasten with 4 BOLTS(#22) and 4 CURVED WASHERS (#19). Tighten with provided Allen wrench.Step 14: Attach UPPER COMPUTER CABLE (#7) and HR CABLE (#8) to under sideof COMPUTER (#1). Place COMPUTER (#1) on top of HANDLEBAR ASSEMBLY(#2), the reading rack should wrap around the bottom of the COMPUTER (#1). AttachCOMPUTER (#1) to HANDLEBAR ASSEMBLY (#2) with COMPUTER MOUNTINGSCREWS (#3). (In <strong>com</strong>puter back) Tighten with Phillips head screwdriver.Step 15: Plug AC ADAPTOR (#71) into the wall and into the recumbent bike. ThePOWER PLUG (#72) on the bike is located at the front end of the MAIN UNIT (#13)just above the FRONT STABILIZER TUBE (#11)Seat AdjustmentFor best results, the seat should be adjusted for your height.1. Unlock “seat locking” mechanism.2. Adjust seat location so that with feet on the pedals, you can <strong>com</strong>fortably reachpedal at full extension.That’s it!You’re finished and now you can begin to reach your fitness goals!Please reference the Owner’s Manual for information regarding <strong>com</strong>puteroperation, product maintenance, warranty information, and general fitness andexercise guidelines.<strong>Schwinn</strong> Customer Service1.800.864.1270