A9900618 (Issue 3) - Triumph Instructions.com
A9900618 (Issue 3) - Triumph Instructions.com
A9900618 (Issue 3) - Triumph Instructions.com
- No tags were found...

Create successful ePaper yourself
Turn your PDF publications into a flip-book with our unique Google optimized e-Paper software.
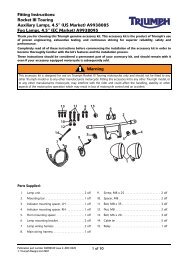
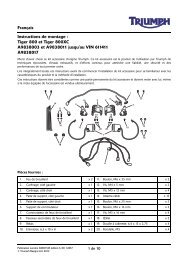
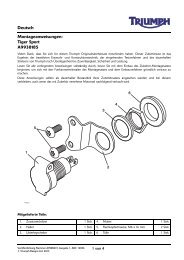
EnglishFitting <strong>Instructions</strong>:Daytona 675, Daytona 675 R, Speed Triple from VIN 461332,Speed Triple 1050 R, Sprint GT 1050, Street Triple, Street Triple RTiger 800 and Tiger 800XCA9830046 and A9830047Thank you for choosing this <strong>Triumph</strong> genuine accessory kit. This accessory kit is the product of <strong>Triumph</strong>'s use of provenengineering, exhaustive testing, and continuous striving for superior reliability, safety and performance.Completely read all of these instructions before <strong>com</strong>mencing the installation of the accessory kit in order to be<strong>com</strong>ethoroughly familiar with the kit’s features and the installation process.These instructions should be considered a permanent part of your accessory kit, and should remain with it even if youraccessory-equipped motorcycle is subsequently sold.A983004711Parts Supplied:1. Direction indicator 2 offA9830046124653Parts Supplied:1. Relay 1 off 4. Sub-harness 1 off2. Ground cable 1 off 5. Rubber grommet 1 off3. Terminal, ground cable 1 off 6. Cable ties 5 offPublication part number <strong>A9900618</strong> issue 4, ADC 12962© <strong>Triumph</strong> Designs Ltd. 20131 of 6
WarningThis accessory kit is designed for use on <strong>Triumph</strong>motorcycles only and should not be fitted to any othermanufacturer’s motorcycle. Fitting this accessory kit to anyother manufacturer’s motorcycle will affect theperformance, stability and handling of the motorcycle. Thismay affect the rider’s ability to control the motorcycle andcould cause an accident.WarningWith LED indicators fitted, if one of the indicator lightsfails, the remaining indicator may not flash faster but willcontinue to flash at its normal speed.Riding a motorcycle with any of its lights not working isillegal and dangerous. Check that the lights and indicatorsare working and rectify as necessary, as described in theowner's handbook.WarningAlways have <strong>Triumph</strong> approved parts, accessories andconversions fitted by a trained technician of an authorised<strong>Triumph</strong> dealer. The fitment of parts, accessories andconversions by a technician who is not of an authorised<strong>Triumph</strong> dealer may affect the handling, stability or otheraspects of the motorcycle’s operation, which may result inloss of motorcycle control and an accident.WarningThroughout this operation, ensure that the motorcycle isstabilised and adequately supported to prevent risk ofinjury from the motorcycle falling.NoticeFor the US and Canadian markets only, this accessory kitdoes not <strong>com</strong>ply with F/CMVSS 108.The fitting of this accessory kit is at the owner's risk. If youuse a motorcycle fitted with this kit on public roads, youmay be prosecuted.Note:• Ensure that a relevant <strong>Triumph</strong> Service Manual isavailable for reference during the fitting of thisaccessory kit.WarningA torque wrench of known accurate calibration must beused when fitting this accessory kit. Failure to tighten anyof the fasteners to the correct torque specification mayaffect motorcycle performance, handling and stability. Thismay result in loss of motorcycle control and an accident.2 of 6
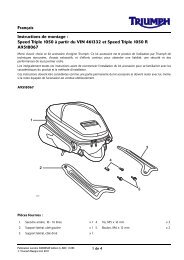
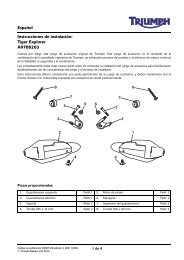
Direction Indicators1. Disconnect the battery as described in the ServiceManual.2. If necessary, remove any body panels to access thedirection indicator connectors, as described in theService Manual.3. Release the fixing securing the direction indicator.Retain the fixing for re-use.1Direction Indicator Relay1. Disconnect the battery as described in the ServiceManual.2. Locate the direction indicator relay as described in theService Manual.Note:• For models with the indicator relay that fits into arelay connector block, continue from step 3 tostep 4. Then continue from step 14.• For models with the indicator relay that has anelectrical connector fitted to it, continue fromstep 5.212cdow_31. Direction indicator, front shown2. FixingNote:• Note the routing of the direction indicatorharness for installation.4. Follow the route of the direction indicator harnesses,disconnect them from the main harness and removethe indicators. Retain the indicators if the motorcycle isto be returned to its original condition.5. Fit the direction indicators from the kit and tighten thefixings to the torque figure stated in the ServiceManual.6. Route the direction indicators harness as noted forremoval and connect to the main harness. Ensure thatthe black cable is connected to the black cable on themain harness.7. Refit any body panels that may have been removed asdescribed in the Service Manual.1. Relay for connector block2. Relay with an electrical connector3 of 6
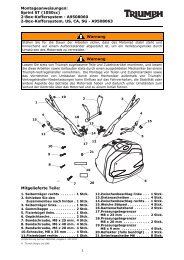
Indicator Relay Fitted to a Connector Block3. Remove the relay and retain it if the motorcycle is to bereturned to its original condition.6. Collect the relay and the rubber grommet fromkit A9830046. Fit the grommet to the relay with itsupper edge a minimum of 3 mm below the top of therelay as shown below.123 mm1celf_21. Direction indicator relay2. Relay connector block4. Fit the relay from the kit. The relay will fit only one way.Do not force fit the relay.T10021. Rubber grommet7. Collect the sub-harness from the kit and connect it tothe indicator relay, as shown below.Indicator Relay with an Electrical Connector5. Note the position of the indicator relay and detach itfrom its mounting. Disconnect the electrical connectorand remove the relay. Retain the relay if the motorcycleis to be returned to its original condition.2131T09991. Indicator relay, Tiger 800 shown2. Electrical connector2T1004_11. Sub-harness2. Brown lead3. Green lead8. Collect the ground cable from the kit. Align theM6 ring terminal end of the cable with the battery'snegative terminal. Following the main harness, routethe ground cable back to the relay mounting positionusing the cable ties to secure the ground cable whereappropriate.9. Ensure that there is enough cable to crimp thesupplied terminal and refit the relay to its mount. Trimoff any excess cable at the relay end.4 of 6
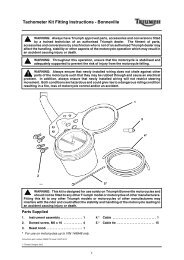
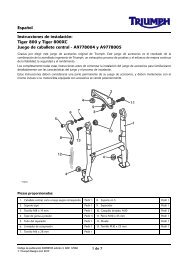
10. Strip back 5 mm of the insulation from the groundcable. Fit the terminal from the kit to the ground cableand crimp to secure.12. Fit the indicator relay to the mounting, as noted forremoval.21213T1001_11. Terminal2. Ground cable11. Connect the ground cable to the indicator relay, asshown below.T10051. Indicator relay2. Ground cable3. Sub-harness connector13. Connect the main harness to the sub-harness.1221T1004_11. Indicator relay2. Ground cableT10061. Main harness2. Sub-harness5 of 6
All Models14. Reconnect the battery, positive (red) lead first. Formodels with the new ground cable fitted, ensure it isconnected to the battery negative.15. Check the operation of the direction indicators. Rectifyas necessary.16. Refit any body panels that may have been removed asdescribed in the Service Manual.WarningIf, after fitment of this accessory kit, you have any doubtabout the performance of any aspect of the motorcycle,contact an authorised <strong>Triumph</strong> dealer and do not ride themotorcycle until the authorised dealer has declared it fitfor use. Riding a motorcycle when there is any doubt as toany aspect of the performance of the motorcycle mayresult in loss of control of the motorcycle, leading to anaccident.WarningThe motorcycle must not be operated above the legalroad speed limit except in closed course conditions.WarningOnly operate this <strong>Triumph</strong> motorcycle at high speed inclosed course, on-road <strong>com</strong>petitions or on closed courseracetracks. High speed operation should only beattempted by riders who have been instructed in thetechniques necessary for high speed riding and arefamiliar with the motorcycle’s characteristics in allconditions. High speed operation in any othercircumstances is dangerous and will lead to loss ofmotorcycle control and an accident.WarningNever ride an accessory-equipped motorcycle at speedsabove 80 mph (130 km/h).The presence of accessories will cause changes in thestability and handling of the motorcycle. Failure to allowfor changes in motorcycle stability may lead to loss ofcontrol or an accident.Remember that the 80 mph (130 km/h) limit will bereduced by the fitting of non-approved accessories,incorrect loading, worn tyres, overall motorcycle conditionand poor road or weather conditions.6 of 6