Clutches - CelicaTech
Clutches - CelicaTech Clutches - CelicaTech
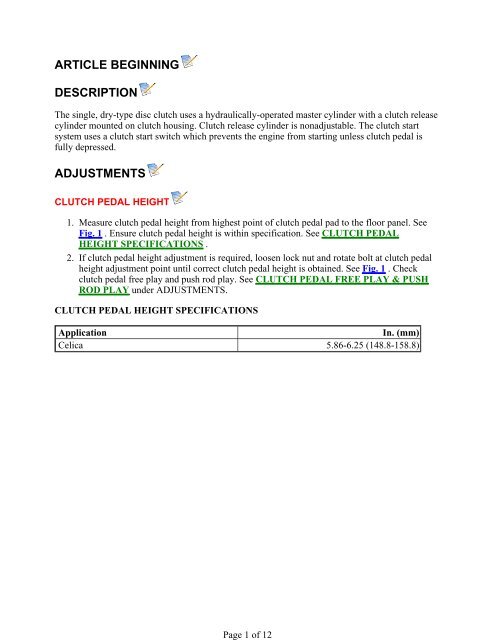
- Page 2: Page 2 of 12Fig. 1: Clutch Pedal He
- Page 5 and 6: Fig. 3: Identifying Typical Clutch
- Page 7 and 8: Page 7 of 124.5.6.7.8.9.Remove fron
- Page 9 and 10: Page 9 of 12Fig. 6: Checking Diaphr
- Page 11 and 12: Page 11 of 12Fig. 8: Exploded View
Page 2 of 12Fig. 1: Clutch Pedal Height, Push Rod Play & Adjustment PointsCourtesy of TOYOTA MOTOR SALES, U.S.A., INC.CLUTCH PEDAL FREE PLAY & PUSH ROD PLAY1.2.To check clutch pedal free play, push clutch pedal downward until beginning of clutchresistance is felt. See Fig. 2 . Note distance that clutch pedal moves. This is the clutch pedalfree play.Clutch pedal free play should be .20-.59" (5.0-15.0 mm). If clutch pedal free play adjustmentis required, loosen lock nut on push rod at master cylinder. See Fig. 1 . Rotate push rod toobtain correct pedal free play. Tighten lock nut.
Page 4 of 122.3.Ensure no continuity exists when clutch pedal is released. This is OFF position. The ON andOFF position is determined by distance that plunger extends from threaded end of clutchstart switch. See Fig. 4 .For proper distance to determine switch continuity, see CLUTCH START SWITCHPLUNGER CONTINUITY SPECIFICATIONS . Replace or adjust clutch start switch asnecessary. Reinstall electrical connector.CLUTCH START SWITCH PLUNGER CONTINUITY SPECIFICATIONS (1)ApplicationIn. (mm)Celica .295-.335 (7.50-8.50)(1) Distance from threaded end of clutch start switch where continuity changes. See Fig. 4 .
Fig. 3: Identifying Typical Clutch Start Switch LocationCourtesy of TOYOTA MOTOR SALES, U.S.A., INC.Page 5 of 12
Fig. 4: Testing Clutch Start SwitchCourtesy of TOYOTA MOTOR SALES, U.S.A., INC.REMOVAL & INSTALLATIONCLUTCH ASSEMBLYWARNING:To prevent air bag deployment, disconnect negative battery cableand wait at least 90 seconds before working on vehicle.Removal1.2.3.Disconnect negative battery cable. On 2.2L (5S-FE) models, remove battery and cruisecontrol actuator. On all models, remove air cleaner case with air intake hose. Remove clutchrelease cylinder with hose attached and secure aside.Remove starter. Disconnect necessary ground straps, electrical connections and controlcables from transaxle. Remove upper transaxle mounting bolts from cylinder block.Raise and support vehicle. Remove front wheels. Remove lower engine covers. Draintransaxle fluid. Remove axle shafts from transaxle. See the AXLE SHAFTS - 1.8L , or theAXLE SHAFTS - 2.2L article in DRIVE AXLES.Page 6 of 12
Page 7 of 124.5.6.7.8.9.Remove front exhaust pipe, located below oil pan. Remove front exhaust pipe supportbracket. On 2.2L (5S-FE), remove stiffener plate, located between cylinder block andtransaxle, at rear of oil pan.On all models, support engine with hoist. Using transmission jack, slightly raise transaxle toremove weight from engine mounts.Remove front (exhaust manifold side) engine mount-to-crossmember bolts/nuts. Removerear (intake manifold side) engine mount-to-crossmember bolts/nuts.Remove front (exhaust manifold side) engine mount and rear (intake manifold side) enginemount brackets from cylinder block. Remove bolts and crossmember, located below engineand transaxle. Remove transaxle mount bolts.Remove remaining transaxle mounting bolts. Slightly lower engine and remove transaxle.Place a reference mark on clutch cover and flywheel for reassembly reference.Alternately loosen clutch cover bolts until spring tension is released. Remove clutch coverand clutch disc. Remove clutch release fork, clutch release bearing and pivot stud fromtransaxle (if necessary). See Fig. 5 .Inspection1.2.3.4.Check wear on facings of clutch disc by measuring depth of each rivet head. Minimumdepth at any rivet is .012" (.30 mm). Check clutch disc runout. Maximum runout at facing onclutch disc is .031" (.80 mm). Replace clutch disc if not within specification.Using dial indicator, check flywheel runout. Replace flywheel if flywheel runout is greaterthan .004" (.10 mm).Using caliper, measure depth and wear on diaphragm spring on clutch cover. See Fig. 6 .Maximum depth is .024" (.60 mm) and maximum width is .197" (5.00 mm). Replace clutchcover if necessary.Ensure clutch release bearing rotates smoothly. Replace clutch release bearing if necessary.Installation1.2.3.4.5.If installing flywheel, apply thread sealant on threads of flywheel bolts before installing.Install and alternately tighten flywheel bolts in a crisscross pattern to specification. SeeTORQUE SPECIFICATIONS .Install clutch disc in clutch cover. Align reference marks on clutch cover and flywheel.Install clutch disc and clutch cover on flywheel.Using clutch aligner, center clutch disc on flywheel. Install and alternately tighten clutchcover bolts in a crisscross pattern to specification. See TORQUE SPECIFICATIONS .Apply molybdenum disulfide grease to clutch release fork-to-pivot stud contact surfaces,hub on clutch release bearing and clutch disc splines. Install clutch release fork and clutchrelease bearing on transaxle (if removed).To install remaining components, reverse removal procedure. Tighten bolt/nuts tospecification. See TORQUE SPECIFICATIONS . Fill transaxle with 75W-90 gear oil withAPI GL-4 or GL-5 rating.WARNING:To prevent air bag deployment, disconnect negative battery cableand wait at least 90 seconds before working on vehicle.
Fig. 5: Exploded View Of Typical Clutch AssemblyCourtesy of TOYOTA MOTOR SALES, U.S.A., INC.Page 8 of 12
Page 9 of 12Fig. 6: Checking Diaphragm Spring Depth & WidthCourtesy of TOYOTA MOTOR SALES, U.S.A., INC.CLUTCH MASTER CYLINDERRemoval & Installation1.2.3.Use syringe to remove brake fluid from clutch master cylinder.Remove clip and clevis pin from push rod assembly at clutch pedal. Disconnect hydraulicline at clutch master cylinder. Remove nuts and clutch master cylinder.To install, reverse removal procedure. Bleed hydraulic system. Adjust clutch pedal height,clutch free play and push rod play. See CLUTCH PEDAL HEIGHT and CLUTCHPEDAL FREE PLAY & PUSH ROD PLAY under ADJUSTMENTS.CLUTCH RELEASE CYLINDERRemoval & InstallationDisconnect hydraulic line at clutch release cylinder. Remove bolts and clutch release cylinder. Toinstall, reverse removal procedure. Bleed hydraulic system.
Page 10 of 12OVERHAULNOTE:For exploded view of typical clutch master cylinder, see Fig. 7 . Forexploded view of typical clutch release cylinder, see Fig. 8 .Fig. 7: Exploded View Of Typical Clutch Master CylinderCourtesy of TOYOTA MOTOR SALES, U.S.A., INC.
Page 11 of 12Fig. 8: Exploded View Of Typical Clutch Release CylinderCourtesy of TOYOTA MOTOR SALES, U.S.A., INC.TORQUE SPECIFICATIONSTORQUE SPECIFICATIONSApplicationFt. Lbs. (N.m)Clutch Cover Bolt 14 (19)Crossmember Bolt1.8L (7A-FE) 26 (35)2.2L (5S-FE) 38 (52)Exhaust Pipe Support Bracket Bolt/Nut 14 (19)Flywheel Bolt1.8L (7A-FE) 58 (79)2.2L (5S-FE) 65 (88)Front (Exhaust Manifold Side) Engine Mount Bracket-To-Cylinder Block 57 (77)BoltFront (Exhaust Manifold Side) Engine Mount-To-Crossmember Bolt/Nut1.8L (7A-FE) 59 (80)2.2L (5S-FE) 47 (64)Front (Exhaust Manifold Side) Engine Mount Through-Bolt 64 (87)Pivot Stud-To-Transaxle1.8L (7A-FE) 27 (37)2.2L (5S-FE) 29 (39)
Page 12 of 12ApplicationFt. Lbs. (N.m)Rear (Intake Manifold Side) Engine Mount Bracket-To-Cylinder Block57 (77)BoltRear (Intake Manifold Side) Engine Mount Through-Bolt 64 (87)Rear (Intake Manifold Side) Engine Mount-To-Crossmember Bolt/Nut1.8L (7A-FE) 59 (80)2.2L (5S-FE) 47 (64)Starter Bolt 29 (39)Stiffener Plate Bolt - 2.2L (5S-FE)Cylinder Block Side 32 (43)Transaxle Side 15 (20)Transaxle Mounting Bolt10-mm Bolt 34 (46)12-mm Bolt 47 (64)Transaxle-To-Mount Bolt 47 (64)Wheel Lug Nut 76 (103)© 2008 Mitchell Repair Information Co., LLC.


