Quick Reference Guide â Destination Learning Management ...
Quick Reference Guide â Destination Learning Management ...
Quick Reference Guide â Destination Learning Management ...
- No tags were found...

Create successful ePaper yourself
Turn your PDF publications into a flip-book with our unique Google optimized e-Paper software.
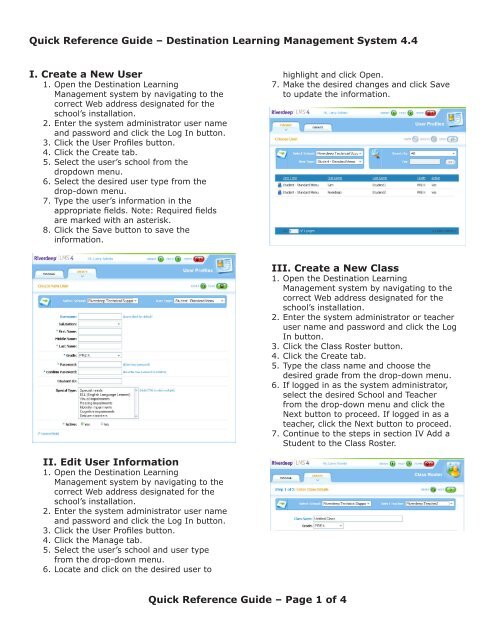
<strong>Quick</strong> <strong>Reference</strong> <strong>Guide</strong> – <strong>Destination</strong> <strong>Learning</strong> <strong>Management</strong> System 4.4IV. Add a Student to the Class Roster 1.Afterperforming the steps in section IIICreate a Class, click on the desiredstudents from the left side of the screen.The user icon will highlight. 2. Click the green right arrow to add thestudents to the class. 3. Click the Save button to save the class. V. Creating an Activity 1. Open the <strong>Destination</strong> <strong>Learning</strong><strong>Management</strong> system by navigating to thecorrect Web address designated for theschool’s installation. 2. Enter the teacher user name andpassword and click the Log In button. 3. Click the Activities button. 4. Click on the Create tab. 5. Add content to the activity based on either Riverdeep Scopeand Sequence or stateeducational standards by clicking on theblue arrows to expand the sections andplace a check in the box or boxes for the desired content. 6. Click the Next button. 7. To preview a section, click the blue text ofthe section and click the Preview button.When finished previewing content, clickthe Next button to proceed. 8. Type in the desired name of the activityand choose the folder location to save theactivityfrom the drop-down menu. 9.Clickthe Save button to save the activity. VI. Assign an Activity 1. Open the <strong>Destination</strong> <strong>Learning</strong><strong>Management</strong> system by navigating to thecorrect Web address designated for the school’s installation. 2. Enter the teacher user name and password and click the Log In button. 3. Click the Activities button. 4. Click on the Assign tab. 5. Click on the plus symbols to expand the list of activities. Click on the desired activity to assign. 6. Place a check next to the desired class ontheright side to assign to the entire class,or click the plus symbols to expand theclass and place a check next to thedesired students. 7. To preview an activity, click the blue text of the activity name and click the Previewbutton. When finished previewingcontent, click the Next button to proceed. 8. Enter the desired name for the activity andselecta start and end date for the activity.9. Clickthe Assign button to assign the activity. <strong>Quick</strong> <strong>Reference</strong> <strong>Guide</strong> – Page 2 of 4
<strong>Quick</strong> <strong>Reference</strong> <strong>Guide</strong> – <strong>Destination</strong> <strong>Learning</strong> <strong>Management</strong> System 4.4VII. Create a TestVIII. Assign a Test1.Openthe <strong>Destination</strong> <strong>Learning</strong>1. Openthe <strong>Destination</strong> <strong>Learning</strong><strong>Management</strong> system by navigating to the<strong>Management</strong> system by navigating to thecorrect Web address designated for thecorrect Web address designated for the school’s installation.school’s installation. 2. Enter the teacher user name and2. Enter the teacher user name andpassword and click the Log In button.password and click the Log In button. 3. Click the Tests button.3. Click the Tests button.4.Clickon the Create tab.4. Clickon the Assign tab.5.Addcontent to the test based on either5. Click on the plus symbols to expand the Riverdeep Scope and Sequence or statelist of tests. Place a check next to theeducational standards by clicking on thedesired test to assign.blue arrows to expand the sections and6. Place a check next to the desired class on place a check in the box or boxes for thethe right side to assign to the entire class,desired content.or click the plus symbols to expand the6. At the bottom, choose the number of test classand place a check next to the questions to randomly select for the testdesiredstudents. and click the Next button.7. To preview the test click the Preview7. Click the question number to preview thebutton. When finished previewingquestion. To add or remove a question,content, click the Next button to proceed.click the checkbox next to the question8. Select the desired parameters of the test,number. such as test date, due date and pass rate.8. Click the Next button.9. Click the Assign button to assign the test.9. Type in the desired name of the test and optional description and choose the folderlocation to save the test from the dropdown menu.10. Click the Save button to save the test. <strong>Quick</strong> <strong>Reference</strong> <strong>Guide</strong> – Page 3 of 4
<strong>Quick</strong> <strong>Reference</strong> <strong>Guide</strong> – <strong>Destination</strong> <strong>Learning</strong> <strong>Management</strong> System 4.4IX. Creating a Lesson Plan1. Open the <strong>Destination</strong> <strong>Learning</strong><strong>Management</strong> system by navigating to thecorrect Web address designated for theschool’s installation.2. Enter the teacher user name andpassword and click the Log In button.3. Click the Lesson Plans button.4.Clickon the Create tab.5. Typethe lesson plan information such astitle, duration, or overview in theappropriate fields. Note: Required fieldsare marked with an asterisk. 6. To add items to the lesson plan, choosethe desired item from the drop-down boxandclick the OK button.7.Addor select the desired item content andclick the Update button.8. Repeat Steps 6 and 7 for each additionaldesired item to add to the lesson plan.9. Click the Save button to save thelesson plan.principal or teacher), District (if logged in asdistrict administrator), School (if logged inas principal), or Student(s) (if logged in asdistrict administrator, principal or teacher).5. Select the desired report criteria from thevarious drop-down menus and controls.6. Click the View Report button to display theinformation onscreen or click the Exportbutton to export the information inCSV format.X.Generate a Report1.Open<strong>Destination</strong> <strong>Learning</strong> <strong>Management</strong>by navigating to the correct Web addressdesignated for the school’s installation.2. Enter the district administrator, principal, orteacher user name and password and clickthe Log In button.3. Click the Reports button.4. Select one of the available tabs: Usage (iflogged in as district administrator, <strong>Quick</strong> <strong>Reference</strong> <strong>Guide</strong> – Page 4 of 4