Owner's Manual R8CPU VS GB - Verlinde SA
Owner's Manual R8CPU VS GB - Verlinde SA
Owner's Manual R8CPU VS GB - Verlinde SA
- No tags were found...

You also want an ePaper? Increase the reach of your titles
YUMPU automatically turns print PDFs into web optimized ePapers that Google loves.
STAGEMAKER SYSTEM <strong>R8CPU</strong>-<strong>VS</strong> & CC48Page 3Bypass 14Reset 14Mode 14Phase fault indicato 14Rear view single rack 15Rack link IN and OUT 15Rack ID 15Ethernet 15Circuit breakers 15OPERATORS DESK DESCRIBTION 16On/Off switch 16Emergency stop 16Dead mans button 17Joy-stick 17Hub data In / Out 17Rack link IN 17Lap top 17COMMISIONING 18Single rack configuration 18Single rack connections 18Single rack connections 19Multi rack configuration 19Multi rack connections 21<strong>Manual</strong> operations in Local mode 21<strong>Manual</strong> operations in Local mode 22VERLINDE reserves the right to alter or amend the above v information without notice11/2007 / VESE<strong>GB</strong><strong>R8CPU</strong>2A
STAGEMAKER SYSTEM <strong>R8CPU</strong>-<strong>VS</strong> & CC48Page 4SOFTWARE START-UP 23Installation 23TCP/IP Address 23SYSTEM INTIALI<strong>SA</strong>TION & OPERATING TOOLS 25Program 25Language 25Option Configuration Hoist range 26Option Configuration Users 26Option Configuration Definition 27Cue Control 27Programming mode 28Operating mode 28Simulation 29Record Cue 29Reference position 30Hoist Initialisation 32Program tools & definitions 34Show 34Cue 35Object 35Group 36Synchronisation: 37Members 38Presets 38Hoist 38VERLINDE reserves the right to alter or amend the above v information without notice11/2007 / VESE<strong>GB</strong><strong>R8CPU</strong>2A
STAGEMAKER SYSTEM <strong>R8CPU</strong>-<strong>VS</strong> & CC48Page 5<strong>Manual</strong> operations in Remote mode 39PROGRAMMING A SHOW 43EFFECT MODUS 49RUNNING A SHOW 52JOY-STICK 54ON SCREEN INFORMATION 55FAULT MES<strong>SA</strong>GES 56TEXT MES<strong>SA</strong>GES 57SYSTEM SHUTDOWN 58VERLINDE reserves the right to alter or amend the above v information without notice11/2007 / VESE<strong>GB</strong><strong>R8CPU</strong>2A
STAGEMAKER SYSTEM <strong>R8CPU</strong>-<strong>VS</strong> & CC48Page 7WarrentyOn the equipment, there is a warranty effective for a period of one year in accordanceto our general warranty conditions. A special note however is to be made with respectto the warranty on the laptop supplied with your system, as this warranty is not coveredby us but world wide by Dell.However in order to make advantage of the warranty, you have to transfer thewarranty rights for which to follow the Dell TAG transfer procedure:Make note of the TAG number at the bottom of your lap-top and got to:www.dell.com/globaltagtransferRead the instructions and scroll to the lower section of the page to fill-in all *markedpockets.On places that refer to us as supplier, fill-in:- email address : contact@verlinde.com- original owner : <strong>Verlinde</strong> <strong>SA</strong>- country : France- service level : NBDThe transfer will be confirmed to your email address, from that moment on may applyon full service from the Dell helpdesk in you country. See www.dell.com for the neareststation.VERLINDE reserves the right to alter or amend the above v information without notice11/2007 / VESE<strong>GB</strong><strong>R8CPU</strong>2A
STAGEMAKER SYSTEM <strong>R8CPU</strong>-<strong>VS</strong> & CC48Page 8NOTES ON <strong>SA</strong>FETYGeneral• This device is designed for the control of professional stage equipment and is not suitable forany other purpose. It should only be used by or under the supervision of qualified andtrained personnel.• Read the information in this manual carefully as it contains important information oninstallation, safety and operation.• It is very important that this manual accompanies the system if sold or passed on to others, sothat the any operator can inform himself about the mode of operation of the device.• After unpacking check that the device is intact and complete. If this should not be thecase, please immediately contact our service department.• The device must only be used by competent persons.• Electrical work necessary for the installation of the device must be undertaken by a qualifiedelectrician or person with the necessary specialised knowledge.• Do not use the device in damp environments and avoid ambient temperatures above 42 °Cand below 2 °C.• Do not dismantle or modify the device in any way.• Prevent any ingress of liquids or the insertion of metallic objects in the device.• In case of serious malfunction, switch off the device and contact the service department orthe manufacturer.• Do not open the device. It contains only user non-repairable components.• Never attempt to repair the device yourself.SystemA system complies of minimum one (1) <strong>R8CPU</strong>-<strong>VS</strong> controller rack and the correspondingoperator’s desk CC48. For manual operations however it is possible to run the hoistswithout the operator’s desk connected, provided the 24Vdc IN and OUT connectorsare equipped with a blind plug.HoistsAs the control with connected hoists represents a system, it is essential that theconnected hoists are adapted to match the controller’s configuration. In case of anadvanced level of security such as BGV-C1 or BGV-D8+, it is important that this level isbeing applied to the hoists as well. If this is not the case, the entire system including thecontroller may be regarded as such.VERLINDE reserves the right to alter or amend the above v information without notice11/2007 / VESE<strong>GB</strong><strong>R8CPU</strong>2A
STAGEMAKER SYSTEM <strong>R8CPU</strong>-<strong>VS</strong> & CC48Page 9Power supplyIt must be ensured that all three phases (400 V), neutral and ground are present at thedevice and phases are in clockwise sequence. In the event of a phase fault, the”Phase Fault” LED at the front the controller lights up. Operation is then NOT possible.To remedy this condition, the phases can be reversed with the phase reverser in theCEE connector. If this fails to remedy the fault, the supply cable must be checked.Use a wide-bladed screwdriver, pressure must be applied on the satellite together witha rotating motion. When the pressure is relieved, the two poles are clamped in place.SoftwareBe aware at all times that from software point of view the system is not able to verifywhether there are obstacles within the operational area of the moving object. It is notable to take distances and object angles in to account and thus can’t determinewhether the programmed motion is feasible or not. The operator is fully responsible forthe consequences of any kind of damage that might occur due to un thoughtfulprogramming, or lack of attention during the performance of a motion.Goal positions, object angles and speeds are to be chosen by the operator in a waythat all hoists are carrying the object at all times and no important slack chain occursduring the complete run of the cue.Note:The software is pre-installed on the operator’s desk CC48. In case of an update, firstremove the previous version using the Windows Uninstall features, than enter the CD,select the Set-up icon and follow the instructions.Emergency stopThe Emergency Stop button on the rack front panel or on the operating desk switchesoff the respective rack completely. For linking with further racks, the devices must beconnected with the interlink cables. If only one device is used, the 2Vdc out connectermust be closed with the provided blind plug.Improper useIn order to secure safety, it is essential to use the link cables provided with theequipment. If not doing so, the manufacturer won’t take any responsibility andwarranty will be considered as obsolete in such case.VERLINDE reserves the right to alter or amend the above v information without notice11/2007 / VESE<strong>GB</strong><strong>R8CPU</strong>2A
STAGEMAKER SYSTEM <strong>R8CPU</strong>-<strong>VS</strong> & CC48Page 10USE OF PROGRAMABLE HOIST<strong>SA</strong>pplicationsProgrammable hoists usually are being used for scenic over-head operations in placesof public entry. For that reason specific precautions in terms of safety are required.These precautions could be, different from country to country yet we recommend hoistswith a safety factor 10:1 and equipped with a double brake as a minimum.ProvisionIt is the purchasers obligation to precise the applicable code’s and standards for thehoist and the hoist controls if any beyond the International accepted once as listed inthe enclosed CEE Declaration of Conformity.UseDepending on the type of use, and applicable code of praxis, the necessary minimumrequirement must be selected in accordance with table 1 at next page.VERLINDE reserves the right to alter or amend the above v information without notice11/2007 / VESE<strong>GB</strong><strong>R8CPU</strong>2A
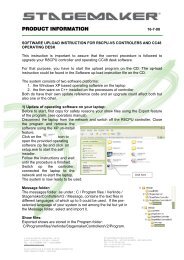
STAGEMAKER SYSTEM <strong>R8CPU</strong>-<strong>VS</strong> & CC48Page 11LOAD CONFIGURATIONSType of useLoad typesEquipment for1.Single loadsSetting withvisual contactGscenicmovementG2.Straight structuressuspended from twohoists3.Straight structuressuspended frommore than two hoists4.Connectedstructures suspendedfrom different hoists5.Combined structuressuspended fromthree hoistsG G + Z 1G + Z 1 G + Z 3orG + Z 1 + Z 2 + Z 4G + Z 1 G + Z 1 + Z 2G + Z 1 G + Z 3orG + Z 1 + Z 2 + Z 46.Combined structuressuspended frommore than threehoistsG + Z 3orG + Z 1 + Z 4G + Z 37.Rigidly guidedstructuresG + Z 1 + Z 4 G + Z 3 + Z 4G = Basic equipmentZ = Additional equipmentZ 1 = Asynchronous group movementswith group deactivationZ 2 = Reset via synchronous pointZ 3 = Synchronous group movements (path and time synchronous)or synchronic controlZ 4 = Shutdown on overload (slack rope/slack chain safety mechanism)VERLINDE reserves the right to alter or amend the above v information without notice11/2007 / VESE<strong>GB</strong><strong>R8CPU</strong>2A
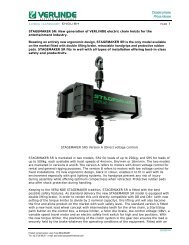
STAGEMAKER SYSTEM <strong>R8CPU</strong>-<strong>VS</strong> & CC48Page 12CONTROLLER DESCRIPTIONRACKThe rack is the link between the STAGEMAKER operating desk CC48 and the hoists. Itcontrols the hoist movements and positions and stores the corresponding data in itsmemory. <strong>Manual</strong> system override makes operations without the operating desk CC48possible.Front view of control rack <strong>R8CPU</strong>-<strong>VS</strong>The following view shows the positions of the individual control elements:Phase faultStatus Led’sMOTOR MOTOR MOTOR MOTOR MOTOR MOTOR MOTOR MOTOR1 2 3 4 5 6 7 8OKUPLOCALPCDEFAULTCPURESETPHASE POWERFAILURE SUPPLYONMode switchDOWNDirection indicatorBY-PASSSPEEDOFFResetHoist pre-selectionsGOOn / OFF buttonsBypass switch<strong>R8CPU</strong>-<strong>VS</strong>GO buttonE-STOPSpeed selectorON / OFF ButtonsTo power the rack push the On button and keep it pressed for 1 second to allowthe system to check phase’s sequence. The OFF button should be used to achievea power-down. However before to do so be sure the operating desk has beenpowered down correctly first. This to ensure all position date has been stored in therack memory.Note:The main power will be switched off once pressing the OFF button on the controller.However the 24Vdc remains standby and so the green LED remains lit. For a completeshut-off use the fuse switches at the back of the controller.VERLINDE reserves the right to alter or amend the above v information without notice11/2007 / VESE<strong>GB</strong><strong>R8CPU</strong>2A
STAGEMAKER SYSTEM <strong>R8CPU</strong>-<strong>VS</strong> & CC48Page 13Emergency stopButton to be pressed in case of emergencies. Main contactor is de-activated andall movements are stopped immediately. The emergency stop is a safety deviceand should not be used otherwise.In order to cancel an applied Emergency stop button, turn the knob anticlockwiseto release it. In order to continue operation press the ON button to activate themain contactor and start re-initialisation.Hoist pre-selectionUp or Down motion are to be made with the toggle pre-set switches. These areeffective in the Local mode only.A selection will be overruled once the Mode selector is set to Remote again.Speed selectorIn manual mode this feeder potentiometer could be used to adjust the speedbetween 1 and 100% and thus adapted to the application. Ramps foracceleration and deceleration are pre-set in the inverter on the hoist. Theseshould not be modified without consultation. See also the hoist manual.Note:The speed selector is only effective in case of variable speed hoists..GO buttonBy pressing this button, all pre-selected hoists will be activated, provided themode selector is set in Local mode.The button must be kept pushed for as long as the operation is required.If several racks are linked, the Go command is also effective on the other racksconnected.Direction indicatorThese LED’s indicate the selected direction of the motion for the correspondingchannel.Status LED’sThese LED’s have a multifunction;• Not blinking no hoist connected, or hoist in failure• Blinking with interval means unit is initialising• Constant blinking, hoist is in correct operational statusNote:When switching on, the hoist fault indicator lights may light up. This is normal andnot a fault. After a short delay, needed for internal check-up, these LED’s go out.VERLINDE reserves the right to alter or amend the above v information without notice11/2007 / VESE<strong>GB</strong><strong>R8CPU</strong>2A
STAGEMAKER SYSTEM <strong>R8CPU</strong>-<strong>VS</strong> & CC48Bypass (key-switch)This switch is to be used in case the slack chain detection is activated andprohibits further operation up- or downwards. For this purpose, the switch must bekept in the respective position to neutralise the situation.Page 14ResetThe reset button serves to reset a hoist fault (overload, thermal etc.) or theselected hoist direction can be cancelled.ModeThis switch is to be used to select the Local (manual) or PC remote mode (CC48operating desk).In local mode, all hoists could be controlled from the rack front.With the selector in the PC remote mode, manual operations from the rack are nolonger possible except the emergency stop button. Operation of the system is tobe made from the control desk CC48.Phase fault indicatorIf the power connection is not a clockwise phase sequence, or one phase ismissing, this LED shows red and starting is not possible. A clockwise phasesequence can be established by reversing two phases. With the phase reverser inthe CEE plug. Press with a screwdriver the satellite with the two phasesdownwards and rotate it 180 degrees.VERLINDE reserves the right to alter or amend the above v information without notice11/2007 / VESE<strong>GB</strong><strong>R8CPU</strong>2A
1.41.21.61TestTelemecanique1.41.21.61TestTelemecaniqueSTAGEMAKER SYSTEM <strong>R8CPU</strong>-<strong>VS</strong> & CC48Page 15Rear view single rackMain fusesRack link INGENERALCONTROLIN24VdCSecondary fusesOUT24VdCRackIDEthernetPCRack link OUTMOTOR 1-4 MOTOR 5-8OFFSTOP STARTOFFSTOP START-9+POWER SUPPLY3x400V+N+PE/32AEthernet CAD5Rack IDCircuit-breakersRack link IN and OUTThis feature is to meet safety requirements in line with EN61508 and is the hardwired link between the Emergency Stop and Dead-mans button. Rack link IN is tobe used to connect the operating desk CC48. The OUT must be closed with thesupplied blind plug. If a rack is used without operating desk, IN and OUT must beconnected by means of the supplied link cable.When several racks are used, for instance 2, connect the rack link OUT of the firstwith rack link IN of the second and use the blind plug to close the line.Rack IDIn order to identify a rack, the ID switch should be set at 1. In case more racks areconnected to the CC48 operator’s desk, select for the next 2 – 3 etc. For acorrect communication between rack’s and operator’s desk, each rack musthave a unique number.EthernetUse at this point a CAD 5 quality cable and connect it with the operator’s deskCC48. A proper communication is achieved when the communication icon ismoving constantly.Circuit breakersPer group of 4 hoists there is one circuit breaker with manual reset. In case oftripping all activated hoist will stop.VERLINDE reserves the right to alter or amend the above v information without notice11/2007 / VESE<strong>GB</strong><strong>R8CPU</strong>2A
STAGEMAKER SYSTEM <strong>R8CPU</strong>-<strong>VS</strong> & CC48Page 16OPERATORS DESK DESCRIBTIONThe operator’s desk has a control computer for remote operations and programming ofpre-sets. rack is the link between the STAGEMAKER operating desk CC48 and the hoists.It controls the hoist movements and positions and stores the corresponding data in itsmemory. <strong>Manual</strong> system override makes operations without the operating desk CC48possible.Front view of operators desk CC48This view shows the positions of the individual control elements:- Hub- 24Vdc link INLap topOn / Off switchSOFTWAREFlight caseEmergency stopO / IJoy stickDead mans buttonDEAD MANOn/Off switchMain power switch of the CC48 operators desk.Emergency stopButton to be pressed in case of emergencies. Main contactor is de-activated andall movements are stopped immediately. The emergency stop is a safety deviceand should not be used otherwise.In order to cancel an applied Emergency stop button, turn the knob anticlockwiseto release it. In order to continue operation press the ON button to activate themain contactor and start re-initialisation.In the event the emergency stop has been activated, one could continue thecue sequence after restarting the system and pressing the GO button.VERLINDE reserves the right to alter or amend the above v information without notice11/2007 / VESE<strong>GB</strong><strong>R8CPU</strong>2A
STAGEMAKER SYSTEM <strong>R8CPU</strong>-<strong>VS</strong> & CC48Note:After a complete supply power down situation and system restart, there might be aslight difference between actual hoist positions and defined reference position. This isdue to the difference in braking distance and eventual substantial asymmetric loadpattern. In such case the best is to redefine the reference position if positions arecritical.The use of the emergency stop in this respect is not to be considered as a powerdown situation.Dead mans buttonSafety button that needs to be pressed down for as long as the motion is requiredor takes place.In the event the dead mans button is released before the cue ended, one couldcontinue the cue sequence after pressing the dead mans button again andactivating the GO button.Page 17Joy-stickStick to adapt the speed in manual mode to the given circumstances once thedirection is pre-selected. The stick position is a reference for the speed. Thebutton on top of the Joy-stick is the dead-mans handle. If used, there is no needto press the blue button as well.The Joy-stick could be used also to interfere with the pre-programmed speed ofthe current cue. This allows the operator to accelerate or slow-down the length ofthe current cue and adapt it to the scene on stage.This option is only effective in combination with variable speed hoists.Hub data In / OutLap top and one or more <strong>R8CPU</strong>-<strong>VS</strong> controllers are connected via the hub builtinto the CC48 operating desk to create a network.Rack link INThis feature is to meet safety requirements in line with EN61508 and is the hardwired link between the Emergency Stop and Dead-mans button. Rack link IN is tobe used to connect the operating desk CC48 with the first <strong>R8CPU</strong>-<strong>VS</strong>.Lap topThe lap top is an integrated part of the operator’s desk CC48. It has beenconfigured to serve the system as visualisation- and operating tool. It is notallowed to add or run other programs than originally installed on this laptop, this toassure trouble free operations.VERLINDE reserves the right to alter or amend the above v information without notice11/2007 / VESE<strong>GB</strong><strong>R8CPU</strong>2A
O / IDEAD MANSOFTWAREMOTOR1MOTOR2MOTOR3MOTOR4MOTOR5MOTOR6MOTOR7MOTOR8LOCALPCDEFAULTCPUPHASEFAILUREPOWERSUPPLYSTAGEMAKER SYSTEM <strong>R8CPU</strong>-<strong>VS</strong> & CC48Page 18COMMISIONINGFirst familiarise yourself with the position of the individual connectors at the rear of therack. Read carefully the section CONTROLER DESCRIPTION.Note:Be sure that the rack(s) and operating desk are still switched until all cables areproperly connected.Single rack configurationOKUPRESETONDOWNBY-PASSSPEEDOFFGOPower supplyVERLINDE reserves the right to alter or amend the above v information without notice11/2007 / VESE<strong>GB</strong><strong>R8CPU</strong>2A
1.6 OFF1.41.21STOP STARTTestTelemecanique1.6 OFF1.41.21STOP STARTTestTelemecanique+FUSSTAGEMAKER SYSTEM <strong>R8CPU</strong>-<strong>VS</strong> & CC48Page 19Single rack connectionsLink cableCC 48 Operating desk`Patch cable RJ45HubBlind stop (Out)OUT24VdCEthernetPCPOWER SUPPLY230VIN24VdCGENERALCONTROLOUT24VdCRack EthernetID PCMOTOR 1-4 MOTOR 5-8-9POWER SUPPLY3x400V+N+PE/32A230 Vac -50Hz3x400 V– 50Hz –Gr+N / CEE 32AmpVERLINDE reserves the right to alter or amend the above v information without notice11/2007 / VESE<strong>GB</strong><strong>R8CPU</strong>2A
O / IDEAD MANSOFTWAREOKUPDOWNOKUPDOWNOKUPDOWNMOTOR MOTOR MOTOR MOTOR MOTOR MOTOR MOTOR MOTOR1 2 3 4 5 6 7 8MOTOR MOTOR MOTOR MOTOR MOTOR MOTOR MOTOR MOTOR1 2 3 4 5 6 7 8MOTOR MOTOR MOTOR MOTOR MOTOR MOTOR MOTOR MOTOR1 2 3 4 5 6 7 8LOCALLOCALLOCALPCPCPCDEFAULTCPUDEFAULTCPUDEFAULTCPUPHASEFAILUREPHASEFAILUREPHASEFAILUREPOWERSUPPLYPOWERSUPPLYPOWERSUPPLYSTAGEMAKER SYSTEM <strong>R8CPU</strong>-<strong>VS</strong> & CC48Page 20Multi rack configurationRESETONBY-PASSSPEEDOFFGORESETONBY-PASSSPEEDOFFGORESETONBY-PASSSPEEDOFFGOPower supplyVERLINDE reserves the right to alter or amend the above v information without notice11/2007 / VESE<strong>GB</strong><strong>R8CPU</strong>2A
+++FUSSTAGEMAKER SYSTEM <strong>R8CPU</strong>-<strong>VS</strong> & CC48Page 21Multi rack connectionsOUT24VdCEthernetPCPOWER SUPPLY230VIN24VdCCC 48 Operating deskMOTOR 1MOTOR 2MOTOR 3MOTOR 4RackID-9EthernetPCJOYSTICK<strong>R8CPU</strong> rack (3x)OUT24VdCPOWER SUPPLY3x400V+N+PE/32AMOTOR 5MOTOR 6MOTOR 7MOTOR 8Link cableIN24VdCMOTOR 1MOTOR 2MOTOR 3MOTOR 4RackIDEthernetPCJOYSTICKLink cable (2x)-9MOTOR 5MOTOR 6MOTOR 7MOTOR 8OUT24VdCPOWER SUPPLY3x400V+N+PE/32APatch cable RJ45 (3x)MOTOR 1MOTOR 2MOTOR 3MOTOR 4IN24VdCBlind plugRackIDEthernetPCJOYSTICK-9OUT24VdCPOWER SUPPLY3x400V+N+PE/32AMOTOR 5MOTOR 6MOTOR 7MOTOR 8VERLINDE reserves the right to alter or amend the above v information without notice11/2007 / VESE<strong>GB</strong><strong>R8CPU</strong>2A
STAGEMAKER SYSTEM <strong>R8CPU</strong>-<strong>VS</strong> & CC48Page 22<strong>Manual</strong> operations in Local modeIn this mode, the <strong>R8CPU</strong> controller could be used for set-up purposes without theadd of the operators desk CC48.1. First connect the hoists to the rack. Double check the connectors for a secure fit.Each hoists needs to be connected with the controller trough a 16p / 16Amp multiconnector.2. Ensure that the all circuit breakers at the back of the rack’s are switched to ON.3. Connect the rack to the main supply (CEE 32 Amp 3x400V-Gnd+N), whereby themain-switch must be set to the OFF position with each new commissioning. The redpower LED lids as soon as power is applied to the rack.4. Check the phase sequence and reverse if necessary. For this purpose, simply rotatethe satellite with two poles in the CEE plug, using a screwdriver. By exerting lightpressure on the recess until the lock releases to enable the satellite to rotate.5. Press the ON button to activate the main contactor and to power the rack. In caseof multiple racks, start the racks in correct order, first the one with IP digit No.1 waituntil it is ready than continue with No.2 etc. For testing purposes, the EmergencyStop button must subsequently be actuated once and release.Note:When switching on, or after the reset command, the systems runs an internal automaticsafety check program. The red Local / PC LED as well as all channel indicators remain litshortly. The system is ready for operation once in Local mode the LED PC stopped burning.6. Set the rack mode switch to Local and select the direction of the hoist (s) using thehoist pre-set toggle switches.7. Set the speed selector at the lower speed range (fader down) and push the RUNbutton to activate the hoist(s) pre-selected. Adapt the speed to the operatingcircumstances using the fader up or down wards whilst pressing the RUN button.Note:Before to arrive on the point to stop, reduce the speed using the speed regulator; faderdownwards. If the RUN button is released and de speed is not lowered before toreach the point to stop, the motion will come to an immediate stop instead of acontrolled stop.VERLINDE reserves the right to alter or amend the above v information without notice11/2007 / VESE<strong>GB</strong><strong>R8CPU</strong>2A
1.6 OFF1.41.2 1STOP STARTTe stTelemecanique1.6 OFF1.41.2 1STOP STARTTestTelemecaniqueRackID-IN24VdCOUT24VdCEthernetPC+POWER SUPPLY3x400V+N+PE/32ASTAGEMAKER SYSTEM <strong>R8CPU</strong>-<strong>VS</strong> & CC48Page 23SOFTWARE START-UPThe software enables convenient and pre-programmable cue operation for up to 64hoists. Initially familiarise yourself with the software before using it to start programmingor activate movements.InstallationThe operator’s software is installed on theLaptop / operators desk. And runs onWindows XP platform.The Windows XP start-up password to use is:“stagemaker bird”VersionNew software versions are supplied on CD andprovided with a self installer. For some older versions a special procedure has tobe followed for which an instruction is providedThe software version could be found in the upper left corner of the screen.Installation only takes five minutes.TCP/IP AddressThe installed Ethernet card on your PC requires an address in order to address theracks. For this purpose go to your network environment.Under the CONFIGURATION folder, mark the TCP/IP driver -> ”name of yourEthernet card” and choose PROPERTIES.The following addresses can be defined in the IP address folder:IP address : 192.168. 1. 205Subnet Mask : 255.255.255. 0Confirm the entry with OK to apply the address.The software on the Laptop cannot be usedwithout installed TCP/IP driver(s) of thecontroller rack <strong>R8CPU</strong>-<strong>VS</strong>. If the local networkbetween laptop, operating desk CC48 andcontroller <strong>R8CPU</strong>-<strong>VS</strong> is not set or connectedproperly, the following error message(s)appear.Apart of the laptop IP address, each controller rack has also it’s unique IP addressof which the last digit has to be set on the corresponding controller.- first <strong>R8CPU</strong>-<strong>VS</strong> rack 192.168. 1. 211- second rack 192.168. 1. 212- third rack 192.168. 1. 213- forth rack 192.168. 1. 214etc.GENERAL CONTROLMOTOR 1-4 MOTOR 5-89Thumb wheel to setlast digit of IPaddressVERLINDE reserves the right to alter or amend the above v information without notice11/2007 / VESE<strong>GB</strong><strong>R8CPU</strong>2A
OKUPDOWNMOTOR MOTOR MOTOR MOTOR MOTOR MOTOR MOTOR MOTOR1 2 3 4 5 6 7 8LOCALPCDEFAULTCPUPHASEFAILUREPOWERSUPPLYSTAGEMAKER SYSTEM <strong>R8CPU</strong>-<strong>VS</strong> & CC48Page 24After changing the last IP digit on the controller,wait until the LED “CPU default” on the front stopsflashing and restart the software before tocontinue any operation or command. During thefleshing, an internal security routinechecks the system.Default LEDBY-PASSSPEEDRESETONOFFGOTo check the correct setting of the rack IPaddress, click on the tab IP address. Eventualcorrections could be made at this point.If the software is being used only in the simulationmode, the TCP/IP driver could be switched offafter clicking on the IP address tab in theprogram mode and by deactivating the TCP/IPport and confirm with OK.Click hereAt start-up the port is set to active automatically.The complete rack port settings over view couldbe found under Option / Configuration:Click hereThe communication between lap top and rack is correct if the icon on the screenis constantly rotating.Icon should rotateNOTE:If data connection is broken during a Cue performance, the motion willcome to a stop. After solving the problem, the software needs to berestarted and the Cue could be finished by giving a new start command.This however is possible only in Cue mode, not in effect mode.If a new start command is given while in effect mode, the hoists will return to thestarting position of the effect.VERLINDE reserves the right to alter or amend the above v information without notice11/2007 / VESE<strong>GB</strong><strong>R8CPU</strong>2A
STAGEMAKER SYSTEM <strong>R8CPU</strong>-<strong>VS</strong> & CC48Page 25SYSTEM INTIALI<strong>SA</strong>TION & OPERATING TOOLSSince a proper operation of your system is not possible without completing thesystem initialisation procedure, it is essential to go through the following menusections step by step and complete the corresponding tables.The following sections willexplain the availablecommands in the uppercommand section on theprogram mode page,As well as the ones in the lower command field of the operation mode page.ProgramThe program tab gives you theopportunity to Import or export files.It also includes the Exit mode toclose the software.LanguageThe program command texts areavailable in different languages.Select language in the uppercommand section in the programmode. And confirm modification.The language change will beeffective after closing and openingthe program folder.VERLINDE reserves the right to alter or amend the above v information without notice11/2007 / VESE<strong>GB</strong><strong>R8CPU</strong>2A
STAGEMAKER SYSTEM <strong>R8CPU</strong>-<strong>VS</strong> & CC48Page 26Option Configuration Hoist rangeFrom this table the hoist(s) should be selected and patched in accordance withthe hoists you are using. This implements that one controller could run differenthoists at the same time.It is essential that the correct selection is made as this is the reference for theprogram software.Option Configuration UsersUnder the User menu, newsystem operators could beidentified, with uniquenames and password. Thepassword is case sensitive,i.e. distinction is madebetween upper and lowercase characters. A new usercan be designated as a userby the supervisor. Thesupervisor is able to access all program functions and operating parameters. Theoperator is only able to execute pre-programmed show, he cannot enter orchange any data. When using the system for the first time, ask your supplier forthe installed user name and password (admin)VERLINDE reserves the right to alter or amend the above v information without notice11/2007 / VESE<strong>GB</strong><strong>R8CPU</strong>2A
STAGEMAKER SYSTEM <strong>R8CPU</strong>-<strong>VS</strong> & CC48Page 27Option Configuration DefinitionAt this page, controllers are to be defined, each with their own address andcorresponding hoist sequence number defined by the last digit of the IP address.See also sectionTCP/IP addressCue ControlThis feature allows you to avoid conflictsbetween Cue’s in a certain sequence.Click the corresponding pocket to activatethe condition YES or NO.It is not recommended, but this safetyfeatures could be by-passed, for thatpurpose select the corresponding pocketand a warning will be given in the command field.Click here to deactivate Cue controlWarning message security reducedVERLINDE reserves the right to alter or amend the above v information without notice11/2007 / VESE<strong>GB</strong><strong>R8CPU</strong>2A
STAGEMAKER SYSTEM <strong>R8CPU</strong>-<strong>VS</strong> & CC48Page 28Programming modeBeing in the operating mode, click at the box in the lower command section ofthis page to return to the programming mode.Click here to return to program modeThe programming mode is the main programming field were Shows, Cue’s,Groups etc. are created and all specific Cue parameters and conditionsare defined.Operating modeClick at the box Movement once in the programming mode, to switch to theoperating mode.Click Click here here to to go go back back to to operating mode modeCurrent Cue indicationClick here to go overall viewIn the operating mode, the screen only will showthe graphics of the hoists that are part of theselected Cue.VERLINDE reserves the right to alter or amend the above v information without notice11/2007 / VESE<strong>GB</strong><strong>R8CPU</strong>2A
STAGEMAKER SYSTEM <strong>R8CPU</strong>-<strong>VS</strong> & CC48Page 29Click on the box Overallview in the programmingmode to go to a separatewindow.The overall view shows allavailable hoist positions withtheir actual status.Click on Movement in theupper corner to go back tooperating mode.SimulationFor simulation purposes, the operating desk CC48 or the individual lap top, couldbe used without being connected to the control rack <strong>R8CPU</strong>-<strong>VS</strong>. For that purposeclick on Simulation in the command section of the program mode.If TCP/IP address is still in active mode, a warning message will appear. Go to IPaddress and de-activate the address to continue operations in simulation mode.See section TCP/IP Address.Click here to go to simulation modeIn the simulation mode you are able to program (blind) shows or familiariseyourself with the software completely independent of the racks.Record CueFor easy and fast programming use the Record Cue function. By clicking this boxthe current positions of the selected hoists will be stored in the correspondingselected Cue. If the Cue already contained positions, these will be overriddenafter a warning message.This function is not available in Simulation mode.Click here to store the cueVERLINDE reserves the right to alter or amend the above v information without notice11/2007 / VESE<strong>GB</strong><strong>R8CPU</strong>2A
STAGEMAKER SYSTEM <strong>R8CPU</strong>-<strong>VS</strong> & CC48Page 30Reference positionThis function allows you to set a zero position with any required place of reference.Setting the zero position is the first thing to do after completion of the set-up, butbefore to enter or alter any Cue positions.The reference position is the distance between the hook towards a fixed point onstage.As such it is most essential as it is the only reference link between the positionvalue’s in the software and the reality on stage.Click here to go to referencedefinitionsNote:A falls or non adapted reference value might lead to life treating situations andmay cause serious damage to the equipment..Before to open the referenceposition folder, the programwill ask you if you want tocontinue. If so, select Yes.There are three possibilities touse as reference:- Limit switch UP: in this casethe position buffers will bereset to zero if this limit switch isEnter value “0”activated. It is recommended to usethis function only for permanentClick here for manual referenceinstallations.- Limit switch Down: in this case the positionbuffers will be reset to zero if this limit switchClick here for identical positionis activated. It is recommended to use thisfunction only for permanent installations.- <strong>Manual</strong> positioning: this is the most common way to set the reference position.References could be set identical for all hoists, or per individual hoist. It isrecommended to use the first option. In case individual references is selected, atable with hoists will open and the reference value has to be entered for eachhoist.See also Option Configuration Reference position, for alternative zero references.VERLINDE reserves the right to alter or amend the above v information without notice11/2007 / VESE<strong>GB</strong><strong>R8CPU</strong>2A
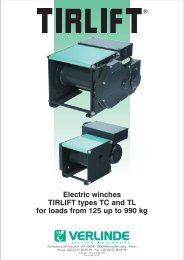
STAGEMAKER SYSTEM <strong>R8CPU</strong>-<strong>VS</strong> & CC48Page 31Example of reference procedure;- switch the controller to manual mode, and lower all hooks till they justreach the floor.- switch back to PC mode and select Reference position- confirm selection on the pop-up screen- select <strong>Manual</strong> positioning- select Identical distance- enter a “zero” 0 or any other value that has been used- select OK to confirmThey operating mode will appear and all position indicators (lower display) willshow the new reference. The reference will be stored in the rack memory.Under side hoistUnder side hoist0.2 200 m mm upper upper hardware limit *)to be seton hoist0.1 m upper software limit100 mm upper software limit0.1 m max. upper software position100 mm upper operational limit+ 2.1 m max. lower software position2.100 mm lower operational limit2.000 mm lower software limit+ 2.2 m lower software limit10 mm lower hard ware limit+ 0.1 m lower hardware limit *)0 Stage floor- 0 stagelevel*) to be set on the hoistNote:It is recommended touse a reference valueoutside the operatingarea and limit switchpositions. See diagram.If the used referencevalue is not zero “0”, beware to enter the valuein meter.Since the encoder in the hoist is considered as a relative value, the referenceposition might be subject of reset. It also needs to be reset if hoist has beenmoved to another height or location, as well as when the hoist has beenactivated without being connected to the controller.VERLINDE reserves the right to alter or amend the above v information without notice11/2007 / VESE<strong>GB</strong><strong>R8CPU</strong>2A
STAGEMAKER SYSTEM <strong>R8CPU</strong>-<strong>VS</strong> & CC48Page 32Hoist InitialisationFrom the hoist type list created under Option Configuration Hoist range, hoists need tobe selected and patched with the hoist appointed to a Cue or Group once a newShow has been created.Select the new Show and click on “hoist” in the tree at left side to open the hoist list.Click here to open tableClick in the column Hoist range on the box of your choice to open the list with differenthoist types on the left side. Select the hoist type that corresponds to your hoist (seename plate on the hoist) and double click on the box behind the type code.Your selection will now appear in the Hoist range list.Click here to open hoist tableDouble click here to activateComplete the list by entering the software limits for Up and Down as well as for thesafety limit Max. Height related to the Show location. Keep in mind that the hoist hasalso a mechanical safety limit switch that should be adjusted with the lifting hook forUpper position as well as the chain stopper for Lower position at minimum 0.2m fromthe hoist body. The “Max. Height” setting is an additional safety limit and should be setbetween upper limit switch level and upper software limit.VERLINDE reserves the right to alter or amend the above v information without notice11/2007 / VESE<strong>GB</strong><strong>R8CPU</strong>2A
STAGEMAKER SYSTEM <strong>R8CPU</strong>-<strong>VS</strong> & CC48Page 33These given values might be subject of change as they are depending on type ofmechanical limit switch applied. A proper setting is essential in order to avoidinterference of these safety devices during normal operations.The operational software limit could be set at any convenient position with a minimumof 0.1m from the Max. Height position.The speed in the last column will be given automatically once the hoist type selection ismade.NOTE:This procedure is linked to a Show and has to be done for each new Show as hoisttypes could be different from case to case. However if you have only one type ofhoist in your fleet, we advise you to create a Blanc Show in which all the hoist ofyour fleet are identified once. This Blanc Show could be copied and used for eachnew Show as a basis.NOTE:In case less than eight hoists are connected to a rack it is important to startwith the first, second etc channels. If one channel is out of order, randomconnection is possible, but only when all eight channels are patched with anhoist.VERLINDE reserves the right to alter or amend the above v information without notice11/2007 / VESE<strong>GB</strong><strong>R8CPU</strong>2A
STAGEMAKER SYSTEM <strong>R8CPU</strong>-<strong>VS</strong> & CC48Page 34Program tools & definitionsThe program has a three architecture, starting with a Show, Cue,Object, Group and Group member. The different program stepsdefining a Show, the creation of Cue’s with its Objects (hoists orgroup of hoist), Group definition and assignment of Group members,all has to be done first before to be able to create any kind ofprogrammed action.ShowA Show is the combination of all pre-programmedsequences of motions for an event whatever this may be. Tocreate a new Show, click right mouse button on“Stagemaker Controller” at the top of the three and selectthe Add Show option from the menu that appears. Enter thename in the activated field and confirm OK.To Delete, Rename or Copy a Show, select thecorresponding Show and click with right mouse buttonto open the Show menu. Make your selection, applythe corresponding changes and confirm action.If the Copy function has been chosen, click rightmouse button on “Stagemaker Controller” again toopen the Show menu. Select Paste Show, give thenew show a name and confirm action.VERLINDE reserves the right to alter or amend the above v information without notice11/2007 / VESE<strong>GB</strong><strong>R8CPU</strong>2A
STAGEMAKER SYSTEM <strong>R8CPU</strong>-<strong>VS</strong> & CC48Page 35CueA cue is a group of pre-programmed sequences of motions.Any number of hoists can be combined under a cue. In a cuea single hoist or a group of hoists are defined, each to go totheir target position when the cue is started.To add a Cue, select the Show in which the Cue has to beadded, click left mouse button to open the Add.. menu andselect Add Cue. Enter the name in the activated field andconfirm OK.To Delete, Rename, add Object or Copy a Cue, select thecorresponding Cue and click with right mouse button to open the Cue menu.Make your selection, apply the corresponding. If the Copy function has beenchosen, click right mouse button on the selected Cue again to open the cuemenu. Select Paste Cue, give the new cue a name and confirm action.ObjectAn object is a part of a cue and represents a single hoists or a group of hoists. Theobject is assigned to a random position or a pre-set position from the pre-set list.Within the cue objects are able to start at different momentsusing the time delay function.To add an Object to a Cue, select the Cue in which theObject has to be added, click left mouse button to openthe Object menu and select Add Object. Enter the name inthe activated field and confirm OK.To Delete, Rename, d Object or Copy a Cue, select thecorresponding Cue and click with right mouse button toopen the menu. Make your selection, apply thecorresponding changes and confirm action.If the Copy function has been chosen, click right mousebutton on the selected object again to open the objectmenu. Select Paste Object, give the new object a nameand confirm action.VERLINDE reserves the right to alter or amend the above v information without notice11/2007 / VESE<strong>GB</strong><strong>R8CPU</strong>2A
STAGEMAKER SYSTEM <strong>R8CPU</strong>-<strong>VS</strong> & CC48Page 36GroupA group consists of one or several individual hoists called members. Working withgroups has the advantage that programming or alterations in positions are madesimultaneously for all group members in once.There are two different type of groups available:• loose group (non conditional group)• synchronous groupA loose group is a number of single hoists defined as group.This may simplify the programming and the operation.Instead of clicking at each individual hoist when hoists arenot defined as group, activation of all the hoists in thegroup is effected by one single click. De group transfers thecommands to the individual hoists.There is no mechanical link between two individual hoists,so it remains possible to add or retract an hoist from thegroup at any time. Even during the run of a cue, an singlehoist could be stopped while the rest in the groupcontinues to their goal positions.A show that is built together using just groups, meaning even single hoists areconfigured as groups, remains flexible in set-up and modifications. Groups couldbe easily modified or transferred from rack no.1 to rack no.2 etc. This avoids a lotof changes at Cue level with all its details.In a non conditional group the end position could be the same for all the hoists.To create a Group, select the Show in which the Group has tobe added, click right mouse button to open the Group menuand select Add Group. Enter the name in the activated fieldand confirm OK.To Delete, Rename, or Copy a Group, select thecorresponding Group and click with right mouse button toopen the menu. Make your selection, apply the correspondingchanges and confirm action.If the Copy function has been chosen, click right mouse buttonon the selected group again to open the group menu. SelectPaste group, give the new group a name and confirmaction.Note:Because of required speed regulation (with variable speed hoists only), in this mode it isnot possible to run at full speed. Electric limits Up/Down remain active at single hoist.Safety related functions like Emergency limits, over- and under-load remain active forthe group.VERLINDE reserves the right to alter or amend the above v information without notice11/2007 / VESE<strong>GB</strong><strong>R8CPU</strong>2A
STAGEMAKER SYSTEM <strong>R8CPU</strong>-<strong>VS</strong> & CC48Synchronisation:The hoists (object) or a group of hoists within a Cue could be defined asSynchronised or Loose.Select the Cue and double click in the pocket behind the selection in the columnSynchronised Cue to activate No for non synchronised or Yes for synchronisedobjects.Page 37Synchronised mode: the hoists are kept synchronised in actual positions as well asin time to reach the goal position.Non synchronised mode: the hoist are arriving in the same time at the goalposition, eventual each in different speed.NOTE:This feature is only valid for hoists with variable speed.Synchronisation during the acceleration time is not possible. In the event of substantialload differences the distance between the hoists therefore might be slightly out ofsynchronisation tolerance during this short period. However this will be compensatedonce the acceleration time is passed provided the synchronisation mode is selected.It is advised to activate the synchronisation mode in all cases where multiple hoistscarrying one ridged object.Enter the required synchronisation tolerance inmeter. Beware that A proper correction can’tbe achieved if the value is to small in relation tothe acceleration time.Enter synchronisationtolerance hereVERLINDE reserves the right to alter or amend the above v information without notice11/2007 / VESE<strong>GB</strong><strong>R8CPU</strong>2A
STAGEMAKER SYSTEM <strong>R8CPU</strong>-<strong>VS</strong> & CC48Page 38MembersA group is the combination of several individual hoistscalled members. Once a group has been created, themembers have to be appointed.To add a member, select the corresponding Groupand click with right mouse button to open the Groupmenu. Select Add Member and give the newmember a name and confirm action.To add another member, or to delete one, selectthe corresponding member and click with rightmouse button to open the Member menu. Makeyour selection, apply the corresponding changesand confirm action.PresetsA preset is a programming tool that can help you to improve the speed ofprogramming. It is a pre-programmed target position. Using pre-sets in a cueinstead off individual random settings, does have the advantage that wheneveran identical target positions in all cue’s has to be changed, all hoist with the sametarget position are modified in one pre-set change action. This instead ofmodifying all the individual details at hoist level.To add a preset, select the corresponding Show and clickwith right mouse button to open the menu. Select AddPreset and give the new preset a name and confirmaction. Once the preset has been created, select thepreset and enter the level value fore instance 300.To Add, Delete or Rename a preset, select thecorresponding preset and click with right mouse button toopen the Preset menu. Make your selection, apply the corresponding changesand confirm action.HoistIn important part of the initial settings is the definition of the operating area , themaximum height, the operational distance, reference position and eventually themaximum speed. This needs to be defined for each individual hoist in each show.For further details see Hoist Initialisation.VERLINDE reserves the right to alter or amend the above v information without notice11/2007 / VESE<strong>GB</strong><strong>R8CPU</strong>2A
STAGEMAKER SYSTEM <strong>R8CPU</strong>-<strong>VS</strong> & CC48Page 39<strong>Manual</strong> operations in Remote modeIn this mode, the <strong>R8CPU</strong> controller has to be connected with the operator’sdesk CC48.1. First connect the hoists to the rack. Double check the connectors for a secure fit.Each hoists needs to be connected with the controller trough a 16p / 16Amp multiconnector.2. Connect the RJ45 patch cables, one from each rack to the operating desk CC48. Ifmore than one rack is in use, and the operator’s desk is not in the immediatelocation as the racks are, an intermediary hub might be used to limit the number ofpatch cables.3. Set the ID of each rack in the correct mode, starting with 1 for rack 1, rack 2 – 2 etc.4. Connect by means of the link cable, the OUT plug on the operator’s desk CC48 withthe IN plug on the rack. Close the safety circuit by plugging the blind plug on theOUT position of the rack. If there are more than one rack’s, connect each time theIN and OUT plugs and close the loop with the blind plug. (See diagram)Note:The link cable(s)and blind stop provides a hard wired connection to secure thesafety functions E-stop and Dead-man’s button. Without the link cable(s)and blindplug properly connected, the controller(s) cannot be switched on.5. Ensure that the all circuit breakers at the back of the rack’s are switched to ON.6. Connect the rack to the main supply (CEE 32 Amp 3x400V-Gnd+N), whereby themain-switch must be set to the OFF position with each new commissioning. The redpower LED lids as soon as power is applied to the rack.7. Check the phase sequence and reverse if necessary. For this purpose, simply rotatethe satellite with two poles in the CEE plug, using a screwdriver. By exerting lightpressure on the recess until the lock releases to enable the satellite to rotate.8. Press the ON button to activate the main contactor and to power the rack. In caseof multiple racks, only one ON button has to be pressed. For testing purposes, theEmergency Stop button must subsequently be actuated once and release.Note:When switching ON, or after the reset command, the system runs an internal safetyroutine check program. The red Local / PC LED as well as all channel indicator LED’s litshortly. The system is ready for operation once the in PC mode the LED Local goes off.VERLINDE reserves the right to alter or amend the above v information without notice11/2007 / VESE<strong>GB</strong><strong>R8CPU</strong>2A
STAGEMAKER SYSTEM <strong>R8CPU</strong>-<strong>VS</strong> & CC48Page 409. Set the rack mode switch to Remote and select the direction of the hoist (s)using the hoist pre-set switches.10. Set the speed selector at the lower speed range (fader down) and push the RUNbutton to activate the hoist(s) pre-selected. Adapt the speed to the operatingcircumstances using the fader up or down wards whilst pressing the RUN button.Note:Before to arrive on the point to stop, reduce the speed using the speed regulator; faderdownwards. If the RUN button is released and de speed is not lowered before toreach the point to stop, the motion will come to an immediate stop instead of acontrolled stop.11. Start the Laptop and openthe Windows XP program;click on the <strong>Verlinde</strong>program Icon at the desk topand enter name andpassword. The factory settingfor both name and passwordis “admin” to start with.Enter hereClick hereClick on the box to confirm that good notice is taken of all “Notes on Safety” asmentioned in the hoist and controller manual. The start up procedure won’t proceedif this confirmation is not made.Note:Reading carefully “Notes on Safety” as well as all notes markedas to avoid eventual damage to material and / or individuals.as such, is essentialVERLINDE reserves the right to alter or amend the above v information without notice11/2007 / VESE<strong>GB</strong><strong>R8CPU</strong>2A
STAGEMAKER SYSTEM <strong>R8CPU</strong>-<strong>VS</strong> & CC48Page 4112. Open the over view page by clicking on Movement button on the program page.Click hereOver view page,Click here to return toprogramming page13. Click once on the arrow ▲ Up or Down▼ of the corresponding hoist(s)to select the motion. The selected arrow turns in to green ▲ Up andred ▼ for down when activated. Select the same button again todeselect.Click here14. Press the ● blue Dead mans button on theoperators desk, keep it pressed, click on START and click on GO to startthe motion. Click again on green ▲ Up or red ▼ down to de-selectand stop the motion. Release the blue Dead mans button once themotion has come to acomplete stop.15. Use the Joy-stick to selectthe speed suitable for theoperation of thatmoment. Adapt thespeed to the operatingcircumstances pressingthe stick more or lessClick than here to activateClick here first to releaseVERLINDE reserves the right to alter or amend the above v information without notice11/2007 / VESE<strong>GB</strong><strong>R8CPU</strong>2A
STAGEMAKER SYSTEM <strong>R8CPU</strong>-<strong>VS</strong> & CC48Page 42forward whilst pressing the ●dead mans button or the little button on top ofthe joy-stick. This option is only effective in combination with variable speed hoistsNote:Once the “GO” command is given, the hoist starts moving in the chosen direction atthe minimum speed. With the joy-stick, the speed is affected from minimum tomaximum speed. It doesn’t control the speed from zero.Note:Before to arrive at the point to stop, reduce the speed using the fader on the rack orthe joy-stick on the desk. If the ● dead mans button is released and the speed is notlowered before to reach the goal position, the motion will come to an immediate stopinstead of a controlled stop. Depending of load, speed and intensity of use, this maycause the inverter to trip. If so switch off the power to the hoist and restart. .VERLINDE reserves the right to alter or amend the above v information without notice11/2007 / VESE<strong>GB</strong><strong>R8CPU</strong>2A
STAGEMAKER SYSTEM <strong>R8CPU</strong>-<strong>VS</strong> & CC48Page 43PROGRAMMING A SHOWBefore to start programming, besure that the hoists connected tothe system matches with theselections made. See alsoInitialisation of Hoists op pagina 32.The next step to take is thecreation of a new show, next defineand create the number of Cue’swithin this show. Create and defineGroups, group Members andObjects.In case of groups don’t forget todefine the group to beSynchronised or not, see op pagina 37.See also section Program tools & Definitions op pagina 34, how to create a show,a cue and objects op pagina 35.Once the show with it’s Cue’s and respective Objects are defined the remainingthing to do is to enter the Object details, like position, timing, ramps and speed.Object details and patchingObjects are to be pre-defined as an single hoist, or could be also a Group ofhoists. In that case the Group with its members (hoists) should be defined first. Seealso section Program tools & Definitions op pagina 36 how to create a Group.Select the Cue (Scene) double click in the three to open the table.Single hoist patching:Select the Object from the cue and click in the corresponding pocket in thecolumn Object to open the selection table.Click hereClick hereVERLINDE reserves the right to alter or amend the above v information without notice11/2007 / VESE<strong>GB</strong><strong>R8CPU</strong>2A
STAGEMAKER SYSTEM <strong>R8CPU</strong>-<strong>VS</strong> & CC48Page 44Double click in the pocket behind the hoist to patch with the Object..Double click hereClick on Return to come back to the previous mode.Click hereGroup patching:Before to define an Object as Group the a group must be created and membersassigned to it. See section Program Tools & Definitions op pagina 36, how tocreate a Group.Select the Grouped and double click to open it. Click on the member to view thedetails on the right side .VDouble click hereClick hereClick on the pocket to open the list on the left side and assign the required hoistfrom the list to the group by double clicking in the pocket behind it.Double click hereClick on Return to come back to the previous mode.VERLINDE reserves the right to alter or amend the above v information without notice11/2007 / VESE<strong>GB</strong><strong>R8CPU</strong>2A
STAGEMAKER SYSTEM <strong>R8CPU</strong>-<strong>VS</strong> & CC48Page 45To patch the Group with the Object, select the Object from the cue andclick in the column Object at the corresponding pocket, to open the selectiontable.Click hereClick hereSelect from the table the corresponding group to assign, by double clicking in thepocket behind it.Double click hereClick on Return to come back to the previous mode.Once the Members (hoists) are defined and assigned to the group, the groupmust be defined as Synchronised or Loose. See also Program Tools & Definitionssection Groups op pagina 36 and op pagina 37.Click hereClick hereVERLINDE reserves the right to alter or amend the above v information without notice11/2007 / VESE<strong>GB</strong><strong>R8CPU</strong>2A
STAGEMAKER SYSTEM <strong>R8CPU</strong>-<strong>VS</strong> & CC48Page 46Click on the pocket to open the list on the left side and assign theselection Loose or Synchronic by double clicking in the pocket behind it.Double click hereClick on Return to come back to the previous mode.Synchro group indicatorA synchronised group shows a coloured pocket .Preparing presets:Create upfront as many Presets as needed. See also Program Tools & Definitionssection Groups op pagina 36.Click on the Preset to open the Preset table. Add comment in the description boxto identify the Preset and enter the Preset position in the last column. (Value’s inmeter, use point as decimal)Click hereEnter text hereEnter value hereVERLINDE reserves the right to alter or amend the above v information without notice11/2007 / VESE<strong>GB</strong><strong>R8CPU</strong>2A
STAGEMAKER SYSTEM <strong>R8CPU</strong>-<strong>VS</strong> & CC48Page 47Building a Cue:Once the Objects are defined as individual hoists or as groups with dedicatedmembers (hoists) and presets are set, all elements are present to configure theCue after these have been defined in the Show. See also section Program tools &Definitions how to patch Objects to a Cue op pagina 43 and op pagina 44 forgroups.1) Specify a time delay in the column “Delay” if desired and enter the goalposition, or select a Preset.Enter delay hereEnter position hereTo use a preset, click in column “Preset” on the empty box to open the list ofprepared Presets on the left side. Than double click to assign the preset to theCue. The Preset position will appear in the column “position”Double click hereClick hereNote:A selected Preset will override the value in the corresponding box, if one was enteredbefore.2) Alter acceleration ACC and deceleration DCC if the application requireschanging the starting or braking ramp. Minimum time is 1 and maximum is 10seconds. This timing is added on top of the default setting of the inverter on thehoist, which are set as ACC 1.5 and DCC 0.5 second.VERLINDE reserves the right to alter or amend the above v information without notice11/2007 / VESE<strong>GB</strong><strong>R8CPU</strong>2A
STAGEMAKER SYSTEM <strong>R8CPU</strong>-<strong>VS</strong> & CC48Page 483) Enter speed value adapted to the application in column “V speed”.The last column shows the maximum speed related to the hoist type selected. SeeHoist Initialisation op pagina 32.Enter ACC and DCC hereEnter speed hereNOTE:If the synchronised mode is selected, the speed cannot be more than 90% of themaximum speed, this to allow the system to correct discrepancies. Synchronised hoistsare marked with a purple pocket.Live Cue buildingFor an alternative and easy Cue programming method proceed as follows:Set mode switch at thecontroller in <strong>Manual</strong> modeand place the Object(hoists or group of hoists) inthe required position usingthe toggle switches on the<strong>R8CPU</strong> controller for hoistUp or Down selection andthe RUN button to start themotion. Speed could beincreased using the speedfader.(Not applicable in case ofhoists with fixed speed).Click here to confirmClick hereSee also <strong>Manual</strong> Operations in Local mode op pagina 21.Switch back to PC mode select a CUE, or create a new CUE, in which to store theactual position. The CUE should already contain the number of hoists that aremanually selected. Click on the “Record Cue” button in the command field tostore the hoists positions and confirm if O.K.VERLINDE reserves the right to alter or amend the above v information without notice11/2007 / VESE<strong>GB</strong><strong>R8CPU</strong>2A
STAGEMAKER SYSTEM <strong>R8CPU</strong>-<strong>VS</strong> & CC48Page 49EFFECT MODUSThe effect mode allows you in the Sychro mode “Yes” to program a Cue with a fixedduration. The speed of the hoists will be automatically adapted to the distance to goand taking the ramps for acceleration and deceleration in consideration.Since objects in this mode are running time synchronic in stead of position synchronic,one has to beware of eventually slack chain that might occur if substantial asymmetricload patterns are at stake in combination with very short travel distances.Using the Memo Cue button, see also System Initialisation & Operating Tools sectionMemo Cue control op pagina 27, it is possible to define and record all hoist positions ofthat vary moment in once. In particular for multi point suspended objects this feature isa valuable programming option.This mode also allows you to start a Cue with an eventual delay time, once the previousCue has come to an end. Loop functions are also feasible.Procedure to follow:1) Double click at the show of your choice to open the program tree, and clickon the “Group Cue” tab to open the Effect modus list.Enter a reference or give the effect a name. Click then in the columnProgrammer the corresponding box to open the programming field.Double click hereClick here2) Enter a name for identification and click in the column at the correspondingbox to open the Effect mode Programming.Enter nameClick hereDouble click in the column Synchro to activate Yes for synchronised operations intime mode, or No for non sychronised operations in fixed speed mode. The optionYes for time based operations is not available in case of hoists with fixed speed. .VERLINDE reserves the right to alter or amend the above v information without notice11/2007 / VESE<strong>GB</strong><strong>R8CPU</strong>2A
STAGEMAKER SYSTEM <strong>R8CPU</strong>-<strong>VS</strong> & CC48Page 503) Click in the column Cue at the First line to open the pre-programmedCue list and select the first Cue as from where to start the Cue cycle.Click hereSelect Cue here4) Click in the column Cue at the second line to open the pre-programmed Cuelist and select the second Cue in sequence of your choice. Enter the desired Cuelength in seconds. The minimum time is given in the box next to it.Double click in the column “<strong>Manual</strong>” in the corresponding box if each selectedCue has to be started in the given sequence with the manual GO command.Double click in the column “Automatic” in the corresponding box if the selectedrange of Cue’s will start automatically after the first GO command. This way, thesecond Cue will start once the previous has ended. Enter in the last column a time(s) if a delay between two Cue’s is required.Enter Cue length (s)Double click hereMinimum Cue length (s)Enter time delay5) Repeat this process for all Cue’s that need to be activated in the sequence.The lower part of the screen shows the sequence details, like travel distance fromstarting Point to beginning of second Cue etc. The maximum speed, see alsoHoist Initialisation op pagina 32, is the values equal to the maximum speed of thehoist, or the adapted limited maximum. The effective calculated speed duringthe Cue based on the programmed Cue length is given in the column V min.VERLINDE reserves the right to alter or amend the above v information without notice11/2007 / VESE<strong>GB</strong><strong>R8CPU</strong>2A
STAGEMAKER SYSTEM <strong>R8CPU</strong>-<strong>VS</strong> & CC486) Using the Loop to Step function, it is possible to create a repetitivesequence of Cue’s. Enter in the column Loop the number of times the positionhas to be repeated, enter in the column To Step the next step in the sequence.If value’s in Loop and Step remain zero, the sequence will start in generic orderand come to a stop at the end of the list.Be ware to check if random sequence of the various Cue’s are not creating aconflict. See also Cue control op pagina 27.Page 51Enter Loop sequence hereEnter Step sequence hereClick here to return7) Click OK to go back to the Effect Modus list for further programming of othersequences, or click at the Movement button to close the Effect programmingsession and to go back to the overview and command page.8) Once back on the command page, select the Effect mode and Click on theeffect name. Press the ● dead man button and give GO to run the effect.The bar in the centre gives information about the current Cue, time and standbymode or not.Click hereEffect mode status infoClick hereNOTE:The● dead-mans button must be pressed for as long as the process takes.Once the GO button is activated, the Object (hoists or group of hoist) will first proceedto it’s starting position provided it wasn’t there already.VERLINDE reserves the right to alter or amend the above v information without notice11/2007 / VESE<strong>GB</strong><strong>R8CPU</strong>2A
STAGEMAKER SYSTEM <strong>R8CPU</strong>-<strong>VS</strong> & CC48Page 52RUNNING A SHOWStart the program, see also <strong>Manual</strong> operations in Remote mode, op pagina 39.To run a Show first all preparations should have taken place as described in theProgramming a Show section op pagina 43and further.1) Select the Show of your choice from the tree and double click on it to open the“Show”.If the tree is still closed, first double click on “Stagemaker controller” to open it.2) Double click at the Show of your choice to open it.Double click here3) Click on the Cue of your choice to check it forexecution, and click at the “Movement” button toreturn to the overview page.Click hereClick hereSelect cue4) Press the ● blue dead-mans button at the operator’s desk and click the GObutton to start the motion.On the screen you ca follow the motion and the remaining Cue time. Keep the ●blue dead-mans button pressed for the complete duration and release after themotion has stopped and thus the object (hoist or group) reached it’s goalposition.VERLINDE reserves the right to alter or amend the above v information without notice11/2007 / VESE<strong>GB</strong><strong>R8CPU</strong>2A
STAGEMAKER SYSTEM <strong>R8CPU</strong>-<strong>VS</strong> & CC48Page 53Note:If data connection is broken during a Cue performance, the motion will cometo a stop. After solving the problem, the software needs to be restarted and theCue could be finished by giving a new Go command.This however is possible only in Cue mode, not in effect mode.If a new Go command is given while in effect mode, the hoists will return to thestarting position of the effect.Special feature:With the selection to change position in Movement in the programming modepage, it is possible to modify the goal position of a selected Cue on the overviewpage . The pre-programmed value remain in the memory but will be overriddenonly once.Name of selected CueType here positionClick here activateVERLINDE reserves the right to alter or amend the above v information without notice11/2007 / VESE<strong>GB</strong><strong>R8CPU</strong>2A
STAGEMAKER SYSTEM <strong>R8CPU</strong>-<strong>VS</strong> & CC48Page 54JOY-STICKUse the Joy-stick to interfere manually with the pre-programmed speed of thecurrent cue. This allows the operator to accelerate or slow-down the speed inorder to affect length of the current cue and adapt it to the scene on stage.Pressing the stick forward whilst pressing the ● dead mans button or the littlebutton on top of the joy-stick, the current speed will increase. Pulling it back wards,the current speed reduces. This option is only effective in combination withvariable speed hoistsImportant:With the joy-stick, the pre-programmed speed is overruled and affected from minimumto maximum speed. It doesn’t control the speed from zero. This implements that thestick should be back in zero position before the Object’s goal position is reached, takenthe deceleration time in to account. If not, the motion will stop abrupt once the goalposition is reached which could generate unpleasant strong dynamic effect.VERLINDE reserves the right to alter or amend the above v information without notice11/2007 / VESE<strong>GB</strong><strong>R8CPU</strong>2A
STAGEMAKER SYSTEM <strong>R8CPU</strong>-<strong>VS</strong> & CC48Page 55ON SCREEN INFORMATIONFault indicator, click on it for further detailsHoist or channel numberMotion up indicatorHoist status; green if hoist is connectedand stand-byRun time current cue, or actual load if loadsensors are installedBlue operational area between softwarelimits Up and DownMotion down indicatorIf purple hoist in synchronisation modeHook position in relation to Up / Down limitsGoal positionPoint with mouse to get details on hoistposition and settingsCurrent position on Grey background,colour changes to Red by reaching uppersoft ware limit and Yellow at reaching thelower software limit.Group indicator, max. 8 different coloursTo check the current hoist values and settings, point withthe curser with in the green area of one hoist to activate apup-up screen with the information.Point hereVERLINDE reserves the right to alter or amend the above v information without notice11/2007 / VESE<strong>GB</strong><strong>R8CPU</strong>2A
STAGEMAKER SYSTEM <strong>R8CPU</strong>-<strong>VS</strong> & CC48Page 56FAULT MES<strong>SA</strong>GESIn case the software detects a fault coming from onehoist, a RED indicator will appear. Select the hoist with thecursor to open a pup-up menu with the fault list.If the error message « n’est pas une valeur en virgilflottante correct » appears, there is a conflict betweenthe decimal setting in Windows. Change point to commaor vice versa, or adapt the Windows setting.Click on OK to return and make the change.Conflict in hoist attribution message appears incase one hoist is assigned twice to a Cue or Group.Click on OK to return and make the change.VERLINDE reserves the right to alter or amend the above v information without notice11/2007 / VESE<strong>GB</strong><strong>R8CPU</strong>2A
STAGEMAKER SYSTEM <strong>R8CPU</strong>-<strong>VS</strong> & CC48Page 57TEXT MES<strong>SA</strong>GESTo add or alter text messages, go to the <strong>Verlinde</strong> folder in Windows Program files, openthe Stagemaker controller folder and open the Message folder called “Langue”.The text in the first column can’t be modified. Anny new language table could becreated provided the characters are supported by the program software. Just mentionthe language in the top box of the new column (Langue 4 e.f.) and translate thewordings line by line.Once ready, close the window and restart the <strong>R8CPU</strong> application to effectuate thechanges.VERLINDE reserves the right to alter or amend the above v information without notice11/2007 / VESE<strong>GB</strong><strong>R8CPU</strong>2A
STAGEMAKER SYSTEM <strong>R8CPU</strong>-<strong>VS</strong> & CC48Page 58SYSTEM SHUTDOWNIn both the <strong>R8CPU</strong>-<strong>VS</strong> controller and CC48 operators desk, software is running foroperation, hoist control and memorizing positions. It is there for essential to follow theshut-down procedure.check the local / remote selector to be in the remoteclick with the mouse on the “return to program” buttonclick on “Program”, select “Exit” and wait until the program is closedswitch-off the control computer using the Windows commandspress the OFF button on the rack. If several racks are in use, by switching of one rack,the others will follow automatically.VERLINDE reserves the right to alter or amend the above v information without notice11/2007 / VESE<strong>GB</strong><strong>R8CPU</strong>2A