Curved-Lid Tool Chest, Pt. 2 - Woodsmith Woodworking Seminars
Curved-Lid Tool Chest, Pt. 2 - Woodsmith Woodworking Seminars
Curved-Lid Tool Chest, Pt. 2 - Woodsmith Woodworking Seminars
- No tags were found...

You also want an ePaper? Increase the reach of your titles
YUMPU automatically turns print PDFs into web optimized ePapers that Google loves.
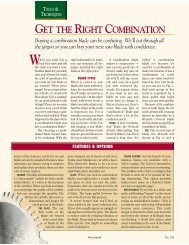
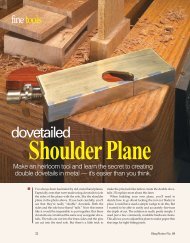
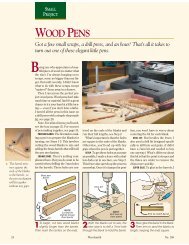
But for my tool chest, I wantedto show a little contrast betweenthe frame and drawer front. SoI discarded the center piece andmade the drawer front from a differentworkpiece that was slightlydarker. With the case front in hand,you can focus on the joinery.Cutting Box Joints. Now it’stime to set up your saw for cutting1 ⁄ 4 "-wide box joints. I started withthe side pieces then cut the matingjoints on the case front.Trimming. With these box jointscomplete, rip the case front to finalwidth. Then, with the side piecesin hand, step over to the bandsaw to cut the angled front edge.Stay outside the line and aim for asmooth, straight edge for a good fitwith the lid later on. A little sandingor trimming with a block planewill help with this.Upper Side Pieces. Now youcan glue the upper side pieces inplace to complete the side assemblies(Figure 2). If needed, trim theback edge of the side assembliesflush and set them aside for now.Back Panel. The back panel issimple. It’s just a glued-up blankcut to final size. The importantthing here is that the length of thefront and back should be the same.CUPPERSIDE(!/2" x 5&/8" - 5#/8")NOTE: ALIGNGROOVES WITHBOX JOINT SLOTS(SEE DETAILS)GROOVES IN BACKAND SIDES ARE OFFSET(SEE FIGURE 2a)LOWERSIDENOTE: CUT ALLGROOVES!/4" x !/4" DEEPCUPPERSIDEBACK(!/2" x 13#/4" - 19!/2")D3 FIGURE ers and front piece to keep thingssquare as the glue dried. Then youC!/4UPPERSIDENOTE: CUT REARBOX JOINTS AFTERGLUING UP SIDE PANELSGo ahead and cut the box joints onthe side assemblies and rear panel.I started cutting from the bottomedge of the pieces, working myway to the top edge.Now, I’ll admit that cutting thislong run of box joints can be intimidating.But if you take your timeand work on being consistent withevery cut, you shouldn’t have anyproblems getting them to fit.Grooves. To hold the case dividersand drawer bays you’ll buildlater, there are quite a few groovesyou’ll need to cut in the sides andback. The key here is to align thegrooves with the box joint slots,as shown above in Figures 2a and2b. This keeps the grooves hiddenafter the case is assembled.Dividers and Drawer Guides.The last things to do on the caseare to cut the dividers to fit thegrooves in the case and add thedrawer guides. After dry-fittingthe assembly, I glued up the sidesand back first, using the divid-can add the dividers and frontpiece to complete the assembly.Finally, the drawer guides aresimply cut to size and glued to theLOWERBACKbottom divider. The next things toSIDEwork on are the drawer bays thatfit inside the case.NOTE: CASE DIVIDERSARE MADE FROM!/2" PLYWOODDRAWERGUIDE(!/2" x 1" - 10")FCASE FRONTECASE DIVIDER(10" x 19")ECASE DIVIDER2 FIGUREa.!/4DBACK!/2a.FLOWERSIDEECASEDIVIDER!/4B4!/2ETHIS GROOVEALIGNS WITH10th NOTCHFROM TOP(OR 4!/2")b.DRAWERGUIDEFDALOWERSIDE3!/4NOTE: CASE DIVIDERSARE GLUED IN PLACEBEFORE CASE FRONTFDRAWERGUIDEFRONT VIEW!/4!/2ESIDE VIEWwww.ShopNotes.com 17