Brembo Disc Brakes - Good Karma Productions
Brembo Disc Brakes - Good Karma Productions
Brembo Disc Brakes - Good Karma Productions
- No tags were found...

You also want an ePaper? Increase the reach of your titles
YUMPU automatically turns print PDFs into web optimized ePapers that Google loves.
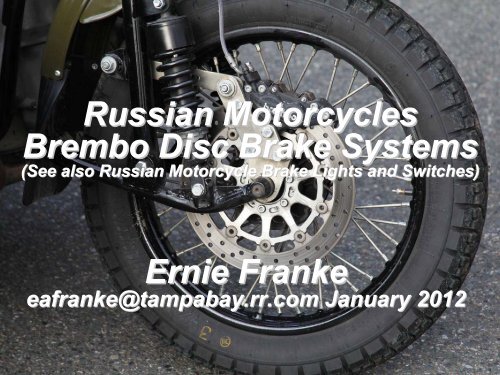
Russian Motorcycles<strong>Brembo</strong> <strong>Disc</strong> Brake Systems(See also Russian Motorcycle Brake Lights and Switches)Ernie Frankeeafranke@tampabay.rr.comJanuary 2012
Ural <strong>Brembo</strong> <strong>Brakes</strong>• Ural Equipped with Hydraulic <strong>Disc</strong> Brake in Front, with Manual Shoe-Type <strong>Brakes</strong> in Rearand Sidecar–Front Wheel Hydraulic <strong>Disc</strong> Brake Consists of Caliper, Brake Pads and <strong>Disc</strong>–Front Brake Responsible for 70% of Total Stopping Power–Sidecar Brake Connected to Rear Brake Pedal–Spare Tire, Used to Directly Replace either Rear Wheel or Sidecar Wheel, but <strong>Disc</strong> BrakePrevents All-Around Replacement, as in the Old Days when Ural Used a Drum FrontBrake• WARNING in Owner’s Manual: Never Use Front Brake to Stop when Motorcycle Is Movingin Reverse–Severe Damage to Front Brake Caliper and Mounting Plate Will Occur• Order of Presentation–<strong>Brembo</strong> (Italy) <strong>Disc</strong> <strong>Brakes</strong>–Calipers–Replaceable Pads–Hydraulic Reservoir–Hydraulic Brake Line–Ural by Year and Model–Fixed / Floating Rotor <strong>Disc</strong>: New and Old• Front <strong>Disc</strong> <strong>Brakes</strong> Require Periodic Inspection, but Do Not Require Adjustment–Brake Pads Inspected by Removing Dust Shield from Top of Caliper–Check Thickness Pads: Should Be Replaced when Less than 1/8” of Pad Remaining onEither Pad–Brake Hose Inspected for Leaks and Cracks along Length of Hose and Banjo Fittings onBoth Ends<strong>Brembo</strong> <strong>Brakes</strong> are found on modern Urals (2003+), but not on Dneprs.
Ural <strong>Disc</strong> Brake PartsStainless Steel, Braided Cable, Hydraulic Brake Line (Hose)Banjo FittingBleed ValveBrake Pad Dust CoverPins for Retaining Brake Pads<strong>Disc</strong> Rotor“Floating” <strong>Disc</strong> Rivets (Buttons)
Brake <strong>Disc</strong> Evolution by Part Numbers• Front <strong>Disc</strong> Brake Caliper Introduced to Urals in 2003– Front Brake Caliper (<strong>Brembo</strong>): IMZ-8.1238-27005-01 (<strong>Brembo</strong> 20.6800.10)• Brake Rotor <strong>Disc</strong>– 2003-2007: IMZ-8.1037-06026 (Russian) 300 mm diameter• Not Available Anymore: Upgrade Using <strong>Brembo</strong> Items;– 8 IMZ-8.1037-06026-10 <strong>Brembo</strong> Floating Rotor Installed from 2007– 8a IMZ-8.1037-06132 (steel) IMZ-8.1037-06132-10 (aluminum) <strong>Brembo</strong> Brake Adapter - Used to Mount <strong>Brembo</strong>Rotor (adapter plate has width to it to shim the rotor out from the hub)– Brake <strong>Disc</strong> (2007-2009): IMZ-8.1037-06026-10 (<strong>Brembo</strong> 08.4899.72) 320 mm diameter• <strong>Disc</strong> a Little Bit Thinner• European Recall in Fall 2010 to Add Washers beneath Rotor Screws– Original Bolts Too Long in Some Cases– Bolts Fit <strong>Brembo</strong> <strong>Disc</strong>s, which Were Thicker– Brake <strong>Disc</strong> (2010+): IMZ-8.1037-06026-NG (www.ngbrakedisc.com) 295 mm diameter• Front Brake Switch– Brake Switch (<strong>Brembo</strong>) Up to 2006: IMZ-8.1037-17048-07– Brake Switch (<strong>Brembo</strong>) 2007-2008: IMZ-8.1037-17048-2007, IMZ-8.1037-17048-EU– Brake Switch (<strong>Brembo</strong>) 2009+: IMZ-8.1037-17048-2009 (<strong>Brembo</strong> 10.4671.61)• Front Master Brake Cylinder (MBC) Assembly– Front Master Brake Cylinder: IMZ-8.1238-27003-10 (<strong>Brembo</strong> 10.4620.79)• Hydraulic Brake Line (Hose)– Rubber Brake Hose (2003-2007)• IMZ-8.1037-27014-10 (for Telescopic Fork)• IMZ-8.1037-27015 (for Leading Link)– Steel-Flex Braided Brake, incl. banjo bolts and sealing rings (2008+): IMZ-8.1037-27015-08• Front Brake Pads– Set of Two Brake Pads: IMZ-8.1238-27097 (<strong>Brembo</strong> 107.6708.10 Organic Compound)– Set of Two Brake Pads: <strong>Brembo</strong> Sintered: 07.6708.02– Set of Two EBC Double-H Sintered Metal Brake Pads: FA244HH• Conversion Kit for Drum Brake to <strong>Brembo</strong> <strong>Disc</strong> Brake– Complete Assy. Converts Russian Drum Brake to a 2007-Style <strong>Brembo</strong> <strong>Disc</strong> Brake, Includes All Components (frontwheel, fork leg, rotor, caliper mounts, reaction link, all hardware, etc.)– Front Forks– Telescopic Fork (Russian): IMZ-8.103-08001-30 (750 cc)– Leading Link Fork Assy for <strong>Disc</strong> Brake from 2006: IMZ-8.1037-08001-40– Leading Link Fork Assy for <strong>Disc</strong> Brake from 2007: IMZ-8.1037-08001-41– Leading Link Fork Assy for <strong>Disc</strong> Brake from 2008: IMZ-8.1037-08001-08– Leading Link Fork Assy for <strong>Disc</strong> Brake from 2011: IMZ-8.1037-08001-90-ColorAs you can see, it’s hard to keep up with the changes associatedwith <strong>Brembo</strong> disc brakes.
<strong>Disc</strong> Brake Evolution on Urals (2003-2004)2004)• 2003 PatrolRubber Brake HoseFixed Rotor <strong>Disc</strong>Right-Hand Caliper• 2003 TouristRubber Brake HoseFixed Rotor <strong>Disc</strong>Right-Hand Caliper• 2004 PatrolRubber Brake HoseFixed Rotor <strong>Disc</strong>Right-Hand Caliper• 2004 TroykaRubber Brake HoseFixed Rotor <strong>Disc</strong>Telescopic ForkLeft-Hand Caliper• 2004 TouristRubber Brake HoseFixed Rotor <strong>Disc</strong>Right-Hand CaliperIt takes a heap of investigation to determine the evolutionary pathof such a simple arrangement.
<strong>Disc</strong> Brake Evolution on Urals (2005-2006)2006)• 2005 RetroRubber Brake HoseFixed Rotor <strong>Disc</strong>Left-Hand Caliper• 2005 TroykaRubber Brake HoseFixed Rotor <strong>Disc</strong>Left-Hand Caliper• 2005 PatrolRubber Brake HoseFixed Rotor <strong>Disc</strong>Right-Hand Caliper• 2005 Gear-UpRubber Brake HoseFixed Rotor <strong>Disc</strong>Right-Hand Caliper• 2006 PatrolRubber Brake HoseFixed Rotor <strong>Disc</strong>Right-Hand Caliper• 2006 TroykaRubber Brake HoseFixed Rotor <strong>Disc</strong>Left-Hand Caliper• 2006 Gear-UpRubber Brake HoseFixed Rotor <strong>Disc</strong>Right-Hand CaliperThe forks’ leading link design, though archaic, actually works betterfor sidecar handling than do conventional telescopic forks.
<strong>Disc</strong> Brake Evolution on Urals (2007-2008)2008)• 2007 PatrolFloating Rotor DiskNew Brake Hose Routingwith Retaining ClipsRight-Hand Caliper• 2007 Pustinja FloatingRotor Disk• 2007 RetroRight-Hand CaliperFloating Rotor DiskRight-Hand Caliper• 2008 PatrolFloating Rotor DiskRight-Hand Caliper• 2008 Gear-UpFloating Rotor DiskRight-Hand Caliper• 2008 RetroFloating Rotor DiskLeft-Hand CaliperFloating <strong>Disc</strong>(Note Rivets)• 2008 TouristFloating Rotor DiskRight-Hand CaliperThe evolution of disc brakes involves rotors, calipers, brake lines,switches, pads, master cylinders and conversion kits.
<strong>Disc</strong> Brake Evolution on Urals (2009-2011)2011)• 2009 Patrol• 2009Floating Rotor DiskGear-UpFloatingRight-Hand CaliperRotor DiskRight-Hand Caliper• 2010 Red OctoberFloating Rotor DiskRight-Hand Caliper• 2009 RetroFloating Rotor DiskLeft-Hand Caliper• 2011 PatrolFloating Rotor DiskRight-Hand Caliper• 2009 SaharaFloating Rotor DiskRight-Hand Caliper• 2009 Ural TFloating Rotor DiskRight-Hand Caliper• 2011 M-70MFloating Rotor Disk onTelescopic ForkRight-Hand CaliperSteel-Braided Hose
Leading-Link Link versus Telescopic Front Forks• Leading Link Fork–Used on Patrol, Gear-Up and Tourist–Mounts <strong>Brembo</strong> Caliper on Right-Hand Side• Telescopic Fork–Used on Retro, Troyka–Mounts <strong>Brembo</strong> Caliper on Left-Hand Side• Except for Ural T and M-70 (Telescopic Fork and Right-Hand Caliper)Telescopic-Type Type ForkLeading Link, Lever-Type ForkDiffering front forks require differing brake solutions.
Owner’s s ManualsLeading Link ForkRight-Hand CaliperRubber Brake LineTelescopic ForkLeft-Hand CaliperRubber Brake LineComponent (750 cc)Front ForkBrake LineFront Wheel Bracket Mounting SetLeading Link ForkIMZ-8.10378.1037-08001-50 (for EU)IMZ-8.10378.1037-08001-40 (from 2006)IMZ-8.10378.1037-08001-41 (from 2007)IMZ-8.10378.1037-08001-08 (from 2008)IMZ-8.10378.1037-08001-90-Color (2010) ) (Bearing Type)IMZ-8.10378.1037-08001-33 (up to 2007) ) (Bushing Type)IMZ-8.10378.1037-27015IMZ-8.10378.1037-27001Telescopic Front ForkIMZ-8.10368.1036-0800108001 (Retro from2010)IMZ-8.10378.1037-08001-1111 (Paoli)IMZ-8. 126-2701427014-1010IMZ-8.12368.1236-2700127001
2006-2011 Ural Maintenance ManualsTelescopic Fork (Retro)<strong>Brembo</strong> Caliper on Left SideFloating Rotor <strong>Disc</strong>Rubber Brake LineCaution: The maintenance manuals for Patrol, Gear-Up and Touristshow figures that may not indicate the correct year or model.
Ural Changes and Upgrades for <strong>Brembo</strong> <strong>Brakes</strong>:Timeline<strong>Brembo</strong> Fixed <strong>Disc</strong>Introduced to Front Brake(non-floating disc)Floating <strong>Disc</strong> on Retro/TroykaFront Brake<strong>Brembo</strong> Floating <strong>Disc</strong> on All Models(IMZ-8.1037-08001-08 Leading LinkFork Assembly)NG-Manufactured <strong>Disc</strong>,Still using <strong>Brembo</strong> Caliper2003 2004 2005 2006 2007 2008 2009 2010 2011timeUral Engine Increased Enginefrom 650cc to 750ccPaoli Fork IntroducedSteel Flex-BraidBrake Line Introduced‘06 and Earlier Urals with <strong>Disc</strong> <strong>Brakes</strong> UseSame Fork as Early Drum Brake Units(IMZ-8.103-08001 Leading Link Fork Assembly)<strong>Brembo</strong> Fixed <strong>Disc</strong>(IMZ-8.1037-08001 Leading Link Fork Assembly)<strong>Brembo</strong> full-floating disc proved more than capable of stoppingthe 700-plus pound bike (along with rider and passenger) with ease.
<strong>Disc</strong> Brake Evolution on Urals• 2011 Patrol / Gear-Up• Steel-Braid Hydraulic Line• 2009 Ural Gear-Up /Tourist / Patrol / Wolf• 2010 Patrol• Newer Steel-Braid Hydraulic Line• 2009 Ural-TFlexible-BraidBrake LineFloating <strong>Disc</strong>(Note Rivets)Marzocchi Telescopic Fork on sT• 2010 Solo sT (solo tour)
<strong>Disc</strong> <strong>Brakes</strong> (2000 How Stuff Works)• <strong>Disc</strong> Brake Similar to <strong>Brakes</strong> on a Bicycle–Bicycle <strong>Brakes</strong> Have Caliper, which Squeeze Brake Pads against Wheel–Motorcycle <strong>Disc</strong> Brake Pads Squeeze Rotor instead of Wheel–Force Transmitted Hydraulically, Instead of thru a Wire Cable–Friction between Pads and <strong>Disc</strong> Slows <strong>Disc</strong> Down
Ural’s Floating (two-piece)(Rotor• Two Types of Motorcycle Brake <strong>Disc</strong>s: Fixed (2003-2006) & Floating (2007+)• Fixed Brake <strong>Disc</strong> (introduced on 2003 Urals)–One Piece <strong>Disc</strong>• Brake Pad Contact Face and Wheel Mounting Face All Part of Same Piece of Metal–Relatively Inexpensive to Produce–Perform Perfectly Well–If Subjected to Serious, Possibly Unable to Dilate or Expand• Floating Brake <strong>Disc</strong> (introduced on 2007 Urals)–Constructed in Two Parts• Aluminum Center Part Fixed to Motorcycle Wheel and Stainless Rotor–When Rotor Subjected to Serious Heat, It Expands–By Allowing It to Float Separately from the Mounting Face, It Is Free to Expand and Shrink at Willwithout Being Constrained by Its Mounting–Expansion Takes Place in All Directions at Once and Not Constrained• If you prevent this from happening in one direction (by fixing it on its mounting face) it has nochoice but to warp, so floating discs are made in two parts to allow the discs to expand andprevent them from warping. This is mainly a high performance type brake disc.• Which is better?–Fixed disc is much better for high-performance braking. For daily driving, floating disc is good. Andwhy most car manufacturers prefer floating discs? Becuase these are easier to design and fabricate,thus lower manufacturing costs.–Floating rotors are two piece rotors that has the hub and the disc joined by bolts. That way you canhave lightweight alloys for the hub and a different compound/fabrication for the disc and have thebest of both worlds. Also heat dissipates faster in floating rotors, why I'm not sure.–The main complain about floating rotors is that they're much louder than normal rotors becausethey're two-piece, thus allowing more noise to be eminate when the disc "vibrate" under braking.The floating disc heats up more uniformly, and the controlled float which ispresent allows for the differential expansion of the hot disc,and the relatively cool aluminum bell. This allows the disc to be usedunder severe conditions without having a detrimental effect.
Bembo Directional <strong>Brakes</strong>• Are <strong>Brembo</strong> Calipers Directional?–<strong>Brembo</strong>'s calipers are directional, due to the use of differential piston sizes (30/40 mm).The leading pistons are smaller in diameter in order to combat uneven wear of the brakepads. Upon close examination of the caliper, you will find a small arrow cast in placewhich denotes the direction of disc rotation. Additionally, when mounted on the vehicle,the bleed screw must be at the top of the caliper.• <strong>Brembo</strong> <strong>Brakes</strong> in Australia–The disc brake is one of the reasons that sidecar Urals cannot be sold in Australia.Certifying engineers, DOTARS and the various state and territory rego authorities alltake a rather dim view of brake components rubbing or bending when applied in reverse.And when that then ceases to allow the front brake to work in the forward direction, it isreferred to as a catastrophic failure. Now, while putting a warning in the owner's manualnot to use the front brake in reverse may work in Europe, the USA and Canada, it doesn'tcut it here for a vehicle fitted with a reverse gear in Australia.(http:// http://bcozz.multiply.com/journal/item/345)
2010 Catalog Hydraulic <strong>Disc</strong> <strong>Brakes</strong> (uralnwcouralnwco.ipower.com)2010650/750 ccItem #Part #DescriptionQuantity1233or 3A4or 4A56778IMZ-8.1238-27003Component: 2218.20.00 (650/750)IMZ-8.1037-17048-2007IMZ-8.1037-17048-EUIMZ-8.1037-17048-2009Component: 3040.04.00 (650/750IMZ-8.1238-27005-01IMZ-8.1037-27015IMZ-8.1037-27016 (650/750)IMZ-8.1037-27015-08IMZ-8.1238-27097EBC padsIMZ-8.125-27228IMZ-8.1037-27187IMZ-8.1037-2718610284460 (650/750)IMZ-8.1037-27001-01Master Cylinder Assembly (<strong>Brembo</strong> 10.4620.79)Brake Stop-Light SwitchBrake Stop-Light Switch (<strong>Brembo</strong> 10.4761.61)Brake Stop-Light Switch italian for European wire harness 2007Brake Stop-Light SwitchLeverCaliper (<strong>Brembo</strong> 20.6800.10)Front Brake Hose, Rubber (2003-2007)Front Brake Hose, RubberSteel-Flex Brake Line (2008+)Brake Pads (<strong>Brembo</strong> 107.6708.10)EBC Brake PadsAdapterCoupling Bolt (Banjo Fitting)Sealing WasherSealing Washer<strong>Brembo</strong> Hydraulic Brake Assembly1111111111Kit of 2 PadsKit of 2 Pads12481
Front <strong>Disc</strong> Brake Part Evolution• 2006-2007• #7 Wheel Hub: IMZ-8.1037-06020-10• #8 Front Brake Rotor: IMZ-8.1037-06026(Not Available - Upgrade to <strong>Brembo</strong> item 8A and 8B)• #8A Front brake rotor IMZ-8.1037-06026-10(from 2007 (<strong>Brembo</strong>))• #8B <strong>Brembo</strong> Brake Adapter IMZ-8.1037-06132(Used to mount <strong>Brembo</strong> Rotor)• #20 Screw M8x16 200299-P27C• 2008-2010• #7 Wheel Hub: IMZ-8.1037-06020-10• #8 Front Brake Rotor: IMZ-8.1037-06026-10(<strong>Brembo</strong> 08.4899.72)• #20 Screw M8x16 DIN 6912 M8x16• #21 Rotor Spacer (Intermediate Bushing):IMZ-8.1037-06132-10
Ural Hydraulic <strong>Disc</strong> <strong>Brakes</strong>(Уральский гидравлические дисковые тормоза)• Hydraulic Disk <strong>Brakes</strong>–Master Cylinder, Located on Right Side of Steering Handlebar–Hydraulic Fluid Hose, Connecting the Master Cylinder to the Brake Caliper–Brake Disk, Bolted on the Front Wheel HubCaliper Piston (Cup)Right-Hand Brake LeverHydraulic Brake Line
Front Brake Master Brake Cylinder (BMC): <strong>Brembo</strong> Model PS13 (10.4620.79)(www.oppracingoppracing.com)Brake LeverBrake HoseBanjo Fitting(Coupling Bolt)Lever to Master CylinderFluid ReservoirHandlebar BracketReservoirFluid LevelViewing Window<strong>Brembo</strong> SKU #’s:Lever: 110.4372.13Lever Pin: 110.2798.50Clamp: 110.4372.13Cap: 110.4308.60Inlet: 110.2706.50Micro-Switch: 110.4418.13The <strong>Brembo</strong> part number is stamped on the bottom of the mastercylinder reservoir, where the final two numbers indicate the piston diameter.
Front Brake Light Switch (www.f2motorcycles.ltd.(www.f2motorcycles.ltd.uk)• Brake Light Micro-Switch for <strong>Disc</strong> Brake–Ural 750’s Fitted with <strong>Brembo</strong> <strong>Disc</strong> Front Brake–Two Slightly Different Types• 2003-2008–IMZ-8.1037-17048-2007 (<strong>Disc</strong>ontinued in favor of a pressure switch on abanjo fitting)–f2Motorcycles: F23307/TO 2007–<strong>Brembo</strong> Part #: 110.4418.14 (switch is soldered into the harness a coupleof inches from the switch, so you'll be splicing into the harness)–Most Switch Vendors List Distance between Mounting Holes, the one thatfits is 10 mm, center-to-center.–IMZ-8.1037-17048-EU: Brake Switch, Italian, for European Wire Harness2007• 2009-201X–IMZ-8.1037-17048-2009–f2Motorcycles: F23307/AFTER 2007–<strong>Brembo</strong> Part #: 10.4671.61
<strong>Brembo</strong> Front Brake Micro-Switch(www.• <strong>Brembo</strong> 110.4418.13• List Price: $12.43(www.oppracing.com)
<strong>Brembo</strong> Fixed CaliperP4 30/34 F (<strong>Brembo</strong>(Part #: 20.6800.10)• Fixed Caliper: 6800 Series• Four Opposed Pistons (2 x 30mm + 2 x 34mm dia.)• Pads Supported by Two Pins• Material: Cast Aluminum BodyRear of MotorcycleBleeder Valve<strong>Brembo</strong> Part #’s:#Bleeder Screw: 105.3246.14Dust Cover: 105.1502.10Retainers: 105.4542.18Pin/Retainer: 120.3942.30Pad Spring: 120.2255.90Front of MotorcycleTwo Pad-Retaining Pins30 mm dia. . Piston65 mm Mounting Distance34 mm dia. . Piston17 mm Mounting BoltsIt Appears that Ural Mounts (Left- and Right-Hand) <strong>Disc</strong>Direction backwards from <strong>Brembo</strong> Recommendation??
Hydraulic Brake Caliper and Brake Hose(downloads.imzimz-ural.com)• Caliper Parts:#1 Front Brake Caliper: <strong>Brembo</strong> 20.6800.10#4 Brake Hose Assy: AMP1165#12 Bolt М10-1,25-6q х40 201682-P27C 4 each#14 Adapter: IMZ-8.125-27228#18 Sealing Washer: 10284460 7 each#20 Washer 10L: 252156-Р27С 2 eachBanjo Fitting(coupling Bolt)
<strong>Disc</strong> Brake and Hydraulic Line Inspection<strong>Disc</strong> Brake and Hydraulic Line Inspection• Check <strong>Disc</strong> Brake Pads Every Service Interval–<strong>Disc</strong> <strong>Brakes</strong> Do Not Require Adjustment–Brake Pads Inspected by Removing Dust Shield from Top of Caliper and Checkthe Thickness of the Pads–Pads Replaced when Less than 1/8” of Pad Remaining on Either Pad• Check Brake Hose Every Service Interval–Brake Hose Inspected for Leaks and Cracks along Length of Hose–WARNING: Never Use Any Aftermarket Brake Hose for Front Brake. Use OnlyGenuine Ural Brake Hoses. Could Result in Front Brake Failure and Void theWarranty.–Check Banjo Fittings on Either End• 2008: Steel-Braided Brake Hoses–Stainless Brake Line - BIG Difference! (sovietsteeds.com) Rougaroo–Far Superior to Rubber Flex Lines–Brake Is Way More Responsive–With Stainless, There Is No Sponginess At All
Early Rubber Brake Hose for <strong>Disc</strong> Brake(www.uralural-zentrale.de)•Product No.: S2073-S•Manufacturer: SASIC FRANCE•Length: 96 cm•Pressed-on 10 mm Banjo Fittings with Protecting Tube•List Price: 11.89 EUR
Later Steel-Braided Brake Line (www.(www.sovietsteeds.com)Banjo FittingsA Banjo fitting comprises a perforated hollow bolt and spherical union for fluidtransfer, commonly found in automotive fuel, oil and hydraulic brake systems.The name stems from the shape of the fitting, having a large circular sectionconnected to a thinner pipe, generally similar to the shape of a banjo.
Brake Reservoir (Service Manual)• Check Brake Reservoir Every Service Interval–try to get the master cylinder as level as possible (you might want to do thisbefore you remove the cover)–Wipe off all dirt and avoid any contamination of the brake fluid in the reservoir–remove the two top screws on the reservoir–Remove the cover and the rubber gasket–Fill the reservoir to within 1/4 inch of the top with only DOT approved 3 or 4brake fluid–Be careful not to spill brake fluid on the paint, as damage to the paint mayoccur–Squeeze the brake lever several times to ensure that any air that has beenintroduced is forced out of the system.–Replace Rubber Gasket, Cover and Two Screws• Bleeding the Brake Line after the hose has been replaced–Remove Cover as Above–squeeze the brake handle while at the same time, open the bleeder on thebrake caliper.–When the lever goes all the way in, close the bleeder, release the lever and doit again (and again, etc) until you get no more air bubbles from the bleeder.–Don't let your master cylinder run low or you'll have to start from scratch.You may want a helper!
Brake Fluid: DOT 3, 4 and 5 (www.(www.cyclebrakes.com)• All <strong>Brembo</strong> Braking Products Use Natural, Rubber-Base Seals–USE ONLY DOT-3/4 NON-SILICONE Type Fluids such as CASTROLTM 'LMA'–INCOMPATIBLE with DOT-5 Silicone-Based Brake Fluids–DOT- 5 SILICONE-based Fluids React with Natural-Rubber Seals to Swell Them• CAN CAUSE SEVERE PISTON RETRACTION PROBLEMS• No cure for problems caused by DOT-5, other than complete sealreplacement• The cap on the rectangular master cylinders says "DOT 3 - 5 Fluids“–Silicone DOT- 5 fluids are NOT generally in use in Europe, but Glycol-based"DOT-5.1" fluids ARE.–Hence, the "DOT-5" cap designation• For best braking performance, we recommend changing brake fluid twice a year.If the machine is to be stored in a damp environment (over the winter, say), werecommend installing fresh fluid before and after the storage period. At minimumservice levels, glycol brake fluids MUST be completely changed at intervals notto exceed a period of 18 months.• DOT-4 has a higher boiling point than #3–Probably only an issue when REALLY heating up the brakes–DOT-3 will get it done fine on a Ural• Dot 3 will slowly attack British brake rubber• Dot 4 is compatible with British brake rubber parts• Dot 5 is silicone brake fluid
EBC Double-H H Sintered Metal Brake Pads: FA244HH• Folks Start Replacing Pads between 10 and 15 kms• Brake Friction Surfaces (disc rotor) Should Be <strong>Good</strong> for Life of the Motorcycleand/or Owner, whichever comes first.• IMZ's Part Number for Brake Pad Set: IMZ-8.1238-27097• Less Expensive, Fully-Reliant EBC Replacement is FA244HH–HH Rated: Highest friction rating• Double-H Became Standard by Which All Brake Pads Are Judged• Double-H pads claimed their name from the industry standard gauge formeasuring friction levels on brake pads• Grades of brake pads range from E,F,G through to H rating, each gradebeing a 20% step up in friction delivery–Double H: H rated cold and H rated when hot–Long-Lasting and Powerful Brake Effect, Do Not Fade–Fits <strong>Brembo</strong> 20.6800.10/20 4-piston (two-pin pad fixing) CalipersHoles for Pad-RetainingPins on CalipersHigh-friction, Double-H sintered pads offer the maximum brake effectand a lifetime approximately double that of any organic pad.
EBC Carbon Graphite (Organic) Brake Pads: FA244•Typical Organic "feel" which Many Riders Prefer•Ideal for general use with low rotor damage characteristics•Environmentally friendly, free of asbestos, lead and other toxic materials•Pads for Leisure / Sport Use· Lowest heat generation· <strong>Good</strong> for fast, dry, riding· Optimum 280 mm size Rotors•The EBC Kevlar series has now been renamed NAO series or Non-Asbestos Organic, although the famous DuPont Kevlar fiber is still usedin conjunction with other high-tech fibers that have come on the market.
Replacing Front Disk Brake PadsReplacing Front Disk Brake Pads (www.sovietsteeds.com)• 2005 Patrol• Started to Hear Metal Squeal Sound and Feel Brake Fade.1. Drape an Old Towel under Front Brake Fluid Container or Master Cylinder by theHandlebars, because Some Fluid Will Come Out2. Remove Two Small Cir-Clips with Needle-Nose Pliers, that are into the HoldingPins (2) by Front Brake Pads. Holding Pins Have to Be Rotated until Cir-ClipsAre Exposed from under the Side of the Dust Cover. At the End of the HoldingPins Is a Squared-Off End for a Place to Grab Them. Once Removed, Pull Outthe Holding Pins. These Pins Go thru the Eyelets of the Brake Pads and thru theBrass-Looking Dust Cover on Top. (DO NOT TRY AND PRY THE BRASS DUSTCOVER OFF! You'll destroy it. That dust cover is held in place by the holdingpins.) Make Note that the Dust Cover Has an Arrow On It. That Arrow Pointstowards the Bike/Engine, Looking at It from the Front of the Bike.3. Remove Cover from Brake Fluid Master Cylinder. DO NOT PUMP THE FRONTBRAKE LEVER WITH THE MASTER CYLINDER COVER OFF! Or You Will Get aFountain of Brake Fluid all over.4. Remove Old Brake Pads
Replacing Front Disk Brake Pads (www.sovietsteeds.com)5. Look Down at Four Pucks that Engage thePads. If Pads Are Shot, the Pucks Are inTowards the Brake Rotor pretty good.6. Take Expander Tool (Harbor Freight for $7),Primarily Used for Removal of Rubber Hoses,but Works Great for Spreading Out the Pucks.When Pucks Are Expanded, the Fluid in theMaster Cylinder Starts to Rise. Some FluidWill Overflow. Because the New Pads AreThick, They Require that the Pucks AreSpread Out or Re-Tracked as Much asPossible to Fit In the New Pads.7. Once Pucks Are Spread, Put In the New Pads.To Get the Eyelets (2 on each pad) to Line-Upwith the Brake Pad Mounts for the HoldingPins to Go Back In, Use a Small Ice-Pick toGo thru the Brake Mount Hole on the the In-Board Side of the Mount, Hold Up the NewBrake Pad on the In-Board Side, Put the DustCover Back in Place over the Pads and Rotor,and Put Back in the Holding Pins.8. Once the two holding pins are in which gothrough the two new pads and through thedust cover, I put back in the two retaining circlips. One for each holding pins. Then Iturned the holding pins to hide the top of thecir clips under the brass dust cover.Shot after 15,000 km's
Replacing Front Disk Brake Pads (www.cont.(www.sovietsteeds.com)cont.9. Once all assembled, I put the master cylinder cover back on. Then I pumped thefront brake lever till I felt it regain action. Then I took the master cylinder coverback off and put a little Dot 4 brake fluid (On newer Urals, older Urals I believeuse Dot 3) to make up for lost fluid. Put the Master cylinder cover back on. ThenI took her for a spin in my neighborhood and tested several times. According to<strong>Brembo</strong> instructions, the pads should be run in for about 25 mikes or so,meaning that I should go easy on them, but confidently use them till theyburnish in. When I first went around the block, I made several stops and wentback home, the rotor was very hot to the touch. But after another ride of about 2miles they were not as hot, so the new pads are sitting right against the rotorwhen new. As I run her she should settle out.10. Another thing I do is when the pucks are out, I spray em with WD40 and scruboff the grime with a soft bristle toothbrush. Rinse with brake-clean, and rehydratethe rubber seals with a protectant.The tool is for rubber hose removal but works great for spreading brake pucks.
Re-Build of Brake Master Cylinder (BMC) on 2007 Patrolby URAL CT, Plano, TX (sovietsteeds.com)•<strong>Brembo</strong> Kit for Brake Master Cylinder: SKU or part number of kit fromYoyodyne: 110.4362.50 cost: $18.27 (http://www.yoyodyneti.com/ProductInfo.aspx?productid=110.4362.50)BMC re-build kit on left and mastercylinder to the right.All the component needed plus thelubricant that came with the kit. Notethe O-ring, seal (white), & sealretaining ring (silver)...these go intothe BMC bore.
Re-Build of <strong>Brembo</strong> Brake Master Cylinder on 2007 Patrolby URAL CT, Plano, TX (sovietsteeds.com)) cont.1. Remove all fasteners securing the brake hose to the rig2. Drain all the brake fluid out, including the caliper3. Loosen banjo bolts4. Detached the Brake Master Cylinder (BMC) from the handle bar. Since I will be rebuildingthe caliper, I loosened the caliper banjo bolt too, then I removed the whole front discbrake system.5. Separate BMC and Caliper from Brake Hose (make sure you do not loose copperwashers). Now you may proceed to work on it from a workbench.6. Take the brake lever out and set it aside.7. Remove the pin, dust cover, & plunger assembly. All you have left in the BMC cavity arethe seal retaining ring, seal and O-ring.Remove nut and pin to separatelever from BMCNew parts on left and used partson right. Seal retaining ring,seal, & o-ring ostill in BMC
Re-Build of <strong>Brembo</strong> Brake Master Cylinder (BMC) on 2007 Patrolby URAL CT, Plano, TX (sovietsteeds.com)) cont.8. Carefully remove (pry with a small screw driver or dental pick) the seal andretaining ring. Then you’ll have clear access to remove the O-ring.9. Clean the BMC using your favorite brake cleaner.10. Check the bore to make sure it is not damaged, gouged, or pitted. Use an ultrafine sandpaper and gently remove any burrs you may have left from thedisassembly. Clean it again (repeat #9).11. Using the <strong>Brembo</strong> provided lubricant, carefully assemble the items in the kit tothe BMC .…O-ring, the seal, then the seal retaining ring. Find a suitable drift toinstall the retaining ring carefully.Items still in the BMC. You have tocarefully remove these parts out. DONOT DAMAGE the bore of the BMC.Should look like this when installed.
Re-Build of <strong>Brembo</strong> Brake Master Cylinder (BMC) on 2007 Patrolby URAL CT, Plano, TX (sovietsteeds.com)) cont.• …Assemble the spring & stop, install the brass washer onto the piston (akaplunger), the small rubber seal, then the spring/stop assembly.…Carefully insert lubricated piston assembly into the bore.…Place the dust seal and using the plunger pin, carefully install the lever/boltand use the lever to push in & hold the assembly in place while you work thedust seal around to install it. Tricky operation but you’ll get it.12. Install the BMC to the handle bar. If all you’re rebuilding is the BMC, put inyour brake fluid of choice (DOT3 or 4) and bleed the brake system. Didn’t put inthe brake fluid yet because I was going to rebuild the caliper too. My preferenceis DOT4 because I think it’s less hydroscopic than DOT3.The damaged plunger seal on my Ural's BMC. That wasthe reason why the BMC could not build pressure toactivate the caliper pistons. I think the piece is lodgedinside the brake hose and blocks the fluid fromreleasing the pistons causing the front brake to "hangup". Note: I'm just showing the damaged seal...cup sideof seal should be facing towards the banjo end of BMCNotice the clipped piecefrom the seal...
Seal Repair Kit for <strong>Brembo</strong> Caliper on 2007 Patrolby URAL CT, Plano, TX (sovietsteedssovietsteeds.com)• Seal Repair Kit from Yoyodyne: YB3034 ~$501. Drain All Brake Fluid from Brake master Cylinder (BMC) and Caliper (you needto change the fluid anyways)2. Remove Caliper from the Rig. Do Not Remove the Hose Attachment from theBMC End, unless you're Re-Building the Master Cylinder too.3. With Caliper Out, Place It on Work bench, Remove the Brake Pads. Use the UralAir-Pump with the Pointed Attachment that Came with the Pump. Place a pieceof corrugated cardboard between the brake pistons and give the handle a swiftpump. The pistons will come out but they may or may not pop out completely.The cardboard will prevent the pistons from banging against each other. Youcan also use rags. You can use compressed air but dial the air pressure waydown so the pistons do not come flying out. Watch out because there may besome residual fluid in the bore.Ural air pump attached to the caliperClose up...notice the Ural-suppliedpointed attachment
Seal Repair Kit for <strong>Brembo</strong> Caliper on 2007 Patrolby URAL CT, Plano, TX (sovietsteedssovietsteeds.com) ) cont.4. Using a #40 torx bit, Remove the 4 Bolts that Attaches the Two Halves Together.Again Take Care not to ding the pistons or mating surface.5. Carefully separate the two halves and remove the pistons...again take care inremoving them.#40 Torx bitNote the 4 bolts securing the <strong>Brembo</strong>caliper halvesTwo of the pistons...there are four(2) 30mm & (2) 34mm pistons
Seal Repair Kit for <strong>Brembo</strong> Caliper on 2007 Patrolby URAL CT, Plano, TX (sovietsteedssovietsteeds.com) ) cont.6. Remove one O-ring and the old seals from the caliper using a dental pick or anysuitable tool. Do not damage the bore. Replace them with the new seals, twoper bore. Pay attention to the size, one bore is 30 mm & the other is 34 mm.7. Wet the pistons with brake fluid and carefully align a piston to the proper boreand push in to seat. Alignment is critical for ease of installation.8. Assembly of the two halves is the reverse. Securely tighten all 4 bolts. Installcaliper to the rig. BTW, I used this pin set to clear the small openings from thebrake master cylinder. There are 2 small holes on the reservoir.Pin set used to clean thesmall openings in the carbHere's a pix of the setNote that the bottom seal is thickertoo.of new seals and anthan the top (wiper) seal.O-ring. Wet themwith brake fluidbefore installationRepair Kit has 4 pistons (2) 30mm & (2) 34mm, 4 seals, 4 scraper seals, & 1 O-ring.
<strong>Brembo</strong>-Recommended Brake Bleeding Procedures(www.cyclebrakescyclebrakes.com)1.Fill the master cylinder reservoir with fresh, specified brake fluid from a sealed container.Operate the master cylinder lever SLOWLY several times to fill the brake circuits andbegin to expel air from them.2.Connect a transparent plastic tube (of appropriate bore for a leakproof fit) to the caliperbleed valve, placing the free end in a brake-fluid-proof container. Position the bleed tubeso that it rises above the bleed valve for a few inches (to allow a fluid head above thebleed valve exit) before descending into the container.3.Operate the brake lever 3 - 4 times, keeping it pulled in on the last stroke. Loosen thecaliper bleed valve enough to allow fluid and purged air (seen as bubbles in the fluid) toenter the attached tube. Close the bleed valve. Repeat this operation several times whilemaintaining a sufficient fluid level in the master cylinder reservoir. With each cycle ofbleeding, the lever should meet with more resistance, indicating that the air is beingremoved from the system (there should also be progressively fewer bubbles in the purgedfluid in the tube). If conditions are ideal, satisfactory lever resistance should be attained atthe point no more bubbles are observable in the purged fluid in the tube.4.Occasionally, a system will still have "spongy" lever even though no more air can befound in the purged fluid. This indicates air is still trapped in some part or parts of thecircuit, and must be removed. The following methods will help to free the trapped air andcomplete the bleeding process:(a) Making sure the reservoir is filled and capped, lean the machine so the reservoir ispositioned above the master cylinder outlet, then give the lever several short, quickstrokes. This gives the residual air a less- interrupted upwards path towards the reservoir,and out of the line. Return the machine to the upright position, rap the calipers sharplywith a plastic hammer or screwdriver handle, manipulate the flex lines and repeat. If thisdoesn't quite correct the problem, let the machine sit overnight and repeat the next day. Inmost cases, this should give an air-free final bleed. Be sure the reservoir is filled to thecorrect level after final bleeding.(b) In the case of master cylinders mounted on clip-on bars with a steep angle, it may bedifficult to lean the machine sufficiently to position the reservoir above the master cylinderoutlet. In this case it will be necessary to bleed the fitting at the high point (i.e. the mastercylinder outlet).
Bleeding <strong>Brembo</strong> Brake System (<strong>Brembo</strong><strong>Brembo</strong> Brake Catalog)http://www.cyclebrakescyclebrakes.com/ .com/<strong>Brembo</strong>_catalog.pdf• To bleed the brakes proceed as follows:–Turn the handlebar until the top edge of the reservoir is horizontal.–Fill the reservoir with brake fluid ;• During bleeding avoid letting the brake fluid level go below the MIN level.–Apply the brakes several times to fill the braking system partially.–Insert a flexible transparent tube to the bleed screw.–Bleed through one bleed screw at a time:• Pull the brake lever all the way and keep it in this position;• Unscrew the bleed screw, let some brake fluid flow out (initially only air willcome out) and then tighten the bleed screw (lightly);• Let go of the brake lever, wait a few seconds and repeat the above stepsuntil no air bubbles come out of the bleed screw;–Tighten the bleed screw to the prescribed torque and fill up the reservoir withbrake fluid.–Verify that there are no leaks from the various fittings and connections. If thebraking system has been bled properly, following the lever dead travel, you willfeel the direct action of the fluid without any sponginess; if this is not so,repeat the bleeding procedure.• Notes: If the lever seems too elastic following the bleeding procedure, proceed inthe following manner:–Remove one brake pad from a caliper.–Apply the brakes several times so as to push-out the pistons about 3 - 4 mm.–Push back the pistons (avoid damaging the rotor and the pistons).–Put the brake pad back into the caliper.–Repeat the above steps on the other(s) pad(s) and/or caliper(s).–Verify whether brake lever travel has improved.
Ural (Урал(Урал) 2001-20042004The front brake-light switch is placed in parallel with the rear brake-light switch.
2010 Ural SchematicThe front brake-light switch remains the same over the years.
Disk Brake System (www.(www.ural-zentrale.de)•Product #: S2073•List Price: 275 EUR•Disk brake conversion kit for all models•Brake disc is simple plugged in the wheel splines•Delivered with brake disk with flange, mounting and cover, brake calliperwith brake pads, hydraulic hoses with fittings, master cylinder with leverand bolts.•Caution: Caliper bracket has to be welded on the fork or swing-arm.Suitable only for experienced DIY mechanics!
<strong>Disc</strong> Brake Conversion for Dnepr Front Wheel:Christian's Dneprseiten (dnepr.at/e/tech_26.htm)• Dnepr Front Drum Brake Not Made for Panic Braking• The Conversion :–Front Wheel Yamaha SR500 (also possible: XS650)–Two Brake <strong>Disc</strong>s SR500 diameter = 298mm (or XS1100)–Brake Pliers and Pump Yamaha XS850 (identically XS1100)–Steel-Flex Hose without Distributors Directly to the Pump–Taper Roller Bearing for the Steering–Bearings at the Front Wheel Were Changed to 20mm inner diameter, an AppropriateSpacer Was Made–<strong>Disc</strong> Brake Lugs Made of Steel Plates (5mm) on Roller Bearings Situated on the AxleFluid ReservoirDual Hydraulic Brake LinesDual Front Wheel <strong>Disc</strong>s
Three-Wheel <strong>Disc</strong> Brake Conversion (dneprdnepr.at/e/ .at/e/ga_monega.htm)• Based on Dnepr• <strong>Disc</strong> <strong>Brakes</strong> on All Three Wheels (<strong>Brembo</strong> d'Or – Gold <strong>Brembo</strong>)–Quick-Locking Mechanisms for Hydraulics–Adapters from Full Aluminum, etc.• Foot Brake Pedal Operates the Side Car - and Rear Wheel AND a Small Caliperbehind the front caliper• Real Integral Brake Assembly with Full Exchangeability of Wheels