instruction manual 1200w 125mm (5”) angle grinder - Toolbox
instruction manual 1200w 125mm (5”) angle grinder - Toolbox
instruction manual 1200w 125mm (5”) angle grinder - Toolbox
- No tags were found...

Create successful ePaper yourself
Turn your PDF publications into a flip-book with our unique Google optimized e-Paper software.
INSTRUCTION MANUAL1200W125MM (<strong>5”</strong>)ANGLE GRINDERAG125MAGINSTRUCTION MANUAL050922 ED4 JJ1
Dear CustomerIf you require any help with your product, whether it is a Warranty claim, spare part or user information, pleasephone our Help Line for an immediate response. Phone 1300 880 001 in Australia or 0800 445 721 in New Zealand.IntroductionYour new GMC power tool will more than satisfy yourexpectations. It has been manufactured under stringent GMCQuality Standards to meet superior performance criteria.You will find your new tool easy and safe to operate, and, withproper care, it will give you many years of dependable service.CAUTION. Carefully read through this entire InstructionManual before using your new GMC Power Tool. Take special care to heed the Cautions and Warnings.Your GMC power tool has many features that will make yourjob faster and easier. Safety, performance, and dependabilityhave been given top priority in the development of this tool,making it easy to maintain and operate.Environmental protectionRecycle unwanted materials instead ofdisposing of them as waste. All tools, hosesand packaging should be sorted, taken to thelocal recycling centre and disposed of in anenvironmentally safe way.Description of symbolsThe rating plate on your tool may show symbols. Theserepresent important information about the product or <strong>instruction</strong>son its use.Wear hearing protection.Wear eye protection.Wear breathing protection.Double insulated for additional protection.Conforms to relevant standards forelectromagnetic compatibility.SpecificationsNominal voltage:230–240Vac ~ 50HzInput power:1200WVariable speed: 4000 - 10,500min -1Insulation class:Double insulatedDisc size:<strong>125mm</strong>Spindle:M14Disc bore diameter:22.2mmSound pressure level:95 dB(A)Weight:2.7kg3
Safety <strong>instruction</strong>sWARNING. Read and understand all <strong>instruction</strong>s. Failure tofollow all <strong>instruction</strong>s listed below may result in electric shock,fire and/or serious injury. The term “power tool” in all of thewarnings below refers to your mains-operated (corded) powertool or battery-operated (cordless) power tool.Save these <strong>instruction</strong>sWork area• Keep work area clean and well lit. Cluttered and dark areasinvite accidents.• Do not operate power tools in explosive atmospheres,such as in the presence of flammable liquids, gases, ordust. Power tools create sparks which may ignite the dust orfumes.• Keep children and bystanders away while operating apower tool. Distractions can cause you to lose control.Electrical safety• Power tool plugs must match the outlet. Never modify theplug in any way. Do not use any adapter plugs with earthed(grounded) power tools. Unmodified plugs and matching outletswill reduce risk of electric shock.• Avoid body contact with earthed or grounded surfacessuch as pipes, radiators, ranges and refrigerators. Thereis an increased risk of electric shock if your body is earthed orgrounded.• Do not expose power tools to rain or wet conditions.Water entering a power tool will increase the risk of electricshock.• Do not abuse the cord. Never use the cord for carrying,pulling or unplugging the power tool. Keep cord away fromheat, oil, sharp edges or moving parts. Damaged or ent<strong>angle</strong>dcords increase the risk of electric shock.• When operating a power tool outdoors, use an outdoorextension cord suitable for outdoor use. Use of a cordsuitable for outdoor use reduces the risk ofelectric shock.Personal safety• Stay alert, watch what you are doing and use commonsense when operating a power tool. Do not use a powertool while you are tired or under the influence of drugs,alcohol, or medication. A moment of inattention whileoperating power tools may result in serious personal injury.• Use safety equipment. Always wear eye protection. Safetyequipment such as a dust mask, non-skid safety shoes, hardhat, or hearing protection used for appropriate conditions willreduce personal injuries.• Avoid accidental starting. Ensure the switch is in the offpositionbefore plugging in. Carrying power tools with yourfinger on the switch or plugging in power tools that have theswitch on invites accidents.• Remove any adjusting key or wrench before turningthe tool on. A wrench or a key that is left attached to arotating part of the power tool may result in personal injury.• Do not overreach. Keep proper footing and balance atall times. This enables better control of the power tool inunexpected situations.• Dress properly. Do not wear loose clothing or jewellery.Keep your hair, clothing and gloves away from moving parts.Loose clothes, jewellery or long hair can be caught in movingparts.• If devices are provided for the connection of dustextraction and collection facilities ensure that these areconnected and properly used. Use of these devices canreduce dust-related hazards.Power tool use and care• Do not force the power tool. Use the correct power toolfor your application. The correct power tool willdo the job better and safer at the rate for which itwas designed.4
• Always use the front handle and ensure a good grip on the<strong>grinder</strong> housing with one hand and the handle with the otherhand before proceeding with any work.• Make sure that the disc is not in contact with the work whenyou start the <strong>grinder</strong>.• Be careful not to damage the spindle or either of the discflanges. Damage to these parts could result in disc breakage.• Do not press the spindle lock button whilst the spindle isturning.• Only use good quality grinding and cut off discs. Cheap poorquality discs tend to glaze up which loads the motor and candamage it. Use discs for their designated purpose only. Forinstance, do not use cutting discs for grinding or metal wheelson masonry.• Watch out for flying sparks. Hold the tool at an <strong>angle</strong> ofapproximately 15º to 30º to the work piece surface.• Let the disc do the grinding or cutting at a reasonable feed, asoverloading will occur if too much pressure is applied and thedisc slows resulting in inefficient cutting and possible damageto the motor.• When using the <strong>grinder</strong>, use safety equipment including safetygoggles or shield, ear protection, dust mask and protectiveclothing including safety gloves.ALWAYS WEAR EYE PROTECTIONWear gogglesWear hearing protectionWear a breathing maskContents of cartonThe GMC AG125MAG Angle Grinder is supplied with thefollowing accessories as standard:• Pin wrench• Side handle• <strong>125mm</strong> metal cutting disc• Instruction <strong>manual</strong>UnpackingDue to modern mass production techniques, it is unlikely thatyour GMC Power Tool is faulty or that a part is missing. If youfind anything wrong, do not operate the tool until the parts havebeen replaced or the fault has been rectified. Failure to do socould result in serious personal injury.6
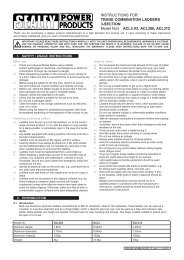
Know your productBefore using the <strong>angle</strong> <strong>grinder</strong>, familiarise yourself with all theoperating features and safety requirements.Use the tool and accessories only for the applications intended.All other applications are expressly ruled out.1. On/off switch2. Power lock-on button3. Spindle lock button4. Disc guard5. Front handle6. Mounting points forthe handle7. LED Overloadprotection system8. Motor housing149. Pin wrench10. Outer flange11. Disc12. Inner flange13. Variable speed dialwith soft start14. Quick release guard lever3Disc assembly showing flange requirementsDepressed disc (thicker than 4mm)648571321Depressed disc (4mm or less in thickness)Raised inner1010part facingthe disc9 912111211Raised innerpart facingaway fromthe disc7
Setting upMulti-position front handleScrew the front handle (5) into themost suitable mounting port (6)(left side or right side) to suit theapplication. Ensure that the handleis fully screwed in place and firm.Disc guardWARNING. Switch off the <strong>grinder</strong> and disconnect it from thepower point.NOTE. Grinding operations normally require the <strong>angle</strong> <strong>grinder</strong>to be held with the grinding disc parallel to the plane of theworkpiece whilst cutting operations normally require the <strong>angle</strong><strong>grinder</strong> to be held with the cutting disc at right <strong>angle</strong>s to theworkpiece. Take the time to find the best combination of fronthandle and slimline handle positions to suit the task on hand. Itcan make a considerable difference to the levels of convenienceand safety of operation.1. Open the quick release guard lever (14).2. Position the lug on the inside of the central guard ring in thevertical slot in the spindle cover and press the guard onto thespindle cover.3. Twist the guard to theappropriate position for eithergrinding or cutting.4. Lock the guard in position withthe quick release guard lever.OperationThis <strong>angle</strong> <strong>grinder</strong> can be used for grinding and cutting steel,stone or ceramic workpieces such as pipe, box section,rectangular, <strong>angle</strong> iron steel bar,house bricks and tiles. Do notattempt to grind wood or a softmetal such as lead. The materialwill quickly “fill” the disc and renderit useless.Before starting the <strong>grinder</strong> firstensure that the disc, disc guard andtool are in good condition.Position the guard (4) as described in the disc guard section sothat it will deflect hot sparks away from the operator.Switching on and off1. Plug the power cord into the power point.2. Start the tool by depressing the on/off trigger switch (1).Release the trigger to stop the tool.3. If you press the lock on button(2) while the trigger switch isdepressed, the switch is kept inthe operating position. To releasethe lock on button, press andrelease the trigger switch.4. Hold the <strong>grinder</strong> firmly while itis switched on and only applygentle pressure to the workpiece.Little more than the weight of thetool should be applied to give thebest and most efficient materialremoval. Forcing and excessivepressure can cause dangerousdisc fracture or damage tothe tool. Hold the <strong>grinder</strong> atapproximately 15° to 30º to thework and move slowly.8
5. Once the grinding or cuttingis finished, pull in and releasethe on/off switch (1) to stop the<strong>grinder</strong>.WARNING. Avoid flying sparks30ºand ensure they do not hit anyinflammable materials, as they are15ºvery hot and could cause personalinjury or a fire.WARNING. The disc continues to turn for a few seconds eventhough the switch is turned off. Keep your hands well away fromthe moving disc.Led overload protection systemOverloading the tool means the tool is being leaned onexcessively during use, slowing down the speed of the tool. As aresult of the motor slowing down, the internal fan does not workto its full capacity.1. The LED Overload protection system will alert you when it isoverloading.2. The <strong>grinder</strong> will warn you whenyou are approaching overload byflashing the Yellow light3. If you continue to ignore theyellow light or do not see it, thered light will come on and the<strong>grinder</strong> will immediately come toa stop.4. When this occurs, wait a brief moment then restart the<strong>grinder</strong>, however, take additional care not to press on the tooltoo much.Variable speedThe variable speed feature of this <strong>grinder</strong> enhances the grindingperformance and saves the disc from undue wear.1. The variable speed dial (13) is used to program the speed ofthe disc. The speed should be adapted to the material beinggrinded.2. Use your finger or thumb to turnthe dial forwards to increasethe speed and backwards todecrease it.3. Position “1” denotes the lowestspeed. Position “6” denotes thehighest speed.NOTE. Using the correct speed forthe job increases the life of the disc.Variable speed with soft startThis <strong>grinder</strong> is fitted with soft start technology. This featureoperates when you start the tool by slowly increasing the powerto the selected speed. The soft start feature eliminates any “kick”when the <strong>grinder</strong> is switched on. In conventional <strong>grinder</strong>s withoutsoft start the switch is heated up instantly thus reducing the lifeexpectancy. The soft start feature ensures a longer life for thetool.Replacing a discCAUTION. Switch off the <strong>grinder</strong> and disconnect it from thepower point.1. Turn the <strong>angle</strong> <strong>grinder</strong> on to its back and press the spindlelock button (3) and rotate the spindle until it locks.2. Insert the pins of the wrench (9) into the holes in the outerflange (10) and remove it and the old disc.NOTE. Do not remove the inner flange (12).9
WARNING. Do not use a disc marked with a lower RPM thanthat of the Max no load speed shown on the rating plate.3. Clean the flanges and check the new disc.4. Holding the <strong>angle</strong> <strong>grinder</strong> with the spindle facing upwards,check that the inner flange is on the spindle and correctlylocated. The two machined flat sections must face the <strong>angle</strong><strong>grinder</strong> and locate in the appropriate position on the spindle.5. Place the disc onto the spindle with the label facing the <strong>angle</strong><strong>grinder</strong>. The hole in the disc should locate onto the spindle andfit firmly into the spigot section of the inner flange.NOTE. Depending on whether the disc has a flat inner section ora depressed inner section, proceed as follows.6. For discs with a flat inner section,screw on the outer flange (10)with the protruding spigot sectionfacing away from the disc.7. For discs with a depressed innersection, screw on the outer flangewith the protruding spigot sectionfacing the disc so that it locates inthe hole in the disc.8. Hand tighten the outer flange untilthe disc is secure.9. Press the spindle lock button andtighten the flange with the wrench.10. Turn the new disc by hand,ensuring that it is tightly securedand that it rotates fully and doesnot wobble unduly.11. Run the <strong>angle</strong> <strong>grinder</strong>under no load for at least oneminute to ensure the new discis in good condition. Make sureyou are wearing all the safetygear and that you face the<strong>grinder</strong> away from you.CAUTION. Do not use excessive force to clamp the disc. It couldcrack it and cause failure during use.WARNING. Do not immerse the disc into any type of lubricantincluding water. This <strong>angle</strong> <strong>grinder</strong> is designed as a dry <strong>grinder</strong>/cutter. Failure to observe this warning could result in a fatalshock.LubricationThe grease in the gearbox will require replacement afterextensive use of the tool. Please go to a qualified service agentto perform this service.Power cord maintenanceIf the supply cord needs replacing, the task must be carried outby the manufacturer, the manufacturer’s agent, or an authorisedservice centre in order to avoid a safety hazard.Cleaning1. Keep the tool’s air vents unclogged and clean at all times.2. Remove dust and dirt regularly. Cleaning is best done with arag. Wear safety goggles or an eye shield and gloves whistcleaning.3. Re-lubricate all moving parts at regular intervals.4. Never use caustic agents to clean plastic parts.CAUTION. Do not use cleaning agents to clean the plastic partsof the tool. A mild detergent on a damp cloth is recommended.Water must never come into contact with the tool.General inspectionRegularly check that all the fixing screws are tight, particularly theouter flange. They may vibrate loose over time.10
Carefully read the entire Instruction Manualbefore using this product.Before returning this product for a Warranty Claim or any other reasonPlease Call 1300 880 001 (Australia) or 0800 445 721 (New Zealand)When you make your call, please have the following information at hand:GMC Product Type GMC Product CodeA GMC Service Engineer will take your call and, in most cases, will be able tosolve your problem over the phone.You are welcome to use this phone-in service to make suggestions or givecomments about any GMC product.With continuing product development changes may have occurred which renderthe product received slightly different to that shown in this <strong>instruction</strong> <strong>manual</strong>.The manufacturer reserves the right to change specifications without notice.Note: Specifications may differ from country to country.Helpline 1300 880 001 (Australia) or 0800 445 721 (New Zealand)The GMC 777 Helpline operates from 7am to 7pm, 7 days a week (EST). This allows you to contactGMC directly with any queries and technical questions you have regarding products.Save this Manual for future referenceGMC Head Office:45-55 South Centre Road, Melbourne Airport, Victoria, Australia 3045Telephone (03) 8346 1100 Fax (03) 8346 1200