Technical Pub (TP0290) - Gentex Corporation
Technical Pub (TP0290) - Gentex Corporation
Technical Pub (TP0290) - Gentex Corporation
- No tags were found...

Create successful ePaper yourself
Turn your PDF publications into a flip-book with our unique Google optimized e-Paper software.
When you replace components or install additional components on<strong>Gentex</strong> products, always use genuine factory-new <strong>Gentex</strong> parts. Thiswill ensure a correct fit and maintain the safety of the product. Useof non-<strong>Gentex</strong> parts (salvage, refurbished, etc.) for replacementor additional installation will void any product warranty and maycompromise the safety of the user.
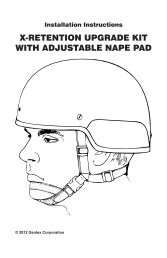
Installation Instructions: X-Retention Upgrade KitDescriptionThe X-Retention Upgrade Kit (Figure 1) enhances the stability of the U.S. ArmyACH-style helmets. A fixed nape pad remains securely in place to minimizehelmet rotation, especially with night vision goggles (NVGs). Dual chin strapadjustments allow proper chin strap positioning.The kit is designed to fit the U.S. Army TBH II, MICH, and ACH helmets, and the<strong>Gentex</strong> TBH II HC and TBH II HST helmets.Retention assemblyShoulder screwsWashersConical nutsFigure 1. X-Retention Upgrade Kit1
Tools and Materials Required• Two flat-tip screwdrivers• Torque tool (if available)• Removable thread-locking compoundProcedure1. Remove the four lateralpads (Figure 2) to reachthe attaching hardwareof the existing retentionassembly inside thehelmet. Note the positionof the pads.Lateral padLateral pad2. Remove the hardwareand the existingretention assembly fromthe helmet.NOTES:• Before installing thescrews in Step 3, applyremovable thread-lockingcompound to the screwthreads.• When tightening thescrews, apply a torque of80-100 inch-ounces (if atorque tool is available).If a torque tool is notavailable, tighten asmuch as possible usingtwo flat-tip screwdrivers.Lateral padX-retention strapWasherShoulder screwAttachment pointsLateral padFigure 2. Lateral Pads to Remove (Typical)Conicalnut3. Install the X-Retention Kitwith the shoulder screws,washers, and conical nutsat the four attachmentpoints (Figure 3).4. Reinstall the lateral pads.Figure 3. Retention Kit Attachment2
Ensure that all helmet adjustment mechanisms are properly adjustedfor a snug, secure fit at all times when the helmet is worn. Failure todo so can result in an unstable helmet that will not protect the wearer.5. Have the wearer don the helmet and buckle the chin strap (Figure 4).6. Ensure that the front edge of the helmet rests just above the eyebrows. Ifthe helmet is too high or too low, adjust the front strap slides up or down asneeded.7. Adjust the nape strap for a snug, secure fit.8. Pull the ends of the chin strap for a snug fit, and attach the ends to the pilefastener.9. Ensure that the helmet does not move about on the head. Tighten the strapsfurther if necessary.10. Release the chin strap buckle to remove the helmet.Front strap slide(both sides)Pile fastenerBuckleEnd of chin strap(both sides)End of nape strap(both sides)Figure 4. Retention Adjustment Points3
Part NumbersBelow are the part numbers for the X-Retention Upgrade Kit. For moreinformation, contact <strong>Gentex</strong> <strong>Corporation</strong>, P. O. Box 315, Carbondale, PA 18407;phone (570)282-3550; fax (570)282-8555. Visit www.gentexcorp.com.Description Part Number National Stock NumberX-Retention Upgrade Kit,Camouflage Green,Small/MediumX-Retention Upgrade Kit,Camouflage Green,Large/X-LargeX-Retention Upgrade Kit,Foliage Green,Small/MediumX-Retention Upgrade Kit,Foliage Green,Large/X-LargeX-Retention Upgrade Kit,Black,Small/MediumX-Retention Upgrade Kit,Black,Large/X-Large05B12101-1 N/A05B12101-2 N/A05B12101-3 8470-01-541-921405B12101-4 8470-01-541-921705B12101-5 N/A05B12101-6 N/A4
<strong>TP0290</strong> REV. 6 FEBRUARY 2012