Visual Studio 2010 Tutorial
Visual Studio 2010 Tutorial
Visual Studio 2010 Tutorial
- No tags were found...

Create successful ePaper yourself
Turn your PDF publications into a flip-book with our unique Google optimized e-Paper software.
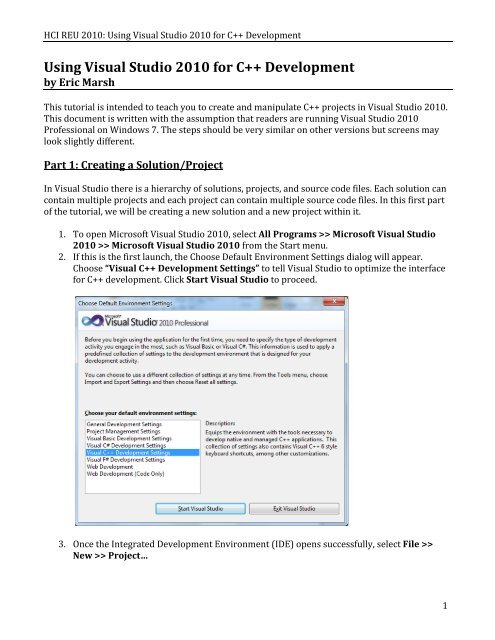
HCI REU <strong>2010</strong>: Using <strong>Visual</strong> <strong>Studio</strong> <strong>2010</strong> for C++ Development 4. In the New Project dialog, select <strong>Visual</strong> C++ >> General from the Installed Templates list. Select the “Empty Project” template. 5. Type “helloworld” in the Name field and “Day1” for the Solution name. Use the Browse… button to choose an appropriate Location for the project files. Make sure that Create directory for solution is checked. This will create a main directory with your solution name that will contain separate directories for your projects. In <strong>Visual</strong> <strong>Studio</strong>, you can have multiple projects in a single solution. Click OK. 2
HCI REU <strong>2010</strong>: Using <strong>Visual</strong> <strong>Studio</strong> <strong>2010</strong> for C++ Development Part 2: Adding Source Code Now that the solution and project have been created, it’s time to add some source code that will be used to generate a program. In this part we will add a new file and create a standard “Hello World!” application. 1. Right-‐click on the folder named “Source Files” in the Solution Explorer panel at the left side of the screen. Select Add >> New Item… 2. In the Add New Item dialog, select <strong>Visual</strong> C++ >> Code from the Installed Templates list. Select “C++ File (.cpp)” for the template and type a filename for the new file in the Name field at the bottom of the dialog. Feel free to use any name that you want but it is good practice to use descriptive names for source code files. Click Add. 3
HCI REU <strong>2010</strong>: Using <strong>Visual</strong> <strong>Studio</strong> <strong>2010</strong> for C++ Development Now it’s time to write some code! The sample below is the famous “hello world!” program. This is the first program in just about any basic tutorial for just about any programming language. It simply prints “Hello World!” to the screen. This program is intended to be a simple example of code structure, comments, and displaying static information to the user. 3. Type the “hello world!” code shown below into the .cpp file that you created in the previous step. 4
HCI REU <strong>2010</strong>: Using <strong>Visual</strong> <strong>Studio</strong> <strong>2010</strong> for C++ Development The first several lines of code (in green) are comments. It is good practice to comment your code and a header comment is important to provide a description of the code, who wrote it, etc… For the assignments in this course, you will be required to have header comments in all source code files and you are strongly encouraged to include meaningful comments throughout your code that might help a third party (or you, a year from now) understand how it works. The “#include ” statement tells the compiler to include the iostream header file, allowing for functionality from that file to be used in this program. The following line, “using namespace std;” tells the compiler that we will be using the standard library as our main namespace. The core of the program is the “main” function. This is where the compiler will look to initialize and run the program. The “int” indicates that this function will return an integer value when completed. It is customary for the main function to return an integer, just to verify that execution completed successfully. “cout” is a function from the iostream header file that will basically print anything in quotes as screen output. The “endl” is used for the end of a line, causing further output to be printed on the next line. The “cin” statement simply causes the program to wait until the user presses the Enter key. 5
HCI REU <strong>2010</strong>: Using <strong>Visual</strong> <strong>Studio</strong> <strong>2010</strong> for C++ Development 4. Once the code is written, the program must be built before it can be run. Under the Build menu, you will see several options. Since a solution can contain multiple projects, the item Build Solution will build every project within this solution. Otherwise, you can select to build a specific project by selecting Build helloworld. In this case, they both perform the same function since we only have a single project in this solution. 5. If there are any build errors, they will appear in the “Output” pane at the bottom of the screen. If not, it is now time to run your program. 6. Select Debug >> Start Debugging or press F5. This should execute the program, bringing up a black terminal window with the statement “Hello World!” If you have changed anything in your file since you last built it, a dialog will appear stating that the project is “out of date.” If so, simply click Yes and the program will be rebuilt and executed. 6
HCI REU <strong>2010</strong>: Using <strong>Visual</strong> <strong>Studio</strong> <strong>2010</strong> for C++ Development 7
HCI REU <strong>2010</strong>: Using <strong>Visual</strong> <strong>Studio</strong> <strong>2010</strong> for C++ Development 8
HCI REU <strong>2010</strong>: Using <strong>Visual</strong> <strong>Studio</strong> <strong>2010</strong> for C++ Development Part 3: Adding Another Project to an Existing Solution The procedure for adding additional projects to an existing solution is basically the same as when you created your first project. 1. Right click on your solution in the Solution Explorer. 2. Select Add >> New Project… 3. Select “Empty Project” and provide a Name for the new project. This time it will not ask for a solution name since we already told it which solution it should be a part of. 9
HCI REU <strong>2010</strong>: Using <strong>Visual</strong> <strong>Studio</strong> <strong>2010</strong> for C++ Development 4. Now you can add source code just like you did for the Hello World project above. 10
HCI REU <strong>2010</strong>: Using <strong>Visual</strong> <strong>Studio</strong> <strong>2010</strong> for C++ Development Part 4: Project Settings Sometimes developers need to make changes to the default project configuration. In this section, we will explore these possibilities. 1. Right click on a project name in the Solution Explorer and select Properties. A dialog box will appear. This is where you will specify various project properties. 11
HCI REU <strong>2010</strong>: Using <strong>Visual</strong> <strong>Studio</strong> <strong>2010</strong> for C++ Development 2. Select Configuration Properties >> C/C++. If you need to specify additional directories where the compiler should search for includes (header files, etc…), you can add them to the “Additional Include Directories.” This will be useful if you want to add libraries such as OpenSceneGraph, VRJuggler, or OpenCV. 12
HCI REU <strong>2010</strong>: Using <strong>Visual</strong> <strong>Studio</strong> <strong>2010</strong> for C++ Development 3. For some libraries, you will need to add library files called dependencies. Examples include osg.lib, vrj-‐2_2.lib, or cv200.lib (most have the .lib extension). To add libraries, browse to Configuration Properties >> Linker >> Input and change the “Additional Dependencies” setting. 13
HCI REU <strong>2010</strong>: Using <strong>Visual</strong> <strong>Studio</strong> <strong>2010</strong> for C++ Development 4. If the library files are not located in the <strong>Visual</strong> <strong>Studio</strong> default library directories, you will have to manually add the locations. These can be added to “Additional Library Directories” under Configuration Properties >> Linker >> General. 5. Browse the project property pages. You won’t have much use for most of the stuff in here but it is good to know what type of functionality is available. 14