The Cane Tip The Walking Staff Tip Small Cane ... - Lee Valley Tools
The Cane Tip The Walking Staff Tip Small Cane ... - Lee Valley Tools
The Cane Tip The Walking Staff Tip Small Cane ... - Lee Valley Tools
- No tags were found...

You also want an ePaper? Increase the reach of your titles
YUMPU automatically turns print PDFs into web optimized ePapers that Google loves.
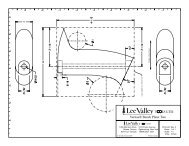
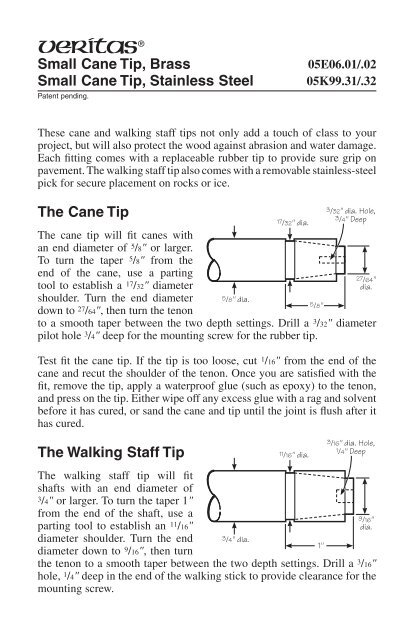
<strong>Small</strong> <strong>Cane</strong> <strong>Tip</strong>, Brass<strong>Small</strong> <strong>Cane</strong> <strong>Tip</strong>, Stainless SteelPatent pending.05E06.01/.0205K99.31/.32<strong>The</strong>se cane and walking staff tips not only add a touch of class to yourproject, but will also protect the wood against abrasion and water damage.Each fitting comes with a replaceable rubber tip to provide sure grip onpavement. <strong>The</strong> walking staff tip also comes with a removable stainless-steelpick for secure placement on rocks or ice.<strong>The</strong> <strong>Cane</strong> <strong>Tip</strong><strong>The</strong> cane tip will fit canes withan end diameter of 5 /8" or larger.To turn the taper 5 /8" from theend of the cane, use a partingtool to establish a 17 /32" diametershoulder. Turn the end diameterdown to 27 /64", then turn the tenonto a smooth taper between the two depth settings. Drill a 3 /32" diameterpilot hole 3 /4" deep for the mounting screw for the rubber tip.Test fit the cane tip. If the tip is too loose, cut 1 /16" from the end of thecane and recut the shoulder of the tenon. Once you are satisfied with thefit, remove the tip, apply a waterproof glue (such as epoxy) to the tenon,and press on the tip. Either wipe off any excess glue with a rag and solventbefore it has cured, or sand the cane and tip until the joint is flush after ithas cured.<strong>The</strong> <strong>Walking</strong> <strong>Staff</strong> <strong>Tip</strong><strong>The</strong> walking staff tip will fitshafts with an end diameter of3/4" or larger. To turn the taper 1"from the end of the shaft, use aparting tool to establish an 11 /16"diameter shoulder. Turn the enddiameter down to 9 /16", then turn5/8" dia.3/4" dia.17/32" dia.11/16" dia.3/32" dia. Hole,3/4" Deep27/64"dia.the tenon to a smooth taper between the two depth settings. Drill a 3 /16"hole, 1 /4" deep in the end of the walking stick to provide clearance for themounting screw.5/8"1"3/16" dia. Hole,1/4" Deep9/16"dia.
Test fit the tip. If the tip is too loose, cut 1 /16" from the end of the stick andrecut the shoulder of the tenon. Apply a drop of oil to the screw suppliedwith the walking stick tip and thread it into the tip until it just protrudesinto the cane tip cavity. <strong>The</strong> screw will keep glue from clogging the threadswhen gluing the tip onto the walking stick. Once you are satisfied with thefit, remove the tip, apply a waterproof glue (such as epoxy) to the tenon,and press on the tip. Either wipe off any excess glue with a rag and solventbefore it has cured, or sand the cane and tip until the joint is flush after ithas cured.<strong>The</strong> stainless-steel pick can be turned firmly into the tip by using a pieceof wire, hex key, or a drill bit as a Tommy bar.Note: A neater alternative to removing excess glue with solvent or bysanding is to use a glue resist such as Waxilit ® . Dry fi t the tip to the shaft,and apply a light coat of the glue resist to the wood and cane tip surfacesaround the assembled joint area. Glue the tip on, then peel off any excessglue while it is semi-cured and still in a fl exible state. Before applyingany fi nish, remove all Waxilit ®residue with a non-oily solvent, such asmethyl hydrate.Apply Waxilit ® here while dryfitting together.260© Veritas <strong>Tools</strong> Inc. 2009814 Proctor Avenue 1090 Morrison DriveOgdensburg, New York Ottawa, Ontario13669-2205 USA K2H 1C2 Canadacustomerservice@veritastools.comwww.veritastools.comINS-076 Rev. DPrinted in Canada.