FUTURELIGHT PHW-710 Quick Guide
FUTURELIGHT PHW-710 Quick Guide
FUTURELIGHT PHW-710 Quick Guide
- No tags were found...

You also want an ePaper? Increase the reach of your titles
YUMPU automatically turns print PDFs into web optimized ePapers that Google loves.
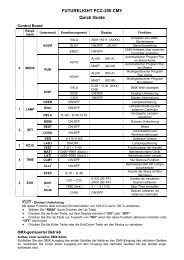
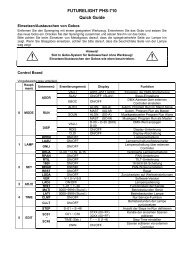
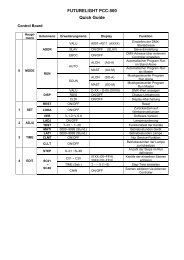
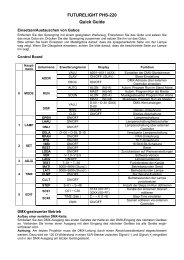
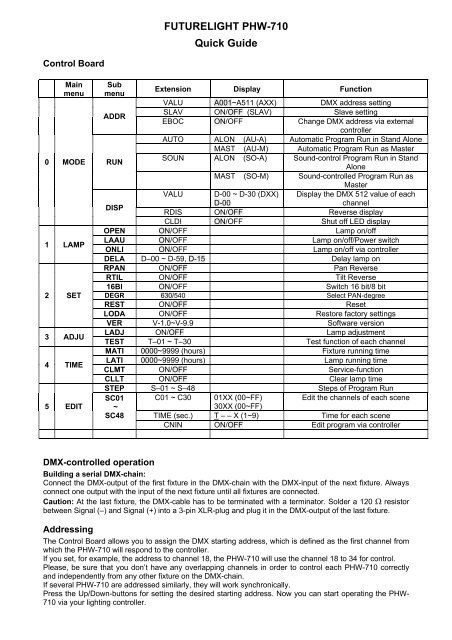
<strong>FUTURELIGHT</strong> <strong>PHW</strong>-<strong>710</strong><strong>Quick</strong> <strong>Guide</strong>Control BoardMainmenu0 MODE1 LAMP2 SET3 ADJU4 TIME5 EDITSubmenuExtension Display FunctionVALU A001~A511 (AXX) DMX address settingADDRSLAV ON/OFF (SLAV) Slave settingEBOC ON/OFF Change DMX address via externalcontrollerAUTO ALON (AU-A) Automatic Program Run in Stand AloneMAST (AU-M) Automatic Program Run as MasterRUNSOUN ALON (SO-A) Sound-control Program Run in StandAloneMAST (SO-M) Sound-controlled Program Run asMasterVALU D-00 ~ D-30 (DXX) Display the DMX 512 value of eachDISPD-00channelRDIS ON/OFF Reverse displayCLDI ON/OFF Shut off LED displayOPEN ON/OFF Lamp on/offLAAU ON/OFF Lamp on/off/Power switchONLI ON/OFF Lamp on/off via controllerDELA D–00 ~ D-59, D-15 Delay lamp onRPAN ON/OFF Pan ReverseRTIL ON/OFF Tilt Reverse16BI ON/OFF Switch 16 bit/8 bitDEGR 630/540 Select PAN-degreeREST ON/OFF ResetLODA ON/OFF Restore factory settingsVER V-1.0~V-9.9 Software versionLADJ ON/OFF Lamp adjustmentTEST T–01 ~ T–30 Test function of each channelMATI 0000~9999 (hours) Fixture running timeLATI 0000~9999 (hours) Lamp running timeCLMT ON/OFF Service-functionCLLT ON/OFF Clear lamp timeSTEP S–01 ~ S–48 Steps of Program RunSC01 C01 ~ C30 01XX (00~FF)Edit the channels of each scene~30XX (00~FF)SC48 TIME (sec.) T – – X (1~9) Time for each sceneCNIN ON/OFF Edit program via controllerDMX-controlled operationBuilding a serial DMX-chain:Connect the DMX-output of the first fixture in the DMX-chain with the DMX-input of the next fixture. Alwaysconnect one output with the input of the next fixture until all fixtures are connected.Caution: At the last fixture, the DMX-cable has to be terminated with a terminator. Solder a 120 Ω resistorbetween Signal (–) and Signal (+) into a 3-pin XLR-plug and plug it in the DMX-output of the last fixture.AddressingThe Control Board allows you to assign the DMX starting address, which is defined as the first channel fromwhich the <strong>PHW</strong>-<strong>710</strong> will respond to the controller.If you set, for example, the address to channel 18, the <strong>PHW</strong>-<strong>710</strong> will use the channel 18 to 34 for control.Please, be sure that you don’t have any overlapping channels in order to control each <strong>PHW</strong>-<strong>710</strong> correctlyand independently from any other fixture on the DMX-chain.If several <strong>PHW</strong>-<strong>710</strong> are addressed similarly, they will work synchronically.Press the Up/Down-buttons for setting the desired starting address. Now you can start operating the <strong>PHW</strong>-<strong>710</strong> via your lighting controller.