Optics Laser Shoot Surface instructions - Science Olympiad
Optics Laser Shoot Surface instructions - Science Olympiad
Optics Laser Shoot Surface instructions - Science Olympiad
- No tags were found...

You also want an ePaper? Increase the reach of your titles
YUMPU automatically turns print PDFs into web optimized ePapers that Google loves.
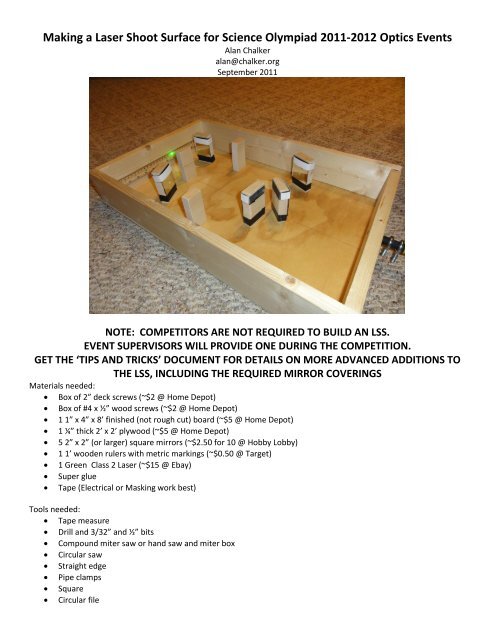
Construction consists of the following steps:1. Mark off lines on the 1” x 4” at the following distances from one end (all in inches): 23.5, 47, 60.75, 74.5, 76.5,78.5, 80.5, 82.5, 84.5, 86, 87.5, 892. Use the straight edge to draw a line down the exact middle of one 4” side of the board.3. Use the compound miter saw to cut the 1” x 4” on each of the marked line, as square as possible (note somehome improvement stores will do this for a small fee). You should end up with the following pieces (plus someextra leftover): 2 x 23.5”, 2 x 13.75”, 5 x 2”, 3 x 1.5”4. Use the straight edge to mark a line on the 2’ x 2’ plywood, 15.25” from one side, and cut it with a circular sawYour major pieces should somewhat look like this:5. Stand the 1” x 4” pieces up on end around the edges of the plywood, in approximately the correct position theywill end up in. Make sure the lines marking the middle all face inwards. Note that the longer pieces will overlapthe edges of the side pieces (as seen in the picture on the first page).6. Use a pipe clamp to hold the pieces together as shown below. Make sure the pieces are as square as possibleand firmly seated against the plywood base. Note the pipe clamp should be positioned at the bottom of theboards to allow room to drill holes.
7. Drill holes in each end of the long pieces with the 3/32” bit as shown below left. Note the screws will end up inthe orientation shown below right.8. Screw in 4 of the 2” deck screws into the holes to hold the sides in place.9. Move the pipe clamps up to the top edge of the boards (covering the screws) and repeat the drilling processwith the bottom edges such that there are 2 screws in each corner.10. Use the pipe clamps to clamp the side frame to the bottom plywood base, as shown below:11. Flip the LSS over and drill 4 3/32” holes offset from each corner about an inch in a clockwise direction as shownin the picture below.12. Screw the base to the side frame with 4 2” deck screws.
13. Unscrew the plywood base and set the side frame on edge. Align the metric edge of the wooden rulers with themiddle lines of 1 short edge as shown below.14. Use the 3/32” drill to drill through the ruler and into the side boards.15. Use the #4 x ½” wood screws to hold the ruler in place.16. Mark the exact middle point of the short edge that does not have a ruler attached to it and drill a ½” holethrough that point. A drill press is best used here to ensure the hole is perfectly square.17. The ½” hole will be slightly too small for most laser pointers. Use the circular file to enlarge it as shown below.Go slowly and test fit the laser often in order to ensure a very tight fit.18. Reassemble to side frame to the base and turn on the laser. Mark the point where it hits the far wall with asmall pencil mark.19. Use the square to translate the mark from the target point and the center of the laser to the plywood base asshown below.
20. Remove the plywood base and use a straight edge to draw a straight line between the two marks made in theprevious step, as shown below. This will be the middle line.21. Use super glue to glue the mirrors to the middle of the 2” wide mounting blocks as shown below. You shouldalso use wrap tape around the top and bottom of the mirror to ensure it doesn’t fall off. Label the prefinishededges of the mounting blocks as top or bottom, and the edges that you cut as the sides, in order to ensure themirror stand at right angles to the base.22. The smallest block is used as the barriers(3 in Division C, 1 in Division B). A setup with laser hitting the targetpoint is shown below and on the first page.NOTE: GET THE ‘TIPS AND TRICKS’ DOCUMENT FOR DETAILS ON MORE ADVANCEDADDITIONS TO THE LSS, INCLUDING THE REQUIRED MIRROR COVERINGS