Digi Master L-718 - Sekonic
Digi Master L-718 - Sekonic
Digi Master L-718 - Sekonic
- No tags were found...

You also want an ePaper? Increase the reach of your titles
YUMPU automatically turns print PDFs into web optimized ePapers that Google loves.
SEKONICDIGI MASTER L-<strong>718</strong>Operating Instructions
ContentsParts Designations .......................................... 2Liquid Crystal Display ..................................... 4Mode Selection and OperationReference Table ............................................. 6Accessories1. Lumisphare ................................................... 82. Lumidisc ........................................................ 83. Reflected-light filter ........................................ 94. Viewfinder 5° (sold separately) ...................... 95. Synchro cord (sold separately) ...................... 9Preparing the Meterfor Operation1. Insert the batteries ....................................... 102. Checking the batteries ................................. 103. Selecting measuring mode .......................... 114. Setting ISO sensitivity ................................. 135. Setting shutter speed .................................. 136. Display lighting ............................................ 147. Running-lock for continuousreading ....................................................... 14Wireless (cordless) Measurementusing Electronic Flash Unit .......................... 15Wired Measurement using FlashUnit with Synchro Cord ................................ 16Cumulative Measurement usingElectronic Flash Unit ..................................... 17Ambient Light Measurement ........................ 18Memory Display Function ............................. 20Post-Measurement Calculation .................... 22Contrast Metering for LightingBalance .......................................................... 24Illuminance (Lux) Measurement ................... 25Adjusting the Balance of the Meter .............. 26Care of the Meter ........................................... 27Specifications ................................................ 281
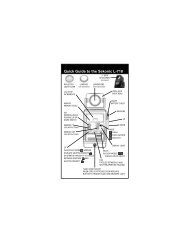
Parts DesignationsLumisphare (interchangeable withLumidisc and Reflected Light Filter)Swivel headHolder for swivel headTripod threadSetting mark for LumisphareBattery chamberMeasuring switchPower switchLiquid crystal displayCarrying strap eyeletUP/DOWN keyMode selection keyISO keyMemory-off keyMemory keyF/T selection keyF/EV selection keyMulti-measurement keyDisplay-light keySlide coverSynchro terminal22Lumidisc23Reflected-Light Filter24Synchro cord, 5m length(sold separately)23
Liquid Crystal Display(1) b.c. mark (battery check) isdisplayed when the meter isswitched on.(2) <strong>Digi</strong>tal value of the measuredF-stop or EV is shown (f/1~f/90 or EV(- 1) ~ EV25), whenthe meter is used in T-prioritymode.(3) F-stop value is set in F-prioritymode for ambient lightmeasurement.(4) E.u. (underexposure) or E.o.(overexposure) mark isdisplayed when the measuringrange is exceeded.Any of the following symbols isdisplayed depending on the modeselection.for wireless (cordless)measurement for flash lightfor wired measurement forflash lightfor cine modeIn case of ambient lightmeasurement (excepting cinemode), no symbol mark isindicated.This display comes into operationwhen the multi-measurement key ispressed in both modes of wirelessand wired measurement for flashlight. The number of cumulativeflashes is limited up to 9. If itexceeds 9, the E mark (error) isindicated.Display for film speed movesthrough a range of ISO 3 ~ ISO8000 by pressing either UP orDOWN key while holding the ISOkey depressed.By pressing F/EV key, the indicatedsymbol is converted from F to EV,and vice versa. When the meter isused in the flash mode, only F markis displayed.When the meter is used in T-prioritymode,(1) F-stop number is also displayedin bar-dot symbols at 1/2 F-stopincrements.(2) The measured F-stop valuesare indicated in bar dot symbolby pressing the memory keyafter each measurement. Thenumber of memorized values islimited up to 2.(1) Battery capacity is shown whenthe meter is switched on.(2) Bar symbols indicate thefractions of F-stop or EV value.(1) <strong>Digi</strong>tal value of the measuredshutter speed is shown in thisdisplay (30min. ~ 1/8000sec.),when the meter is used inF-priority mode.(2) Shutter speed is set in T-prioritymode;for flash light:1sec. ~ 1/500sec.for ambient light:30min. ~ 1/8000sec.for cine scale:6fps. ~ 128fps.4
6Mode Selection and Operation Reference Table
Accessories1. LumisphareUse Lumisphare when you wish tomeasure incident light for portraits andthree-dimensional subjects.< Mounting >Match the red dot on the Lumisphareframe to the setting mark on the swivelhead. Gently rotate the sphareclockwise until it clicks securely intoplace. To remove, rotate the spharecounter-clockwise.Point the Lumisphare accurately towardthe camera from the subject position.Swivel head is rotatable 270°horizontally and 90° upward.2. LumidiscUse Lumidisc when you wish tomeasure lighting contrast and lux aswell as the exposure of singledimensionalsubjects.< Mounting >Same as for the Lumisphare.Hold the meter at the subject position andpoint the Lumidisc accurately toward thelight source. When measuring theexposure of two-dimensional subjects,point the Lumidisc toward the camerafrom the subject position.3. Reflected-light filterUse Reflected-light filter when you wishto measure the reflected light(brightness) of subject. Use it tocalculate the relative brightness ratio(illumination contrast of subject) foradjusting lighting balance, or when it isdifficult to take incident lightmeasurement.< Mounting >Same as for the Lumisphare.Point the reflected-light filter accuratelytoward the subject. When you wish tomeasure some part of the subject, doso as close to the subject as possible.4. Viewfinder 5°(sold separately)Use Viewfinder in the same way as thereflected-light filter to measure reflectedlight. With a light acceptance angle of 5°you can make a spot measurement ofdistant subjects.5. Synchro cord(sold separately)Synchro cord connects the meter to theflash unit for measuring flash light inwired measurement mode. Synchro cord,5 meters length, has 3 plugs so that itcan simultaneously synchronize themeter with the flash unit and the camera.The terminal on the meter has a lockingmechanism to ensure a secureconnection. To disconnect the cord,simply pull the ring attachment towardyou to release the locking mechanism.8
Preparing the Meter for Operation1. Insert the batteriesDIGI MASTER requires 2 pcs of AAsize pen-light battery (1.5V x 2).(1) Open the battery chamber cover bysliding it in the direction of arrow.(2) Insert the batteries carefully aligning(+) and (-) polarities as indicatedinside the chamber.(3) Replace the cover by sliding it andinserting its notch into the slot of themeter.(3) DIGI MASTER is equipped with autoshut-off function. If you leave themeter inactive for about 5 minutes,the power is automatically switchedoff. If you wish to use the meteragain, slide the power switch back toOFF position once and then switchthe meter on again.3. Selecting measuring mode< NOTE >• After changing the batteries, pleaseswitch the meter ON once, and thenOFF. It prevents the unexpectedbattery consumption that may occurdepending on the status of electriccircuit of the meter.• When not using the meter for a weekor more, remove the batteries fromthe meter. It prevents any internaldamage arising from battery leakage.2. Checking the batteriesCheck the battery capacity before usingthe meter. A weak battery does notassure the correct light readings.(1) Slide the power switch to ONposition. Then b.c. and dot symbolmarks are displayed for about0.5sec. to indicate the battery level(Fig. 1). If the battery is too weak togive a correct light reading, the b.c.mark flashes.(2) After checking (for about 0.5sec.),the display is automaticallychanged to the measuring mode(Fig. 2). If you wish to keep the b.c.and dot marks indicating, switchthe meter ON while depressing ISOkey. The marks keep indicatinguntil you stop depressing the ISOkey1011
(3) In the ambient light mode,(a) T-priority measurement orF-priority measurement canbe selected by pressing theF/T selection key (Fig. 7).4. Setting ISO sensitivityPress either side of UP/DOWN key whiledepressing ISO key. Film speed (ISOsensitivity) can be set within the range ofISO 3 ~ ISO 8000 (Fig. 9).The set value of ISO sensitivity ismemorized even if the meter is switchedoff or the measuring mode is changed.(b) EV measurement can beselected by pressing the F/EVselection key in the F-prioritymode (Fig. 8).5. Setting shutter speedPress either side of UP/DOWN key. Thedisplay of shutter speed can be changedwithin the range of 30min. ~ 1/8000sec.for ambient light measurement, and1sec. ~ 1/500sec. for flash lightmeasurement (Fig. 10).After the display of 1/8000sec. the cinescale is indicated (8, 16, 24, 32, 64 and128fps.). In this case the symbol C isdisplayed (Fig. 11).The set value of shutter speed (includingdine scale) is memorized even if themeter is switched off.1213
Wireless (cordless) Measurement usingElectronic Flash Unit6. Display lightingDIGI MASTER is equipped with a backgroundillumination for LCD. Electroluminescence ''ECLAT" illuminates theLCD while the display-light key (D.L.) isdepressed (Fig. 12).In case the photographing subject is too far to use synchro cord, or in casethe synchro cord disturbs photographing, flash light can be measuredwithout connecting the cord.(2) Set the film speed (ISO) andshutter speed (T) as shown in theparagraphs for “Preparing theMeter for Operation”.7. Running-lock for continuousreadingThe measuring switch can be locked forcontinuous reading for ambient light.(1) Switch the meter ON.(2) Rotate the switch knob clockwiseuntil the slit on the knob matches tothe white dot while depressing theknob.(3) Release the locking function after thereading is over. While the measuringswitch is locked, auto shut-offfunction does not work.(4) While the symbol is flashing (forabout 90sec.), fire the flash unitby pressing its test button.(5) The appropriate F-stop value isdisplayed on the meter. Themeasured value is indicated in dualdisplay by F-stop number with barsymbols and bar-dot symbol marks(Fig. 15).• Running-lock is only usable forambient light measurement, not forflash light.14• The display continues to indicate themeasured value for about 5 minutesafter measurement unless thefollowing measurement is made.After this period of time the autoshut-off circuit operates and turnsthe display off.15
Wired Measurement using Flash Unitwith Synchro CordCumulative Measurement usingElectronic Flash UnitWired measurement is recommendable when you measure the flash lightfrom the subject position, or when the meter fails to register flash light inwireless (cordless) measurement; for example, close to a fluorescent lamp,or in high ambient condition, and so forth.When you are unable to obtain sufficient illumination with a single flash oryou try for special effects using a multiple exposure technique, there may becases that you wish to use your flash repeatedly. In such cases, you shouldset the meter to the cumulative measurement mode. Cumulativemeasurement is usable for both wireless (cordless) and wiredmeasurements for flash light.(2) Set the film speed (ISO) and shutterspeed (T) as shown in theparagraphs for “Preparing the Meterfor Operation”.(3) Connect the synchro cord to thesynchro terminal of meter and theflash unit.(4) Point the Lumisphare accuratelytoward the camera from the subjectposition, and press the measuringswitch to fire the flash.(5) The appropriate F-stop value isdisplayed on the meter (Fig. 18).For repeat measurement, pressthe measuring switch again.< NOTE >• The notes for wireless measurementare also applicable to wiredmeasurement.(1) Before pressing the measuringswitch, set the cumulativemeasurement mode by pressing themulti-measurement key. The symbolof MO is indicated on the display(Fig. 19).(2) Measure the flash light as shown inthe paragraphs for “Wireless(cordless) Measurement usingElectronic Flash Unit” or “WiredMeasurement using Flash Unit withSynchro Cord”.(3) The reading and the number ofcumulative frequency are displayedautomatically each time the flash isfired (Fig. 20). The maximumpossible cumulative flashes is 9. Ifthe flash is fired 10 or more times,the number of cumulative flashes isreplaced by E mark (Error) and nofurther reading is possible (Fig. 21).(4) To repeat the cumulativemeasurement, press the multimeasurement key once to releasethe current reading. And press themulti key again to prepare the freshreading.In case of wireless (cordless)measurement, pressing themeasuring switch can also releasethe current reading.• Memory display function (refer topage 20) is not usable if the meter isused in the cumulativemeasurement mode.1617
Ambient Light MeasurementMeasuring ambient light, whether it is daylight or standard electric light, is afairly simple matter using either incident or reflected light method.• F-priority and T-priority can beconverted by pressing F/Tselection key (Fig. 25)(2) Set the film speed (ISO) and shutterspeed (in T-Priority mode) as shownin the paragraphs for “Preparing theMeter for Operation”.When you use the meter in F-prioritymode, set the film speed (ISO) andF-stop value.(3) Press the measuring switch. Theappropriate F-stop value (or shutterspeed) is displayed on the meter(Fig. 23).(4) If the measuring switch is keptdepressed, the display gives acontinuous reading of the changesin brightness.• F and EV measurement can also beconverted by pressing F/EV selectionkey (Fig. 26)(5) When the measuring range isexceeded, E.u. (underexposure) orE.o. (overexposure) mark isdisplayed (Fig. 24).1819
Memory Display FunctionDIGI MASTER is equipped with a memory function for measured 2 F-stopvalues. This function is usable for both wireless (cordless) and wiredmeasurements for a single flash light as well as ambient light measurementin T-priority mode, but not for cumulative flash measurement.(4) Memory mode is released bypressing the memory-off key(Fig. 30).(1) After measurement, press thememory key. The measured F-stopvalue is memorized and displayed inbar dot symbol (Fig. 27).(2) The number of measurement tobe memorized is limited up to 2(Fig. 28).(3) If you press the memory key after 2dots have been displayed, the thirddot starts flashing (Fig. 29). After 2or 3 sec., flashing stops and thethird dot is also remaining on thedisplay. This third dot is not adisplay of memorized value, and willbe replaced by the followingmeasurement.2021
Post-Measurement Calculation(1) Post-measurement calculation bychanging ISO sensitivityBy changing ISO sensitivity themeasured F-stop value isautomatically changed to theappropriate one corresponding tothe changed ISO value (Fig. 31).This calculation is applicable to allmeasuring modes, both flash andambient light measurement.(3) Post-measurement calculation bychanging F-stop value :By changing the set F-stop valuethe measured shutter speed isautomatically changed to theappropriate one corresponding tothe changed F-stop value (Fig. 33).This calculation is applicable onlyfor ambient light measurement inF-priority mode.(2) Post-measurement calculation bychanging T value :By changing the set shutterspeed (T) the measured F-stopvalue is automatically changed tothe appropriate one correspondingto the changed T value (Fig. 32).This calculation is applicable onlyfor ambient light measurement inT-priority mode.2223
Contrast Metering for Lighting BalanceIlluminance (Lux) MeasurementWhen calculating a desired lighting balance, DIGI MASTER can be usedto measure the brightness of main and fill-in lightings from the subjectposition.DIGI MASTER can be used as an expendient Lux meter when used withthe Lumidisc in ambient light measurement mode.(1) Mount the Lumidisc instead ofLumisphare for usual incident lightmeasurement.(2) Select the measuring mode, and setthe ISO sensitivity and shutter speed(T) as shown in the paragraphs for“Preparing the Meter for Operation”.(3) Point the center of Lumidiscaccurately toward the center of axisof the main lighting source from thesubject, and measure the lightaccording to the measuring methodfor the respective mode.(4) Using the same procedure, measurethe fill-in light(s). In this case, be surethat the meter is held so that it is notinfluenced by the main lightingsource.(5) The F-stop difference between themain and fill-in lighting sources islighting contrast ratio (Table 1).< NOTE >• In case of the measurement for F-stop value, memory displayfunction (refer to page 20) is usefulfor this metering.Difference inContrast ratioexposure reading1 2 : 11 1/2 3 : 12 4 : 13 8 : 14 16 : 15 32 : 1(Table 1)(2) Set the ISO sensitivity to ISO 100.(3) Press the F/EV selection keyand select EV mode.(4) Hold the meter so that the Lumidiscis parallel to the plane to bemeasured, and press themeasuring switch.(5) The measured EV value can beconverted to the corresponding Luxvalue using the (Table 2).2425
Adjusting the Balance of MeterCare of the MeterWhile every effort has been made to ensure the most accurate standardcalibrations as applied by SEKONIC for your DIGI MASTER, provision hasbeen made for an adjustment of approximately ± 1EV by correcting thesetting of the dial on the underside of the swivel head. It is recommendedthat you test the meter fully in actual photographic conditions beforeadjusting it to suit your preference.(1) Carefully apply a screwdriver to theslot in the dial on the underside ofthe swivel head and turn it gently.(2) If you turn the dial clockwise, youcan increase the index whichreduces exposure whenphotographing.(3) If you turn the dial counter-clokwise,you can reduce the index whichincreases exposure whenphotographing.< NOTE>• Do not touch this dial unless youmake an adjustment.DIGI MASTER is a high-precision instrument containing delicate electronic partsand components, and you are recommended to handle the meter with due care.• Avoid dropping or shocking the meter.• Don't store the meter in high temperature or high humidity locations.• Keep Lumisphare and Lumidisc clean and free from scratches.• To avoid unnecessary battery drain, keep the meter switched off unless actually inuse. When not using the meter for a week or more, remove the batteries from themeter in order to prevent any internal damage arising from battery leakage.However note that the memory settings are tossed when the battery is removed.• Operating temperature : 0°C ~ (+)40°C• Storage temperature : (-)20°C ~ (+)60°CIn the event that servicing is required, contact your nearest service agency. When yousend the meter to service agency by ordinary mail, it should be carefully packed in acarton box using some shock-absorbing material at least 3cm in thickness.2627
SpecificationsMeasuring system : Incident and reflected light type for both flash and ambientlightMeasuring range : f/1.4 ~ f/90+0.9AV / ISO 100 (for flash light)EV(-)1 ~ EV19.9 / ISO 100 (for ambient lightmeasurement)Repeat meteringaccuracy± 0.1 EVCalibration constants : C=340 K=12.5 (for Lumidisc : C=250)Light receiving partSensor:Silicon PhotodiodeSwivel head : 270° horizontally and 90° upward rotatableAttachments : Lumisphare and Lumidisc for incident light, Reflected-lightfilter (acceptance angle 54°) and Viewfinder 5° (soldseparately)DisplayMeasuring mode :Film speed :Shutter speed :f/stop :EV scale : (-)6 ~ 25.9Other display :Wired and wireless measurements for flash light, wired andwireless cumulative flash measurements, ambient lightmeasurement, cine scale and EV measurementISO 3 ~ 8000 at 1/3 SV unit1sec. ~ 1/500sec. for flash light30min. ~ 1/8000sec. for ambient lightcine scale : 8, 16, 18, 24, 32, 64 and 128fps.1.4 ~ 90+0.9AV for flash light1.0 ~ 90+0.9AV for ambient lightE.u. (underexposure), E.o. (overexposure) and batterycheckDisplay illumination : Electro Luminescence (“ECLAT” manufactured by Elix Co.,Ltd., subsidiary of <strong>Sekonic</strong>)Power Bourse : 2 x AA pen light battery (1.5V x 2)Standard accessories : Lumisphare, Lumidisc, Reflected-light filter, neck strap,2 batteries and caseDimensions andweight :157 x 68 x 28mmabout 190 grams (excl. batteries)28