Light Emitting Diodes - AeroElectric Connection
Light Emitting Diodes - AeroElectric Connection
Light Emitting Diodes - AeroElectric Connection

You also want an ePaper? Increase the reach of your titles
YUMPU automatically turns print PDFs into web optimized ePapers that Google loves.
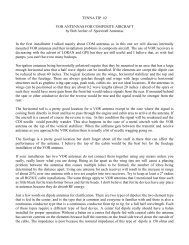
Bob Nuckolls6936 Bainbridge RoadWichita, Kansas 67226-1008Voice/Fax: 316-685-8617E-mail: nuckolls@aeroelectric.comMarch 28, 1998<strong>Light</strong> <strong>Emitting</strong> <strong>Diodes</strong>I remember when I put my hands on a light emitting diode(LED) for the first time . . . it was about 28 years ago. Idon't remember what I paid for it. Undoubtedly, a great dealmore than they cost now. The light output was pretty small,about 2 mCd (miniCandelas) as I recall. None-the-less, itLEDs should not be confused with laser diodes althoughthey are cousins. Unlike an incandescent lamp LED's aremuch more efficient. About 97% of the energy used topower an incandescent lamp comes off as heat or otherradiation other than visible light. LEDs tend to be moreefficient by a factor of 10 or better.Unlike incandescent lamps that are rated for an operatingvoltage our solid-state lamps are current devices. Thevoltage required to drive a red LED into conduction issomething on the order of 1.7 volts; green ones seem tocheck in at about 2.3 volts. However, irrespective of howmuch current you push though it, an LED's operatingvoltage doesn't vary much.Figure 1.was a truly amazing device. No heat, very small powerrequirements (approx 2 Volts at 20 milliamperes . . . only40 milliwatts). LEDs were relatively rare in consumerproducts then. Pocket calculators used them for displays,some wrist watches had LED displays too. You couldn'tleave them on all the time due to their relatively high powerdrain . . . a button on the side of the watch would illuminatethe digits to display current time. Car radios and homestereos used them for "stereo" indicator lights. Some highend power amplifiers had LED bar graphs to display peakpower output. Nowadays, LEDs are everywhere. They'reinexpensive, available in a variety of colors and muchbrighter. LEDs with light outputs on the order of 15,000mCd are not uncommon. These devices will throw a spot oflight on the wall 20 feet away!For example, I powered the larger of the two LEDs shownhere with my bench power supply. There was visible lightoutput at 3 milliamperes of input current where the voltageacross the lamp was 1.5 volts. Increasing the current to 20milliamps (rated current) raised the voltage to only 1.6volts. Stuffing 100 milliamperes to it (5 times overload) gotme a lot more light with only 1.7 volts dropped across thelamp. Hmmm . . . if we hook these guys right up to 12 voltsthe current goes out of sight and smokes the little feller.Figure 2.Copyright 1998 Robert L. Nuckolls, III, Wichita, Kansas. All rights reserved. This document may be reproduced electronically or mechanicallyfor distribution in a not-for profit, educational endeavor if it is published in its entirety and without modification.Page 1
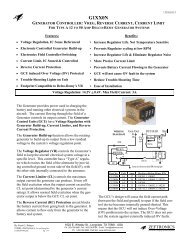
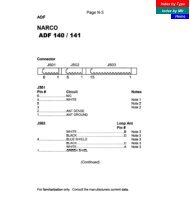
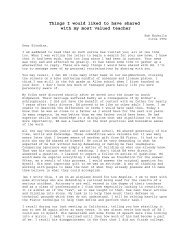
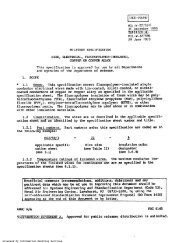
The schematic in Figure 2 shows how to get an LEDilluminated. A resistor in series is used to limit the currentto the lamp's rated value. In this case, we've designed for a20 milliamp rated lamp running from a 14 volt bus. Theresistor sets the lamp's operating current in accordance withan Ohm's Law calculation:(1) R = E / I(2) R = (14 - 1.7) / .020(3) R = 615 OhmsWhere:R = calculated value for the dropping resistor.E = voltage to drop across the resistor (in this case 12.3volts) and . . .I = the operating current for the LED (0.020 amps).A second consideration in sizing the resistor is to calculatethe energy dumped off as heat:(4) W = E * I(5) W = 12.3 * 0.020(6) W = 0.246 WattsWhere:W = power dissipated in the resistor in WattsE = voltage drop across the resistor (12.3 volts) and . . .I = current through the resistor (0.020 amps).Figure 3. LED Mounting Suggestion.Copyright 1998 Robert L. Nuckolls, III, Wichita, Kansas. All rights reserved. This document may be reproduced electronically or mechanicallyfor distribution in a not-for profit, educational endeavor if it is published in its entirety and without modification.Page 2
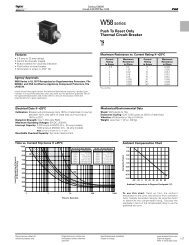
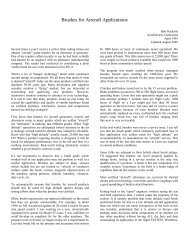
If you try to purchase a 615-ohm resistor, you'll find that thenearest standard value is 620 ohms. 1/4 Watt (or 250milliwatt) resistors are also a standard size. In this case,we've calculated that almost exactly 250 milliwatts of heatwill be dumped off causing the resistor to operate right atthe top of it's rated capability. Here, I would select the nextlarger resistor rating of 500 milliwatts so that we don't workit so hard.Note the "A" (anode) and "K" (cathode) markings on boththe schematic and pictorial representations of the LED.Before the LED's leads are cut, one lead is generally longerthan the other. Further, the long lead may be adjacent to asmall "flat" molded into the LED's base flange. The longlead next to the flat is the cathode connection (or minussupply lead) for the LED. Now, let's talk about somecommon myths I've heard circulated recently about LEDs.resistant stranded conductors and (2) mount the device sothat it's appearance is appropriate to an aircraft instrumentpanel. Figure 3 suggests one way to accomplish both goals.Drilling out a piece of standard threaded fastening hardware(in this case, a capscrew) can provide a sturdy pocket wheresmall, stranded leadwires can be soldered to short stubs ofthe LED's original solid leadwires. An appropriate amountof 5 minute epoxy can be used to retain the LED and wiresin a single, rugged assembly. The fixture is mounted on thepanel by means of a single hole and mating nut on the backside.There are probably many variations on this theme. If anyonewould like to share their own preference for an elegant LEDmounting method, I'd be pleased to add it to this article.Myth 1: "LEDs are electrically fragile. Take care not toexceed their rated current by even a small amount oryou'll smoke it."Generally not true. The LED I just measured on the benchwas temporarily subjected to 100 milliamps of forwardcurrent with no observable effects. A few months ago, Imounted a super-bright LED (rated for 60 milliamperes) ona wall pluggable power supply and biased it up to 125milliamperes . . . twice it's rated current. I left it plugged in24 hours a day for about 4 months . . . approximately 2,800hours. When I get around to it, I'm going to double thecurrent again and see what happens. But suffice it to say thatthe little feller tolerated a 2x "overload" quite nicely.Myth 2: " . . . yeah . . but hook 'em up backwards andthey're toast . . "I dug a half dozen pieces out of the junk drawers and wasable to apply 30 volts of reverse voltage for a minute or soto any device without killing them. By-in-large, thecommon LEDs in green, yellow, red and near combinationsare quite robust. The exceptions to this are the newer bluedevices. I'm told that the physics of their construction doesmake them more fragile than the their older predecessors.Given that a 20 mA lamp becomes visible at less than 3milliamps of bias; will stand a 2x overload for thousands ofhours; and doesn't crash with 30 volts of reverse voltagesuggests that the garden variety LED is rather rugged. So, ifyou can't find a 620-Ohm resistor in stock but can find a470-Ohm device, go for it.Figure 4.A few weeks ago, a builder on one of the Internet listserversasked me about my recommendations for selectingand using LEDs on the instrument panels of airplanes. Ithad been some time since I'd surveyed the market for readyto mount LED indicator products so I took a quick trip to alocal Radio Shack store to see what was hanging on thepegs. I found several interesting items. The Radio Shack276-084 (Red) and 276-085 (Green) indicator lampassemblies (Figure 4) are supplied with stranded wire leadsand built in resistor for operation in a 12-volt DC system(look close in the picture and you'll see a little lump under aheat shrink sleeve on the black lead where the resistorresides. These devices are easily mounted by means of a nutthat threads onto the fixture's body from behind.Mounting an LED has two challenges: (1) transition fromsolid conductor leadwires into more flexible and vibrationCopyright 1998 Robert L. Nuckolls, III, Wichita, Kansas. All rights reserved. This document may be reproduced electronically or mechanicallyfor distribution in a not-for profit, educational endeavor if it is published in its entirety and without modification.Page 3
The last two items I've illustrated are available from RadioShack in red only but they are the brightest of the fourproducts I looked at. The RS276-011 is most attractive tome from the standpoint of installed appearance and high onoffcontrast ratio for sunlight viability. Certainly there aremany other LED indicator products on the market. Here aresome things to look for:(1) Ease of mounting. The loose lamps in Figure 1 havesolid leadwires and no built in means for installation. Thereare some holders for loose lamps that make 'em easier tomount but you still have to deal with the solid wire leads.Figure 5.The RS276-011 lamp assembly (Figure 5) is also suppliedwith wire leads and a built in resistor for 12V operation.This device snaps into a drilled hole.Figure 6.Another interesting product is the RS276-088 lampassembly shown in Figure 6. This device also features abuilt in resistor for 12V operation and is self-mounting bysimply pressing it into a drilled hole. This device has solderlugs as opposed to wire leads.(2) Ease of wiring. All except the loose lamps shown inthis article have interconnection features friendly toinstallation in aircraft. Lamp assemblies with built inresistors have added incentives for selection.(3) Viewability and finished appearance. All of the productsreviewed would look good installed. My personal preferencewould lean toward the RS276-011 device. In my opinion,it's tapered, polished black bezel looks pretty sharp. It'sintensity seems adequate too.I've found a number of ready-to-mount products in thecatalogs that are good looking, easy to mount (single hole),small (.2" diameter), multiple colors and a measley 2-10mCd of light output! These are quite adequate for indoorlighting visibility but pretty dim for the daytime cockpit. I'llrevise this article as other devices appropriate to aircraftpanels are discovered. In the mean time, you can easily putyour hands on high intensity red, yellow, amber and greenLEDs that are guaranteed to get your attention under anycockpit lighting conditions. If you want to go all solid state,it can be done.Copyright 1998 Robert L. Nuckolls, III, Wichita, Kansas. All rights reserved. This document may be reproduced electronically or mechanicallyfor distribution in a not-for profit, educational endeavor if it is published in its entirety and without modification.Page 4
![G-Series-Ext [pdf] - Carling Technologies](https://img.yumpu.com/50918301/1/190x245/g-series-ext-pdf-carling-technologies.jpg?quality=85)